
Loading...
Loading...
Loading...
Loading...
Loading...
Loading...
Loading...
Loading...
Loading...
Loading...
Loading...
Loading...
Loading...
Loading...
Loading...
Loading...
Loading...
Loading...
Loading...
Loading...
Loading...
Loading...
Loading...
Loading...
Loading...
Loading...
Loading...
Loading...
Loading...
Loading...
Loading...
Loading...
Loading...
Loading...
Loading...
Loading...
Loading...
Loading...
Loading...
Loading...
Loading...
Loading...
Loading...
Loading...
Loading...
Loading...
Loading...
Loading...
Loading...
Loading...
Loading...
Loading...
Loading...
Loading...
Loading...
Loading...
Loading...
Loading...
Loading...
Loading...
Loading...
Loading...
Loading...
Loading...
Loading...
Loading...
Loading...
Loading...
Loading...
Loading...
Loading...
Loading...
Loading...
Loading...
Loading...
Loading...
Loading...
Loading...
Loading...
Loading...
Loading...
Loading...
Loading...
Loading...
Loading...
Loading...
Loading...
Loading...
Loading...
Loading...
Loading...
Loading...
Loading...
Loading...
Loading...
Loading...
Loading...
Loading...
Enabling Samaaj (society), Sarkar (government), & Bazaar (industry/market) partners with a digital platform that would help ensure zero deaths, disease, and environmental contamination resulting from poor sanitation - a reality for every citizen across the Global South.
Water-Sanitation aims to ensure zero untreated waste by catalysing open digital ecosystems.
This section includes the following:
TQM UI Tech Documentation
TQM is an independent UI module which only depends on the core UI libraries.
Here are the articles in this section:
Sanitation Worker UI Documentation
As part of FSM v1.4, sanitation worker related features/screens have been added to the FSM UI. These screens are accessible with current FSM related roles such as FSM_Admin, Creator, Editor, Collector, etc.
The following screens are available for the sanitation worker UI:
Sanitation Worker Details
Here are the articles in this section:
Product Suite
Reference Implementations
Technology
Setup
Water-Sanitation is an open-source web and mobile-enabled platform designed to digitise operations in the waste management value chain, from collection to treatment. It provides the ability to drive coordination across multiple independent and disconnected stakeholders, ensuring a continued chain of custody of waste throughout.
According to a United Nations (UN) report, only 54% of the world population has access to safe sanitation. We believe that at the heart of the problems in sanitation are ineffective systems that fail to deliver. Hence, systems must be progressively reformed. To move habitats towards zero untreated waste, we will leverage the capabilities built by the Digital Infrastructure for Governance, Impact & Transformation (DIGIT), and ensure the traceability of waste by enabling the ecosystem with the following features:
Chain of custody: We will ensure a seamless and traceable chain of custody for waste. This will enable stakeholders to track waste from its source to its final destination, ensuring accountability and transparency in the waste management process.
Actionable data: Our system will provide actionable data on waste management operations, which will enable stakeholders to make informed decisions. This data will be used to optimise waste collection and treatment processes, identify areas for improvement, and drive evidence-based decision-making.
Code for innovation: We will foster innovation by providing a digital platform that encourages collaboration among stakeholders. Our system will facilitate the sharing of ideas, best practices, and innovative solutions for sanitation challenges, driving continuous improvement in the waste management ecosystem.
Current digital efforts across geographies do not take a “whole of system view” and do not solve the cost of coordination and duplication issues. Such siloed, solution-centric approaches and tools create a new set of problems and inefficiencies for countries:
Higher costs and time: This is incurred on creating or procuring and maintaining these systems, including the onboarding cost of the same actors in each programme.
Data exists in multiple systems: They are not interoperable, leading to duplication, inconsistencies, poor adoption by on-ground workers, and sub-optimal decision-making.
Limited reusability and innovation: Data and capabilities are intertwined and ‘locked,’ making it extremely hard for the wider ecosystem to innovate and build upon.
Sub-scale: The tools are not able to scale for the national population and across waste streams.
Water-Sanitation solutions are built on the principles of societal platforms, envisioning a space where sanitation is supported by shared resources, curated knowledge, and evolving solutions that address the needs of the community. We recognise that the challenges of sanitation are systemic and require the collective efforts of all stakeholders to be effectively addressed. Drawing from the insights gained from our urban mission, we embrace the triple helix model, which emphasises partnerships among different stakeholders, including civil society (samaaj), government (sarkaar), and industry/market (bazaar), to generate innovation through synergistic collaboration. Leveraging our experience in building large-scale public digital infrastructure, we are well-positioned to create the foundation for this ecosystem and drive progress in solving the most pressing sanitation issues. We believe that by fostering cooperation and collaboration among all stakeholders, we can create sustainable solutions that meet the needs of communities and contribute to the transformation of the sanitation landscape.
While sanitation requirements and solutions may vary among local governments, there are commonalities in the value chain of sanitation waste streams, such as faecal sludge management, solid waste management, plastic waste management, etc. These value chains typically involve steps such as generation, containment, collection, transport, treatment, and disposal/reuse. These similarities provide an opportunity to abstract and digitise various components of the service value chain, with the potential to encode standards and enable data-driven visibility into sanitation services.
The Water-Sanitation solution is specifically designed to allow for the contextualisation and reuse of components across different waste streams and geographies. By incorporating standards into the platform and leveraging data registries and reusable building blocks in the technology stack, applications can be developed more efficiently and quickly at the solution layer, resulting in lower costs and faster implementation. This approach enables flexibility and scalability in addressing diverse sanitation needs, while also promoting interoperability and consistency in the digital solutions deployed. By leveraging the Water-Sanitation solutions, stakeholders can build innovative applications tailored to local contexts, while adhering to standardised components and data structures, leading to more effective and sustainable sanitation services.
Following is a glimpse of how this would work:
The above image illustrates the core infrastructure services, and the enabling services that are built/configured for a Faecal Sludge Management (FSM) solution with the following functionality:
Allowing citizens to request septic tank desludging services
Scheduling desludging services for a certain set of property types/localities, etc.
Automated or manual assignment of vendors to perform requests
Tracking sludge from collection to disposal at a treatment plant using the Internet of Things (IoT)
Notifications to stakeholders at each point in the workflow
Dashboards and reports
Now, consider that instead of FSM, a solution needs to be built for Solid Waste Management:
The same set of infrastructure and enabling services could be used to configure the following functionalities:
Scheduling the collection of waste based on different categories
Automated or manual assignment of vendors to perform requests
Tracking adherence to the schedule
Tracking waste movement from pickup to disposal at a treatment facility
Notifications to stakeholders at each point in the workflow
Dashboards and reports
Further, only an additional service for segregation monitoring would have to be built.
To illustrate this further, imagine building a solution for sanitation worker welfare:
The same set of services can be used here as well, with the addition of a few components. The Water-Sanitation platform is built leveraging the DIGIT Core Services, which are customised into the following key building blocks:
Service Request Management
Define pricing
Record service requests
Assign and manage service requests
Provide subsidies
Calculate service fees
Track status
Collect feedback
Transport Management
Schedule pickup
Assign vehicles and drivers
Track status
Billing and Payments
Generate demand
Generate receipts
Online payment gateway
Notifications
SMS
In app
Service Delivery Monitoring
Dashboards
Reports
This screen is similar to the View Past Test Results screen for a plant operator.
Refer the following page View Past Test Results/Test's Summary Screen
UI for reference:
The release provides the functionality of tagging the gram panchayat (GP) and villages via urban local bodies (ULBs). The ULB will be servicing desludging requests for households in the respective GP.
The functionality included are:
Adding GPs while creating an application.
Make the amount per trip field editable for GPs.
Click to access the backend service document.
The Driver-Individual Migration Scripts is responsible for fetching all existing drivers in the system and subsequently generating creates corresponding individuals in the system.
The data migration has been implemented in Vendor Service with latest stable build -
File Path -
File Path -
Please use FSM_ADMIN credentials for accessing this API.
Faecal Sludge Management (FSM) is a system that enables citizens to raise a request for septic tank cleaning with their urban local bodies (ULBs) directly or for reaching out to a ULB counter. Citizens can track the application, make a payment for the charges and rate the service.
billing-service
mdms-service
workflow-v2
boundary-service
user-service
idgen-service
user-events
collection-service
notification-service
vendor
vehicle
fsm-calculator
egov-url-shortener
collection-service
pdf-service
Vehicle Registry is a system that enables urban local body (ULB) employees to create and search vehicle entities and schedule vehicle trips for FSM applications, and track the vehicle trip.
egov-mdms-service
egov-workflow-v2
user-service
egov-idgen
vendor
FSM Calculator is a system that enables the FSM aAdmin to create billing slabs for the FSM application(s) with different combinations of propertytype, slum, and tank capacity, among others. It generates the demand after calculating the charges for the given application using the billing slabs already configured.
billing-service
mdms-service
workflow-v2
User-service
fsm
The following are the known issues for DIGIT FSM v1.4:
List of actions required to go live in the new State for the FSM module:
: Tenant, boundary, workflow etc
Category
Details
Known Issues
Requests pending for action with sanitation workers will remain open if the Sanitation Worker is deactivated while the request is pending to be completed.
Functional Limitations
Automatic mapping between functional and system roles is not defined
A sanitation worker is currently created at the instance level. In case a sanitation worker is operating within a specific boundary, functionality to limit operations is not provided.
Editing Tagged Sanitation workers: Sanitation workers once tagged to a request cannot be edited.
Part search for Sanitation worker ID is not available
Adding GPs while creating an application
The user can add a GP and the villages under that GP while creating an application. The GPs are tagged to the ULBs closest to them. The ULBs will be servicing the desludging requests from the GPs and the villages falling under that GP.
Make the amount per trip field editable
Once the application is created with a selection of GPs, the amount per trip field will become editable for the user.
vendor:develop-fc828adcbe-31 {
"id": 376,
"name": "Migrate Driver Data to Individual",
"url": "/vendor/v1/_migrate",
"displayName": "Migrate Driver Data to Individual",
"orderNumber": 0,
"enabled": false,
"serviceCode": "vendor",
"code": "null",
"path": ""
}{
"rolecode": "FSM_ADMIN",
"actionid": 376,
"actioncode": "",
"tenantId": "pg"
}The current version provides the following features:
Define pricing for desludging services based on the property type, sub-type and volume, and categories where services are free/subsidised.
Interface for citizens to request for desludging services and track service delivery.
Interface for urban local bodies (ULBs) to record service requests received via multiple channels, and track service delivery.
Interface for Faecal Sludge Treatment Plant (FSTP) operators to record the entry of vehicles against service requests.
Interface for FSTP operators to record the entry of vehicles without service requests.
Collect feedback from citizens on the completion of service delivery.
Define and monitor against SLAs.
Assignment of requests to transportation vendors.
Interface for transport vendors to manage requests and track the status of requests.
Assignment of vehicles and drivers to service requests.
Calculate service fees based on the defined pricing and the number of trips.
Define the minimum amount payable at the ULB level while requesting for services.
Collect part payments in advance and the rest as balance.
Interface for citizens to make payments via a payment gateway.
Interface for ULBs to collect and record payments.
Generate receipts.
Send notifications via SMS.
Send in-app notifications.
Dashboards at the state and ULB levels.
- View KPIs (Total requests, trends in requests, SLAs, and capacity utilisation of FSTPs, and vendor performance).
- Filters (Time, ULB)
Reports
The following masters are also maintained as part of the product:
Vehicle master
Driver master
Vendor master
Treatment plant master
The DIGIT-Faecal Sludge Management (FSM) allows citizens to raise service requests for desludging and pay the fees for the service delivery online. For governing bodies and vendors, it makes service delivery easier and captures information end-to-end, ensuring waste pick up and its disposal at the correct treatment plant. Real-time tracking of service delivery, along with the availability of rich transactional data allow decision makers to ensure a better citizen service experience and promote a cleaner/healthier environment.
Apply for desludging services
Make payment for services
Register desludging operators
Update vehicle logs
Manage vendors, vehicles and drivers
Refer to the table below to understand the different user roles and the scope of action linked to each role. The manual provides a detailed description of how to use the system for each role.
Citizen
Apply for desludging services
Make payment for services
Individuals and society groups/communities
Desludging Operators (DSO)
Take action on assigned service requests
Private or government entities
Septage Treatment Plant Operator (SeTPO)
Update vehicle log
Private or government entities
Employees
Apply for desludging services on behalf of citizens
Receive payment from citizens over the counter
Send back applications
Reject applications
Assign DSOs to service requests and update the status of the service requests
ULB employees
This section guides you through the details of using the FSM module for each role. Click on the relevant role below to learn more about how to use the FSM system.
Employees
Logging in with the plant operator role will take the user to the landing page.
The landing page has a list of cards which includes the TQM card.
The landing page shows a pending tasks card at the bottom of the page.
The pending tasks card lists tests pending to be updated by this user.
The tasks which are overdue will show up first in the pending tasks card.
There is an option to view all the pending tasks which takes the user to TQM inbox page.
Clicking on the Treatment Quality Monitoring (TQM) card will take the user to the TQM home page.
The TQM home page shows a TQM card with the links to Inbox, View Past Tests.
It also shows 2 cards below which are -> Your performance, Alerts card.
The "Your Performance" card shows relevant metrics such as test compliance and the percentage of tests that passed which shows the efficiency of the plant(s) linked to the logged in user.
The 'Alerts' card shows a count of the different types of alerts that were raised by the system. This data comes from the anomaly finder.
Every page in the plant operator's screen has a help button on the top right.
Clicking on it takes the user to the help screen which shows a list of videos. Each video has a title and a description.
Clicking on a video runs it in a media player.
Flows in the app can be stored in a video and it can be shown in this screen.
This page is fully configurable through MDMS.
Refer to the following MDMS file to configure the list of videos:
Multiple languages can be configured. Currently, English and Hindi are the two options available.
Sample configuration object:
{
"TQM": {
"moduleCode" : "TQM",
"videosJson": [
{
"headerLabel": "TQM_HELP_Q1",
"description": "TQM_HELP_Q1_DESC",
"en_IN": "https://media.w3.org/2010/05/sintel/trailer.mp4",
"hi_IN": "https://media.w3.org/2010/05/sintel/trailer.mp4"
},
{
"headerLabel": "TQM_HELP_Q2",
"description": "TQM_HELP_Q2_DESC",
"en_IN": "https://media.w3.org/2010/05/sintel/trailer.mp4",
"hi_IN": "https://media.w3.org/2010/05/sintel/trailer.mp4"
},
{
"headerLabel": "TQM_HELP_Q3",
"description": "TQM_HELP_Q4_DESC",
"en_IN": "https://media.w3.org/2010/05/sintel/trailer.mp4",
"hi_IN": "https://media.w3.org/2010/05/sintel/trailer.mp4"
},
{
"headerLabel": "TQM_HELP_Q4",
"description": "TQM_HELP_Q4_DESC",
"en_IN": "https://media.w3.org/2010/05/sintel/trailer.mp4",
"hi_IN": "https://media.w3.org/2010/05/sintel/trailer.mp4"
},
{
"headerLabel": "TQM_HELP_Q5",
"description": "TQM_HELP_Q5_DESC",
"en_IN": "https://media.w3.org/2010/05/sintel/trailer.mp4",
"hi_IN": "https://media.w3.org/2010/05/sintel/trailer.mp4"
},
{
"headerLabel": "TQM_HELP_Q6",
"description": "TQM_HELP_Q6_DESC",
"en_IN": "https://media.w3.org/2010/05/sintel/trailer.mp4",
"hi_IN": "https://media.w3.org/2010/05/sintel/trailer.mp4"
}
],
"screenHeader":"TQM_HELP_SECTION"
}
}
The above configuration object is used to render the screen. It has a video level header and description along with URLs for Hindi and English videos. The page level header is also present.
The module name can be configured. For example, here we have added the module name as TQM.
Videos and training resources
A complete walkthrough of the DIGIT FSM module -
All content on this page by eGov Foundation is licensed under a Creative Commons Attribution 4.0 International License.
After adding all the data for ulb in MDMS,next step is to create user for Employee and FSTP.
From HRMS, Create Employee user and FSTP user of new tenant and add roles to it.
EMPLOYEE USER Example
FSTP USER Example
Set the password of EmployeeId by checking the logs of sms service.
DIGIT Sanitation started with and in future, we will pick up Solid Waste Management (SWM). Beyond that, we believe that the platform can be leveraged for other waste streams but the nature of our intervention will be evolve.
The waste we flush down the toilet does not always go into a sewer. Approximately 70% of the households in India have toilets connected to septic tanks or soak pits, technically known as on-site containment systems. They accumulate and store faecal matter over a long period. In sewers, the faecal matter travels daily with a lot of water through long concrete pipes. But in the case of on-site systems, it stays stored for about 3-5 years. Once the storage is full, the waste is emptied and transported to the treatment plant through vacuum trucks. The end-to-end value chain of safe storage, collection, transport, treatment, and end-use or disposal of faecal matter is called Faecal Sludge and Septage Management or FSSM. ‘Faecal Sludge’ and ’Septage’ are used to describe faecal matter in a specific physical and chemical state after prolonged storage.
FSSM has emerged as a cost-efficient population scale alternative to the networked sewer, which has been the traditional method of wastewater management.
Cost-effective: FSSM is 10 times cheaper than sewer systems.
Coverage: Less than one-third of urban toilet users are connected to sewer systems. The rest are more or less dependent on FSSM systems. Targeting FSSM will help us impact the maximum number of citizens.
Scale: In India's Swachh Bharat mission, 11 crore toilets were constructed across the country. Most are connected to on-site systems, which again increases the need for FSSM.
Our current understanding of the problems in septage management is based on our interactions with stakeholders and thorough published reports, and whitepapers. We are aware that FSSM systems have interdependent parts, and each stage of the FSSM value chain impacts how effectively the next stage functions. For instance, if the septic tanks do not have proper access, they will add to the cost of emptying, adding time and cost burden on desludging operators (DSOs). Similarly, it becomes unviable for the DSOs to dump the waste at the treatment plant if it is far from the city which is often the case.
While the linear sanitation value chain provides an understanding of the flow of faecal sludge, it does not capture all stakeholders in the process that control and influence the current effectiveness of sanitation systems.
We will use a systems mapping approach to outline the different factors and interactions within the sanitation value chain. We will explore systemic challenges at each part of the value chain that result in poor sanitation outcomes.
City managers, central/state governments
While sanitation is a priority of the central and state governments, city administrators have been strapped due to deficiencies in standards, building codes, municipal processes, and contracting and monitoring capabilities. These make it difficult to ensure the adequacy, usability, and safety of the toilets provisioned by public funds.
Masons
Masons are fundamental in proper construction of toilets and containment units. But a majority of masons currently lack the necessary training on construction standards. They are rarely employed using formal contracts, contributinb to the lack of traceability and accountability during the construction of toilets.
Citizens
Lack of awareness of the impact of improper construction of toilets and containment tanks, or constraints of affordability and space, leads citizens to influence masons to build containment units that do not follow technical standards. It is difficult to identify trained masons and services are procured through social networks and word of mouth.
Desludging operators
Lack of proper access to the containment systems adds time-cost to service.
Treatment plants are located far from the city, making safe dumping unviable.
While the payment from citizens is a clear incentive for emptying the tanks or pits, there are no incentives to ensure the safe transport of the faecal sludge to the treatment plant.
Operations remain inefficient without timely and useful information for service delivery. Working conditions are risky, but provisions for personal protection equipment and emergency healthcare services are rare.
Citizens
It is difficult to identify and book desludging services and service delivery is not reliable.
Low-income households are denied service since they are not able to afford the full cost.
City managers, central/state governments
Challenging to regulate the market for safe dumping without compromising service delivery.
Lack of clear and actionable information in terms of safe or unsafe dumping of faecal sludge.
Lack of pricing policies, infrastructure standards, licensing processes, and contracting and monitoring capacity limit the ability of decision-makers to take action.
City managers, centre/state governments
Difficult to regulate the market across various stages of construction and operations.
Operational data of the treatment plant and process is often recorded offline and used for post-facto auditing. There is a pervasive lack of actionable information.
Lack of rational pricing policies, comprehensive service benchmarks and infrastructure standards, contracting and monitoring tools hamper corrective action.
Plant operators
The supply of desludging load varies in an unreliable and unpredictable manner, and over time, leads to system failure.
Treatment plant management and maintenance is difficult and costly, and the payments are often not linked to performance.
The performance is not directly causally linked to the environmental impact.
Operations are not monitored to facilitate preventive action within the plant, and lack any binding linkages with standard operating procedures and service level agreements.
Civil society and academia
In the absence of data, researchers struggle to create new knowledge around the failures, risks, and opportunities, as well as give recommendations for improvement.
Since policy and standards are not mapped to operational data, it is difficult for the ecosystem to translate knowledge to action, impact and access.
Government
Inability to trace the impact and proper usage of grants and subsidies for sanitation.
Limited state capacity in terms of budget, skilled human resources, tools, and technology. Coordination across multiple functions, such as standard-setting, policy-making, contracting, audit, monitoring, is needed to keep sanitation systems functional.
Limited penetration of technology, innovation, and competition in the sanitation sector, makes it difficult for the government to enforce accountability across internal processes and market interactions.
At the core of all systemic challenges, there are problems that hinder a systemic change, limit stakeholders from implementing changes, or even cause the system to collapse. The identified problems are explained below:
Current standards do not cover all aspects of sanitation and service delivery - such as standards of treated human waste, treatment plant technologies, and benchmarks, among others.
The ecosystem has created many standards, which are not formally notified or enforced.
Where standards exist, awareness and compliance are dismal for the following reasons:
Many actors in the value chain do not have the necessary knowledge, skills, or standard operating procedures.
Complexities in service delivery result in incomplete or improper service.
Poor requirement specifications in the Request for Proposals (RFPs) documents.
Model contracts exist but are not followed.
Delays in corrective action since contracts are not tightly coupled with monitoring.
Systemic data either does not exist or remains disjointed to understand how much waste exists, where, when, with whom, and why.
Feacal sludge tends to drop out of the value chain, untreated.The unavailability of the information - who dropped it, when, how, or where it ended up polluting the environment - hampers the process of taking corrective and preventive measures
Data around faceal sludge (how much, where, when, who is responsible) is too little.
Required data is not created, available, or shared across relevant ecosystem actors. As a result, the performance of sanitation systems remains opaque and unobservable.
Current systems are not structured to maximise the value from faceal sludge and related services.
The policy framework may not recognise treated human excreta as compost. Unclear and fragmented demand for treated waste contributes to lax operations upstream.
Logging in with ULB admin role takes the user to the home page of DIGIT-UI.
If a ULB admin user is logged in, he/she will have access to TQM, and a TQM card will be visible on this screen.
Links such as Inbox, View Past Tests, and create test are available on this card.
A notification card is available on the bottom, which is specific to TQM. All the TQM-related notifications configured will show up here. Currently, it shows notifications for tests whose results are not updated on time (crossed scheduled date).
Use the egov-user-event service.
Sample request object:
The API returns a list of notifications relevant to the logged in user.
Sample curl for notifications:
The role-action mapping for /egov-user-event/v1/events/_search is added for this user that is, the ULB admin whose role code is PQM_ADMIN.
As part of the worker welfare v1.0, a new worker registry concept is being introduced. The creation of a worker, updation of details, searching and tagging a worker for different operations on sanitation programmes will be covered. We will leverage the Individual Registry for storing and querying details about a worker.
The individual service is an enhanced version of the user service that houses data about individuals. The individual service is being re-used from .
Click to access the Individual Service.
Change from driver concept to worker.
Deprecation of the driver table.
Backward compatibility for existing drivers (converting a driver user into an individual and mapping/backfilling to vendors).
Introducing worker vendor mapping.
Creation of workers directly using Individual registry APIs.
For enabling any municipal-service on a fresh environment and for the first time, we need to have basic idea of what DIGIT does and what all generic services are required for setting it up .
DIGIT is an open-source, customizable platform that lends itself to extensibility. New modules can be built on top of the platform to suit new use-cases or existing modules can be modified or replaced. To enable this, in addition to deploying DIGIT, a CD/CI pipeline should be set up. CD/CI pipelines enable the end user to automate & simplify the build/deploy process.
Refer for further reference of DIGIT and its deployment.
DIGIT platform comprises of couple of core-services that serves as the backbone for the platform. There are several core-services like:
..and
Each microservice has a distinct function, which is explained in the provided documentation links. Once you understand the platform and its terminology, you'll be well-prepared to activate any particular municipal service.
Vehicle Registry is a system that enables urban local body (ULB) employees to create and search vendors, that is, Desludging Operators (DSO) and driver entities with appropriate vehicle entities for the FSM application.
egov-mdms-service
egov-user-service
boundary-service
Egov-idgen
egov-workflow-v2
vehicle
Import this curl :
Login from FSTP credientials and copy the uuid of FSTP user.
Take FSTP plantCode from PlantInfo.json file for specific ulb.
The status should be always ACTIVE.
Login from FSM_ADMINDEV credentials(for sujog-dev) which is having FSM Admin role for all the ulb’s.
Copy the auth token and user-info. Paste the auth token in the req. Body “authToken” field.
Hit the url.
There are two new updates introduced in FSM v1.2.1 while creating a new application - Stepper Information and Vehicle Capacity Selection in the Service Request Screen.
We are introducing stepper information in FSM while creating an application from the citizen side so that they have visibility on how many steps they need to go over to submit details regarding their tank.
TLTimelineInFSM.js file is the common component and used for rendering the stepper information. The path of the file is:
frontend/micro-ui/web/micro-ui-internals/packages/modules/fsm/src/components/TLTimelineInFSM.js
The code snippets for defining the steps present in FSM application under case “APPLY”:
The code snippets to render the stepper information in each screen using the timeline component:
Citizens can now select vehicle capacity along with the number of trips required while creating an application. If nothing is selected, we will proceed by taking the minimum vehicle capacity available with the number of trips.
Code path: frontend/micro-ui/web/micro-ui-internals/packages/modules/fsm/src/pageComponents/SelectTripNo.js
The code snippet for rendering the Vehicle Capacity field in Service Request screen:
The code snippet for fetching the vehicles available under all DSO:
The code snippet for setting the default vehicle capacity to minimum:
curl --location --request POST 'https://sujog-dev.odisha.gov.in/fsm/plantmap/v1/_create' \
--header 'Content-Type: application/json' \
--data-raw '{
"RequestInfo": {
"apiInfo": {
"id": "string",
"version": "string",
"path": "string"
},
"deviceDetail": {
"id": "string",
"signature": "string"
},
"ts": 0,
"action": "string",
"key": "string",
"msgId": "string",
"requesterId": "string",
"authToken": "45092a19-3dab-43b0-a9e1-19e8a6c94923",
"userInfo": {"id":3186071,"userName":"FSM_ADMINDEV","salutation":null,"name":"Taresh","gender":"MALE","mobileNumber":"7721827042","emailId":"[email protected]","altContactNumber":null,"pan":null,"aadhaarNumber":null,"permanentAddress":null,"permanentCity":null,"permanentPinCode":null,"correspondenceAddress":null,"correspondenceCity":null,"correspondencePinCode":null,"active":true,"locale":null,"type":"EMPLOYEE","accountLocked":false,"accountLockedDate":0,"fatherOrHusbandName":"Dilip","relationship":"FATHER","signature":null,"bloodGroup":null,"photo":null,"identificationMark":null,"createdBy":575,"lastModifiedBy":1,"tenantId":"od.cuttack","roles":[{"code":"EMPLOYEE","name":"Employee","tenantId":"od"},{"code":"FSM_ADMIN","name":"FSM Administrator","tenantId":"od.cuttack"},{"code":"HRMS_ADMIN","name":"HRMS ADMIN","tenantId":"od.cuttack"},{"code":"SUPERUSER","name":"Super User","tenantId":"od.cuttack"},{"code":"FSM_COLLECTOR","name":"FSM Payment Collector","tenantId":"od"},{"code":"FSM_CREATOR_EMP","name":"FSM Employee Application Creator","tenantId":"od"},{"code":"FSM_EMP_FSTPO","name":"FSM FSTP Opperator","tenantId":"od"},{"code":"SUPERUSER","name":"Super User","tenantId":"od"},{"code":"FSM_EDITOR_EMP","name":"FSM Employee Application Editor","tenantId":"od"},{"code":"FSM_ADMIN","name":"FSM Administrator","tenantId":"od"}],"uuid":"2f3851cd-864e-42d7-869c-d5a05abb8f39","createdDate":"01-09-2022 17:04:45","lastModifiedDate":"17-01-2023 13:49:59","dob":"21/11/1995","pwdExpiryDate":"30-11-2022 17:04:44"}
},
"plantMapping": {
"employeeUuid": "c3249480-b45c-43b6-bfe1-cb78330d258c",
"plantCode": "ODAG_064",
"tenantId": "od.odagaon",
"status":"ACTIVE"
}
}'The following features/components will be available in the TQM module:
Features/Components
Description
Functionality
Schedule of Tests
This component will be used by treatment plant operators and urban local body (ULB) employees to see the schedule of tests.
View the schedule of lab tests and track the compliance. Track the compliance of IoT test results and cases of failures.
Recording Test Results
This component will be used by treatment plant operators and ULB employees to upload results manually and track IoT readings.
Create digital records of quality test results alerts in the following cases:
IoT device not working.
Lab results do not match IoT results.
Anomaly Detection
This component will be used by treatment plant operators and ULB employees to interpret test results.
Identify in real-time/near real-time when the results of a particular test are not as per the benchmarks.
Alerts in the following case:
Results not upto the benchmark.
Dashboards
This module will give stakeholders insights and information regarding the operations of the treatment plant. Users can use this to drill down and identify plants and processes where compliance to testing and/or test results are not upto benchmarks.
Dashboards will also help users see trends over time to see patterns and identify long-term problem areas.
Dashboard to analyse trends in the treatment quality and compliance with the treatment schedule. Drill down will be made available from state to the ULB and at a plant level.
Dashboard to analyse patterns in issues. A drill down will be made available from state to ULB and at a plant level.
The aim is to provide the users of the system information and control at each level - from defining how operations will be run, to updating status against pending operational tasks, and viewing operational data to draw insights to refine operations.
{
"RequestInfo": {
"apiId": "Rainmaker",
"authToken": "a0c56299-3bde-48e2-b0fb-76686fdff3dc",
"userInfo": {
"id": 722,
"uuid": "56e8c2df-af55-46a9-a378-885915cde0ab",
"userName": "TQM_DEV_ULBADMIN",
"name": "ULB Admin",
"mobileNumber": "7281638698",
"emailId": null,
"locale": null,
"type": "EMPLOYEE",
"roles": [
{
"name": "PQM Admin",
"code": "PQM_ADMIN",
"tenantId": "pg.citya"
}
],
"active": true,
"tenantId": "pg.citya",
"permanentCity": null
},
"msgId": "1701078884762|en_IN",
"plainAccessRequest": {}
}
}curl 'https://unified-dev.digit.org/egov-user-event/v1/events/_search?tenantId=pg.citya' \
-H 'authority: unified-dev.digit.org' \
-H 'accept: application/json, text/plain, */*' \
-H 'accept-language: en-US,en;q=0.9' \
-H 'content-type: application/json;charset=UTF-8' \
-H 'cookie: _ga_V2CPZCVTXQ=GS1.1.1695293925.1.1.1695293950.0.0.0; __cuid=59fd9aac25b044f6af006bd4b159cbbf; amp_fef1e8=f4fc07f6-3fb0-4c67-8114-a1beb906e625R...1hf75985a.1hf76uet8.i.8.q; _ga_P1TZCPKF6S=GS1.1.1699974064.1.1.1699975479.60.0.0; _ga=GA1.2.1291438273.1695293925; _ga_0JZG96DZSM=GS1.1.1699977339.2.0.1699977339.60.0.0' \
-H 'origin: https://unified-dev.digit.org' \
-H 'referer: https://unified-dev.digit.org/sanitation-ui/employee' \
-H 'sec-ch-ua: "Google Chrome";v="119", "Chromium";v="119", "Not?A_Brand";v="24"' \
-H 'sec-ch-ua-mobile: ?1' \
-H 'sec-ch-ua-platform: "Android"' \
-H 'sec-fetch-dest: empty' \
-H 'sec-fetch-mode: cors' \
-H 'sec-fetch-site: same-origin' \
-H 'user-agent: Mozilla/5.0 (Linux; Android 6.0; Nexus 5 Build/MRA58N) AppleWebKit/537.36 (KHTML, like Gecko) Chrome/119.0.0.0 Mobile Safari/537.36' \
--data-raw '{"RequestInfo":{"apiId":"Rainmaker","authToken":"a0c56299-3bde-48e2-b0fb-76686fdff3dc","userInfo":{"id":722,"uuid":"56e8c2df-af55-46a9-a378-885915cde0ab","userName":"TQM_DEV_ULBADMIN","name":"ULB Admin","mobileNumber":"7281638698","emailId":null,"locale":null,"type":"EMPLOYEE","roles":[{"name":"PQM Admin","code":"PQM_ADMIN","tenantId":"pg.citya"}],"active":true,"tenantId":"pg.citya","permanentCity":null},"msgId":"1701078884762|en_IN","plainAccessRequest":{}}}' \
--compressed<CardText> {t("ES_VEHICLE CAPACITY")} </CardText>
<RadioOrSelect
options={vehicleMenu?.map((vehicle) => ({ ...vehicle, label: vehicle.capacity }))}
selectedOption={vehicleCapacity}
optionKey="capacity"
onSelect={selectVehicle}
optionCardStyles={{ zIndex: "60" }}
t={t}
isMandatory={config.isMandatory}isDropDown={true}
/>const allVehicles = dsoData.reduce((acc, curr) => {
return curr.vehicles && curr.vehicles.length ? acc.concat(curr.vehicles) : acc;
}, []);
const cpacityMenu = Array.from(new Set(allVehicles.map((a) => a.capacity)))
.map((capacity) => allVehicles.find((a) => a.capacity === capacity));There are three main updates in FSM v1.2.1 for employee UI:
Application timeline
Photo viewed by employee/DSO
Payment mode while completing request
An employee can see the application status in application timeline with provider details.
The path for the code:
frontend/micro-ui/web/micro-ui-internals/packages/modules/fsm/src/pages/employee/ApplicationDetails/index.js
The code snippet to render application timeline:
The code snippet for extracting the provider info for each status:
An employee/DSO can view the photo uploaded by the employee/DSO in complete request action.
The path for the code:
frontend/micro-ui/web/micro-ui-internals/packages/modules/fsm/src/pages/employee/ApplicationDetails/index.js
The code snippets to render the field:
ViewImages.js are the common component used to fetch and render the Image file id. The path is shown below:
frontend/micro-ui/web/micro-ui-internals/packages/modules/fsm/src/components/ViewImages.js
An employee has to select the payment mode while completing the request.
File path:
frontend/micro-ui/web/micro-ui-internals/packages/modules/fsm/src/pages/employee/ApplicationDetails/config/CompleteApplication.js
The code snippet to render the field.
MDMS file fetch for payment mode:
egov-mdms-data/ReceivedPaymentType.json at UAT · egovernments/egov-mdms-data
{
"tenantId": "pg",
"moduleName": "FSM",
"ReceivedPaymentType": [
{
"name": "Payed in Cash",
"code": "PAYED_IN_CASH",
"active": true
},
{
"name": "Payed in Counter",
"code": "PAYED_IN_COUNTER",
"active": true
},
{
"name": "Netbanking",
"code": "NETBANKING",
"active": true
}
]
}Introducing New Services for Enhanced Process Quality Management
Process Quality Management (PQM) Service.
Process Quality Management (PQM) Anomaly Finder Service.
PQM Scheduler (CronJob Scheduler).
Enhancements
Sanitation Worker Welfare feature
Driver-Individual migrate feature
FSM inbox V2
This page contains the changes related to Process Quality Management-related services (PQM) and Sanitation Worker Welfare along with the MDMS, DevOps and configuration setups required to accommodate these features.
The PQM service is required to create, update, search and evaluate tests against benchmarks. Follow the steps given below:
Add the .
Add the new persister file: .
Add the
Configure the build.
Make the role action-mapping changes in the MDMS.
Master Data for PQM
Click on the Job-builder once the above steps are complete.
Restart the following services: egov-accesscontrol, egov-mdms-service, egov-persister
Add the .
Add the .
Configure the build.
Make the role action-mapping changes in the MDMS.
Click on the Job-builder once the above steps are complete.
Restart the following services: egov-accesscontrol, egov-mdms-service.
Add the .
Add the .
Configure the build.
Add mdms changes, refer to this .
Add config changes, refer to this .
Add the Helm chart, refer to this .
Deploy the latest build of vendor and FSM, refer to this .
Sanitation worker depends on the individual service. Refer to this .
Deploy the latest build of individual service refer link#
Migrate all the drivers to individual using
Make sure UI MDMS changes are added from .
Refer to the technical documentation for TQM UI to run UI
Refer to the technical documentation for sanitation worker UI
Code PRs for referenceL
Enabling TQM module in DIGIT-UI
To access the TQM module in DIGIT-UI, enable it from MDMS and add TQM specific roles for the user to access TQM UI.
Add the following configuration in citymodule.json under this path in MDMS. The reference file is given below.
Add TQM to these files in DIGIT-UI codebase. Add it in enabledModules Array.
Note: The name "TQM" should match the name "Tqm" added in mdms(citymodule). However, uppercase or lowercase does not matter.
frontend\micro-ui\web\micro-ui-internals\example\src\index.js
frontend\micro-ui\web\src\App.js
Files for reference:
Sample object:
PQM_TP_OPERATOR -> This role is for Plant Operator user
PQM_ADMIN -> This role is for ULB Admin user
Note: One user cannot have both these roles because flows and UI is different for these users. These roles are added in the mdms. The reference file is given below
Enhancements were made to the core module version to support some of the features in TQM UI such as help section and notification card in ULB admin's home page
The recommended core version for TQM UI is the following:
Every plant operator created will be linked to one or more plants under an urban local body (ULB).
When a plant operator logs in to the system, the top bar is populated with a dropdown which shows a list of plants this user (plant operator) is linked to.
By default, the option "All Plants" is selected.
When a user selects a plant, lets say, plant A, all the data of plant A will be shown in the app, whether it's inbox, view past results page, home page, etc.
Whenever a change in a plant is detected through the dropdown, the app is redirected to the landing screen.
A plant operator is a sanitation worker; while creating a sanitation worker, you can link the sanitation worker to one or multiple plants.
Data such as a list of the current user's plants and active plant is stored in session storage, and is available to use within the app.
Whenever a plant operator logs in, he/she can make a call to this API endpoint "/pqm-service/plant/user/v1/_search" to get a list of the plants that the user is linked to .
Sample payload:
Send the user's individual id/uuid in the request object.
Curl for the above API call:
You will get a list of plants in the response which is used to populate the dropdown.
By default, the "All Plants" option is selected which is the default behaviour.
When a user selects a particular plant, it becomes active and one can filter the data (all tests shown in the app) by that plant's code in the UI.
UI for the top bar:
Online solution to desludging operations management
Our mission is to build a digital tool that enables urban local body employees to deliver desludging services (emptying septic tanks) to citizens. The linear nature of feacal sludge value chains presents a clear framework for comprehending the optimal flow of sludge, but these value chains consist of diverse stakeholders and business models. The absence of coordination among value chain stakeholders and the lack of transparency to enforce standardised practices at each stage of the value chain lead to subpar sanitation outcomes. Furthermore, conflicts between stakeholders and the feasibility challenges of existing and emerging business models diminish the efficiency of the waste value chain.
The Faecal Sludge Management (FSM) application has been able to provide data and visibility to track service requests and understand the service delivery value chain, paving the way for process enhancements in FSM.
The product will provide the following benefits:
Reduce time taken for service delivery.
Establish a chain of custody of waste from the point of collection to disposal.
Digital record keeping of service deliveries.
Support data interoperability with other sanitation systems in the state.
Improve sustainability by providing visibility and control to the government.
From the Screen Admin can search for Sanitation worker and go to it's .
From the , admin can click on "Edit" action
Admin will be redirected to the edit sanitation worker page
This page contains the same form as . The only difference is all the fields are auto populated based on the worker that we are updating
Admin can update all the details except Sanitation Worker Id and Name
Clicking on Submit will show a response screen saying Sanitation Worker details updated successfully
We are hitting Individual Update endpoint "/individual/v1/_update" to update the details of a Sanitation worker
Refer the curl below:
If during update, vendor details are changed then along with individual update we are calling vendor update "/vendor/v1/_update"
Refer the curl below
Role action mapping is done for the above 2 endpoints for "FSM_ADMIN" role
DIGIT FSM V1.4 has been enhanced to provide the base for features to ensure Sanitation Worker Welfare. To know more about DIGIT FSM v1.4 , please follow the .
Deprecating Driver Registry
Introduction of Sanitation Worker Registry
Tagging Sanitation Workers to Service requests.
Click for Known Issue List.
ULB admins have an option to create a test. This is an adhoc test which does not have any workflow involved. By default, it will be in the submitted state when created.
From the home screen, click on the Add Test Result link.
The user is redirected to Create Test screen. This page has two form cards. One is for entering Plant Name, Treatment Process, Stage and output type. The other card has a list of benchmarks according to the selection of the above form.
Note: After filling the first form, only the list of benchmarks will show up.
If any quality criteria is not found for the selection of parameters, an error is shown and user has to select another criteria.
After filling the forms, click on submit to create a test.
After a successful creation, the system automatically redirects to the view test details screen of the newly-created test.
Use pqm-service.
URL for inbox "/pqm-service/v1/_create".
Sample request object:
Role-action mapping is done for the "/pqm-service/v1/_create" and "/pqm-service/v1/search" endpoint for a ULB admin user role, that is:
Process Quality Management (PQM) Service
Create, update, and search for process quality monitoring tests.
Evaluate test values against benchmarks, producing a result (FAIL/PASS) status.
Test results undergo anomaly analysis for comprehensive insights.
Plant performance related charts.
Process Quality Management (PQM) Anomaly Finder Service
Actively monitors anomalies in process quality.
Notifies relevant user groups promptly for proactive anomaly management.
PQM Scheduler (CronJob Scheduler)
Automates test scheduling based on environment configuration.
Triggers schedule APIs from PQM-Service to generate tests.
Efficiently runs tests at specified intervals, ensuring a configurable solution.
Sanitation worker welfare feature
A new worker registry concept has been created.
The creation of a worker, updation of details, searching and tagging a worker for different operations on sanitation programmes.
Driver-individual migration feature
The driver-individual migration scripts is responsible for fetching all existing drivers in the system and subsequently generating creates corresponding individuals in the system.
FSM Inbox V2
The inbox for FSM has been upgraded from V1 to V2.
Citizen
The citizen is able to have multi-channel access to safe and trackable service delivery. This leads to accountable and transparent services, and seamless grievance redressal.
They can receive push notifications with reminders for when their septic tank is due for desludging or with information on how to accurately segregate solid waste — to create behavioural nudges that contribute to healthier habitats.
Overall improvements in waste management and reduction in illegal dumping will mean that everyone lives in a cleaner and healthier neighbourhood, leading to public health gains (for example, a reduction in water-borne diseases).
Sanitation worker
The sanitation workers are skilled in safe sanitation practices, standards and tools.
Monitored service delivery will lead to optimisation of performance and create safe working conditions with transparency, ensuring compliance in safety practices.
Enumeration of sanitation workers will enable delivery of targeted benefits and welfare schemes for workers and their families (for example, health checkups, insurance, social security, scholarships for children, etc.).
ULB Employee
The ULB employee is able to create a single back-end registry for all incoming service requests. They are able to collect and maintain relevant citizen information to deliver efficient services.
The ULB employee is able to do remote tracking of value chain stakeholder — waste-transporters can be tracked in real-time to ensure that there is no illegal dumping of collected waste. They are able to ensure that quality of waste treatment meets the standards by validating automated records without being at the waste treatment plant.
Waste management vendors/Desludging Operators
Waste management vendors are able to assign tools and services that best suit the citizen who has raised the request by referring to the relevant information that would affect service delivery, such as property information. The ability to do this would make the process time and cost-effective.
Increasing the viability of waste management services will enable more private players to enter the fray, limit illegal dumping and eradicate opportunities for illegal manual scavenging.
Faecal Sludge/Co-treatment plant/Centre operator
The plant operator will be able to validate that there is no discrepancy in volume between the waste collected at the households and disposed off at the plant, ensuring that no waste drops off the value chain without treatment.
Adhere to the schedule for treatment quality, and record treatment quality results.
Adhere to the schedule for maintenance, and ensure that the plant is up and running efficiently.
Treatment plants can be plugged into waste-to-value markets, making it easier for buyers of processed and tested waste to discover and buy from them, thereby contributing to the financial sustainability of treatment plants.
Administrators
Govern the entire waste value chain via dashboards.
View the capacity available for transport and treatment at the state and ULB levels, and its utilisation via dashboards.
View compliance of SLAs and citizen satisfaction levels for services.
curl 'https://unified-dev.digit.org/individual/v1/_update?tenantId=pg.citya' \
-H 'authority: unified-dev.digit.org' \
-H 'accept: application/json, text/plain, */*' \
-H 'accept-language: en-US,en;q=0.9' \
-H 'content-type: application/json;charset=UTF-8' \
-H 'origin: https://unified-dev.digit.org' \
-H 'referer: https://unified-dev.digit.org/sanitation-ui/employee/fsm/registry/edit-worker?id=IND-2023-12-11-011010' \
-H 'sec-ch-ua: "Not_A Brand";v="8", "Chromium";v="120", "Google Chrome";v="120"' \
-H 'sec-ch-ua-mobile: ?0' \
-H 'sec-ch-ua-platform: "Windows"' \
-H 'sec-fetch-dest: empty' \
-H 'sec-fetch-mode: cors' \
-H 'sec-fetch-site: same-origin' \
-H 'user-agent: Mozilla/5.0 (Windows NT 10.0; Win64; x64) AppleWebKit/537.36 (KHTML, like Gecko) Chrome/120.0.0.0 Safari/537.36' \
--data-raw '{"Individual":{"id":"02bc1a5b-fed9-4176-bada-974aeeb8e613","individualId":"IND-2023-12-11-011010","tenantId":"pg.citya","clientReferenceId":null,"userId":null,"userUuid":null,"name":{"givenName":"sdjhsdhsdkjhs","familyName":null,"otherNames":null},"dateOfBirth":-19800000,"gender":"MALE","bloodGroup":null,"mobileNumber":"7897897899","altContactNumber":null,"email":null,"address":[{"id":"d2a6e81d-c3ce-4608-af11-5b0d0ca0aa0d","clientReferenceId":null,"individualId":"02bc1a5b-fed9-4176-bada-974aeeb8e613","tenantId":"pg.citya","doorNo":null,"latitude":0,"longitude":0,"locationAccuracy":0,"type":"PERMANENT","addressLine1":null,"addressLine2":null,"landmark":null,"city":"pg.citya","pincode":null,"buildingName":null,"street":null,"locality":{"code":"SUN02","name":null,"label":null,"latitude":null,"longitude":null,"children":null,"materializedPath":null},"ward":null,"isDeleted":false,"auditDetails":{"createdBy":"4a747fc5-6a8c-4645-8748-fec35f1b9e17","lastModifiedBy":"49341961-f413-4ae1-b7f8-92a8d9136f38","createdTime":1702288646617,"lastModifiedTime":1702459735736}}],"fatherName":null,"husbandName":null,"relationship":null,"identifiers":null,"skills":[{"type":"Driving","level":"UNSKILLED"}],"photo":null,"additionalFields":{"fields":[{"key":"FUNCTIONAL_ROLE_1","value":"SANITATION_HELPER"},{"key":"EMPLOYMENT_TYPE_1","value":"FIXED"},{"key":"FUNCTIONAL_ROLE_COUNT","value":"01"},{"key":"EMPLOYER","value":"ULB"}]},"isDeleted":false,"rowVersion":11,"auditDetails":{"createdBy":"4a747fc5-6a8c-4645-8748-fec35f1b9e17","lastModifiedBy":"49341961-f413-4ae1-b7f8-92a8d9136f38","createdTime":1702288646617,"lastModifiedTime":1702459735737},"clientAuditDetails":{"createdBy":null,"lastModifiedBy":null,"createdTime":0,"lastModifiedTime":0},"isSystemUser":true,"isSystemUserActive":true,"userDetails":{"username":"7897897899","password":null,"tenantId":"pg.citya","roles":[{"code":"CITIZEN","tenantId":"pg.citya"},{"code":"SANITATION_WORKER","tenantId":"pg.citya"},{"code":"SANITATION_HELPER","tenantId":"pg.citya"}],"type":"CITIZEN"}},"RequestInfo":{"apiId":"Rainmaker","authToken":"06170439-7751-41d9-8043-04ede25e9499","userInfo":{"id":927,"uuid":"49341961-f413-4ae1-b7f8-92a8d9136f38","userName":"ADMIN","name":"Plant operator","mobileNumber":"8282828121","emailId":null,"locale":null,"type":"EMPLOYEE","roles":[{"name":"FSM Administrator","code":"FSM_ADMIN","tenantId":"pg.citya"},{"name":"FSM Employee Application Viewer","code":"FSM_VIEW_EMP","tenantId":"pg.citya"}],"active":true,"tenantId":"pg.citya","permanentCity":null},"msgId":"1702469181914|en_IN","plainAccessRequest":{}}}' \
--compressedcurl 'https://unified-dev.digit.org/vendor/v1/_update?tenantId=pg.citya' \
-H 'authority: unified-dev.digit.org' \
-H 'accept: application/json, text/plain, */*' \
-H 'accept-language: en-US,en;q=0.9' \
-H 'content-type: application/json;charset=UTF-8' \
-H 'origin: https://unified-dev.digit.org' \
-H 'referer: https://unified-dev.digit.org/sanitation-ui/employee/fsm/registry/edit-worker?id=IND-2023-12-11-011010' \
-H 'sec-ch-ua: "Not_A Brand";v="8", "Chromium";v="120", "Google Chrome";v="120"' \
-H 'sec-ch-ua-mobile: ?0' \
-H 'sec-ch-ua-platform: "Windows"' \
-H 'sec-fetch-dest: empty' \
-H 'sec-fetch-mode: cors' \
-H 'sec-fetch-site: same-origin' \
-H 'user-agent: Mozilla/5.0 (Windows NT 10.0; Win64; x64) AppleWebKit/537.36 (KHTML, like Gecko) Chrome/120.0.0.0 Safari/537.36' \
--data-raw '{"vendor":{"id":"da5dae4c-95d7-43b6-a92f-e504d6000ef8","tenantId":"pg.citya","name":"djhdjkdhsjkh","address":{"tenantId":"pg.citya","doorNo":"","plotNo":"","id":"7132305a-ecd1-4f5e-af02-9894103a3742","landmark":"","city":"CityA","district":"CityA","region":"CityA","state":null,"country":"in","pincode":"","additionalDetails":"{\"description\": \"\"}","buildingName":"","street":"","locality":{"code":"SUN01","name":"Ajit Nagar - Area1","label":"Locality","latitude":"31.63089","longitude":"74.871552","children":[],"materializedPath":null},"geoLocation":null,"auditDetails":null},"owner":{"id":933,"uuid":"5b610239-fa1c-4538-b771-90cf255304b3","userName":"7787678673","password":null,"salutation":null,"name":"djhdjkdhsjkh","gender":"MALE","mobileNumber":"7787678673","emailId":"[email protected]","altContactNumber":null,"pan":null,"aadhaarNumber":null,"permanentAddress":null,"permanentCity":null,"permanentPinCode":null,"correspondenceCity":null,"correspondencePinCode":null,"correspondenceAddress":null,"active":true,"dob":0,"pwdExpiryDate":1710545514000,"locale":null,"type":"CITIZEN","signature":null,"accountLocked":false,"roles":[{"id":null,"name":"FSM Desluding Operator","code":"FSM_DSO","tenantId":"pg"},{"id":null,"name":"Citizen","code":"CITIZEN","tenantId":"pg"}],"fatherOrHusbandName":"djhdjkdhsjkh","relationship":"OTHER","bloodGroup":null,"identificationMark":null,"photo":null,"createdBy":"927","createdDate":1702393314000,"lastModifiedBy":"927","lastModifiedDate":1702486776000,"otpReference":null,"tenantId":"pg"},"vehicles":null,"drivers":null,"workers":[{"id":"59090353-59f6-4242-86ea-bbd92ecbe674","tenantId":"pg.citya","vendorId":"da5dae4c-95d7-43b6-a92f-e504d6000ef8","individualId":"1e5ad42e-2734-48fc-b934-fc32ef5058a6","additionalDetails":null,"auditDetails":{"createdBy":"49341961-f413-4ae1-b7f8-92a8d9136f38","lastModifiedBy":"49341961-f413-4ae1-b7f8-92a8d9136f38","createdTime":1702373514847,"lastModifiedTime":1702462026145},"vendorWorkerStatus":"ACTIVE"},{"id":"1e19a4f0-3ead-4985-bb59-aa4b57df6af2","tenantId":"pg.citya","vendorId":"da5dae4c-95d7-43b6-a92f-e504d6000ef8","individualId":"c050f0e5-d0a0-4f2a-83c0-63876827d6e1","additionalDetails":null,"auditDetails":{"createdBy":"49341961-f413-4ae1-b7f8-92a8d9136f38","lastModifiedBy":"49341961-f413-4ae1-b7f8-92a8d9136f38","createdTime":1702373514847,"lastModifiedTime":1702462071879},"vendorWorkerStatus":"ACTIVE"},{"id":"0a79d0d1-ac14-4ed4-a6cc-7971a29043e2","tenantId":"pg.citya","vendorId":"da5dae4c-95d7-43b6-a92f-e504d6000ef8","individualId":"f6f99ec9-9fcd-489c-8f66-58a4a63432b3","additionalDetails":null,"auditDetails":{"createdBy":"49341961-f413-4ae1-b7f8-92a8d9136f38","lastModifiedBy":"49341961-f413-4ae1-b7f8-92a8d9136f38","createdTime":1702373514847,"lastModifiedTime":1702459924693},"vendorWorkerStatus":"ACTIVE"},{"id":"39cc81f9-58e7-4912-9743-81f51ba03cd5","tenantId":"pg.citya","vendorId":"da5dae4c-95d7-43b6-a92f-e504d6000ef8","individualId":"8215eb13-f247-4782-9acd-665214d24a98","additionalDetails":null,"auditDetails":{"createdBy":"49341961-f413-4ae1-b7f8-92a8d9136f38","lastModifiedBy":"49341961-f413-4ae1-b7f8-92a8d9136f38","createdTime":1702373514847,"lastModifiedTime":1702461623872},"vendorWorkerStatus":"ACTIVE"},{"individualId":"02bc1a5b-fed9-4176-bada-974aeeb8e613","vendorWorkerStatus":"ACTIVE"}],"additionalDetails":{"description":""},"source":"WhatsApp","description":null,"ownerId":"5b610239-fa1c-4538-b771-90cf255304b3","agencyType":"ULB","paymentPreference":"post-service","status":"ACTIVE","auditDetails":{"createdBy":"49341961-f413-4ae1-b7f8-92a8d9136f38","lastModifiedBy":"49341961-f413-4ae1-b7f8-92a8d9136f38","createdTime":1702373514847,"lastModifiedTime":1702466976705}},"RequestInfo":{"apiId":"Rainmaker","authToken":"06170439-7751-41d9-8043-04ede25e9499","userInfo":{"id":927,"uuid":"49341961-f413-4ae1-b7f8-92a8d9136f38","userName":"ADMIN","name":"Plant operator","mobileNumber":"8282828121","emailId":null,"locale":null,"type":"EMPLOYEE","roles":[{"name":"FSM Administrator","code":"FSM_ADMIN","tenantId":"pg.citya"},{"name":"FSM Employee Application Viewer","code":"FSM_VIEW_EMP","tenantId":"pg.citya"}],"active":true,"tenantId":"pg.citya","permanentCity":null},"msgId":"1702469182205|en_IN","plainAccessRequest":{}}}' \
--compressedImport the curl :
curl --location --request POST 'https://fsm-2.3.digit.org/localization/messages/v1/_upsert?tenantId=pg' \
--header 'Content-Type: application/json' \
--data-raw '{
"RequestInfo": {
"apiId": "Rainmaker",
"ver": ".01",
"ts": "",
"action": "_create",
"did": "1",
"key": "",
"msgId": "20170310130900|hi_IN",
"authToken": "94a4a1dd-5691-4534-88ce-d3440c2e1b85",
"userInfo": {
"id": 118,
"userName": "TLCreator",
"salutation": null,
"name": "TLCreator",
"gender": "MALE",
"mobileNumber": "6666666666",
"emailId": null,
"altContactNumber": null,
"pan": null,
"aadhaarNumber": null,
"permanentAddress": null,
"permanentCity": null,
"permanentPinCode": null,
"correspondenceAddress": "Bang",
"correspondenceCity": null,
"correspondencePinCode": null,
"addresses": [
{
"pinCode": null,
"city": null,
"address": "Bang",
"type": "CORRESPONDENCE",
"id": 235,
"tenantId": "uk.haldwani",
"userId": 118,
"addressType": "CORRESPONDENCE",
"lastModifiedDate": null,
"lastModifiedBy": null
}
],
"active": true,
"locale": null,
"type": "EMPLOYEE",
"accountLocked": false,
"accountLockedDate": 1571224291053,
"fatherOrHusbandName": "Test",
"signature": null,
"bloodGroup": null,
"photo": null,
"identificationMark": null,
"createdBy": 4,
"lastModifiedBy": 1,
"tenantId": "uk.haldwani",
"roles": [
{
"code": "PTCEMP",
"name": "PT Counter Employee",
"tenantId": "uk.haldwani"
},
{
"code": "TL_CEMP",
"name": "TL Counter Employee",
"tenantId": "uk.haldwani"
}
],
"uuid": "573dd472-ebbc-4bbd-b093-897d33f95980",
"createdDate": "07-10-2019 17:51:18",
"lastModifiedDate": "13-11-2019 12:19:55",
"dob": "1/10/2019",
"pwdExpiryDate": "05-01-2020 17:51:18"
}
},
"tenantId": "pg",
"messages": [
{
"code": "FROM_OTHER_ULB",
"message": "Other",
"module": "rainmaker-fsm",
"locale": "en_IN"
}
]
}'Login to Super_user and copy the auth token
Change the req. Url to env you want to push also the auth token
Add the localisation message in the request body.
Hit the url.
Reference Localisation Doc :
All localisations of FSM : https://docs.google.com/spreadsheets/d/1RWqP-h_s0lJZnQ9RvFOIePdy7Hxle-RN/edit?usp=sharing&ouid=109809705320882389789&rtpof=true&sd=true
https://docs.google.com/document/d/1z-V8U8BvT1Ict1gRyf4b4aOCjr_snJ-Psk6A_5oKzWs/edit?usp=sharing
https://drive.google.com/drive/folders/1bIv4txLjOSt2L4DsNWkShSgmZFzo73yU?usp=drive_link
Important points :
Related modules for FSM : rainmaker-fsm,rainmaker-common,rainmaker-dss
Push the localisation for all the modules separately
After pushing the localisation,make a file to store all the localisations according to modules.
- name: 'builds/SANITATION/pqm'
build:
- work-dir: 'pqm'
image-name: 'pqm-service'
dockerfile: 'build/maven/Dockerfile'
- work-dir: 'pqm/src/main/resources/db'
image-name: 'pqm-service-db'- name: 'builds/SANITATION/pqm-scheduler'
build:
- work-dir: 'pqm-scheduler'
image-name: 'pqm-scheduler'
dockerfile: 'pqm-scheduler/Dockerfile' - name: 'builds/SANITATION/pqm-anomaly-finder'
build:
- work-dir: 'pqm-anomaly-finder'
image-name: 'pqm-anomaly-finder'
dockerfile: 'build/maven/Dockerfile'
- work-dir: 'pqm-anomaly-finder/src/main/resources/db'
image-name: 'pqm-anomaly-finder-db'{
"module": "Tqm",
"code": "Tqm",
"active": true,
"order": 14,
"additionalComponent": "TqmAdminNotification",
"tenants": [
{
"code": "pg.cityb"
},
{
"code": "pg.cityc"
},
{
"code": "pg.citya"
}
]
}const enabledModules = [
"DSS",
"HRMS",
"Payment",
"FSM",
"Utilities",
"Tqm", // Note -> here case is different than that of in mdms but it does not matter as long as name is same
] "@egovernments/digit-ui-module-core": "1.8.0-beta.13"{
"RequestInfo": {
"apiId": "asset-services",
"ver": null,
"ts": null,
"action": null,
"did": null,
"key": null,
"msgId": "search with from and to values",
"authToken": "{{access_token}}",
"correlationId": null,
"userInfo": {
"id": "1",
"userName": null,
"name": null,
"type": null,
"mobileNumber": null,
"emailId": null,
"roles": null,
"uuid": "d7867ef2-d046-4361-9a82-94c35c98416e"
}
},
"plantUserSearchCriteria": {
"ids": [],
"tenantId": "pg",
"plantCodes": [
],
"individualIds": ["d7867ef2-d046-4361-9a82-94c35c98416e"],
"additionalDetails": {}
},
"pagination": {}
}curl --location 'http://localhost:7008/pqm-service/plant/user/v1/_search' \
--header 'Content-Type: application/json' \
--data '{
"RequestInfo": {
"apiId": "asset-services",
"ver": null,
"ts": null,
"action": null,
"did": null,
"key": null,
"msgId": "search with from and to values",
"authToken": "",
"correlationId": null,
"userInfo": {
"id": "1",
"userName": null,
"name": null,
"type": null,
"mobileNumber": null,
"emailId": null,
"roles": null,
"uuid": "d7867ef2-d046-4361-9a82-94c35c98416e"
}
},
"plantUserSearchCriteria": {
"ids": [],
"tenantId": "pg",
"plantCodes": [
],
"individualIds": ["d7867ef2-d046-4361-9a82-94c35c98416e"],
"additionalDetails": {}
},
"pagination": {}
}'Role
Description
Action
System Administrator
The user can define boundaries, create roles and users, define properties,, upload lisy of localities and slums, as well as create localisation.
Define boundaries.
Create roles and map to actions.
Create users: Map to the role and boundary (boundary mapping to be confirmed).
Define property types and sub-types.
Define pricing.
Upload the list of localities and pin codes.
Upload the list of slums.
Define the minimum advance pricing to be collected.
Create localisation.
Citizen
A citizen can request for a desludging operation online. The user can check the status of the application online, make the payment for the service online, and post desludging, they can rate the quality of the service online.
Request for desludging services.
View the acknowledgement receipt.
View the payment receipts.
Track the status of desludging requests.
View the history of past desludging services.
Make online payments.
ULB Employee (Can be assigned roles as creator, collector, editor, report viewer, dashboard viewer or admin)
A ULB official will act as a regulatory and management authority for the entire desludging process. He/she can receive the request from a citizen online or can create a request on behalf of the citizen online. When the request is received, the user can assign a desludging operator for a request. The official can also update the status of the request on behalf of the DSO after the service is completed at the site, and view the relevant reports.
Add, update, and disable vendors.
Add, update, and disable drivers.
Add, update, and disable vehicles.
Map vendors and drivers.
Map vehicles and drivers.
Create desludging service requests on behalf of citizens.
Accept, reject, or update desludging service requests
Assign vendors to desludging services.
Collect service fees.
View dashboards and reports for a specific ULB.
Transportation Vendors
This user can receive the requests assigned by a ULB official, and update the status of the transaction after the service is completed.
Accept/reject desludging requests.
Assign vehicles to requests.
Update the number of trips.
Map the completion of requests.
Treatment Plant Operator
This user can view the current demand, that is, the list of planned desludging requests available in the system. He/she can update the vehicle log which enters the FSTP/STP every day.
Record incoming vehicles against requests.
Record incoming vehicles without associated service requests.
State Administrator
The user can view dashbaords and reports. The user can also filter dasboards and reports for a specific urban local body and by time.
View dashboards and reports for states.
Filter dashboards and reports by time, and for a specific ULB.
Updated Feature
Description
Maintaining a list of unique sanitation workers in DIGIT Sanitation through a sanitation worker registry
Viewing list
Adding a sanitation worker
Updating details
Disabling sanitation worker
Tagging sanitation workers to vendors
Recording participation of sanitation workers in service delivery by tagging sanitation workers to requests:
Tagging multiple sanitation workers to a request
Editing tagged sanitation workers
SMS to sanitation Worker in case of request assignment
Upgrade to inbox from V1 to V2
To improve performance of the inbox, migrated to version v2 of inbox
Goal
Category
Objective
How will it be measured via the product?
How will we know this is successful?
Zero deaths, diseases, and environmental contamination resulting from poor sanitation
Primary
To ensure every sanitation worker has a valid identity so as to enable distribution of benefits.
Number of sanitation workers registered in the system.
Increase in the number of sanitation Workers enrolled in the system over time.
{
"tests": [
{
"tenantId": "pg.citya",
"plantCode": "ANGUL_FSTP",
"processCode": "FECAL_SLUDGE_MANAGEMENT",
"stageCode": "SOLID_TREATMENT_VAR",
"materialCode": "FECAL_SLUDGE",
"testCriteria": [
{
"criteriaCode": "TSS_LESST_100",
"resultValue": "21",
"isActive": true
}
],
"testType": "LAB_ADHOC",
"scheduledDate": null,
"isActive": null,
"documents": [],
"additionalDetails": {},
"workflow": null
}
],
"RequestInfo": {
"apiId": "Rainmaker",
"authToken": "a0c56299-3bde-48e2-b0fb-76686fdff3dc",
"userInfo": {
"id": 722,
"uuid": "56e8c2df-af55-46a9-a378-885915cde0ab",
"userName": "TQM_DEV_ULBADMIN",
"name": "ULB Admin",
"mobileNumber": "7281638698",
"emailId": null,
"locale": null,
"type": "EMPLOYEE",
"roles": [
{
"name": "PQM Admin",
"code": "PQM_ADMIN",
"tenantId": "pg.citya"
}
],
"active": true,
"tenantId": "pg.citya",
"permanentCity": null
},
"msgId": "1701080787582|en_IN",
"plainAccessRequest": {}
}
}curl 'https://unified-dev.digit.org/pqm-service/v1/_create' \
-H 'authority: unified-dev.digit.org' \
-H 'accept: application/json, text/plain, */*' \
-H 'accept-language: en-US,en;q=0.9' \
-H 'content-type: application/json;charset=UTF-8' \
-H 'cookie: _ga_V2CPZCVTXQ=GS1.1.1695293925.1.1.1695293950.0.0.0; __cuid=59fd9aac25b044f6af006bd4b159cbbf; amp_fef1e8=f4fc07f6-3fb0-4c67-8114-a1beb906e625R...1hf75985a.1hf76uet8.i.8.q; _ga_P1TZCPKF6S=GS1.1.1699974064.1.1.1699975479.60.0.0; _ga=GA1.2.1291438273.1695293925; _ga_0JZG96DZSM=GS1.1.1699977339.2.0.1699977339.60.0.0' \
-H 'origin: https://unified-dev.digit.org' \
-H 'referer: https://unified-dev.digit.org/sanitation-ui/employee/tqm/add-test-result' \
-H 'sec-ch-ua: "Google Chrome";v="119", "Chromium";v="119", "Not?A_Brand";v="24"' \
-H 'sec-ch-ua-mobile: ?0' \
-H 'sec-ch-ua-platform: "Windows"' \
-H 'sec-fetch-dest: empty' \
-H 'sec-fetch-mode: cors' \
-H 'sec-fetch-site: same-origin' \
-H 'user-agent: Mozilla/5.0 (Windows NT 10.0; Win64; x64) AppleWebKit/537.36 (KHTML, like Gecko) Chrome/119.0.0.0 Safari/537.36' \
--data-raw '{"tests":[{"tenantId":"pg.citya","plantCode":"ANGUL_FSTP","processCode":"FECAL_SLUDGE_MANAGEMENT","stageCode":"SOLID_TREATMENT_VAR","materialCode":"FECAL_SLUDGE","testCriteria":[{"criteriaCode":"TSS_LESST_100","resultValue":"21","isActive":true}],"testType":"LAB_ADHOC","scheduledDate":null,"isActive":null,"documents":[],"additionalDetails":{},"workflow":null}],"RequestInfo":{"apiId":"Rainmaker","authToken":"a0c56299-3bde-48e2-b0fb-76686fdff3dc","userInfo":{"id":722,"uuid":"56e8c2df-af55-46a9-a378-885915cde0ab","userName":"TQM_DEV_ULBADMIN","name":"ULB Admin","mobileNumber":"7281638698","emailId":null,"locale":null,"type":"EMPLOYEE","roles":[{"name":"PQM Admin","code":"PQM_ADMIN","tenantId":"pg.citya"}],"active":true,"tenantId":"pg.citya","permanentCity":null},"msgId":"1701080787582|en_IN","plainAccessRequest":{}}}' \
--compressedPQM_ADMINTo add new ulb/tenant for FSM,following steps should be followed:
Add data in MDMS
Reference from Annexure
Data
Location
Description
Annexure -1 Sl. No. A1 - A4
Tenant Details
To show the tenant at login screen
To enable ulb to create application,add tenant in FSM module
Annexure -1 Sl. No. B1 - B6
FSTP Data
To add FSTP information
Annexure-2 Vehicle Make,Vehicle Model,Cesspool Tank Capacity
New Vehicles
Add Vehicles in application.Before pushing the vehicle data,new vehicle should be added in mdms.
Annexure -3
Slum Details
To add slum data,create a folder of a respective tenant and inside it add slum.json file in FSM folder
URC Feature
To enable URC(GramPanchayat) feature for ulb
Annexure -4
Zero pricing feature
To enable zero pricing feature
Annexure -5
Locality and Gram Panchayat Details
Under specific ulb folder,add locality and gp details under egov-location folder.
After this,restart the mdms service and check the status in ui.The tenant will be added in ui.
Create Employee and FSTP login credientials.
Plant Mapping of tenant
Push the localisation of all the slums and Gram Panchayat in tenant.
Push the billing-slab of new tenant
Push the vendor-vehicle data of new tenant
DIGIT Sanitation is enhanced with a new Product -Treatment Quality Monitoring(TQM). The Treatment Quality Monitoring aims to improve the Treatment Quality of plants by ensuring that timely tests are conducted and any deviations are addressed quickly. To know more about Treatment Quality Monitoring(TQM) , please follow the GitBook Link.
Treatment Quality Monitoring(TQM)
Feature
Description
Schedule of Tests
This component will be used by treatment plant operators and urban local body (ULB) employees to see the schedule of tests.
Digital Record of Test Results
This component will be used by treatment plant operators and ULB employees to upload results manually and track IoT readings.
Anomaly Detection
This component will be used by treatment plant operators and ULB employees to interpret test results.
4. Dashboards
This module will give stakeholders insights and information regarding the operations of the treatment plant. Users can use this to drill down and identify plants and processes where compliance to testing and/or test results are not upto benchmarks.
Dashboards will also help users see trends over time to see patterns and identify long-term problem areas
Click here for Known Issue List.
Goal
Category
Objective
How will it be measured via the product
How will we know TQM is successful
Zero deaths, diseases, and environmental contamination resulting from poor sanitation
Primary
To ensure treated waste is as per the quality standards
The percentage of treatment quality tests passed for a specific period
Increase in the percentage of treatment quality tests passed for a specific period
Zero deaths, diseases, and environmental contamination resulting from poor sanitation
Secondary
To ensure treated waste is tested regularly for quick identification of issues
The percentage compliance against testing schedule for a specific period
Increase in the percentage compliance against testing schedule over time
From the TQM card in the home screen, there is a link to "View Past Tests".
The view past tests screen will show the tests whose workflow is completed, that is, they are in the submitted status.
The screen shows a list of cards, each card corresponding to a test, and shows test details similar to inbox.
Filters and sort options are available.
User can filter by Treatment process, Output Type, Test Type and the date range.
Sort is similar to inbox.
Use the pqm-service.
URL for search "/pqm-service/v1/_search".
Sample request object:
Role-action mapping is done for the search endpoint for a plant operator user role, that is:
The Septage Treatment Plant Operator (SeTPO) receives multiple vehicles servicing various desludging requests in the urban local body (ULB) and adjacent gram panchayats (GPs) through the day, each day. Some of these trips made by some vehicles may be associated with the applications raised and serviced through the platform. Additionally, incoming vehicles may come in independently, without corresponding applications.
SeTPO can:
Update the status of applications and trips in “Waiting for Disposal” stage at the FSTP/STP as disposed
Log vehicle(s) requests that are not in the system
FSTP operators are provided credentials to login to the system.
On this page, the following actions can be performed:
Enter username and password
Select the city for login
Reset password by clicking on the “Forgot Password” link
On clicking continue, FSTP operators are redirected to the FSM homepage.
Click on Inbox to view incoming vehicles for disposal against applications and perform actions
Record incoming vehicle that has not come in via an application
View reports
Change language
Edit profile details by clicking on the user icon on the top right hand corner
Logout by clicking on the user icon on top right hand corner
On this page, the following actions can be performed:
To view incoming vehicles for disposal against applications, the user can navigate to the inbox. The inbox displays a list of trips along with the vehicle number that is pending to be disposed off at a specific plant.
The following actions can be performed:
Search for an active trip using the “Application No.”, Vehicle no. and DSO name.
Clear search by clicking on “Clear Search”
View and update trip details by clicking on a trip ID or vehicle log
Sort applications and trips by the application date
On clicking on an application number or vehicle log ID, the user is redirected to the update trip page.
View trip details such as Vehicle no., DSO Name, and Locality.
Update vehicle in time and out time.
Update septage dumped (in litres)
Add additional details and attachments.
Submit form or decline vehicle by clicking on the “Take Action” button
The following actions can be performed:
The take action button has the following options:
Decline Vehicle
Submit
On clicking the Submit button, the application is updated successfully and a snack bar will appear for confirmation. The application will also be removed from the Inbox.
There are multiple reasons why a vehicle may be declined at the treatment plant, such as due to the quality of waste or if the plant is under maintenance. In such cases, the treatment plant operator may decline the incoming vehicle. This can be done from the application details page where the “Take Action” button has the option for Decline. On clicking on this, the following pop-up will appear.
The following actions can be performed:
Select the reason for declining
Close pop-up by clicking on the Close button on the pop up.
Close pop-up by clicking on the cross icon on the top right of the pop up.
Confirm decline by clicking on Decline Vehicle.
On clicking on Decline Vehicle, there will be a snack bar confirming the action and the user will be redirected to the home screen.
Incoming vehicles that have not come in via an application can be recorded by the user using the add ‘New’ button on the FSM home screen. On clicking on the New button, the user will be redirected to the following screen:
The following actions can be performed:
Enter Vehicle Number
Click on Next
Once vehicle number is entered, the ‘Next’ button will be highlighted and the user will be redirected to the Vehicle Log screen.
The following actions can be performed:
Update DSO Name and Locality
Update Vehicle In time and Out time.
Update volume of waste.
Update Additional Details and Attachments.
Submit the form by clicking on Submit.
A snack bar will confirm submission and the user will be redirected to the FSM homepage.
In FSM 1.3 EDITOR users could take workflow actions and assign drivers to FSM Applications now we have changed that assignment. Now EDITOR users can assign a driver and multiple helpers to an FSM Application. And both driver and helper are Sanitation workers now.
EDITOR User role code:
Login with EDITOR user and go to FSM Inbox
From Inbox choose any application whose status is pending for DSO assignment
Go to the application details page from inbox
From the Action bar options click on "Assign Vehicle and Sanitation Workers"
A Popup window will open which looks like the following
We have two new options here, Assign Driver and Assign Sanitation Worker
Assign Driver is single select and mandatory
Assign Sanitation worker is multi-select and we can assign multiple Sanitation workers. Assigning worker is non mandatory though
Both these dropdowns are searchable i.e., EDITOR can search by name and Sanitation worker ID
These dropdowns are populated based on the vendor that is tagged to the current FSM Application.
User can click on Assign to take this action. A toast message is displayed showing the update is successful.
After this action, added Sanitation workers are displayed on the Application Details screen under DSO Details Section
To fetch FSM application details we are hitting this endpoint "/fsm/v1/_search"
Refer the below curl:
To update FSM application we are hitting this endpoint "/fsm/v1/_update"
Refer to the below curl:
To get a particular vendor data tagged to the current application we are hitting this endpoint "/vendor/v1/_search"
Refer to the below curl
Role action mapping for the above three endpoints is done for this role
In FSTP, we are trying to decouple the vehicle dispose from the FSM application. Whether vehicle is attached to any FSM application or not, we allow the vehicle to dispose in the FSTP plant.
After logging as a FSTP user, we have now the home button option:
Code changes path are:
DIGIT-Dev/frontend/micro-ui/web/micro-ui-internals/packages/modules/fsm/src/components/FsmCard.js
After moving into “home” option, an FSTP user can choose from the following options:
FSTP can choose Add Vehicle Log option if he/she wants to check whether a vehicle is linked to any application and dispose.
FSTP can choose Inbox if he/she wants to check all the applications that are is ready to dispose.
The path for code:
frontend/micro-ui/web/micro-ui-internals/packages/modules/fsm/src/pages/employee/FstpOperations.js
The code snippet for populating the options:
The code snippet for rendering the icon:
ULBHomeCard.js is the common component used to populate options in the screen.
The paths:
frontend/micro-ui/web/micro-ui-internals/packages/react-components/src/atoms/ULBHomeCard.js
FSTP can add vehicle log using vehicle number (in proper format with spaces, e.g. AB 00 CD 1234). An improper format will throw an error.
The path for the code:
frontend/micro-ui/web/micro-ui-internals/packages/modules/fsm/src/pages/employee/FstpAddVehicle.js
The code snippet for populating the add vehicle log field and its validation:
The code snippet for rendering the screen:
After entering the vehicle number in the add vehicle log screen, we are fetching the FSM application, which is linked to that specific vehicle number. The data is rendered as shown below:
The path for the code:
frontend/micro-ui/web/micro-ui-internals/packages/modules/fsm/src/pages/employee/FstpServiceRequest.js
The code snippets for fetching the FSM application linked to vehicle number:
Fetching the vehicle Id using vehicle number
Fetching the vehicle log using vehicle Id
Extracting out the FSM application number from vehicle log:
Fetching the FSM application details using FSM application number
The code snippets to render the data:
Mobile view
Desktop view
After selecting the application, FSTPO can dispose the vehicle log in the vehicle log screen.
Additional details and attachment fields are introduced in new updates in FSM v1.2.1 .
The screen for the existing vehicle log:
The screen for new vehicle log if no application is found for vehicle is shown below. FSTPO can dispose the new vehicle log by providing all the details below.
The path for the code:
frontend/micro-ui/web/micro-ui-internals/packages/modules/fsm/src/pages/employee/FstpOperatorDetails.js
The code snippet for additional details and attachments field:
For new vehicle log:
The code snippets to render input field for new vehicle log:
The waste management process comprises five key stages: Generation, containment, transport, treatment, and reuse. To ensure effective waste management, each of these stages must receive adequate attention. Inadequate waste treatment and the subsequent discharge into the environment directly harm both the environment and water quality. Often, effluents find their way into surface water sources. The poor quality of wastewater effluents contributes to the deterioration of the receiving surface water bodies and poses risks to users' health.
Quality and reusability are intimately linked: Well-treated waste output can be repurposed, whether as recycled water or compost. Consumer acceptance of this practice largely hinges on the quality of the output and the benefits it offers.
At present, there is minimal visibility into the handling and treatment of waste at treatment plants. With this in mind, we are introducing Treatment Quality Monitoring (TQM) as an extension to DIGIT Sanitation.
The vision of DIGIT Sanitation is “Zero untreated waste in 1,000 ULBs in 1000 days”. Read more about why this matters .
To achieve “zero untreated waste” it is pertinent to ensure that waste is disposed of in the right method, right place, and right time. Subsequently, all waste disposed of should be processed and treated effectively. We can ensure that the waste is being effectively treated by focusing on the following:
Design the best process for waste treatment.
Ensure adherence to the designed process.
Monitor and track the effectiveness of the process.
We now explore each issue separately:
How do you know that the process you have designed is correct/needs modifications?
The success of a treatment will reflect directly in the results of the process, in terms of quality of output and process efficiency.
Testing at various stages of the process and comparing the parameters from the test results against a benchmark will be an indicator of an effective process.
Based on variations between {what the values should be in an ideal condition} and {the measured values} of the parameters, the changes required in each specific part of the process can be identified.
How do you ensure the process is being followed?
There are no digital touchpoints in the process, so there is no unbiased/people-independent method to track adherence.
An indirect method to measure adherence is through the “measure of outcomes” (parameter testing) and review of the process based on the results thereby leading to the detection of deviations from the SOP.
How do you assess if the process is effective?
Test the treated output at various stages and check if all test parameters are within acceptable range as per standards
Based on the above, monitoring parameters is a key step in ensuring waste is treated and disposed of properly.
Treatment quality monitoring (TQM) is not being carried out in most urban local bodies (ULBs).
Test data is not recorded/analysed for process improvements.
No digital touchpoints in the TQM lifecycle: Lack of such touchpoints create data silos that hinder the relevant information from being accessible to the right person at the right time.
No accountability system in place to assign responsibility to stakeholders to make necessary changes.
TQM is dependent on having access to a lab and also the logistics of sample collection, transportation, interpersonal communications, and waiting times (for tests/test results).
To address these issues, we want to introduce a product for Treatment Quality Monitoring. The objective is to improve the quality of treated waste.
Our hypothesis of how treatment quality can be improved is as follows:
Configure Treatment Processes and Testing Requirements: Configuration of plants and treatment processes provides a consolidated view to the state/TSUs/stakeholders of the treatment processes operational at plants. Additionally, this allows for the definition of treatment requirements, frequencies, and benchmarks at the state level for various processes and their adoption by plants.
Ensure Regular Testing: Implementing regular and high-frequency testing enables the early detection of deviations from the established benchmarks.
Quick Issue Resolution: Identifying deviations and diagnosing them through an analysis of both current and historical data facilitates rapid issue resolution.
Deepen Enquiry: Is a particular plant consistently performing badly? Is a particular treatment process regularly leading to poor-quality output? Which step in the process flow is the deviation starting from? Do quality test results fluctuate often? Looking at trends in data can help deepen enquiry and identify problem areas.
PQM Business Service Request
Instructions for Production execution:
Replace the tenant id for production environment
Replace the request info object with production user info details
For PQM new Business service PQM has been created
Create businessService (workflow configuration) using the /businessservice/_create. Following is the product configuration for PQM
```postman_json
{
"RequestInfo": {
"apiId": "Rainmaker",
"action": "",
"did": 1,
"key": "",
"msgId": "20170310130900|en_IN",
"requesterId": "",
"ts": 1513579888683,
"ver": ".01",
"authToken": "71fc8bf6-4c3f-4bb3-af74-bc2fabf6252e",
"userInfo": {{adduserInfo}}
},
"BusinessServices": [
{
"tenantId": "pg",
"businessService": "PQM",
"business": "pqm",
"businessServiceSla": 432000000,
"states": [
{
"sla": null,
"state": null,
"applicationStatus": null,
"docUploadRequired": true,
"isStartState": true,
"isTerminateState": false,
"isStateUpdatable": true,
"actions": [
{
"action": "SCHEDULE",
"nextState": "SCHEDULED",
"roles": [
"PQM_ADMIN",
"PQM_TP_OPERATOR",
"PQM_CRONJOB_SCHEDULER"
]
}
]
},
{
"sla": null,
"state": "SCHEDULED",
"applicationStatus": "SCHEDULED",
"docUploadRequired": false,
"isStartState": false,
"isTerminateState": false,
"isStateUpdatable": true,
"actions": [
{
"action": "SUBMIT_SAMPLE",
"nextState": "PENDINGRESULTS",
"roles": [
"PQM_ADMIN",
"PQM_TP_OPERATOR"
]
}
]
},
{
"sla": null,
"state": "PENDINGRESULTS",
"applicationStatus": "PENDINGRESULTS",
"docUploadRequired": false,
"isStartState": false,
"isTerminateState": false,
"isStateUpdatable": false,
"actions": [
{
"action": "UPDATE_RESULT",
"nextState": "SUBMITTED",
"roles": [
"PQM_ADMIN",
"PQM_TP_OPERATOR"
]
},
{
"action": "SAVE_AS_DRAFT",
"nextState": "DRAFTED",
"roles": [
"PQM_ADMIN",
"PQM_TP_OPERATOR"
],
"active": true
}
]
},
{
"sla": null,
"state": "DRAFTED",
"applicationStatus": "DRAFTED",
"docUploadRequired": false,
"isStartState": false,
"isTerminateState": false,
"isStateUpdatable": true,
"actions": [
{
"action": "UPDATE_RESULT",
"nextState": "SUBMITTED",
"roles": [
"PQM_ADMIN",
"PQM_TP_OPERATOR"
],
"active": true
},
{
"action": "SAVE_AS_DRAFT",
"nextState": "DRAFTED",
"roles": [
"PQM_ADMIN",
"PQM_TP_OPERATOR"
],
"active": true
}
]
},
{
"sla": null,
"state": "SUBMITTED",
"applicationStatus": "SUBMITTED",
"docUploadRequired": false,
"isStartState": false,
"isTerminateState": true,
"isStateUpdatable": false,
"actions": null
}
]
}
]
}
```
{
"testSearchCriteria": {
"processCodes": [
"WATER_FILTERING",
"FECAL_SLUDGE_MANAGEMENT"
],
"materialCodes": [
"ARSENIC",
"NA",
"SCREENED_SLUDGE",
"FECAL_SLUDGE",
"EFFLUENTS",
"BIOSOLID",
"CHLORINE",
"SALT",
"IRON",
"POTABLE_WATER"
],
"testType": [
"IOT_SCHEDULED",
"LAB_ADHOC",
"LAB_SCHEDULED"
],
"fromDate": 1698777000000,
"toDate": 1701368999000,
"wfStatus": [
"SUBMITTED"
],
"plantCodes": [
"ANGUL_FSTP",
"PURI_FSTP"
]
},
"pagination": {
"limit": 100
},
"RequestInfo": {
"apiId": "Rainmaker",
"authToken": "e5d10a5d-b262-47fc-a9ee-fc24c3a0de19",
"userInfo": {
"id": 721,
"uuid": "41488b21-c742-4290-af8e-a2a1dc3749ac",
"userName": "TQM_DEV_PLANTOPERATOR",
"name": "Plant operator",
"mobileNumber": "7281638699",
"emailId": null,
"locale": null,
"type": "EMPLOYEE",
"roles": [
{
"name": "PQM TP OPERATOR",
"code": "PQM_TP_OPERATOR",
"tenantId": "pg.citya"
}
],
"active": true,
"tenantId": "pg.citya",
"permanentCity": null
},
"msgId": "1701076145507|en_IN",
"plainAccessRequest": {}
}
}curl 'https://unified-dev.digit.org/pqm-service/v1/_search' \
-H 'authority: unified-dev.digit.org' \
-H 'accept: application/json, text/plain, */*' \
-H 'accept-language: en-US,en;q=0.9' \
-H 'content-type: application/json;charset=UTF-8' \
-H 'cookie: _ga_V2CPZCVTXQ=GS1.1.1695293925.1.1.1695293950.0.0.0; __cuid=59fd9aac25b044f6af006bd4b159cbbf; amp_fef1e8=f4fc07f6-3fb0-4c67-8114-a1beb906e625R...1hf75985a.1hf76uet8.i.8.q; _ga_P1TZCPKF6S=GS1.1.1699974064.1.1.1699975479.60.0.0; _ga=GA1.2.1291438273.1695293925; _ga_0JZG96DZSM=GS1.1.1699977339.2.0.1699977339.60.0.0' \
-H 'origin: https://unified-dev.digit.org' \
-H 'referer: https://unified-dev.digit.org/sanitation-ui/employee/tqm/search-test-results' \
-H 'sec-ch-ua: "Google Chrome";v="119", "Chromium";v="119", "Not?A_Brand";v="24"' \
-H 'sec-ch-ua-mobile: ?1' \
-H 'sec-ch-ua-platform: "Android"' \
-H 'sec-fetch-dest: empty' \
-H 'sec-fetch-mode: cors' \
-H 'sec-fetch-site: same-origin' \
-H 'user-agent: Mozilla/5.0 (Linux; Android 6.0; Nexus 5 Build/MRA58N) AppleWebKit/537.36 (KHTML, like Gecko) Chrome/119.0.0.0 Mobile Safari/537.36' \
--data-raw '{"testSearchCriteria":{"processCodes":["WATER_FILTERING","FECAL_SLUDGE_MANAGEMENT"],"materialCodes":["ARSENIC","NA","SCREENED_SLUDGE","FECAL_SLUDGE","EFFLUENTS","BIOSOLID","CHLORINE","SALT","IRON","POTABLE_WATER"],"testType":["IOT_SCHEDULED","LAB_ADHOC","LAB_SCHEDULED"],"fromDate":1698777000000,"toDate":1701368999000,"wfStatus":["SUBMITTED"],"plantCodes":["ANGUL_FSTP","PURI_FSTP"]},"pagination":{"limit":100},"RequestInfo":{"apiId":"Rainmaker","authToken":"e5d10a5d-b262-47fc-a9ee-fc24c3a0de19","userInfo":{"id":721,"uuid":"41488b21-c742-4290-af8e-a2a1dc3749ac","userName":"TQM_DEV_PLANTOPERATOR","name":"Plant operator","mobileNumber":"7281638699","emailId":null,"locale":null,"type":"EMPLOYEE","roles":[{"name":"PQM TP OPERATOR","code":"PQM_TP_OPERATOR","tenantId":"pg.citya"}],"active":true,"tenantId":"pg.citya","permanentCity":null},"msgId":"1701076145507|en_IN","plainAccessRequest":{}}}' \
--compressedPQM_TP_OPERATORFSM_EDITOR_EMPcurl 'https://unified-dev.digit.org/fsm/v1/_search?tenantId=pg.citya&applicationNos=1013-FSM-2023-12-13-000381&_=1702476865870' \
-H 'authority: unified-dev.digit.org' \
-H 'accept: application/json, text/plain, */*' \
-H 'accept-language: en-US,en;q=0.9' \
-H 'content-type: application/json;charset=UTF-8' \
-H 'origin: https://unified-dev.digit.org' \
-H 'referer: https://unified-dev.digit.org/sanitation-ui/employee/fsm/application-details/1013-FSM-2023-12-13-000381' \
-H 'sec-ch-ua: "Not_A Brand";v="8", "Chromium";v="120", "Google Chrome";v="120"' \
-H 'sec-ch-ua-mobile: ?0' \
-H 'sec-ch-ua-platform: "Windows"' \
-H 'sec-fetch-dest: empty' \
-H 'sec-fetch-mode: cors' \
-H 'sec-fetch-site: same-origin' \
-H 'user-agent: Mozilla/5.0 (Windows NT 10.0; Win64; x64) AppleWebKit/537.36 (KHTML, like Gecko) Chrome/120.0.0.0 Safari/537.36' \
--data-raw '{"RequestInfo":{"apiId":"Rainmaker","authToken":"f8eee39f-1194-4d39-85de-12dc9c572a7c","msgId":"1702476865870|en_IN","plainAccessRequest":{}}}' \
--compressedcurl 'https://unified-dev.digit.org/fsm/v1/_update?tenantId=pg.citya&_=1702476876985' \
-H 'authority: unified-dev.digit.org' \
-H 'accept: application/json, text/plain, */*' \
-H 'accept-language: en-US,en;q=0.9' \
-H 'content-type: application/json;charset=UTF-8' \
-H 'origin: https://unified-dev.digit.org' \
-H 'referer: https://unified-dev.digit.org/sanitation-ui/employee/fsm/application-details/1013-FSM-2023-12-13-000381' \
-H 'sec-ch-ua: "Not_A Brand";v="8", "Chromium";v="120", "Google Chrome";v="120"' \
-H 'sec-ch-ua-mobile: ?0' \
-H 'sec-ch-ua-platform: "Windows"' \
-H 'sec-fetch-dest: empty' \
-H 'sec-fetch-mode: cors' \
-H 'sec-fetch-site: same-origin' \
-H 'user-agent: Mozilla/5.0 (Windows NT 10.0; Win64; x64) AppleWebKit/537.36 (KHTML, like Gecko) Chrome/120.0.0.0 Safari/537.36' \
--data-raw '{"fsm":{"citizen":{"id":960,"uuid":"d75d542f-a3bb-42c3-884a-d7fb5e6f14b3","userName":"d90dffe9-05b2-42cd-b87f-9756b0782dec","name":"Janu","password":null,"mobileNumber":"9035169720","tenantId":"pg","salutation":null,"emailId":null,"altContactNumber":null,"pan":null,"aadhaarNumber":null,"permanentAddress":null,"permanentCity":null,"permanentPinCode":null,"correspondenceCity":null,"correspondencePinCode":null,"active":true,"dob":null,"pwdExpiryDate":1710251842000,"locale":null,"type":"CITIZEN","signature":null,"accountLocked":false,"roles":[{"id":null,"name":"Citizen","code":"CITIZEN","tenantId":"pg"}],"bloodGroup":null,"identificationMark":null,"photo":null,"createdBy":"925","createdDate":1702475842000,"lastModifiedBy":"925","lastModifiedDate":1702475842000,"otpReference":null,"gender":null},"id":"f25e914d-e14e-4a9e-97d1-dc2cc51611f3","tenantId":"pg.citya","applicationNo":"1013-FSM-2023-12-13-000381","description":null,"accountId":"d75d542f-a3bb-42c3-884a-d7fb5e6f14b3","additionalDetails":{"tripAmount":750},"applicationStatus":"DSO_INPROGRESS","source":"COUNTER","sanitationtype":null,"propertyUsage":"RESIDENTIAL.ROW_HOUSES","vehicleType":null,"noOfTrips":1,"vehicleCapacity":"1000","status":null,"vehicleId":null,"driverId":"3d916d24-5756-4d01-b547-b4f2feac4366","vehicle":null,"dsoId":"e427ddf2-7c49-47f1-ba0f-4418bb10f0b7","dso":null,"possibleServiceDate":1702425600000,"pitDetail":{"type":null,"id":"ca0cb638-eaec-4b7a-8f5d-5924c4a4bc4a","tenantId":"pg.citya","height":0,"length":0,"width":0,"diameter":0,"distanceFromRoad":0,"auditDetails":{"createdBy":"7e1c6207-49e9-41b4-a965-dea0cdeb677c","lastModifiedBy":"12c0c924-ec4f-41e8-aa41-92c00226ce85","createdTime":1702475842827,"lastModifiedTime":1702475982894},"additionalDetails":null},"address":{"tenantId":"pg.citya","doorNo":null,"plotNo":null,"id":"f5c6c3d9-8634-46e2-b662-22efc130ea03","landmark":null,"city":"CityA","district":null,"region":null,"state":null,"country":null,"pincode":"143001","additionalDetails":null,"auditDetails":{"createdBy":"7e1c6207-49e9-41b4-a965-dea0cdeb677c","lastModifiedBy":"12c0c924-ec4f-41e8-aa41-92c00226ce85","createdTime":1702475842827,"lastModifiedTime":1702475982894},"buildingName":null,"street":null,"slumName":null,"locality":{"code":"SUN03","name":"Bharath Colony","label":"Locality","latitude":null,"longitude":null,"children":[],"materializedPath":null},"geoLocation":{"id":"66d6755a-7ca3-41ab-8a76-89ebbb1166b4","latitude":20.2099797,"longitude":85.6973022,"additionalDetails":null}},"auditDetails":{"createdBy":"7e1c6207-49e9-41b4-a965-dea0cdeb677c","lastModifiedBy":"12c0c924-ec4f-41e8-aa41-92c00226ce85","createdTime":1702475842827,"lastModifiedTime":1702475982894},"wasteCollected":null,"completedOn":0,"advanceAmount":0,"applicationType":"Adhoc Service","oldApplicationNo":null,"paymentPreference":null,"processInstance":null},"workflow":{"action":"REASSING","comments":"VEHICLE_REPAIR"},"RequestInfo":{"apiId":"Rainmaker","authToken":"f8eee39f-1194-4d39-85de-12dc9c572a7c","userInfo":{"id":926,"uuid":"12c0c924-ec4f-41e8-aa41-92c00226ce85","userName":"EDITOR","name":"Plant operator","mobileNumber":"8282828121","emailId":null,"locale":null,"type":"EMPLOYEE","roles":[{"name":"FSM Employee Application Editor","code":"FSM_EDITOR_EMP","tenantId":"pg.citya"},{"name":"FSM Employee Application Viewer","code":"FSM_VIEW_EMP","tenantId":"pg.citya"}],"active":true,"tenantId":"pg.citya","permanentCity":null},"msgId":"1702476876985|en_IN","plainAccessRequest":{}}}' \
--compressedcurl 'https://unified-dev.digit.org/vendor/v1/_search?tenantId=pg.citya&ids=e427ddf2-7c49-47f1-ba0f-4418bb10f0b7' \
-H 'authority: unified-dev.digit.org' \
-H 'accept: application/json, text/plain, */*' \
-H 'accept-language: en-US,en;q=0.9' \
-H 'content-type: application/json;charset=UTF-8' \
-H 'origin: https://unified-dev.digit.org' \
-H 'referer: https://unified-dev.digit.org/sanitation-ui/employee/fsm/application-details/1013-FSM-2023-12-13-000381' \
-H 'sec-ch-ua: "Not_A Brand";v="8", "Chromium";v="120", "Google Chrome";v="120"' \
-H 'sec-ch-ua-mobile: ?0' \
-H 'sec-ch-ua-platform: "Windows"' \
-H 'sec-fetch-dest: empty' \
-H 'sec-fetch-mode: cors' \
-H 'sec-fetch-site: same-origin' \
-H 'user-agent: Mozilla/5.0 (Windows NT 10.0; Win64; x64) AppleWebKit/537.36 (KHTML, like Gecko) Chrome/120.0.0.0 Safari/537.36' \
--data-raw '{"RequestInfo":{"apiId":"Rainmaker","authToken":"f8eee39f-1194-4d39-85de-12dc9c572a7c","userInfo":{"id":926,"uuid":"12c0c924-ec4f-41e8-aa41-92c00226ce85","userName":"EDITOR","name":"Plant operator","mobileNumber":"8282828121","emailId":null,"locale":null,"type":"EMPLOYEE","roles":[{"name":"FSM Employee Application Editor","code":"FSM_EDITOR_EMP","tenantId":"pg.citya"},{"name":"FSM Employee Application Viewer","code":"FSM_VIEW_EMP","tenantId":"pg.citya"}],"active":true,"tenantId":"pg.citya","permanentCity":null},"msgId":"1702476878085|en_IN","plainAccessRequest":{}}}' \
--compressedFSM_EDITOR_EMPGoal
How will it be measured via the product?
How will we know TQM is successful?
To ensure treated waste is as per quality standards.
The percentage of plants with output quality as per benchmarks.
Increase in the percentage of plants with output quality as per benchmarks over time
To ensure treated waste is tested regularly for quick identification of issues.
The percentage compliance against the testing schedule.
Increase in the percentage compliance against the testing schedule over time.
Category
Services
GIT TAGS
Docker artifact ID
Remarks
FSM
FSM
fsm:v1.4.0-4ca02ac299-75
FSM calculator
fsm-calculator:v1.2.0-01dd6c9b3a-14
Vehicle
vehicle:v1.3.0-5682061fd3-18
Vendor
vendor-db:v1.3.0-ece6fa00d1-35
PQM
pqm-service:v1.0.0-7c253cb947-169
PQM Anomaly
pqm-anomaly-finder-db:v1.0.0-4eb854b58b-52
PQM Scheduler
pqm-scheduler:vNA-7201d5466b-13
Digit-UI FSM
DIGIT UI
sanitation-ui:v1.5.0-99fe703c60-449
DIGIT dependency builds
The FSM release is bundled with the DIGIT 2.8 release. Hence, the release builds for DIGIT 2.8 release can be accessed .
Configs
MDMS
Localisation
Devops
Fetching data from the MDMS
The config can be found at CompleteApplication.js
File Path: frontend/micro-ui/web/micro-ui-internals/packages/modules/fsm/src/pages/employee/ApplicationDetails/config/CompleteApplication.js
{
label: "ES_NEW_APPLICATION_PROPERTY_TYPE",
isMandatory: true,
type: "component",
route: "property-type",
key: "propertyType",
component: "SelectPropertyType",
texts: {
headerCaption: "",
header: "CS_FILE_APPLICATION_PROPERTY_LABEL",
cardText: "CS_FILE_APPLICATION_PROPERTY_TEXT",
submitBarLabel: "CS_COMMON_NEXT",
},
nextStep: "property-subtype",
},
{
label: "ES_NEW_APPLICATION_PROPERTY_SUB-TYPE",
isMandatory: true,
type: "component",
route: "property-subtype",
key: "subtype",
component: "SelectPropertySubtype",
texts: {
headerCaption: "",
header: "CS_FILE_APPLICATION_PROPERTY_SUBTYPE_LABEL",
cardText: "CS_FILE_APPLICATION_PROPERTY_SUBTYPE_TEXT",
submitBarLabel: "CS_COMMON_NEXT",
},
nextStep: "map",
},
{
label: "ES_NEW_APPLICATION_PIT_TYPE",
isMandatory: false,
type: "component",
route: "pit-type",
key: "pitType",
component: "SelectPitType",
texts: {
header: "CS_FILE_PROPERTY_PIT_TYPE",
cardText: "CS_FILE_PROPERTY_PIT_TYPE_TEXT",
submitBarLabel: "CS_COMMON_NEXT",
skipText: "CORE_COMMON_SKIP_CONTINUE",
},
nextStep: "tank-size",
},
{
route: "tank-size",
component: "SelectTankSize",
isMandatory: false,
texts: {
headerCaption: "",
header: "CS_FILE_APPLICATION_PIT_SEPTIC_TANK_SIZE_TITLE",
cardText: "CS_FILE_APPLICATION_PIT_SEPTIC_TANK_SIZE_TEXT",
submitBarLabel: "CS_COMMON_NEXT",
},
type: "component",
key: "pitDetail",
nextStep: null,
label: "ES_NEW_APPLICATION_PIT_DIMENSION",
},UploadPitPhoto.js molecule is available within the molecules folder in react-components.
File Path: frontend/micro-ui/web/micro-ui-internals/packages/react-components/src/molecules/UploadPitPhoto.js
Saving Image fileId in FSM service
const uploadImage = useCallback(async () => {
if (uploadedImagesIds === null || uploadedImagesIds.length < 3) {
const response = await Digit.UploadServices.Filestorage("FSM", image, props.tenantId);
setUploadedImagesIds(addUploadedImageIds(response));
} else {
console.log("disabled")
}
}, [addUploadedImageIds, image]);The link for the MDMS changes made is given below.
egov-mdms-data/RoleStatusMapping.json at DEV · egovernments/egov-mdms-data
RoleStatusMappping.json
{
"userRole": "FSM_DSO",
"statuses": [
"DSO_INPROGRESS",
"PENDING_DSO_APPROVAL",
"COMPLETED",
],
"zeroCheck": true,
"fixed": false
},Schedule Action is added for post-pay applications where DSOs can schedule the trip by entering the number of trips.
Code snippet for schedule window:
case "SCHEDULE":
case "ES_FSM_SCHEDULE":
setFormValve(true);
return setConfig(
configScheduleDso({
t,
rejectMenu: Reason?.DeclineReason,
setReason: setDeclineReason,
reason: declineReason,
applicationCreatedTime: applicationData?.auditDetails?.createdTime,
vehicle,
vehicleCapacity: applicationData?.vehicleCapacity,
action,
noOfTrips: applicationData?.noOfTrips
})
);ScheduleDso.js is the file responsible for the schedule window pop up.
File path: frontend/micro-ui/web/micro-ui-internals/packages/modules/fsm/src/pages/employee/ApplicationDetails/config/ScheduleDso.js


Introduced three new services: PQM Service, PQM Anomaly Service, and PQM Scheduler Service.
Create, update, and search for process quality monitoring tests.
Record test results gradually for a test and submit from evaluation when all the test results available
Evaluation of test values against benchmarks configured in MDMS, for producing a test result (FAIL/PASS) status.
Test results undergo anomaly analysis for comprehensive insights.
Plant performance related charts.
Actively monitors anomalies in process quality.
Added notification for relevant user groups promptly for proactive anomaly management.
Automation of test scheduling based on environment configuration and MDMS test standard configurations.
Triggers schedule APIs from PQM-Scheduler to generate tests at defined frequency.
Efficiently runs tests at specified intervals, ensuring a configurable approach.
A new worker registry concept has been introduced. Creating a worker, updating details, searching and tagging a worker for different operations on sanitation programmes. Sanitation workers' creation, updation, and search operations are performed using the individual registry.
Added functionality for creating, updating, and searching for sanitation workers.
Deprecated the drivers tab and added the driver concept from the FSM registry.
Introduced the sanitation workers tab to the FSM registry.
Added functionality for assigning. a sanitation worker to a vendor.
Migration of existing drivers to sanitation workers.
Deprecation of delinking of a driver with vendors introduced in v1.3.
Tag sanitation workers (drivers and helpers) to an FSM application for capturing the workers' activities.
The inbox for FSM has been upgraded from V1 to V2.
No core services have been modified. Workflow details, flow diagram, and API details are given in confluence.
From the FSM card in the home screen, there is a link to the "FSM Registry". FSM admins have access to manage the FSM Registry.
The FSM Registry is multi-tabbed search screen.
Using the FSM Registry, FSM admins can manage vehicles, vendors, and sanitation workers in the system.
There are three tabs available, that is, Vendor, Vehicle, Sanitation Worker.
Vendor and vehicle were already there in FSM 1.3. The Sanitation Worker tab have now been added.
This tab shows a list of sanitation workers in the system.
Admins can search for sanitation workers with the sanitation worker ID, name, and mobile number.
Clicking on a particular ID takes the user to the .
Admins can disable/enable sanitation workers.
There is a vendor dropdown available to each sanitation worker which shows a list of vendors that they can be tagged to. An admin can tag a sanitation worker to a vendor using that dropdown.
Vendors are listed based on agency type. Currently, there are two types of agency: ULB and private vendor.
If a sanitation worker is employed by the ULB, then the dropdown will show vendors whose agency type is ULB, and likewise for private vendors.
The employer selection of a sanitation worker can be done while .
We are using the individual registry to create, update, and disable sanitation workers.
If an admin disables a sanitation worker already tagged to a vendor, then that vendor tagging is also disabled. This implies that the if an admin enables that user, we need to tag the vendor again.
There is an 'Add' option at the top right of this screen using which admins can create vehicle, vendor, and sanitation worker.
Note: There is a SANITATION_WORKER role in the system. All sanitation workers created through the system will have this role.
We will hit hit the individual search API to get a list of sanitation workers using the SANITATION_WORKER system role.
The curl is given below:
We will hit the "vendor/v1/_search" endpoint to get a list of vendors.
The curl is given below:
We will hit the "/vendor/v1/_update" to update tagging of sanitation workers to vendors.
The curl is given below:
We will utilise the individual update API for disabling/enabling sanitation workers.
The curl is given below:
Role-action mapping is done for the above mentioned API endpoints for FSM admin users with the following role code:
From the screen, an admin can create the sanitation worker page using the add option.
Admins can fill the "Add Sanitation Worker" form to create sanitation workers in the system.
Admins can fill details such as Mobile Number, Name, Date of Birth, Photograph, Address, Skills, etc.
The mobile number has to be unique, otherwise a validation error will be shown and the user will not be able to submit the form.
There is a role details section at the bottom which is non-mandatory.
Using this role details section, an admin can specify the functional roles that this worker has, such as driver, helper, etc.
By default, all workers will have a generic SANITATION_WORKER role.
The functional roles have been mapped to the system roles using .
Currently, driver and helper functional roles are present in the system. Both are created as citizens.
Sanitation workers can have multiple functional roles, that is, they can be a driver as well as a helper.
Employer has two options: ULB and private vendor. This specifies the current employer of this worker. This can be changed in .
Sanitation workers can also be tagged to vendors on this page based on whether the employer type is a ULB or a private vendor. This implies that the vendor select dropdown is populated based on the employer type.
Vendors can be a ULB or a private vendor. This is specified in .
After submitting the necessary details, an admin can click on submit and a response page is shown.
We will hit the "/individual/v1/_create" endpoint to create sanitation workers
The curl is given below:
If a vendor is selected while creating a sanitation worker, we are calling this endpoint "/vendor/v1/_update" to tag this worker to a vendor after the individual create has responded with success.
The curl is given below:
Role-action mapping is done for the above two API endpoints for the following role:
To enable FSM module in any new environment, we would need to perform certain steps. Considering an AWS account is already setup, following are the steps to be followed:
Update the with the following requirements:
Indexer config: We will need following indexer files for setting up any module
Persister config Persister files required:
Searcher config
Pdf config Data config: Format config:
Reports Also mention the path of the above report file .
Dashboard configs => =>
Add all configs required
Add all Actions/endpoints required for fsm as mentioned in this . Add all actions with respect to core and business-services as well, like those of - egov-user, egov-mdms-service, apportion-service, collection-service, billing-service, egov-location, egov-common-masters, egov-idgen, egf-master, egov-user-event, otp services, access, egov-workflow-v2, data-uploader, egov-hrms, filestore-service, pdf-service, egov-pdf, report, localization-service, egov-persister, egov-indexer, egov-searcher, eg-pg-service, dasboard-analytics, dashboard-ingest, digit-ui, fsm, fsm-calculator, vendor, vehicle.
Add Role-Action mapping in file
Add required Roles for the respective FSM module in
Add , , , , , , , , , , , folders with their respective files.
Also add ULB/city specific data in their respective folders, for instance, create a folder and add the respective data files like Slum.json, UrcConfig.json, ZeroPricing.json required.
Note: The data sepecific to any ULB needs to be collected from the ULB officials and need to be present in mdms level. Refer the ULB specific data documentation and updation/upsertion
Add all the helm charts with respect to the business-services, core-services and municipal-services. Refer .
Add DevOps level changes in the evironment file. Refer . Add all the paths for files in the configs in the environment file. For instance, add the the path of indexer, persister and searcher files, etc. Make sure to add required properties at each service level as defined in the above mentioned environment file.
Deploy all required core-services builds to support this municipal-services(FSM and its dependent services). The core-services include: egov-accesscontrol, egov-common-masters, egov-data-uploader, egov-document-uploader, egov-enc-service, egov-filestore, egov-idgen,egov-indexer, egov-localization, egov-location, egov-mdms-service, egov-notification-mail, egov-notification-sms, egov-otp, egov-persister, egov-pg-service, egov-searcher, egov-url-shortening, egov-user, egov-workflow-v2, pdf-service, report, user-otp, zuul
Deploy all required business-services builds to support this municipal-service(FSM and its dependent services). The business-services include: billing-service, collection-services, dashboard-analytics, dashboard-ingest, egf-instrument, egf-master, egov-apportion-service, egov-hrms.
Deploy this municipal-service “fsm” as well as dependent municipal-services: fsm-calculator, vendor, vehicle, inbox, egov-user-event.
Upsert the required localizations. Refer for detailed steps.
Upsert the workflows as mentioned in the .
Upsert the SMS templates as localizations in your environment as well as update them in the SMS portal being used by the state. For detailed infomation,
Service
API's
Description
New/Update
PQM Service
/pqm-service/v1/_create
Adhoc create test
New
/pqm-service/v1/_update
Update test with results, save test with partial results as drafts
New
/pqm-service/v1/_search
Search for PQM tests
New
/pqm-service/v1/_scheduler
Schedule test based on the test standards in MDMS
New
/pqm-service/v1/_plainsearch
API for redexing the data
New
pqm-service/plant/user/v1/_create
Add plant and user mapping
New
pqm-service/plant/user/v1/_update
Update plant and user mapping
New
pqm-service/plant/user/v1/_search
Search for plant user mapping
New
PQM Anomaly FInder Service
/pqm-anomaly-finder/v1/_search
Search for anomalies
New
/pqm-anomaly-finder/v1/_plainsearch
Reindex the anomaly data
New
FSM
/fsm/v1/_update
Added list of workers object for tagging workers to the FSM application
Updated
Vendor
/vendor/v1/_update
Added list of workers object to assign sanitation worker to vendor
Updated


Ways to load Vendor details :
From Api
By FSM Registry
Loading from API :
Steps:
Import this collection - https://www.getpostman.com/collections/59691b6d0a7346a7f29b
Change the request url specific to environment.
For Create DSO(URL) : https://sujog-dev.odisha.gov.in/vendor/v1/_create
For Search DSO(URL) : https://sujog-dev.odisha.gov.in/vendor/v1/_search?tenantId=od.anandapur
For Update DSO(URL) : https://sujog-dev.odisha.gov.in/vendor/v1/_update?tenantId=od.anandapur
Login from FSM_ADMINDEV credentials(for sujog-dev) which is having FSM Admin role for all the ulb’s.
Copy the auth token. Paste the auth token in the req. Body “authToken” field.
Request Info (eg. anandapur ulb) for Create DSO :-
{
"RequestInfo": {
"apiId": "Rainmaker",
"authToken": "453cf29c-58de-4e47-9821-91f39e2dde3e",
"userInfo": {
"id": 3186071,
"uuid": "2f3851cd-864e-42d7-869c-d5a05abb8f39",
"userName": "FSM_ADMINDEV",
"name": "Taresh",
"mobileNumber": "7721827042",
"emailId": null,
"locale": null,
"type": "EMPLOYEE",
"roles": [
{
"name": "FSM Administrator",
"code": "FSM_ADMIN",
"tenantId": "od.anandapur"
}
],
"active": true,
"tenantId": "od.anandapur",
"permanentCity": null
},
"msgId": "1660805524793|en_IN"
},
"vendor": {
"tenantId": "od.anandapur",
"name": "NIPS",
"agencyType": "ULB",
"paymentPreference": "post-service",
"address": {
"tenantId": "od.anandapur",
"doorNo": "my door",
"plotNo": "my plot",
"landmark": "my landmark",
"city": "anandapur",
"district": "anandapur",
"region": "anandapur",
"state": "odisha",
"country": "in",
"pincode": "143001",
"additionDetails": null,
"buildingName": "my building",
"street": "my streat",
"locality": {
"id": 2,
"name": "Padampur",
"localname": "Padampur",
"longitude": null,
"latitude": null,
"label": "Locality",
"code": "VIL1",
"children": []
},
"geoLocation": {
"latitude": 0,
"longitude": 0,
"additionalDetails": {}
}
},
"owner": {
"tenantId": "od.anandapur",
"name": "NIPS",
"fatherOrHusbandName": "NA",
"relationship": "FATHER",
"gender": "MALE",
"dob": 550261800000,
"emailId": "[email protected]",
"correspondenceAddress": "KPHB",
"mobileNumber": 8908257220
},
"vehicles": [
{
"tenantId": "od.anandapur",
"registrationNumber": "OD09J7873",
"model": "MAHINDRA",
"type": "MAHINDRA.TRUCK1",
"tankCapacity": "1000",
"suctionType": "SEWER_SUCTION_MACHINE",
"pollutionCertiValidTill": 1611584416772,
"InsuranceCertValidTill": 1611584416772,
"fitnessValidTill": 1611584416772,
"roadTaxPaidTill": 1611584416772,
"gpsEnabled": true,
"source": "Municipal records",
"status": "ACTIVE",
"vendorVehicleStatus": "ACTIVE",
"owner": {
"tenantId": "od.anandapur",
"name": "NIPS",
"fatherOrHusbandName": "NA",
"relationship": "FATHER",
"gender": "MALE",
"dob": 550261800000,
"emailId": "[email protected]",
"correspondenceAddress": "KPHB",
"mobileNumber": 8908257220
}
}
],
"drivers": [
{
"tenantId": "od.anandapur",
"name": "DIPU MUKHI",
"licenseNumber": "OR0920040025878",
"status": "ACTIVE",
"owner": {
"tenantId": "od",
"name": "DIPU MUKHI",
"fatherOrHusbandName": "NA",
"relationship": "OTHER",
"gender": "MALE",
"dob": -19800000,
"emailId": "[email protected]",
"mobileNumber": "6371957727"
},
"vendorDriverStatus": "ACTIVE"
}
],
"source": "WhatsApp"
}
}Note:
Before pushing the vendor,first add Vehicle in MDMS. Take Vehicle Make, Model and Capacity from VehicleMakeModel in MDMS.
No special characters allowed in Vendor name.
Vehicle Registration number should be unique for every vehicle.
Scenerios for Vendor and Vehicle users: - One Vendor can be linked with two or more vehicles. - One Vehicle is linked with One Vendor. - Two Vendors can’t have same mobile number because vendor is a user and user is stored uniquely in database. - Vendor owner, Vehicle owner and Driver owner can be same or different for One Vehicle.
Hit the url it’ll push the data of vendor.
From FSM Registry :
Add details of Cesspool Operator,Vehicle and Driver from FSM Registry and link Vehicle with Cesspool operator and Driver with Cesspool Operator.


curl 'https://unified-dev.digit.org/individual/v1/_search?tenantId=pg.citya&limit=10&offset=0&sortBy=createdTime&sortOrder=DESC&_=1702466726727' \
-H 'authority: unified-dev.digit.org' \
-H 'accept: application/json, text/plain, */*' \
-H 'accept-language: en-US,en;q=0.9' \
-H 'content-type: application/json;charset=UTF-8' \
-H 'origin: https://unified-dev.digit.org' \
-H 'referer: https://unified-dev.digit.org/sanitation-ui/employee/fsm/registry?selectedTabs=WORKER' \
-H 'sec-ch-ua: "Not_A Brand";v="8", "Chromium";v="120", "Google Chrome";v="120"' \
-H 'sec-ch-ua-mobile: ?0' \
-H 'sec-ch-ua-platform: "Windows"' \
-H 'sec-fetch-dest: empty' \
-H 'sec-fetch-mode: cors' \
-H 'sec-fetch-site: same-origin' \
-H 'user-agent: Mozilla/5.0 (Windows NT 10.0; Win64; x64) AppleWebKit/537.36 (KHTML, like Gecko) Chrome/120.0.0.0 Safari/537.36' \
--data-raw '{"Individual":{"roleCodes":["SANITATION_WORKER"],"tenantId":"pg.citya"},"RequestInfo":{"apiId":"Rainmaker","authToken":"06170439-7751-41d9-8043-04ede25e9499","userInfo":{"id":927,"uuid":"49341961-f413-4ae1-b7f8-92a8d9136f38","userName":"ADMIN","name":"Plant operator","mobileNumber":"8282828121","emailId":null,"locale":null,"type":"EMPLOYEE","roles":[{"name":"FSM Administrator","code":"FSM_ADMIN","tenantId":"pg.citya"},{"name":"FSM Employee Application Viewer","code":"FSM_VIEW_EMP","tenantId":"pg.citya"}],"active":true,"tenantId":"pg.citya","permanentCity":null},"msgId":"1702466726727|en_IN","plainAccessRequest":{}}}' \
--compressedcurl 'https://unified-dev.digit.org/vendor/v1/_search?tenantId=pg.citya&vehicleIds=&driverIds=&status=ACTIVE' \
-H 'authority: unified-dev.digit.org' \
-H 'accept: application/json, text/plain, */*' \
-H 'accept-language: en-US,en;q=0.9' \
-H 'content-type: application/json;charset=UTF-8' \
-H 'origin: https://unified-dev.digit.org' \
-H 'referer: https://unified-dev.digit.org/sanitation-ui/employee/fsm/registry?selectedTabs=WORKER' \
-H 'sec-ch-ua: "Not_A Brand";v="8", "Chromium";v="120", "Google Chrome";v="120"' \
-H 'sec-ch-ua-mobile: ?0' \
-H 'sec-ch-ua-platform: "Windows"' \
-H 'sec-fetch-dest: empty' \
-H 'sec-fetch-mode: cors' \
-H 'sec-fetch-site: same-origin' \
-H 'user-agent: Mozilla/5.0 (Windows NT 10.0; Win64; x64) AppleWebKit/537.36 (KHTML, like Gecko) Chrome/120.0.0.0 Safari/537.36' \
--data-raw '{"RequestInfo":{"apiId":"Rainmaker","authToken":"06170439-7751-41d9-8043-04ede25e9499","userInfo":{"id":927,"uuid":"49341961-f413-4ae1-b7f8-92a8d9136f38","userName":"ADMIN","name":"Plant operator","mobileNumber":"8282828121","emailId":null,"locale":null,"type":"EMPLOYEE","roles":[{"name":"FSM Administrator","code":"FSM_ADMIN","tenantId":"pg.citya"},{"name":"FSM Employee Application Viewer","code":"FSM_VIEW_EMP","tenantId":"pg.citya"}],"active":true,"tenantId":"pg.citya","permanentCity":null},"msgId":"1702466726728|en_IN","plainAccessRequest":{}}}' \
--compressedcurl 'https://unified-dev.digit.org/vendor/v1/_update?tenantId=pg.citya' \
-H 'authority: unified-dev.digit.org' \
-H 'accept: application/json, text/plain, */*' \
-H 'accept-language: en-US,en;q=0.9' \
-H 'content-type: application/json;charset=UTF-8' \
-H 'origin: https://unified-dev.digit.org' \
-H 'referer: https://unified-dev.digit.org/sanitation-ui/employee/fsm/registry?selectedTabs=WORKER' \
-H 'sec-ch-ua: "Not_A Brand";v="8", "Chromium";v="120", "Google Chrome";v="120"' \
-H 'sec-ch-ua-mobile: ?0' \
-H 'sec-ch-ua-platform: "Windows"' \
-H 'sec-fetch-dest: empty' \
-H 'sec-fetch-mode: cors' \
-H 'sec-fetch-site: same-origin' \
-H 'user-agent: Mozilla/5.0 (Windows NT 10.0; Win64; x64) AppleWebKit/537.36 (KHTML, like Gecko) Chrome/120.0.0.0 Safari/537.36' \
--data-raw '{"vendor":{"id":"da5dae4c-95d7-43b6-a92f-e504d6000ef8","tenantId":"pg.citya","name":"djhdjkdhsjkh","address":{"tenantId":"pg.citya","doorNo":"","plotNo":"","id":"7132305a-ecd1-4f5e-af02-9894103a3742","landmark":"","city":"CityA","district":"CityA","region":"CityA","state":null,"country":"in","pincode":"","additionalDetails":"{\"description\": \"\"}","buildingName":"","street":"","locality":{"code":"SUN01","name":"Ajit Nagar - Area1","label":"Locality","latitude":"31.63089","longitude":"74.871552","children":[],"materializedPath":null},"geoLocation":null,"auditDetails":null},"owner":{"id":933,"uuid":"5b610239-fa1c-4538-b771-90cf255304b3","userName":"7787678673","password":null,"salutation":null,"name":"djhdjkdhsjkh","gender":"MALE","mobileNumber":"7787678673","emailId":"[email protected]","altContactNumber":null,"pan":null,"aadhaarNumber":null,"permanentAddress":null,"permanentCity":null,"permanentPinCode":null,"correspondenceCity":null,"correspondencePinCode":null,"correspondenceAddress":null,"active":true,"dob":0,"pwdExpiryDate":1710525714000,"locale":null,"type":"CITIZEN","signature":null,"accountLocked":false,"roles":[{"id":null,"name":"FSM Desluding Operator","code":"FSM_DSO","tenantId":"pg"},{"id":null,"name":"Citizen","code":"CITIZEN","tenantId":"pg"}],"fatherOrHusbandName":"djhdjkdhsjkh","relationship":"OTHER","bloodGroup":null,"identificationMark":null,"photo":null,"createdBy":"927","createdDate":1702393314000,"lastModifiedBy":"927","lastModifiedDate":1702481871000,"otpReference":null,"tenantId":"pg"},"vehicles":null,"drivers":null,"workers":[{"id":"59090353-59f6-4242-86ea-bbd92ecbe674","tenantId":"pg.citya","vendorId":"da5dae4c-95d7-43b6-a92f-e504d6000ef8","individualId":"1e5ad42e-2734-48fc-b934-fc32ef5058a6","additionalDetails":null,"auditDetails":{"createdBy":"49341961-f413-4ae1-b7f8-92a8d9136f38","lastModifiedBy":"49341961-f413-4ae1-b7f8-92a8d9136f38","createdTime":1702373514847,"lastModifiedTime":1702462026145},"vendorWorkerStatus":"ACTIVE"},{"id":"1e19a4f0-3ead-4985-bb59-aa4b57df6af2","tenantId":"pg.citya","vendorId":"da5dae4c-95d7-43b6-a92f-e504d6000ef8","individualId":"c050f0e5-d0a0-4f2a-83c0-63876827d6e1","additionalDetails":null,"auditDetails":{"createdBy":"49341961-f413-4ae1-b7f8-92a8d9136f38","lastModifiedBy":"49341961-f413-4ae1-b7f8-92a8d9136f38","createdTime":1702373514847,"lastModifiedTime":1702462071879},"vendorWorkerStatus":"ACTIVE"},{"id":"acf5a060-08db-4173-9232-c923653a57e4","tenantId":"pg.citya","vendorId":"da5dae4c-95d7-43b6-a92f-e504d6000ef8","individualId":"02bc1a5b-fed9-4176-bada-974aeeb8e613","additionalDetails":null,"auditDetails":{"createdBy":"49341961-f413-4ae1-b7f8-92a8d9136f38","lastModifiedBy":"49341961-f413-4ae1-b7f8-92a8d9136f38","createdTime":1702373514847,"lastModifiedTime":1702457057286},"vendorWorkerStatus":"INACTIVE"},{"id":"0a79d0d1-ac14-4ed4-a6cc-7971a29043e2","tenantId":"pg.citya","vendorId":"da5dae4c-95d7-43b6-a92f-e504d6000ef8","individualId":"f6f99ec9-9fcd-489c-8f66-58a4a63432b3","additionalDetails":null,"auditDetails":{"createdBy":"49341961-f413-4ae1-b7f8-92a8d9136f38","lastModifiedBy":"49341961-f413-4ae1-b7f8-92a8d9136f38","createdTime":1702373514847,"lastModifiedTime":1702459924693},"vendorWorkerStatus":"ACTIVE"},{"id":"39cc81f9-58e7-4912-9743-81f51ba03cd5","tenantId":"pg.citya","vendorId":"da5dae4c-95d7-43b6-a92f-e504d6000ef8","individualId":"8215eb13-f247-4782-9acd-665214d24a98","additionalDetails":null,"auditDetails":{"createdBy":"49341961-f413-4ae1-b7f8-92a8d9136f38","lastModifiedBy":"49341961-f413-4ae1-b7f8-92a8d9136f38","createdTime":1702373514847,"lastModifiedTime":1702461623872},"vendorWorkerStatus":"ACTIVE"}],"additionalDetails":{"description":""},"source":"WhatsApp","description":null,"ownerId":"5b610239-fa1c-4538-b771-90cf255304b3","agencyType":"ULB","paymentPreference":"post-service","status":"ACTIVE","auditDetails":{"createdBy":"49341961-f413-4ae1-b7f8-92a8d9136f38","lastModifiedBy":"49341961-f413-4ae1-b7f8-92a8d9136f38","createdTime":1702373514847,"lastModifiedTime":1702462071879}},"RequestInfo":{"apiId":"Rainmaker","authToken":"06170439-7751-41d9-8043-04ede25e9499","userInfo":{"id":927,"uuid":"49341961-f413-4ae1-b7f8-92a8d9136f38","userName":"ADMIN","name":"Plant operator","mobileNumber":"8282828121","emailId":null,"locale":null,"type":"EMPLOYEE","roles":[{"name":"FSM Administrator","code":"FSM_ADMIN","tenantId":"pg.citya"},{"name":"FSM Employee Application Viewer","code":"FSM_VIEW_EMP","tenantId":"pg.citya"}],"active":true,"tenantId":"pg.citya","permanentCity":null},"msgId":"1702466976575|en_IN","plainAccessRequest":{}}}' \
--compressedcurl 'https://unified-dev.digit.org/individual/v1/_update' \
-H 'authority: unified-dev.digit.org' \
-H 'accept: application/json, text/plain, */*' \
-H 'accept-language: en-US,en;q=0.9' \
-H 'content-type: application/json;charset=UTF-8' \
-H 'origin: https://unified-dev.digit.org' \
-H 'referer: https://unified-dev.digit.org/sanitation-ui/employee/fsm/registry?selectedTabs=WORKER' \
-H 'sec-ch-ua: "Not_A Brand";v="8", "Chromium";v="120", "Google Chrome";v="120"' \
-H 'sec-ch-ua-mobile: ?0' \
-H 'sec-ch-ua-platform: "Windows"' \
-H 'sec-fetch-dest: empty' \
-H 'sec-fetch-mode: cors' \
-H 'sec-fetch-site: same-origin' \
-H 'user-agent: Mozilla/5.0 (Windows NT 10.0; Win64; x64) AppleWebKit/537.36 (KHTML, like Gecko) Chrome/120.0.0.0 Safari/537.36' \
--data-raw '{"tenantId":"pg.citya","Individual":{"id":"02bc1a5b-fed9-4176-bada-974aeeb8e613","individualId":"IND-2023-12-11-011010","tenantId":"pg.citya","clientReferenceId":null,"userId":null,"userUuid":null,"name":{"givenName":"sdjhsdhsdkjhs","familyName":null,"otherNames":null},"dateOfBirth":"01/01/1970","gender":"MALE","bloodGroup":null,"mobileNumber":"7897897899","altContactNumber":null,"email":null,"address":[{"id":"d2a6e81d-c3ce-4608-af11-5b0d0ca0aa0d","clientReferenceId":null,"individualId":"02bc1a5b-fed9-4176-bada-974aeeb8e613","tenantId":"pg.citya","doorNo":null,"latitude":0,"longitude":0,"locationAccuracy":0,"type":"PERMANENT","addressLine1":null,"addressLine2":null,"landmark":null,"city":"pg.citya","pincode":null,"buildingName":null,"street":null,"locality":{"code":"SUN01","name":null,"label":null,"latitude":null,"longitude":null,"children":null,"materializedPath":null},"ward":null,"isDeleted":false,"auditDetails":{"createdBy":"4a747fc5-6a8c-4645-8748-fec35f1b9e17","lastModifiedBy":"49341961-f413-4ae1-b7f8-92a8d9136f38","createdTime":1702288646617,"lastModifiedTime":1702459735736}}],"fatherName":null,"husbandName":null,"relationship":null,"identifiers":[{"id":"c29c1d4d-a652-41ed-919e-690ebc26641a","clientReferenceId":null,"individualId":"02bc1a5b-fed9-4176-bada-974aeeb8e613","identifierType":"SYSTEM_GENERATED","identifierId":"********************************e613","isDeleted":false,"auditDetails":{"createdBy":"4a747fc5-6a8c-4645-8748-fec35f1b9e17","lastModifiedBy":"4a747fc5-6a8c-4645-8748-fec35f1b9e17","createdTime":1702288646617,"lastModifiedTime":1702288646617}}],"skills":[{"id":"19a53767-cf30-40ef-b319-448a71543d6b","clientReferenceId":null,"individualId":"02bc1a5b-fed9-4176-bada-974aeeb8e613","type":"DRIVING","level":"UNSKILLED","experience":null,"isDeleted":false,"auditDetails":{"createdBy":"4a747fc5-6a8c-4645-8748-fec35f1b9e17","lastModifiedBy":"49341961-f413-4ae1-b7f8-92a8d9136f38","createdTime":1702288646617,"lastModifiedTime":1702381056019}},{"id":"d033165f-e71a-492d-9047-a0f7a8100bf9","clientReferenceId":null,"individualId":"02bc1a5b-fed9-4176-bada-974aeeb8e613","type":"Driving","level":"UNSKILLED","experience":null,"isDeleted":false,"auditDetails":{"createdBy":"49341961-f413-4ae1-b7f8-92a8d9136f38","lastModifiedBy":"49341961-f413-4ae1-b7f8-92a8d9136f38","createdTime":1702459735089,"lastModifiedTime":1702459735089}},{"id":"83d3c583-4195-49d9-8447-3fdea59a3f47","clientReferenceId":null,"individualId":"02bc1a5b-fed9-4176-bada-974aeeb8e613","type":"Lab Operator","level":"UNSKILLED","experience":null,"isDeleted":false,"auditDetails":{"createdBy":"49341961-f413-4ae1-b7f8-92a8d9136f38","lastModifiedBy":"49341961-f413-4ae1-b7f8-92a8d9136f38","createdTime":1702459735089,"lastModifiedTime":1702459735089}},{"id":"db0d86de-5f6e-42b0-8978-1953bd4a71a4","clientReferenceId":null,"individualId":"02bc1a5b-fed9-4176-bada-974aeeb8e613","type":"Driving","level":"UNSKILLED","experience":null,"isDeleted":false,"auditDetails":{"createdBy":"49341961-f413-4ae1-b7f8-92a8d9136f38","lastModifiedBy":"49341961-f413-4ae1-b7f8-92a8d9136f38","createdTime":1702459735737,"lastModifiedTime":1702459735737}},{"id":"8c623d37-5a83-431a-8c09-5cd6a3bc54c2","clientReferenceId":null,"individualId":"02bc1a5b-fed9-4176-bada-974aeeb8e613","type":"Lab Operator","level":"UNSKILLED","experience":null,"isDeleted":false,"auditDetails":{"createdBy":"49341961-f413-4ae1-b7f8-92a8d9136f38","lastModifiedBy":"49341961-f413-4ae1-b7f8-92a8d9136f38","createdTime":1702459735737,"lastModifiedTime":1702459735737}}],"photo":null,"additionalFields":{"schema":null,"version":null,"fields":[{"key":"FUNCTIONAL_ROLE_1","value":"SANITATION_HELPER"},{"key":"EMPLOYMENT_TYPE_1","value":"FIXED"},{"key":"FUNCTIONAL_ROLE_COUNT","value":"01"},{"key":"EMPLOYER","value":"ULB"}]},"isDeleted":false,"rowVersion":11,"auditDetails":{"createdBy":"4a747fc5-6a8c-4645-8748-fec35f1b9e17","lastModifiedBy":"49341961-f413-4ae1-b7f8-92a8d9136f38","createdTime":1702288646617,"lastModifiedTime":1702459735737},"clientAuditDetails":{"createdBy":null,"lastModifiedBy":null,"createdTime":0,"lastModifiedTime":0},"isSystemUser":true,"isSystemUserActive":false,"userDetails":{"username":"7897897899","password":null,"tenantId":"pg.citya","roles":[{"name":null,"code":"SANITATION_HELPER","description":null,"tenantId":"pg.citya"},{"name":null,"code":"SANITATION_WORKER","description":null,"tenantId":"pg.citya"},{"name":null,"code":"CITIZEN","description":null,"tenantId":"pg.citya"}],"type":"CITIZEN"}},"RequestInfo":{"apiId":"Rainmaker","authToken":"06170439-7751-41d9-8043-04ede25e9499","userInfo":{"id":927,"uuid":"49341961-f413-4ae1-b7f8-92a8d9136f38","userName":"ADMIN","name":"Plant operator","mobileNumber":"8282828121","emailId":null,"locale":null,"type":"EMPLOYEE","roles":[{"name":"FSM Administrator","code":"FSM_ADMIN","tenantId":"pg.citya"},{"name":"FSM Employee Application Viewer","code":"FSM_VIEW_EMP","tenantId":"pg.citya"}],"active":true,"tenantId":"pg.citya","permanentCity":null},"msgId":"1702467231568|en_IN","plainAccessRequest":{}}}' \
--compressedFSM_ADMINcurl 'https://unified-dev.digit.org/individual/v1/_create?tenantId=pg.citya' \
-H 'authority: unified-dev.digit.org' \
-H 'accept: application/json, text/plain, */*' \
-H 'accept-language: en-US,en;q=0.9' \
-H 'content-type: application/json;charset=UTF-8' \
-H 'origin: https://unified-dev.digit.org' \
-H 'referer: https://unified-dev.digit.org/sanitation-ui/employee/fsm/registry/new-worker' \
-H 'sec-ch-ua: "Not_A Brand";v="8", "Chromium";v="120", "Google Chrome";v="120"' \
-H 'sec-ch-ua-mobile: ?0' \
-H 'sec-ch-ua-platform: "Windows"' \
-H 'sec-fetch-dest: empty' \
-H 'sec-fetch-mode: cors' \
-H 'sec-fetch-site: same-origin' \
-H 'user-agent: Mozilla/5.0 (Windows NT 10.0; Win64; x64) AppleWebKit/537.36 (KHTML, like Gecko) Chrome/120.0.0.0 Safari/537.36' \
--data-raw '{"Individual":{"tenantId":"pg.citya","name":{"givenName":"Yin Yang"},"dateOfBirth":897955200000,"gender":"MALE","mobileNumber":"7733773377","address":[{"tenantId":"pg.citya","city":"pg.citya","locality":{"code":"SUN01"},"type":"PERMANENT"}],"identifiers":[{"identifierType":"DRIVING_LICENSE_NUMBER","identifierId":"RJ 12 40412"}],"skills":[{"type":"DRIVING","level":"UNSKILLED"},{"type":"OPERATOR","level":"UNSKILLED"}],"photo":null,"additionalFields":{"fields":[{"key":"FUNCTIONAL_ROLE_1","value":"DRIVER"},{"key":"EMPLOYMENT_TYPE_1","value":"FIXED"},{"key":"FUNCTIONAL_ROLE_COUNT","value":"01"},{"key":"EMPLOYER","value":"ULB"}]},"isSystemUser":true,"userDetails":{"username":"7733773377","tenantId":"pg.citya","roles":[{"code":"FSM_DRIVER","tenantId":"pg.citya"},{"code":"SANITATION_WORKER","tenantId":"pg.citya"},{"code":"CITIZEN","tenantId":"pg.citya"}],"type":"CITIZEN"}},"RequestInfo":{"apiId":"Rainmaker","authToken":"06170439-7751-41d9-8043-04ede25e9499","userInfo":{"id":927,"uuid":"49341961-f413-4ae1-b7f8-92a8d9136f38","userName":"ADMIN","name":"Plant operator","mobileNumber":"8282828121","emailId":null,"locale":null,"type":"EMPLOYEE","roles":[{"name":"FSM Administrator","code":"FSM_ADMIN","tenantId":"pg.citya"},{"name":"FSM Employee Application Viewer","code":"FSM_VIEW_EMP","tenantId":"pg.citya"}],"active":true,"tenantId":"pg.citya","permanentCity":null},"msgId":"1702468403390|en_IN","plainAccessRequest":{}}}' \
--compressedcurl 'https://unified-dev.digit.org/vendor/v1/_update?tenantId=pg.citya' \
-H 'authority: unified-dev.digit.org' \
-H 'accept: application/json, text/plain, */*' \
-H 'accept-language: en-US,en;q=0.9' \
-H 'content-type: application/json;charset=UTF-8' \
-H 'origin: https://unified-dev.digit.org' \
-H 'referer: https://unified-dev.digit.org/sanitation-ui/employee/fsm/registry/new-worker' \
-H 'sec-ch-ua: "Not_A Brand";v="8", "Chromium";v="120", "Google Chrome";v="120"' \
-H 'sec-ch-ua-mobile: ?0' \
-H 'sec-ch-ua-platform: "Windows"' \
-H 'sec-fetch-dest: empty' \
-H 'sec-fetch-mode: cors' \
-H 'sec-fetch-site: same-origin' \
-H 'user-agent: Mozilla/5.0 (Windows NT 10.0; Win64; x64) AppleWebKit/537.36 (KHTML, like Gecko) Chrome/120.0.0.0 Safari/537.36' \
--data-raw '{"vendor":{"id":"e427ddf2-7c49-47f1-ba0f-4418bb10f0b7","tenantId":"pg.citya","name":"testing","address":{"tenantId":"pg.citya","doorNo":"","plotNo":"","id":"525c701b-9d76-431a-85be-5957885c75c5","landmark":"","city":"CityA","district":"CityA","region":"CityA","state":null,"country":"in","pincode":"","additionalDetails":"{\"description\": \"\"}","buildingName":"","street":"","locality":{"code":"SUN01","name":"Ajit Nagar - Area1","label":"Locality","latitude":"31.63089","longitude":"74.871552","children":[],"materializedPath":null},"geoLocation":null,"auditDetails":null},"owner":{"id":780,"uuid":"602dcd18-a9a0-4eb1-bf3d-d2d25402fc0c","userName":"9876543211","password":null,"salutation":null,"name":"testing","gender":"MALE","mobileNumber":"9876543211","emailId":"[email protected]","altContactNumber":null,"pan":null,"aadhaarNumber":null,"permanentAddress":null,"permanentCity":null,"permanentPinCode":null,"correspondenceCity":null,"correspondencePinCode":null,"correspondenceAddress":null,"active":true,"dob":1361318400000,"pwdExpiryDate":1708017613000,"locale":null,"type":"CITIZEN","signature":null,"accountLocked":false,"roles":[{"id":null,"name":"FSM Desluding Operator","code":"FSM_DSO","tenantId":"pg"},{"id":null,"name":"Citizen","code":"CITIZEN","tenantId":"pg"}],"fatherOrHusbandName":"testing","relationship":"OTHER","bloodGroup":null,"identificationMark":null,"photo":null,"createdBy":"715","createdDate":1698519013000,"lastModifiedBy":"927","lastModifiedDate":1702470891000,"otpReference":null,"tenantId":"pg"},"vehicles":[{"owner":{"id":781,"uuid":"86cf4d58-1c57-4878-8a73-3cbef096bf97","userName":"07e76b6d-32c5-41ea-a661-74cc3251e785","password":null,"salutation":null,"name":"Rajesh","gender":"MALE","mobileNumber":"9876543212","emailId":"[email protected]","altContactNumber":null,"pan":null,"aadhaarNumber":null,"permanentAddress":null,"permanentCity":null,"permanentPinCode":null,"correspondenceCity":null,"correspondencePinCode":null,"correspondenceAddress":"","active":true,"dob":0,"pwdExpiryDate":1708077096000,"locale":null,"type":"CITIZEN","signature":null,"accountLocked":false,"roles":[{"id":null,"name":"FSM Driver","code":"FSM_DRIVER","tenantId":"pg"}],"fatherOrHusbandName":"Rajesh","relationship":"OTHER","bloodGroup":null,"identificationMark":null,"photo":null,"createdBy":"715","createdDate":1698519096000,"lastModifiedBy":"927","lastModifiedDate":1702470891000,"otpReference":null,"tenantId":"pg"},"id":"5214b5fd-f760-4cc7-8982-39da770cafbc","tenantId":"pg.citya","registrationNumber":"AB 12 AS 1234","model":"TATA","type":"TATA.407","tankCapacity":1000,"suctionType":"SEWER_SUCTION_MACHINE","pollutionCertiValidTill":0,"InsuranceCertValidTill":0,"fitnessValidTill":0,"roadTaxPaidTill":0,"gpsEnabled":true,"additionalDetails":{"description":""},"source":"Municipal records","vendorVehicleStatus":"ACTIVE","status":"ACTIVE","auditDetails":{"createdBy":"4a747fc5-6a8c-4645-8748-fec35f1b9e17","lastModifiedBy":"49341961-f413-4ae1-b7f8-92a8d9136f38","createdTime":1698499296513,"lastModifiedTime":1702451091704}},{"owner":{"id":862,"uuid":"19aaa423-8a4c-49a4-89af-f19620302352","userName":"33192d06-27b4-41c2-b077-aa2d97d96e71","password":null,"salutation":null,"name":"raju","gender":"MALE","mobileNumber":"6543210987","emailId":"[email protected]","altContactNumber":null,"pan":null,"aadhaarNumber":null,"permanentAddress":null,"permanentCity":null,"permanentPinCode":null,"correspondenceCity":null,"correspondencePinCode":null,"correspondenceAddress":"","active":true,"dob":0,"pwdExpiryDate":1709309830000,"locale":null,"type":"CITIZEN","signature":null,"accountLocked":false,"roles":[{"id":null,"name":"FSM Driver","code":"FSM_DRIVER","tenantId":"pg"}],"fatherOrHusbandName":"raju","relationship":"OTHER","bloodGroup":null,"identificationMark":null,"photo":null,"createdBy":"715","createdDate":1700821030000,"lastModifiedBy":"927","lastModifiedDate":1702470891000,"otpReference":null,"tenantId":"pg"},"id":"e6425160-7fa6-42ee-bdd3-7530dd41dc17","tenantId":"pg.citya","registrationNumber":"PO 23 GH 9876","model":"TATA","type":"TATA.407","tankCapacity":1000,"suctionType":"SEWER_SUCTION_MACHINE","pollutionCertiValidTill":0,"InsuranceCertValidTill":0,"fitnessValidTill":0,"roadTaxPaidTill":0,"gpsEnabled":true,"additionalDetails":{"description":""},"source":"Municipal records","vendorVehicleStatus":"ACTIVE","status":"ACTIVE","auditDetails":{"createdBy":"4a747fc5-6a8c-4645-8748-fec35f1b9e17","lastModifiedBy":"49341961-f413-4ae1-b7f8-92a8d9136f38","createdTime":1700801230911,"lastModifiedTime":1702451091527}}],"drivers":[{"id":"3f1b3a51-9ab9-43a2-8afb-f3c544cdcda1","tenantId":"pg.citya","name":"rajesh","owner":{"id":931,"uuid":"8a9fd87d-23dd-42af-aa24-b518bbc7a713","userName":"1111111147","password":null,"salutation":null,"name":"rajesh","gender":"MALE","mobileNumber":"1111111147","emailId":"[email protected]","altContactNumber":null,"pan":null,"aadhaarNumber":null,"permanentAddress":null,"permanentCity":null,"permanentPinCode":null,"correspondenceCity":null,"correspondencePinCode":null,"correspondenceAddress":null,"active":true,"dob":1262390400000,"pwdExpiryDate":1706798530000,"locale":null,"type":"CITIZEN","signature":null,"accountLocked":false,"roles":[{"id":null,"name":"FSM Driver","code":"FSM_DRIVER","tenantId":"pg.citya"},{"id":null,"name":"FSM Driver","code":"FSM_DRIVER","tenantId":"pg"}],"fatherOrHusbandName":"rajesh","relationship":"OTHER","bloodGroup":null,"identificationMark":null,"photo":null,"createdBy":"927","createdDate":1702389651000,"lastModifiedBy":"927","lastModifiedDate":1702389651000,"otpReference":null,"tenantId":"pg"},"ownerId":"8a9fd87d-23dd-42af-aa24-b518bbc7a713","additionalDetails":null,"description":null,"licenseNumber":"456789032166783","status":"ACTIVE","auditDetails":{"createdBy":"4a747fc5-6a8c-4645-8748-fec35f1b9e17","lastModifiedBy":"4a747fc5-6a8c-4645-8748-fec35f1b9e17","createdTime":1698864130067,"lastModifiedTime":1700715369667},"vendorDriverStatus":"ACTIVE"},{"id":"3d916d24-5756-4d01-b547-b4f2feac4366","tenantId":"pg.citya","name":"Krishana","owner":{"id":932,"uuid":"2499b3ef-c501-4780-9241-bfdd7c12b289","userName":"1111111141","password":null,"salutation":null,"name":"Krishana","gender":"MALE","mobileNumber":"1111111141","emailId":"[email protected]","altContactNumber":null,"pan":null,"aadhaarNumber":null,"permanentAddress":null,"permanentCity":null,"permanentPinCode":null,"correspondenceCity":null,"correspondencePinCode":null,"correspondenceAddress":null,"active":true,"dob":1169683200000,"pwdExpiryDate":1706439751000,"locale":null,"type":"CITIZEN","signature":null,"accountLocked":false,"roles":[{"id":null,"name":"FSM Driver","code":"FSM_DRIVER","tenantId":"pg.citya"},{"id":null,"name":"FSM Driver","code":"FSM_DRIVER","tenantId":"pg"}],"fatherOrHusbandName":"Krishana","relationship":"OTHER","bloodGroup":null,"identificationMark":null,"photo":null,"createdBy":"927","createdDate":1702389651000,"lastModifiedBy":"927","lastModifiedDate":1702389651000,"otpReference":null,"tenantId":"pg"},"ownerId":"2499b3ef-c501-4780-9241-bfdd7c12b289","additionalDetails":null,"description":null,"licenseNumber":"987654321067890","status":"ACTIVE","auditDetails":{"createdBy":"4a747fc5-6a8c-4645-8748-fec35f1b9e17","lastModifiedBy":"4a747fc5-6a8c-4645-8748-fec35f1b9e17","createdTime":1698564751818,"lastModifiedTime":1698995381495},"vendorDriverStatus":"ACTIVE"}],"workers":[{"id":"28db807d-b1f7-4ec0-8198-3a24849564ef","tenantId":"pg.citya","vendorId":"e427ddf2-7c49-47f1-ba0f-4418bb10f0b7","individualId":"eb446b2b-c79b-4b36-ac86-cc1a12d4b7e4","additionalDetails":null,"auditDetails":{"createdBy":"4a747fc5-6a8c-4645-8748-fec35f1b9e17","lastModifiedBy":"4a747fc5-6a8c-4645-8748-fec35f1b9e17","createdTime":1698499213598,"lastModifiedTime":1701253383254},"vendorWorkerStatus":"ACTIVE"},{"id":"64c3e042-7c08-4339-8d8b-c91517993025","tenantId":"pg.citya","vendorId":"e427ddf2-7c49-47f1-ba0f-4418bb10f0b7","individualId":"9a43e3d9-2499-4272-b316-3f10a1458d29","additionalDetails":null,"auditDetails":{"createdBy":"4a747fc5-6a8c-4645-8748-fec35f1b9e17","lastModifiedBy":"4a747fc5-6a8c-4645-8748-fec35f1b9e17","createdTime":1698499213598,"lastModifiedTime":1700733128794},"vendorWorkerStatus":"ACTIVE"},{"id":"681cff35-5ed1-4819-b682-f68d8d88c48c","tenantId":"pg.citya","vendorId":"e427ddf2-7c49-47f1-ba0f-4418bb10f0b7","individualId":"b39b9bea-7df5-40d4-9e96-ea3036adeb88","additionalDetails":null,"auditDetails":{"createdBy":"4a747fc5-6a8c-4645-8748-fec35f1b9e17","lastModifiedBy":"4a747fc5-6a8c-4645-8748-fec35f1b9e17","createdTime":1698499213598,"lastModifiedTime":1700710831040},"vendorWorkerStatus":"ACTIVE"},{"id":"d1adde76-49ce-40ab-891a-17d01499a6f5","tenantId":"pg.citya","vendorId":"e427ddf2-7c49-47f1-ba0f-4418bb10f0b7","individualId":"b00a79bc-4574-4749-a371-e706a404588f","additionalDetails":null,"auditDetails":{"createdBy":"4a747fc5-6a8c-4645-8748-fec35f1b9e17","lastModifiedBy":"4a747fc5-6a8c-4645-8748-fec35f1b9e17","createdTime":1698499213598,"lastModifiedTime":1700730405052},"vendorWorkerStatus":"ACTIVE"},{"id":"31a41afd-dc9f-4ea0-a331-d8be9c655059","tenantId":"pg.citya","vendorId":"e427ddf2-7c49-47f1-ba0f-4418bb10f0b7","individualId":"IND-2023-11-29-010926","additionalDetails":null,"auditDetails":{"createdBy":"4a747fc5-6a8c-4645-8748-fec35f1b9e17","lastModifiedBy":"4a747fc5-6a8c-4645-8748-fec35f1b9e17","createdTime":1698499213598,"lastModifiedTime":1701252195270},"vendorWorkerStatus":"ACTIVE"},{"id":"d6741795-4171-4307-bd65-4d2b29c46364","tenantId":"pg.citya","vendorId":"e427ddf2-7c49-47f1-ba0f-4418bb10f0b7","individualId":"e496c773-251b-42eb-9812-450f453e6cbb","additionalDetails":null,"auditDetails":{"createdBy":"4a747fc5-6a8c-4645-8748-fec35f1b9e17","lastModifiedBy":"4a747fc5-6a8c-4645-8748-fec35f1b9e17","createdTime":1698499213598,"lastModifiedTime":1701695433280},"vendorWorkerStatus":"ACTIVE"},{"id":"dacc15d6-fda6-4f29-8635-cec877ee2649","tenantId":"pg.citya","vendorId":"e427ddf2-7c49-47f1-ba0f-4418bb10f0b7","individualId":"16f9ba98-cb15-4d10-883a-b6d04184b14b","additionalDetails":null,"auditDetails":{"createdBy":"4a747fc5-6a8c-4645-8748-fec35f1b9e17","lastModifiedBy":"4a747fc5-6a8c-4645-8748-fec35f1b9e17","createdTime":1698499213598,"lastModifiedTime":1701943427056},"vendorWorkerStatus":"ACTIVE"},{"id":"c5cc4c36-7791-488a-becb-13a2b5ce9b59","tenantId":"pg.citya","vendorId":"e427ddf2-7c49-47f1-ba0f-4418bb10f0b7","individualId":"19ec0f63-9cc9-4c84-9414-00bdfb1110cc","additionalDetails":null,"auditDetails":{"createdBy":"4a747fc5-6a8c-4645-8748-fec35f1b9e17","lastModifiedBy":"4a747fc5-6a8c-4645-8748-fec35f1b9e17","createdTime":1698499213598,"lastModifiedTime":1702272847021},"vendorWorkerStatus":"ACTIVE"},{"id":"9ec0387b-1a0a-406a-b511-ac4526f6ee50","tenantId":"pg.citya","vendorId":"e427ddf2-7c49-47f1-ba0f-4418bb10f0b7","individualId":"7ac94e46-8278-4aff-9693-908f58902fca","additionalDetails":null,"auditDetails":{"createdBy":"4a747fc5-6a8c-4645-8748-fec35f1b9e17","lastModifiedBy":"4a747fc5-6a8c-4645-8748-fec35f1b9e17","createdTime":1698499213598,"lastModifiedTime":1702024388227},"vendorWorkerStatus":"ACTIVE"},{"id":"31d6a8d2-568c-4956-a87f-81d9caf27adc","tenantId":"pg.citya","vendorId":"e427ddf2-7c49-47f1-ba0f-4418bb10f0b7","individualId":"92c84f7a-ff92-4530-a678-a817540f2c28","additionalDetails":null,"auditDetails":{"createdBy":"4a747fc5-6a8c-4645-8748-fec35f1b9e17","lastModifiedBy":"49341961-f413-4ae1-b7f8-92a8d9136f38","createdTime":1698499213598,"lastModifiedTime":1702448704333},"vendorWorkerStatus":"ACTIVE"},{"id":"6563352a-648b-475b-b2f3-08745155840b","tenantId":"pg.citya","vendorId":"e427ddf2-7c49-47f1-ba0f-4418bb10f0b7","individualId":"19a1da54-5269-4170-b6af-1654cd69e677","additionalDetails":null,"auditDetails":{"createdBy":"4a747fc5-6a8c-4645-8748-fec35f1b9e17","lastModifiedBy":"4a747fc5-6a8c-4645-8748-fec35f1b9e17","createdTime":1698499213598,"lastModifiedTime":1702272832743},"vendorWorkerStatus":"ACTIVE"},{"id":"376dac06-52a4-4a65-b759-435d3a2cc330","tenantId":"pg.citya","vendorId":"e427ddf2-7c49-47f1-ba0f-4418bb10f0b7","individualId":"a32a1429-cc4f-4038-878c-610ea4d36d3a","additionalDetails":null,"auditDetails":{"createdBy":"4a747fc5-6a8c-4645-8748-fec35f1b9e17","lastModifiedBy":"49341961-f413-4ae1-b7f8-92a8d9136f38","createdTime":1698499213598,"lastModifiedTime":1702448935221},"vendorWorkerStatus":"ACTIVE"},{"id":"704af1f6-e2b4-48fa-86bd-60e701163e9d","tenantId":"pg.citya","vendorId":"e427ddf2-7c49-47f1-ba0f-4418bb10f0b7","individualId":"1c1cde73-15c0-44f9-991f-78df04eb4e0d","additionalDetails":null,"auditDetails":{"createdBy":"4a747fc5-6a8c-4645-8748-fec35f1b9e17","lastModifiedBy":"4a747fc5-6a8c-4645-8748-fec35f1b9e17","createdTime":1698499213598,"lastModifiedTime":1702272841574},"vendorWorkerStatus":"ACTIVE"},{"id":"4c64320b-e5c6-485d-9578-144f482ac3f2","tenantId":"pg.citya","vendorId":"e427ddf2-7c49-47f1-ba0f-4418bb10f0b7","individualId":"37dcceb0-40f5-42fd-a801-078e95bad933","additionalDetails":null,"auditDetails":{"createdBy":"4a747fc5-6a8c-4645-8748-fec35f1b9e17","lastModifiedBy":"4a747fc5-6a8c-4645-8748-fec35f1b9e17","createdTime":1698499213598,"lastModifiedTime":1702036374284},"vendorWorkerStatus":"ACTIVE"},{"individualId":"0ca71210-80bb-4b5a-a33b-68865e4728eb","vendorWorkerStatus":"ACTIVE"}],"additionalDetails":{"description":""},"source":"WhatsApp","description":null,"ownerId":"602dcd18-a9a0-4eb1-bf3d-d2d25402fc0c","agencyType":"ULB","paymentPreference":"post-service","status":"ACTIVE","auditDetails":{"createdBy":"4a747fc5-6a8c-4645-8748-fec35f1b9e17","lastModifiedBy":"49341961-f413-4ae1-b7f8-92a8d9136f38","createdTime":1698499213598,"lastModifiedTime":1702451091813}},"RequestInfo":{"apiId":"Rainmaker","authToken":"06170439-7751-41d9-8043-04ede25e9499","userInfo":{"id":927,"uuid":"49341961-f413-4ae1-b7f8-92a8d9136f38","userName":"ADMIN","name":"Plant operator","mobileNumber":"8282828121","emailId":null,"locale":null,"type":"EMPLOYEE","roles":[{"name":"FSM Administrator","code":"FSM_ADMIN","tenantId":"pg.citya"},{"name":"FSM Employee Application Viewer","code":"FSM_VIEW_EMP","tenantId":"pg.citya"}],"active":true,"tenantId":"pg.citya","permanentCity":null},"msgId":"1702468403810|en_IN","plainAccessRequest":{}}}' \
--compressedFSM_ADMIN

Sample of SMS present in FSM product :
The above SMS needs to be registered with specific TEMPLATE ID(Eg.'1407169140018862465') for each Localization key from the state Government/Client on their respective SMS portals.
Append the TEMPLATE ID at the end of message. Example.
Push the sms templates in Localisation. SMS related to OTP:
Urban local body (ULB) officials/employees are responsible for ensuring that regular treatment quality tests are performed at plants. In certain cases, the ULB officials/employees or third-party agencies such as the Pollution Control Board may perform independent tests. In case of non-compliance with treatment quality standards, the ULB officials/employees are to ensure that corrective actions are promptly taken.
Based on the role and responsibilities of the ULB official/employee, the following functionalities are available:
View Test Schedule: Based on the frequency of testing that is configured on the backend, the system generates a testing schedule. ULB officials/employees can view the upcoming tests for all plants tagged to the ULB.
View Past Test Results: A digital record of all the past test results uploaded on the platform can be accessed. Sort and filter functionalities make it easy to view all the test results.
Record Test Result: In case adhoc tests are conducted, employees have a provision to record the test results. Adhoc test results will also be available to view in the past test results section.
Employee login credentials (login ID and password) can be created for employees via the HRMS. Using this, the employees can sign in.
The user can perform the following actions:
Login by entering a username and password, and selecting the city.
Use the "Forgot Password" link to reset password.
After Logging in, the user will land on the home screen which contains a card with links to actions that can be performed by the user.
The "Treatment Quality" card contains the following:
Count of the total pending tests.
Inbox to view the upcoming tests.
View past test results.
Add test result.
Notifications: The notification panel displays the following:
Tests that are overdue for >7 days.
Failed tests where test results are not as per the parameter.
The user can view the details of the test by clicking on the “View Details” button. The user can dismiss the notification by clicking on the cross button.
The inbox link will redirect the user to the list of upcoming tests for plants tagged to the ULB.
View the list of upcoming tests: The list of upcoming tests will be sorted by the pending date, where the test with the highest SLA is displayed first. The user can sort the list by clicking on the table headers.
Filter tests: Filters are displayed on the left-hand panel of the screen. The following filters are available:
Treatment process: This will be multi-select showing values for the treatment processes configured for the ULB.
Stages: This will be a dropdown showing values for stages configured for the plant.
Status: This will be a multi-select showing the value for the status in the treatment quality workflow.
Selected filters can be removed by clicking on the refresh button on the top right hand corner of the filter pane or the clear button. Sort: Tests can be sorted by the pending date by clicking on the date column.
Search:
Tests can be searched using the following:
Test ID
Plant name
Users can fill either test ID or plant or both and click on the search button.
Users can clear search by clicking on the "Clear Search’"
The user can redirect to the home screen by using the breadcrumbs or the back button of the browser.
A test details page can be accessed by clicking on the "Test ID" hyperlink in the inbox.
This will show details about the upcoming test.
The past test results can be viewed from the TQM landing page and clicking on "View Past Results".
On clicking on "View Past Results", the user is redirected to the list of past tests.
The user can perform the following tasks:
View the list of past tests: The results will be sorted on the test date.
View test details: The user can view test details by clicking on the “Test ID” link in each row.
Search tests: The user can search based on the following:
Test ID:
Plant Name.
Treatment process
Test type
Date range
To clear search and view all past tests, the user can click on 'Clear'.
Sort: Tests can be sorted by the pending date by clicking on the date column.
Download test results in Excel and PDF formats using the download button.
On clicking on any "Test ID" hyperlink, the user will be redirected to the test details page. The test details page will display the summary of the submitted test along with the timelines/workflow.
A user can record test results by clicking on the “Add Test Result” link on the treatment quality card.
Clicking on the “Add Test Result” button will redirect the user to the “Add Test Result” page.
The user has to enter the below fields:
Plant Name
Treatment Process
Treatment Stage
Output Type
Quality Parameters: Based on the selections for the above, the parameters to be tested are populated in the form. At Least one parameter needs to be filled in for the submit button to be enabled. If no parameter is filled and the user clicks on the submit button, an error message is displayed saying “At Least one parameter needs to be filled to Add Test Result”.
Attachments, if any.
Once the user clicks on the ‘Submit’ button, the test results page is displayed.
Based on the benchmarks for an acceptable range of parameters defined, the user will be able to view whether the test overall and each parameter has passed or failed.
Action
Localization key
localization message
SMS
1
Employee creates an application
FSM_SMS_ASSIGN_DSO_APPLY
Dear citizen, your application for cleaning septic tank/pit is created with application reference no {2}. You will be notified when an operator is assigned to a request. Request is expected to be completed within {SLA_HOURS}hrs. Thank You. EGOVS.
Dear citizen, your application for cleaning septic tank/pit is created with application reference no FSM-AND-2023-07-27-003405. You will be notified when an operator is assigned to a request. Request is expected to be completed within 48hrs. Thank You. EGOVS.
2
Citizen creates an application
FSM_SMS_ASSIGN_DSO_APPLY
Dear citizen, your application for cleaning septic tank/pit is created with application reference no {2}. You will be notified when an operator is assigned to a request. Request is expected to be completed within {SLA_HOURS}hrs. Thank You. Govt. of Odisha.
Dear citizen, your application for cleaning septic tank/pit is created with application reference no FSM-AND-2023-07-27-003406. You will be notified when an operator is assigned to a request. Request is expected to be completed within 48hrs. Thank You. Govt. of Odisha.
3
At the time of assign vehicle
FSM_POST_PAY_SMS_DSO_INPROGRESS_DSO_ACCEPT
Dear citizen, Vehicle {VEHICLE_REG_NO} will be reaching your location to clean the septic tank/pit on {POSSIBLE_SERVICE_DATE} with reference to your application number {2}. You can contact the operator in +91 {DSO_MOBILE_NUMBER} Thank You. Govt. of Odisha
Dear citizen, Vehicle OD09J7874 will be reaching your location to clean the septic tank/pit on 27-07-2023 with reference to your application number FSM-AND-2023-07-27-003406. You can contact the operator in +91 9988998898 Thank You. Govt. of Odisha
4
Updating no of trips
FSM_SMS_DSO_INPROGRESS_UPDATE
Dear citizen, your application for cleaning septic tank /pit with application number {2} is updated and the operator has entered the number of trips: {NO_OF_TRIPS}. Please click this link {PAY_LINK} to pay the amount of Rs {AMOUNT_TO_BE_PAID} towards cleaning of your septic tank/pit. Thank You. EGOVS
Dear citizen, your application for cleaning septic tank /pit with application number FSM-AND-2023-07-27-003406 is updated and the operator has entered the number of trips: 2. Please click this link https://sujog-dev.odisha.gov.in/egov-url-shortening/Q56N2npkX6OKAJ4l to pay the amount of Rs 2000.0 towards cleaning of your septic tank/pit. Thank You. EGOVS
5
Collect payment
FSM_SMS_DSO_INPROGRESS_PAY
Dear citizen, amount of Rs.{AMOUNT_TO_BE_PAID}/- is received towards the payment of cleaning septic tank /pit for reference no. {RECEIPT_NO}. Please click this link {RECEIPT_LINK} to download the receipt. Thank You. Govt. of Odisha
Dear citizen, amount of Rs.2000.0/- is received towards the payment of cleaning septic tank /pit for reference no. 07/2023-24/009469. Please click this link https://sujog-dev.odisha.gov.in/egov-url-shortening/eRX3JK18bW0BAalM to download the receipt. Thank You. Govt. of Odisha
6
Complete Request
FSM_SMS_CITIZEN_FEEDBACK_PENDING_COMPLETED
Dear citizen, your request for cleaning septic tank/pit is completed. Please take some time to rate us using the link {FSM_APPL_LINK}. Thank You. Govt. of Odisha
Dear citizen, your request for cleaning septic tank/pit is completed. Please take some time to rate us using the link https://sujog-dev.odisha.gov.in/egov-url-shortening/5oyNDr9LJRmnMY6P. Thank You. Govt. of Odisha
7
Cancel Request by ULB
FSM_SMS_CANCELED_CANCEL
Dear citizen, your request for cleaning the septic tank/pit is cancelled with the reason {FSM_CANCEL_REASON}. Please use this link {NEW_FSM_LINK} to create a new request if needed. Thank You. Govt. of Odisha
Dear citizen, your request for cleaning the septic tank/pit is cancelled with the reason CITIZEN_DENIED_REQUEST. Please use this link https://sujog-dev.odisha.gov.in/egov-url-shortening/d0mgXKeAE8XKLxvb to create a new request if needed. Thank You. Govt. of Odisha
8
Decline Request after assinging dso
FSM_SMS_DSO_REJECTED_DSO_REJECT
Dear citizen, your request for cleaning the septic tank/pit is rejected with the reason {FSM_DSO_REJECT_REASON}. Please use this link {NEW_FSM_LINK} to create a new request if needed. Thank You. Govt. of Odisha
Dear citizen, your request for cleaning the septic tank/pit is rejected with the reason Vehicle is under repair. Please use this link https://sujog-dev.odisha.gov.in/egov-url-shortening/LM7ROBzx9dOnAXd0 to create a new request if needed. Thank You. Govt. of Odisha
9
Submit Vehicle Trip
FSM_SMS_DSO_INPROGRESS_UPDATE
Dear citizen, your application for cleaning septic tank /pit with application number {2} is updated and the operator has entered the number of trips: {NO_OF_TRIPS}. Please click this link {PAY_LINK} to pay the amount of Rs {AMOUNT_TO_BE_PAID} towards cleaning of your septic tank/pit. Thank You. EGOVS
Dear citizen, your application for cleaning septic tank /pit with application number FSM-AND-2023-07-27-003408 is updated and the operator has entered the number of trips: 1. Please click this link https://sujog-dev.odisha.gov.in/egov-url-shortening/az21kn2R95Gnpwb4 to pay the amount of Rs 1000.0 towards cleaning of your septic tank/pit. Thank You. EGOVS
10
After updating trips first time and generating payment
FSM_ADVANCE_APP_CREATE
Dear citizen, Your application reference number for cleaning septic tank/pit is {2}. You have opted to pay an advance amount of Rs.{AMOUNT_TO_BE_PAID}/-. Please click this link {PAY_LINK} to make the payment. You will be notified when an operator is assigned. Thank you for contacting us. EGOVS
Dear citizen, Your application reference number for cleaning septic tank/pit is 107-FSM-2023-02-15-006749. You have opted to pay an advance amount of Rs.100/-. Please click this link https://qa.digit.org/egov-url-shortening/p8Lvp0 to make the payment. You will be notified when an operator is assigned. Thank you for contacting us. EGOVS
{
"code": "FSM_SMS_DSO_INPROGRESS_PAY",
"message": "Dear citizen, amount of Rs.{AMOUNT_TO_BE_PAID}/- is received towards the payment of cleaning septic tank/pit for reference no. {RECEIPT_NO}. Please click this link {RECEIPT_LINK} to download the receipt.Thank You. Govt. of Punjab|1301157492438182299|1407169140018862465",
"module": "rainmaker-fsm",
"locale": "en_IN"
}{
"code": "sms.login.otp.msg",
"message": "Dear Citizen, Your Login OTP is %s. Thank You. Govt. of Punjab|1301157492438182299|1407169156622167544",
"module": "egov-user",
"locale": "en_IN"
},
{
"code": "sms.pwd.reset.otp.msg",
"message": "Dear Citizen, Your OTP for recovering password is %s. Thank You. Govt. of Punjab|1301157492438182299|1407169156626870208",
"module": "egov-user",
"locale": "en_IN"
},
{
"code": "sms.register.otp.msg",
"message": "Dear Citizen, Your OTP to complete your Registration is %s. Thank You. Govt. of Punjab|1301157492438182299|1407169156632042484",
"module": "egov-user",
"locale": "en_IN"
}
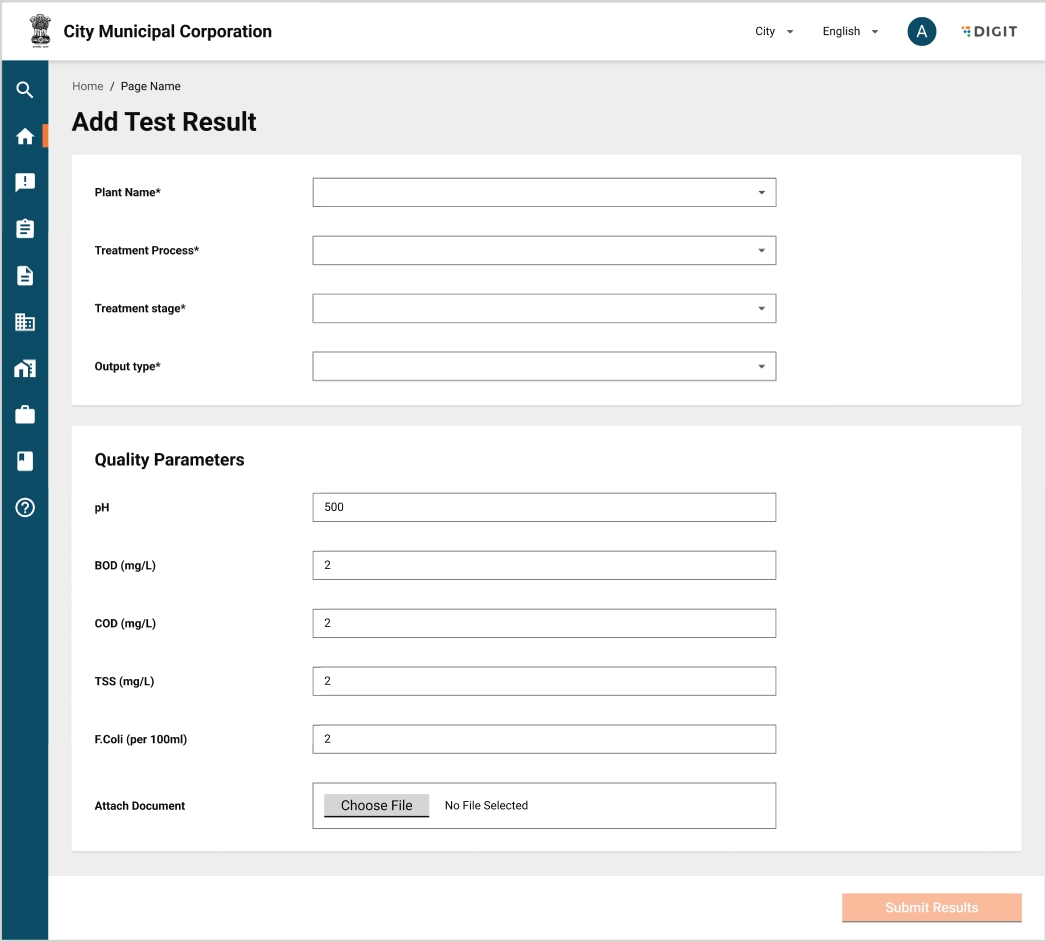


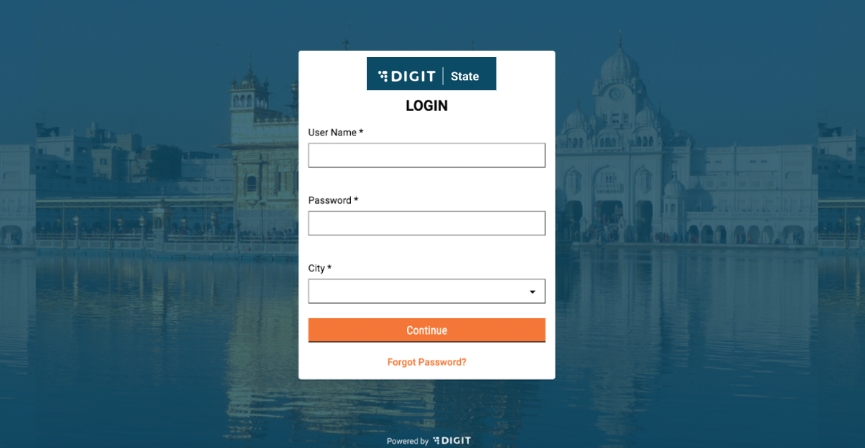
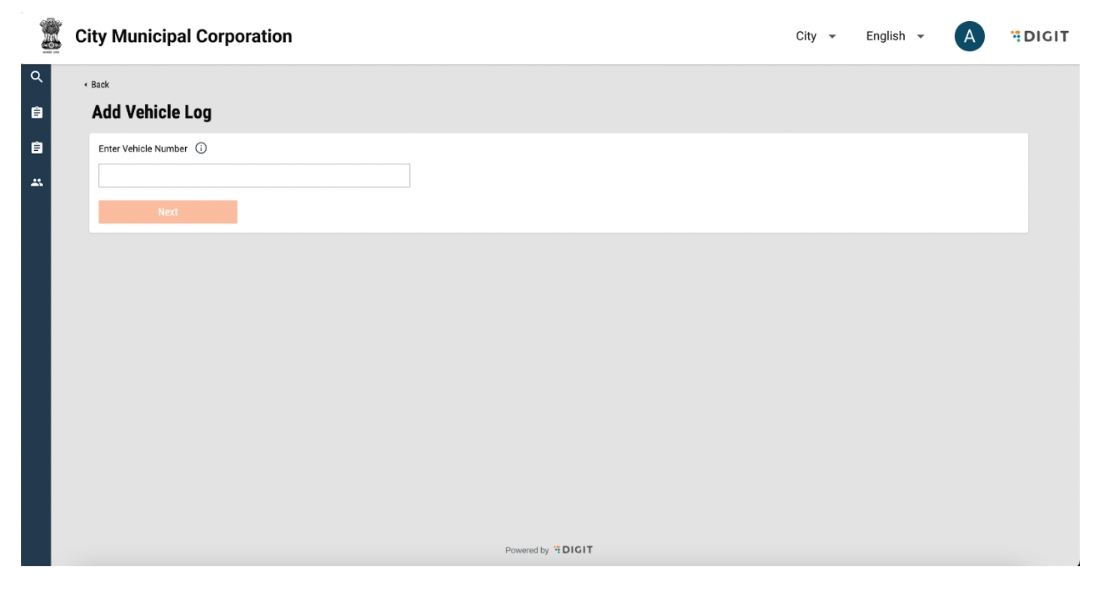
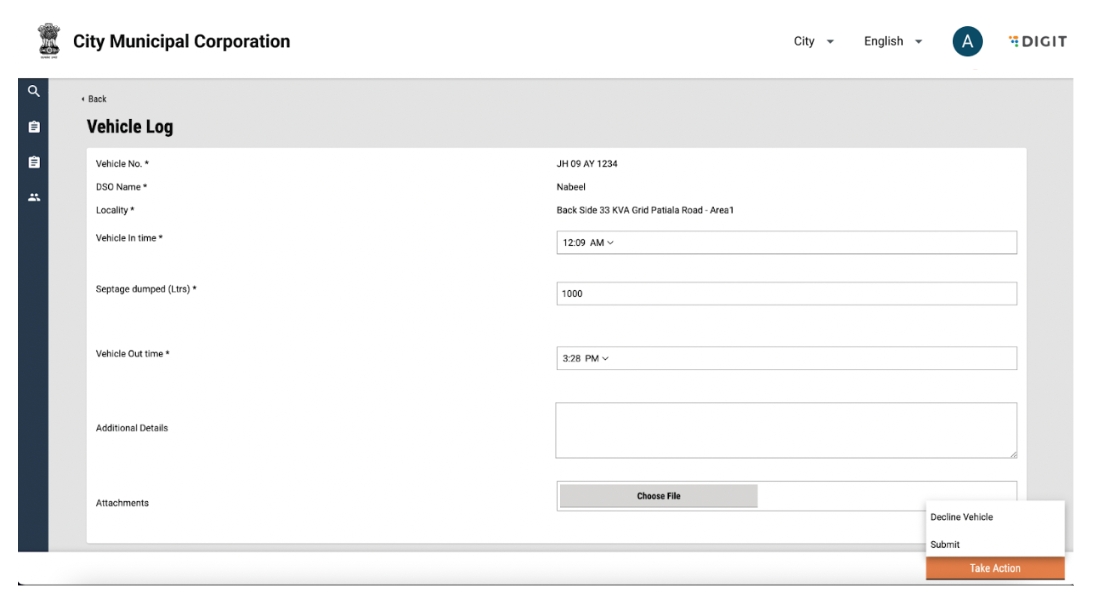
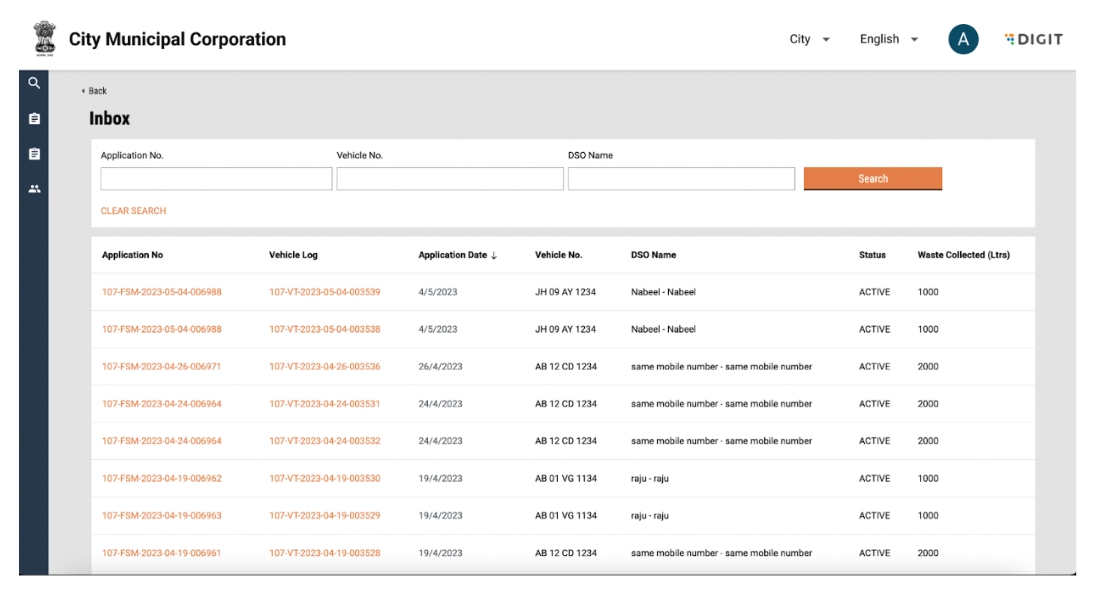
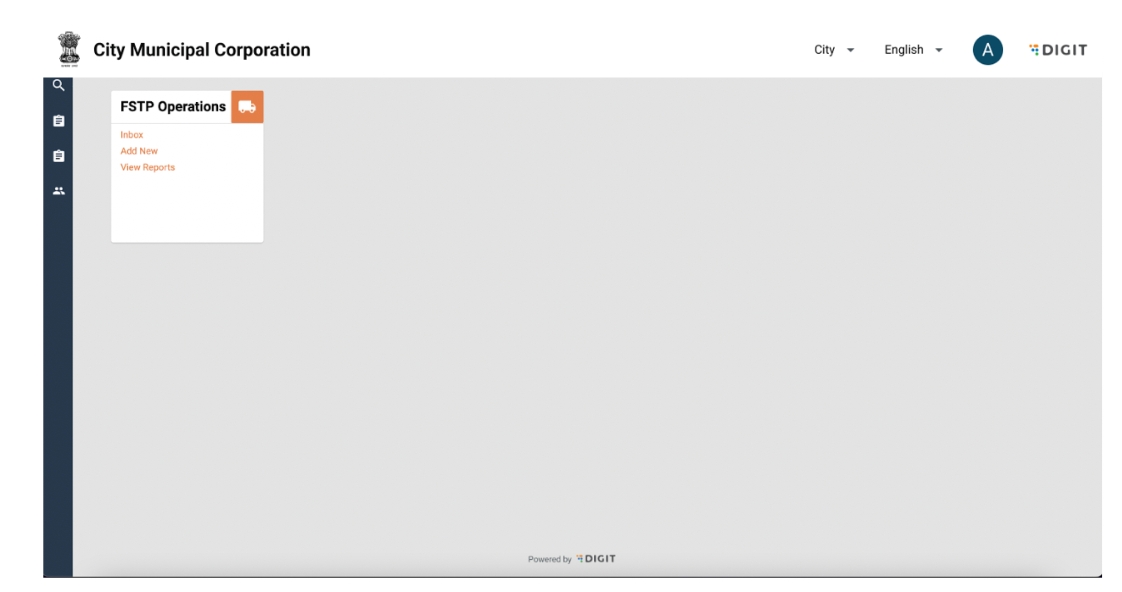
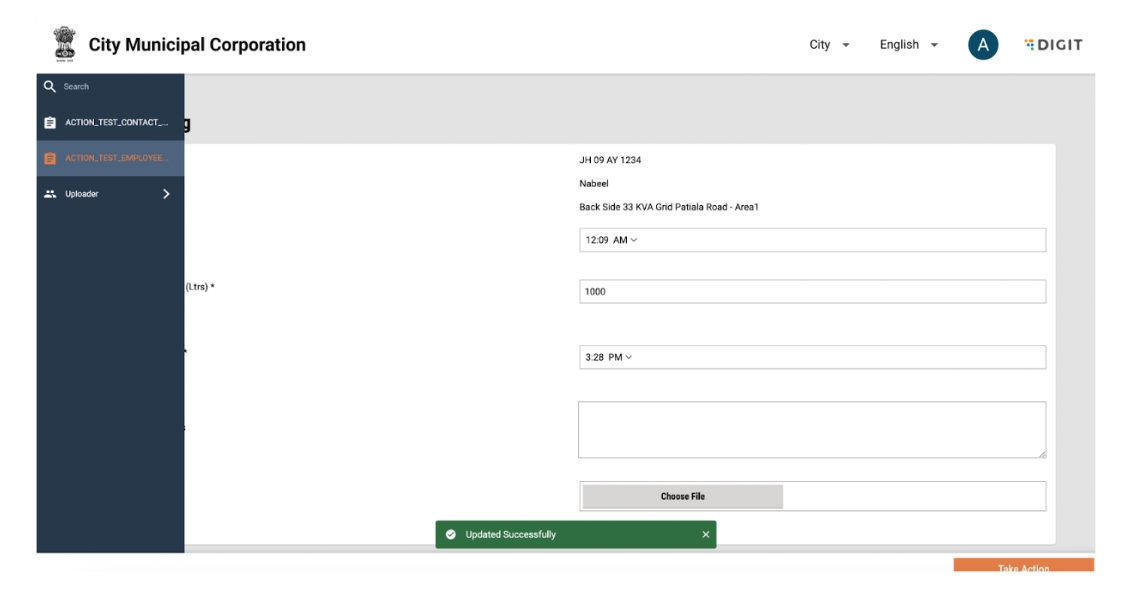
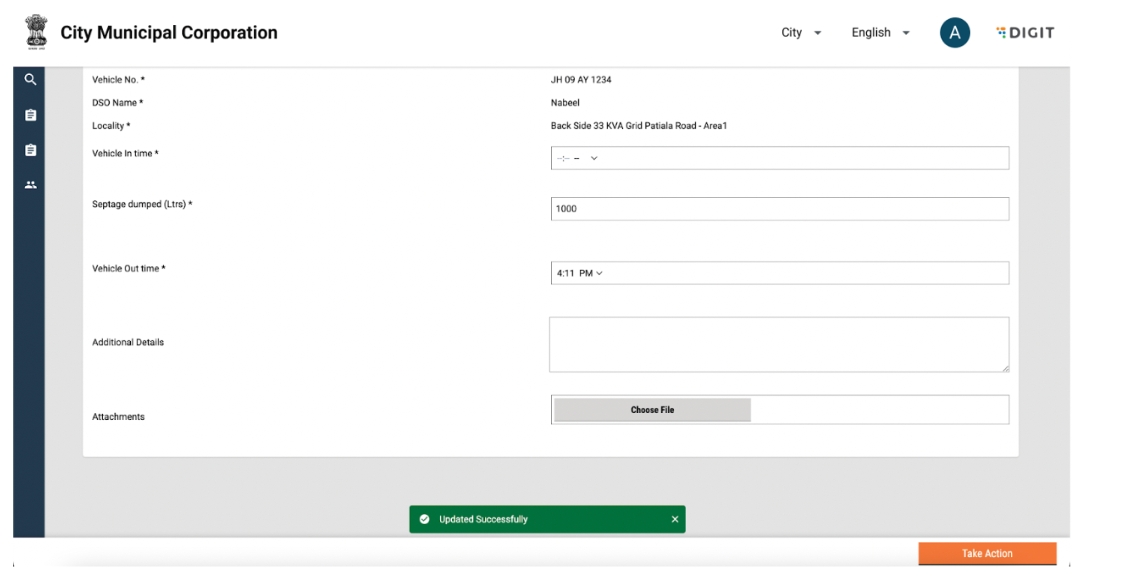
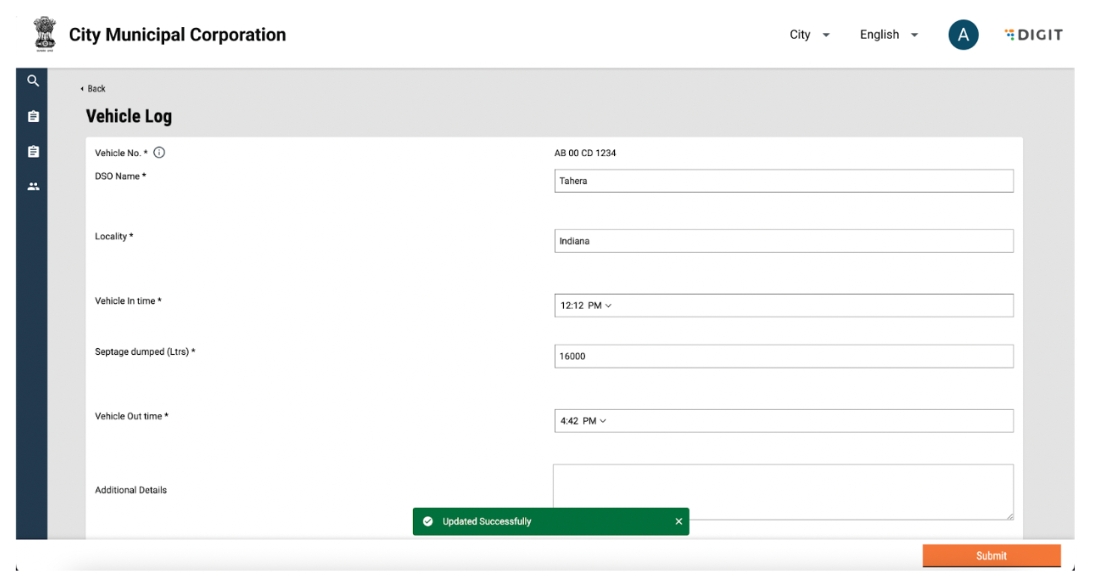
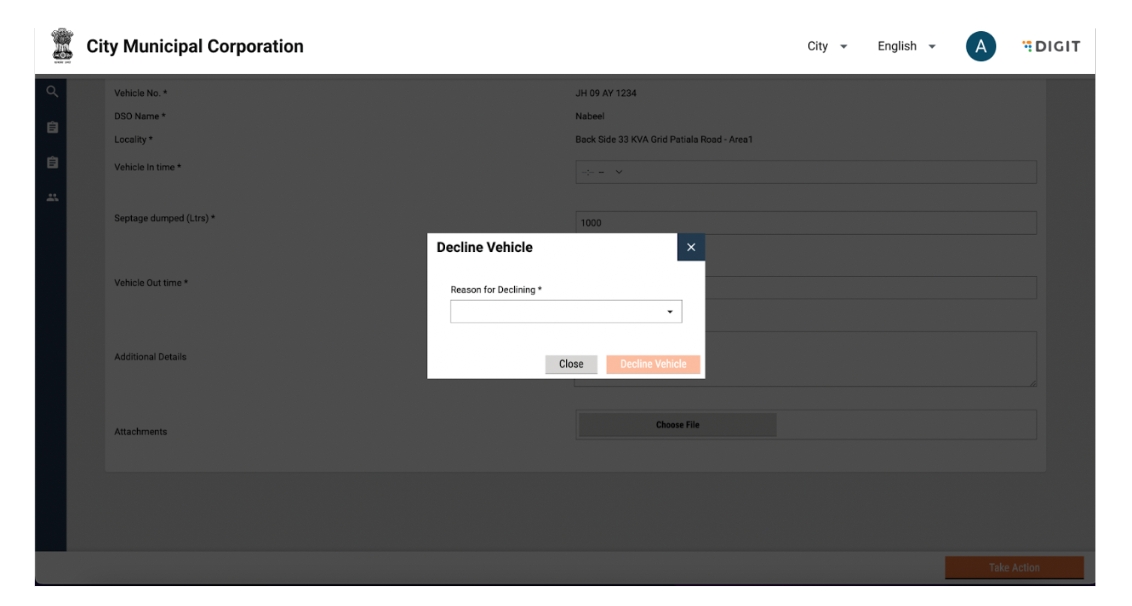


pqm-persister
PQM
Added persister config for the pqm service.
pqm-anomaly-persister
PQM-Anomaly
Added persister file for the pqm-anomaly service.
pqm-indexer
PQM
Added indexer file for the pqm service.
pqm-anomaly-indexer
PQM-anomaly
Added indexer file for the pqm-anomaly service.
pqm-inbox-indexer
PQM
Added inbox indexer file for the pqm service.
Vendor-persister
Vendor
Updated vendor-persister file for sanitation worker feature.
FSM-persister
FSM
Updated fsm-persister file for sanitation worker feature.
TQM Chart API changes
PQM
Added chart API configs for TQM plant operator landing page.
PQM Download PDF
PQM
|
Pdf download configuration for test results summary
PQM
Save test on creation
save-test-application
Update test
update-test-application
Update test workflow
update-workflow-test-application
Save test topic for inbox
save-test-event-application
Update test topic for inbox
update-test-event-application
Anomaly topic for when a test fails
create-pqm-anomaly-finder
Anomaly topic for when a test result has not been submitted
testResultNotSubmitted-anomaly-topic
Creation of plant-user mapping
save-plant-user-mapping
Updation of plant-user mapping
update-plant-user-mapping
PQM Anomaly Finder
Anomaly topic for when a test fails
save-pqm-test-anomaly-details
Anomaly topic for when test result not submitted
testResultNotSubmitted-anomaly-topic
Save anomaly topic
create-pqm-anomaly-finder
Event (In-App) Notification
persist-user-events-async
FSM
Save new FSM application
save-fsm-application
Update FSM application
update-fsm-application
Update FSM application workflow
update-fsm-workflow-application
Update vehicle trip details
update-vehicle-trip-Details
Save plant user mapping
save-plant-map-application
Update plant user mapping
update-plant-map-application
Receipts get pushed to this topic
egov.collection.payment-create
SMS notification topic
egov.core.notification.sms
Event (In-app) notification topic
persist-user-events-async
Vendor
Save vendor topic
save-vendor-application
Update vendor topic
update-vendor-application
Save driver topic
save-driver-application
Update driver topic
update-driver-application
Update vendor-driver and vendor-vehicle relationship
save-vendordrivervehicle-application
From the TQM card in the home screen, there is a link to the Inbox.
The inbox will show a list of tests that are in workflow.
Filters and search options are available such as Treatment process, Stage, Output, Status, Test Id and Plant name.
Clicking on a test will take the user to the test details screen.
Note: Unlike the plant operator inbox, this inbox is only for visibility purposes. A ULB admin cannot take any action in the tests that are in the inbox.
The test detail screen will show all the details about the test and status of the test.
When tests are in the submitted status, it's status will show as PASS or FAIL depending on the values of the benchmark.
If tests are in the workflow, it's status will show as pending.
Use inbox-v2 API.
URL for inbox "/inbox/v2/_search".
Sample request object:
{
"inbox": {
"processSearchCriteria": {
"businessService": [
"PQM"
],
"moduleName": "pqm",
"tenantId": "pg.citya"
},
"moduleSearchCriteria": {
"sortBy": "createdTime",
"plantCodes": [
"ANGUL_FSTP",
"PURI_FSTP"
],
"processCodes": [
"WATER_FILTERING",
"FECAL_SLUDGE_MANAGEMENT"
],
"materialCodes": [
"ARSENIC",
"NA",
"SCREENED_SLUDGE",
"CHLORINE",
"SALT",
"IRON",
"FECAL_SLUDGE",
"EFFLUENTS",
"BIOSOLID",
"POTABLE_WATER"
],
"wfStatus": [
"SCHEDULED",
"PENDINGRESULTS"
],
"fromDate": 1698777000000,
"toDate": 1701368999000
},
"limit": 100,
"offset": 0,
"tenantId": "pg.citya"
},
"RequestInfo": {
"apiId": "Rainmaker",
"authToken": "e5d10a5d-b262-47fc-a9ee-fc24c3a0de19",
"userInfo": {
"id": 721,
"uuid": "41488b21-c742-4290-af8e-a2a1dc3749ac",
"userName": "TQM_DEV_PLANTOPERATOR",
"name": "Plant operator",
"mobileNumber": "7281638699",
"emailId": null,
"locale": null,
"type": "EMPLOYEE",
"roles": [
{
"name": "PQM TP OPERATOR",
"code": "PQM_TP_OPERATOR",
"tenantId": "pg.citya"
}
],
"active": true,
"tenantId": "pg.citya",
"permanentCity": null
},
"msgId": "1701076328474|en_IN",
"plainAccessRequest": {}
}
}curl 'https://unified-dev.digit.org/inbox/v2/_search' \
-H 'authority: unified-dev.digit.org' \
-H 'accept: application/json, text/plain, */*' \
-H 'accept-language: en-US,en;q=0.9' \
-H 'content-type: application/json;charset=UTF-8' \
-H 'cookie: _ga_V2CPZCVTXQ=GS1.1.1695293925.1.1.1695293950.0.0.0; __cuid=59fd9aac25b044f6af006bd4b159cbbf; amp_fef1e8=f4fc07f6-3fb0-4c67-8114-a1beb906e625R...1hf75985a.1hf76uet8.i.8.q; _ga_P1TZCPKF6S=GS1.1.1699974064.1.1.1699975479.60.0.0; _ga=GA1.2.1291438273.1695293925; _ga_0JZG96DZSM=GS1.1.1699977339.2.0.1699977339.60.0.0' \
-H 'origin: https://unified-dev.digit.org' \
-H 'referer: https://unified-dev.digit.org/sanitation-ui/employee/tqm/inbox' \
-H 'sec-ch-ua: "Google Chrome";v="119", "Chromium";v="119", "Not?A_Brand";v="24"' \
-H 'sec-ch-ua-mobile: ?1' \
-H 'sec-ch-ua-platform: "Android"' \
-H 'sec-fetch-dest: empty' \
-H 'sec-fetch-mode: cors' \
-H 'sec-fetch-site: same-origin' \
-H 'user-agent: Mozilla/5.0 (Linux; Android 6.0; Nexus 5 Build/MRA58N) AppleWebKit/537.36 (KHTML, like Gecko) Chrome/119.0.0.0 Mobile Safari/537.36' \
--data-raw '{"inbox":{"processSearchCriteria":{"businessService":["PQM"],"moduleName":"pqm","tenantId":"pg.citya"},"moduleSearchCriteria":{"sortBy":"createdTime","plantCodes":["ANGUL_FSTP","PURI_FSTP"],"processCodes":["WATER_FILTERING","FECAL_SLUDGE_MANAGEMENT"],"materialCodes":["ARSENIC","NA","SCREENED_SLUDGE","CHLORINE","SALT","IRON","FECAL_SLUDGE","EFFLUENTS","BIOSOLID","POTABLE_WATER"],"wfStatus":["SCHEDULED","PENDINGRESULTS"],"fromDate":1698777000000,"toDate":1701368999000},"limit":100,"offset":0,"tenantId":"pg.citya"},"RequestInfo":{"apiId":"Rainmaker","authToken":"e5d10a5d-b262-47fc-a9ee-fc24c3a0de19","userInfo":{"id":721,"uuid":"41488b21-c742-4290-af8e-a2a1dc3749ac","userName":"TQM_DEV_PLANTOPERATOR","name":"Plant operator","mobileNumber":"7281638699","emailId":null,"locale":null,"type":"EMPLOYEE","roles":[{"name":"PQM TP OPERATOR","code":"PQM_TP_OPERATOR","tenantId":"pg.citya"}],"active":true,"tenantId":"pg.citya","permanentCity":null},"msgId":"1701076328474|en_IN","plainAccessRequest":{}}}' \
--compressedRole-action mapping is done for the "/pqm-service/v1/_search" and "/inbox/v2/_search" endpoint for a ULB admin user role, that is:
PQM_ADMINUse pqm-service.
URL for search "/pqm-service/v1/_search".
Sample request object:
{
"testSearchCriteria": {
"processCodes": [
"WATER_FILTERING",
"FECAL_SLUDGE_MANAGEMENT"
],
"materialCodes": [
"ARSENIC",
"NA",
"SCREENED_SLUDGE",
"FECAL_SLUDGE",
"EFFLUENTS",
"BIOSOLID",
"CHLORINE",
"SALT",
"IRON",
"POTABLE_WATER"
],
"testType": [
"IOT_SCHEDULED",
"LAB_ADHOC",
"LAB_SCHEDULED"
],
"fromDate": 1698777000000,
"toDate": 1701368999000,
"wfStatus": [
"SUBMITTED"
],
"plantCodes": [
"ANGUL_FSTP",
"PURI_FSTP"
]
},
"pagination": {
"limit": 100
},
"RequestInfo": {
"apiId": "Rainmaker",
"authToken": "e5d10a5d-b262-47fc-a9ee-fc24c3a0de19",
"userInfo": {
"id": 721,
"uuid": "41488b21-c742-4290-af8e-a2a1dc3749ac",
"userName": "TQM_DEV_PLANTOPERATOR",
"name": "Plant operator",
"mobileNumber": "7281638699",
"emailId": null,
"locale": null,
"type": "EMPLOYEE",
"roles": [
{
"name": "PQM TP OPERATOR",
"code": "PQM_TP_OPERATOR",
"tenantId": "pg.citya"
}
],
"active": true,
"tenantId": "pg.citya",
"permanentCity": null
},
"msgId": "1701076145507|en_IN",
"plainAccessRequest": {}
}
}curl 'https://unified-dev.digit.org/pqm-service/v1/_search' \
-H 'authority: unified-dev.digit.org' \
-H 'accept: application/json, text/plain, */*' \
-H 'accept-language: en-US,en;q=0.9' \
-H 'content-type: application/json;charset=UTF-8' \
-H 'cookie: _ga_V2CPZCVTXQ=GS1.1.1695293925.1.1.1695293950.0.0.0; __cuid=59fd9aac25b044f6af006bd4b159cbbf; amp_fef1e8=f4fc07f6-3fb0-4c67-8114-a1beb906e625R...1hf75985a.1hf76uet8.i.8.q; _ga_P1TZCPKF6S=GS1.1.1699974064.1.1.1699975479.60.0.0; _ga=GA1.2.1291438273.1695293925; _ga_0JZG96DZSM=GS1.1.1699977339.2.0.1699977339.60.0.0' \
-H 'origin: https://unified-dev.digit.org' \
-H 'referer: https://unified-dev.digit.org/sanitation-ui/employee/tqm/search-test-results' \
-H 'sec-ch-ua: "Google Chrome";v="119", "Chromium";v="119", "Not?A_Brand";v="24"' \
-H 'sec-ch-ua-mobile: ?1' \
-H 'sec-ch-ua-platform: "Android"' \
-H 'sec-fetch-dest: empty' \
-H 'sec-fetch-mode: cors' \
-H 'sec-fetch-site: same-origin' \
-H 'user-agent: Mozilla/5.0 (Linux; Android 6.0; Nexus 5 Build/MRA58N) AppleWebKit/537.36 (KHTML, like Gecko) Chrome/119.0.0.0 Mobile Safari/537.36' \
--data-raw '{"testSearchCriteria":{"processCodes":["WATER_FILTERING","FECAL_SLUDGE_MANAGEMENT"],"materialCodes":["ARSENIC","NA","SCREENED_SLUDGE","FECAL_SLUDGE","EFFLUENTS","BIOSOLID","CHLORINE","SALT","IRON","POTABLE_WATER"],"testType":["IOT_SCHEDULED","LAB_ADHOC","LAB_SCHEDULED"],"fromDate":1698777000000,"toDate":1701368999000,"wfStatus":["SUBMITTED"],"plantCodes":["ANGUL_FSTP","PURI_FSTP"]},"pagination":{"limit":100},"RequestInfo":{"apiId":"Rainmaker","authToken":"e5d10a5d-b262-47fc-a9ee-fc24c3a0de19","userInfo":{"id":721,"uuid":"41488b21-c742-4290-af8e-a2a1dc3749ac","userName":"TQM_DEV_PLANTOPERATOR","name":"Plant operator","mobileNumber":"7281638699","emailId":null,"locale":null,"type":"EMPLOYEE","roles":[{"name":"PQM TP OPERATOR","code":"PQM_TP_OPERATOR","tenantId":"pg.citya"}],"active":true,"tenantId":"pg.citya","permanentCity":null},"msgId":"1701076145507|en_IN","plainAccessRequest":{}}}' \
--compressedThe Desludging Operators or DSOs are responsible for initiating and completing action on citizen requests for desludging services. The requests are routed to the respective DSOs by the urban local body (ULB) officials. The DSOs update the application status once the services are delivered and the payments are collected.
DSOs can do the following:
Assign vehicles for desludging services
Decline service requests
Complete service requests
DSOs operators are provided with credentials to log in to the system.
On this page, the following actions can be performed:
Enter username and password
Select city for login
Reset password by clicking on the “Forgot Password” link
On clicking continue, DSOs are redirected to the FSM homepage.
On this page, the following actions can be performed in the FSM card:
Click on Inbox to view assigned requests
Search for historical requests serviced
Change language
Edit profile details by clicking on the user icon on top right hand corner
Logout by clicking on the user icon on the top right hand corner
Requests assigned to the DSO can be viewed by clicking on the Inbox link in the FSM homepage.
Requests pending for acceptance will be viewable in the status: Pending for DSO Approval.
The following actions can be performed:
Search for an active application using “Application No.” and “Mobile No.”
Clear search by clicking on “Clear Search’”
View and update applications by clicking on an application number
Filter applications by locacilty using the ‘Locality’ dropdown
Filter applications by ‘Status’
Search for past applications by using “Search Application”
Sort applications by Application date.
On clicking on an application number, application details are displayed.
The following actions can be performed:
View application details
Click on the “Take Action” button
The take action button has the following options:
Assign Vehicle
Decline Request
A request can be approved by assigning a vehicle. Clicking on “Assign Vehicle’’ will display the following pop-up:
The following actions can be performed:
Update Vehicle Registration No.
Close pop-up by clicking on the Close button on the pop-up.
Close pop-up by clicking on the cross icon on the top right of the pop-up
Confirm decline request by clicking on the “Assign Vehicle” button
A snack bar will confirm assignment of vehicle and the application timeline will be updated to DSO in Progress.
Once DSO is in progress, the number of trips can be updated.
The following actions can be performed:
Search for an active application using “Application No.” and “Mobile No.”
Clear search by clicking on “Clear Search”
View and update applications by clicking on an application number
Filter applications by ‘Locacilty’ using the locality dropdown
Filter applications by ‘Status’
Search for past applications by using “Search Application”
On clicking on an application number, application details are displayed.
The following actions can be performed:
View application details
Click on the ‘Take Action’ button
The take action button has the following options:
Complete Request
Update/Schedule Trips
On clicking on Update/Schedule trips, the following pop up is displayed:
The following actions can be performed:
Increase the number of trips by clicking on the + button
Decrease the number of trips by clicking on the - button
Close pop-up by clicking on the Close button on the pop-up.
Close pop-up by clicking on the cross icon on the top right of the pop-up
Confirm update/schedule trips by clicking on the “Update/schedule” button
A snack bar will confirm that the number of trips have been updated
Once the service request has been completed and all pending payments have been collected, the same has to be confirmed in the system. This can be done by selecting the “Complete Request” button in the “Take Action” button. On clicking on Complete Request, the following pop up is displayed:
The following actions can be performed:
Confirm/Update service date
Confirm/Update Volume of waste collected
Confirm/Update pit details
Upload pit photo
Close pop-up by clicking on the Close button on the pop-up.
Close pop-up by clicking on the cross icon on the top right of the pop-up
Confirm details by clicking on the ‘Completed’’ button
A snack bar will confirm that request has been completed and the status will be updated to “Waiting for Disposal”.
DSOs can choose to decline unserviceable service requests. Applications can be rejected by a DSO in the “Pending for DSO Approval” stage.
The following actions can be performed:
Search for an active application using “Application No.” and “Mobile No.”
Clear search by clicking on “Clear Search”
View and update applications by clicking on an application number
Filter applications by ‘Locacilty’ using the locality dropdown
Filter applications by ‘Status’
Search for past applications by using “Search Application”
On clicking on an application number, application details are displayed.
The following actions can be performed:
View application details
Click on the “Take Action” button
The take action button has the following options:
Assign Vehicle
Decline Request
Clicking on “Decline Request’’ will display the following pop-up:
The following actions can be performed:
Reason for declining
Enter comments
Close pop-up by clicking on the Close button on the pop up.
Close pop-up by clicking on the cross icon on the top right of the pop-up
Confirm decline Request by clicking on the “Decline Request” button
A snack bar will confirm decline and the application timeline will be updated to DSO Rejected.


From the TQM card in the home screen, there is a link to the inbox.
Tests are created through the cronjob scheduler at the backend.
These tests created have a two-step workflow: Scheduled (initial state) -> Select Lab -> Pending Results -> Submitted (final state).
By default, tests which are in the workflow, will show up in the inbox of a plant operator. The inbox shows a list of cards corresponding to each test.
Each card contains data relevant to the test such as Test ID, Treatment Process, Stage, Output, Status, etc.
There is a dynamic action button in each card. According to the current workflow status, it will show either update status (scheduled state) or update results.
Clicking on the update status opens an update test screen which shows data about the test and a dropdown which has a list of labs configured in MDMS. A user can select one of the labs and update the test.
Clicking on update results opens an update test screen, which also shows the same test details, but the bottom card shows a list of benchmarks to be tested in that test. A user can enter these benchmarks and update the test. There is an option to upload a document as well, and at least one benchmark is mandatory to enter.
A success/failure toast is shown once the test is updated.
Filter and sort options are available in the inbox.
A user can filter by -> Treatment Process, Output Type, Date Range, Workflow Status.
A user can sort by date (latest first/latest last).
Use the pqm-service.
URL for inbox "/pqm-service/v1/_update".
Sample request object:
Role-action mapping is done for the "/pqm-service/v1/_update" endpoint for a plant operator user role, that is:
Use the inbox-v2 API.
URL for inbox "/inbox/v2/_search".
Sample request object:
Role action mapping is done for the "/inbox/v2/_search" endpoint for a plant operator user role, that is:
For adding the rate slabs(pricing) of vehicles,consider different combination of propertyType , slum and tank capacity.
Required combination of property types and Sub-property types added in :
RESIDENTIAL and RESIDENTIAL.SUB-PROPERTY_TYPE
INSTITUTIONAL and INSTITUTIONAL.SUB-PROPERTY_TYPE
COMMERCIAL and COMMERCIAL.SUB-PROPERTY_TYPE
Consider billing slab property types and Sub-property types for both slum and non-slum areas.Take slum='YES' for slum areas and take slum='NO' for non-slum areas.
Sample Data for pricing : - The pricing is provided according to Vehicle capacity,property-types and slum areas.
Within the tenant,For two Vehicles having the same capacity,the pricing should be same. Example : In Vehicle-1 and Vehicle-3,for capacity 1000,pricing for Residential properties with Slum='NO' = 1000 Commercial properties with Slum='NO' = 1000 Institutional properties with Slum='NO' = 1000 Residential properties with Slum='YES' = 800 Commercial properties with Slum='YES' = 800 Institutional properties with Slum='YES' = 800
Loading Rate Slabs Steps:
Import this collection -
Change the request url specific to environment.
For search billing-slab(url) -
For create billing-slab(url) -
For update billing-slab(url) -
Login from FSM_ADMINDEV credentials(for sujog-dev) which is having FSM Admin role for all the ulb’s.
Copy the auth token. Paste the auth token in the req. Body “authToken” field.
Download these files - and update the file by changing the different combination of propertyType , slum and tank capacity with respect to tenant/ulb.
Open the runner tab (ctrl+shift+R) and import the file which is shared in the step 5. (For example: billing-athagarh.json for pushing athagarh billing slab).
Drag the api which is provided in Step 1 collection.
Hit the postman collection.
IMPORTANT POINTS:
1.The format of billing slab data is:
Eg.
2.The capacity always starts from 0.
3.Example. If the given capacity is 1000 and 3000 then the range should be:
"capacityFrom": 0,
"capacityTo": 1000,
"capacityFrom": 1001,
"capacityTo": 3000,
4.Consider billing-slab for both slum and non-slum areas.
5.The status is always ACTIVE.
6.If the price of all the slums is given as 0,then mark zeroPricingStatus as true otherwise mark it as false in .
How to update billing slab data:
The format of updating billing slab data is:
2.If the need is to update the price for all the slums from 800 to 500,for this Take the response from search api for slum “YES”,make a json file with updated price and push it using runner with the syntax mentioned in point 1.
Eg.
Zero Pricing property in billing-slab :
For some combination of property types and sub-property types,the zero pricing property is given.For that,the price will be considered as 0(zero) for all the capacities and slum areas.
Feature
Service Name
PR
Added new component for URC
data/pg/FSM/CommonFieldsConfig.JSON
Create UrcConfig.json to enable URC feature
data/pg/angul/FSM/UrcConfig.json
Enabling overRide for tripAmount
data/pg/FSM/Config.json
Added GP data for specific ulb
data/pg/ulb-name/egov-location/boundary-data.json
Feature
Service Name
Changes
URC
FSM
https://github.com/egovernments/DIGIT-Dev/pull/5296 https://github.com/egovernments/DIGIT-Dev/pull/5297 https://github.com/egovernments/DIGIT-Dev/pull/5308 https://github.com/egovernments/DIGIT-Dev/pull/5309 https://github.com/egovernments/DIGIT-Dev/pull/5312 https://github.com/egovernments/DIGIT-Dev/pull/5315 https://github.com/egovernments/DIGIT-Dev/pull/5317 https://github.com/egovernments/DIGIT-Dev/pull/5318 https://github.com/egovernments/DIGIT-Dev/pull/5319 https://github.com/egovernments/DIGIT-Dev/pull/5376 https://github.com/egovernments/DIGIT-Dev/pull/5378 https://github.com/egovernments/DIGIT-Dev/pull/5399 https://github.com/egovernments/DIGIT-Dev/pull/5406
[
{
"code": "CS_FILE_APPLICATION_PROPERTY_LOCATION_GRAM_PANCHAYAT_TEXT",
"message": "Choose the Grama Panchayat of the Property from the list given below.",
"module": "rainmaker-fsm",
"locale": "en_IN"
},
{
"code": "DSS_FSM_TOTAL_REQUESTS_FROM_GP",
"message": "Applications from Grama Panchayat",
"module": "rainmaker-fsm",
"locale": "en_IN"
},
{
"code": "FROM_GRAM_PANCHAYAT",
"message": "From Gram Panchayat",
"module": "rainmaker-fsm",
"locale": "en_IN"
},
{
"code": "WITHIN_ULB_LIMITS",
"message": "Within ULB Limits",
"module": "rainmaker-fsm",
"locale": "en_IN"
},
{
"code": "CS_VILLAGE_NAME",
"message": "Village Name",
"module": "rainmaker-common",
"locale": "en_IN"
},
{
"code": "ES_INBOX_PLEASE_SPECIFY_GRAM_PANCHAYAT",
"message": "If Others, Specify Gram Panchayat",
"module": "rainmaker-common",
"locale": "en_IN"
},
{
"code": "ES_INBOX_PLEASE_SPECIFY_LOCALITY",
"message": "If Others, Specify Locality",
"module": "rainmaker-common",
"locale": "en_IN"
},
{
"code": "ES_INBOX_PLEASE_SPECIFY_VILLAGE",
"message": "Specify Village",
"module": "rainmaker-common",
"locale": "en_IN"
},
{
"code": "CS_GRAM_PANCHAYAT",
"message": "Gram Panchayat",
"module": "rainmaker-common",
"locale": "en_IN"
},
{
"code": "TIP_DSS_FSM_TOTAL_REQUESTS_FROM_GP",
"message": "Applications from Grama Panchayat",
"module": "rainmaker-dss",
"locale": "en_IN"
},
{
"code": "TIP_DSS_FSM_TOTAL_REQUESTS_FROM_GP",
"message": "Applications from Grama Panchayat",
"module": "rainmaker-fsm",
"locale": "en_IN"
},
{
"code": "TIP_DSS_FSM_TOTAL_REQUESTS_FROM_GP",
"message": "Applications from Grama Panchayat",
"module": "rainmaker-common",
"locale": "en_IN"
},
{
"code": "FROM_OTHER_ULB",
"message": "Outside ULB Limits",
"module": "rainmaker-fsm",
"locale": "en_IN"
}
]Feature
Location
PR
Add pie chart: Applications by Source
Add Bar chart: No. of applications per month from Gram Panchayat
configs/egov-dss-dashboards/dashboard-analytics/ChartApiConfig.json,
configs/egov-dss-dashboards/dashboard-analytics/MasterDashboardConfig.json
Name of the ULB: (Write in right side box)
Anandapur Municipality
Details
Description
Vehicle-1
Vehicle-2
Vehicle-3
Cesspool Tank Capacity (in Litres)
->
1000
3000
1000
Per trip Pricing for Residential properties
->
1000
2000
1000
Per trip Pricing for Commercial properties
->
1000
2000
1000
Per trip Pricing for Institutional properties
->
1000
2000
1000
Per trip Pricing for Slum areas
->
800
1500
800
{
"tenantId": "{{tenantId}}",
"capacityFrom": "{{capacityFrom}}",
"capacityTo": "{{capacityTo}}",
"propertyType": "{{propertyType}}",
"slum": "{{slum}}",
"price": "{{price}}",
"status": "{{status}}"
}{
"tenantId": "pg.rourkela",
"capacityFrom": 0,
"capacityTo": 1000,
"propertyType": "RESIDENTIAL",
"slum": "YES",
"price": 800,
"status": "ACTIVE"
}{
"id": "{{id}}",
"tenantId": "{{tenantId}}",
"capacityFrom": "{{capacityFrom}}",
"capacityTo": "{{capacityTo}}",
"propertyType": "{{propertyType}}",
"slum": "{{slum}}",
"price": "{{price}}",
"status": "{{status}}",
"auditDetails": {
"createdBy": "0ea42eb0-4406-4acf-91b0-52eca31403ab",
"lastModifiedBy": "0ea42eb0-4406-4acf-91b0-52eca31403ab",
"createdTime": 1685258218048,
"lastModifiedTime": 1685258218048
}
}Name of the ULB (Write in right side box)
Anandapur Municipality
E. Zero Pricing Properties of ULB
Sl No.
Property Type
Property Sub Type
1
Institutional
CT,PT, Temple, Govt. High School, Govt. Hospital, Govt. School


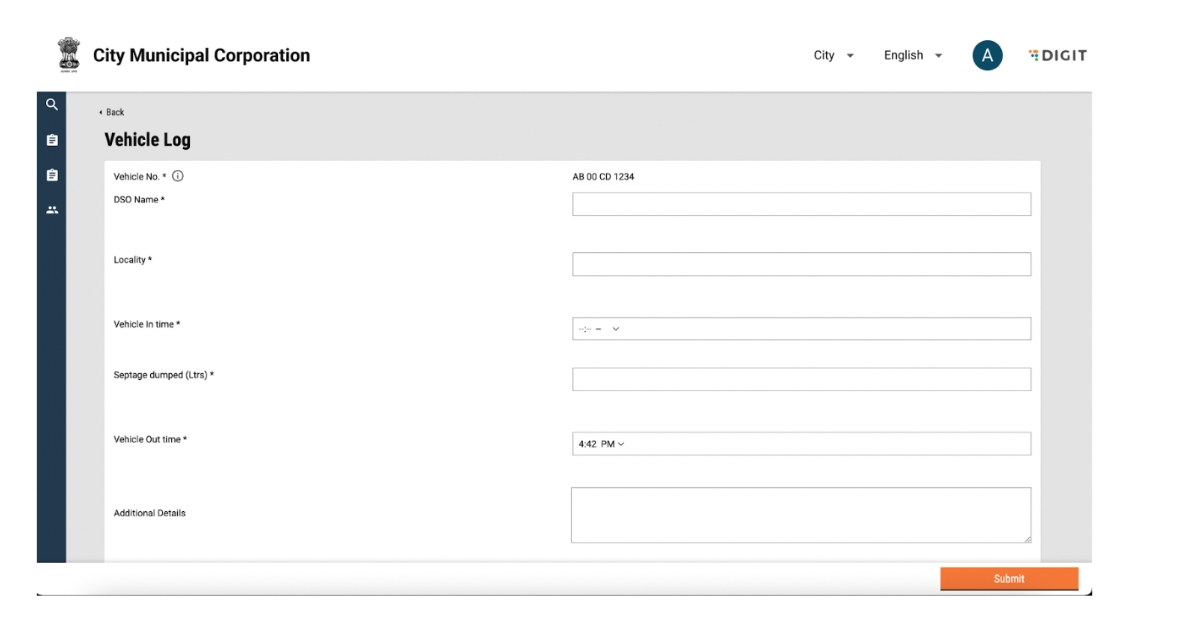
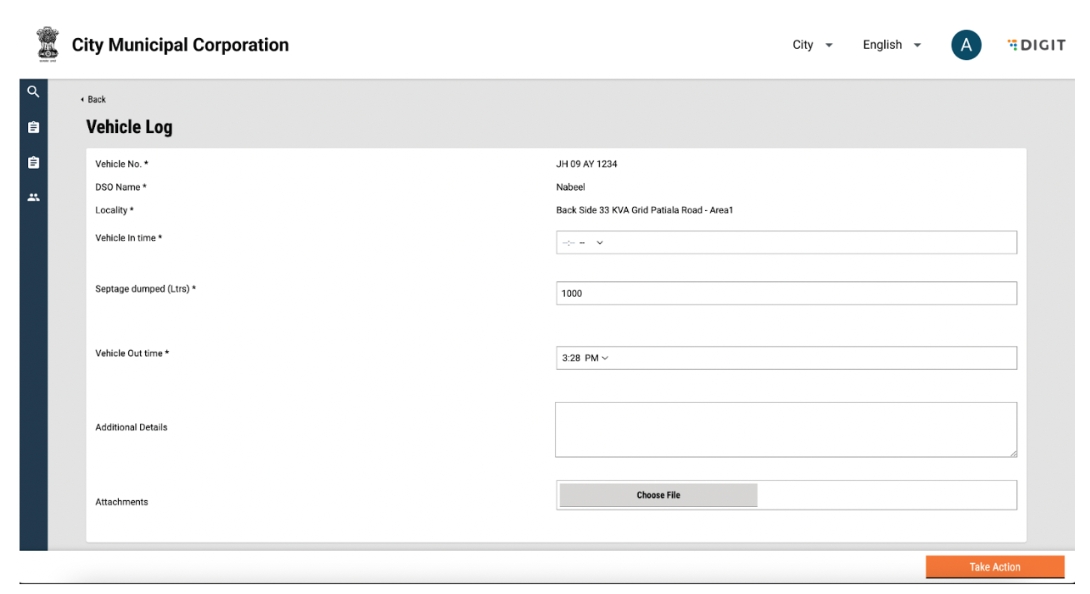

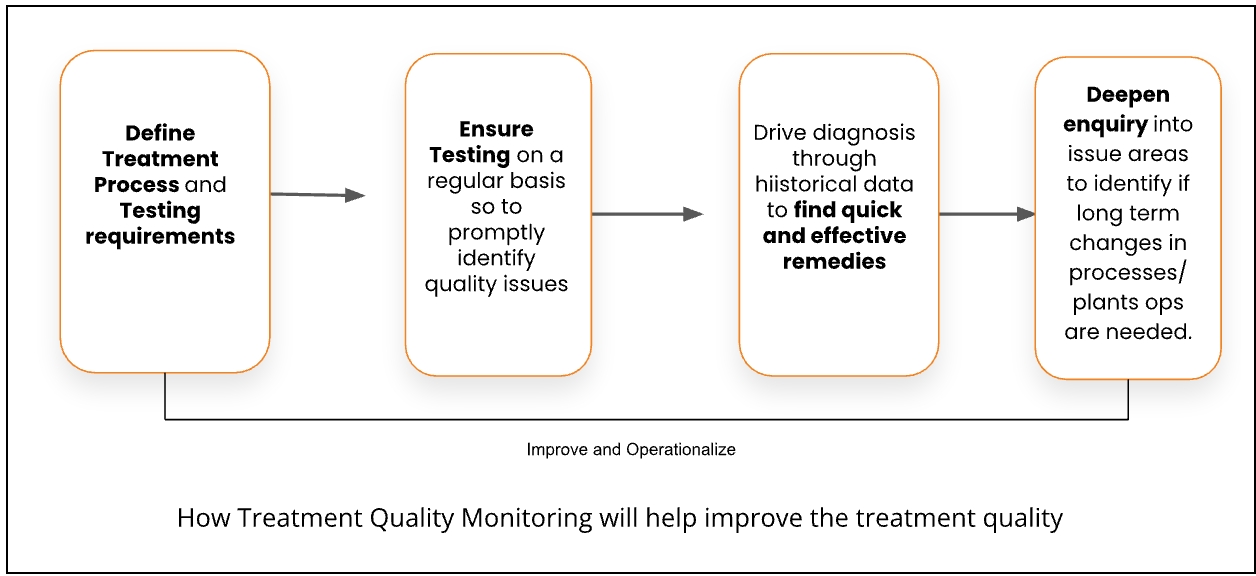
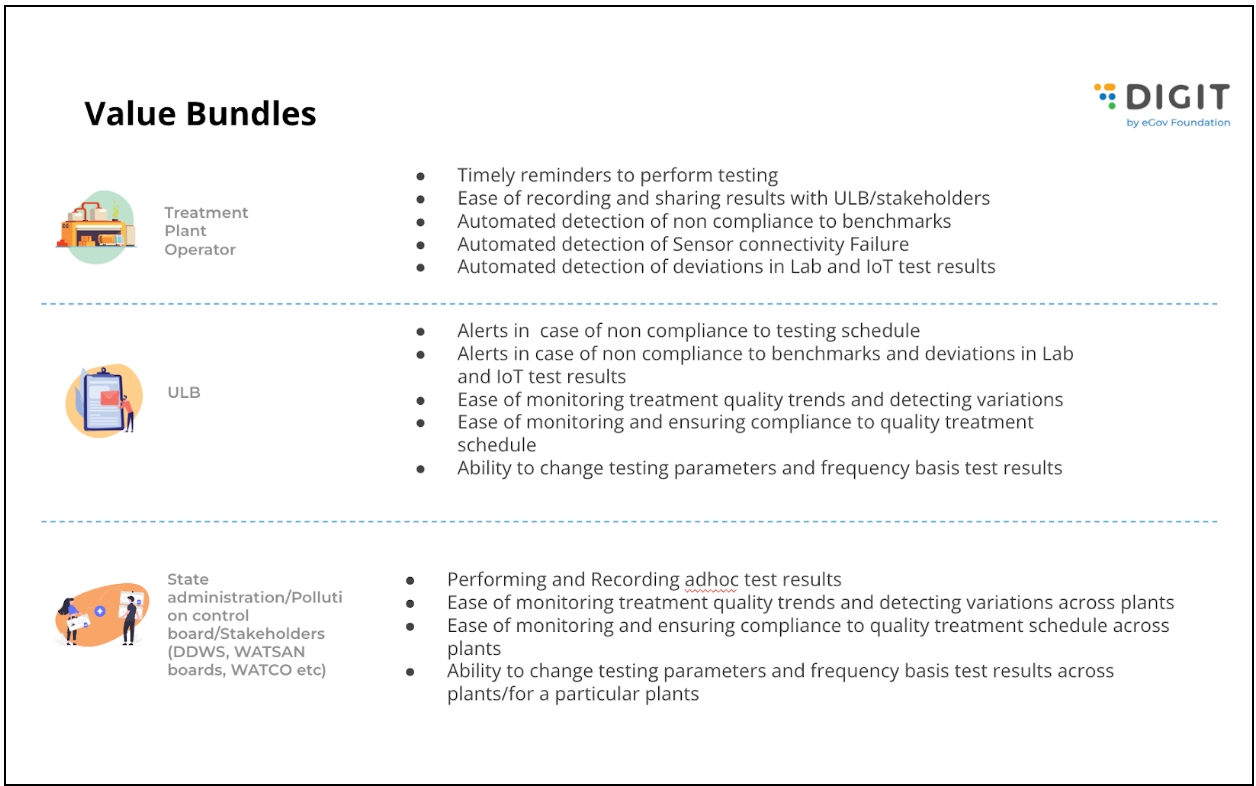
{
"tests": [
{
"id": "591836e7-c38e-4427-ad0d-2ec1f3d5e73b",
"testId": "1013-PQM-2023-11-24-001079",
"testCode": null,
"tenantId": "pg.citya",
"plantCode": "PURI_FSTP",
"processCode": "FECAL_SLUDGE_MANAGEMENT",
"stageCode": "COAGULATION",
"materialCode": "POTABLE_WATER",
"deviceCode": null,
"testCriteria": [
{
"id": "edbaeafe-6db4-413e-9977-01406dd56c87",
"testId": "1013-PQM-2023-11-24-001079",
"criteriaCode": "TSS_LESST_100",
"resultValue": "20",
"allowedDeviation": null,
"resultStatus": "PENDING",
"isActive": true,
"auditDetails": {
"createdBy": "60cf0229-3334-49bd-a83b-7354080ef2fc",
"lastModifiedBy": "60cf0229-3334-49bd-a83b-7354080ef2fc",
"createdTime": 1700824652571,
"lastModifiedTime": 1700824879822
}
}
],
"status": "PENDING",
"wfStatus": "PENDINGRESULTS",
"testType": "LAB_SCHEDULED",
"scheduledDate": 1700888886872,
"isActive": true,
"documents": [],
"additionalDetails": {},
"auditDetails": {
"createdBy": "60cf0229-3334-49bd-a83b-7354080ef2fc",
"lastModifiedBy": "60cf0229-3334-49bd-a83b-7354080ef2fc",
"createdTime": 1700824652571,
"lastModifiedTime": 1700824879822
},
"workflow": {
"action": "UPDATE_RESULT"
},
"labAssignedTo": null
}
],
"RequestInfo": {
"apiId": "Rainmaker",
"authToken": "e5d10a5d-b262-47fc-a9ee-fc24c3a0de19",
"userInfo": {
"id": 721,
"uuid": "41488b21-c742-4290-af8e-a2a1dc3749ac",
"userName": "TQM_DEV_PLANTOPERATOR",
"name": "Plant operator",
"mobileNumber": "7281638699",
"emailId": null,
"locale": null,
"type": "EMPLOYEE",
"roles": [
{
"name": "PQM TP OPERATOR",
"code": "PQM_TP_OPERATOR",
"tenantId": "pg.citya"
}
],
"active": true,
"tenantId": "pg.citya",
"permanentCity": null
},
"msgId": "1701076677904|en_IN",
"plainAccessRequest": {}
}
}curl 'https://unified-dev.digit.org/pqm-service/v1/_update' \
-H 'authority: unified-dev.digit.org' \
-H 'accept: application/json, text/plain, */*' \
-H 'accept-language: en-US,en;q=0.9' \
-H 'content-type: application/json;charset=UTF-8' \
-H 'cookie: _ga_V2CPZCVTXQ=GS1.1.1695293925.1.1.1695293950.0.0.0; __cuid=59fd9aac25b044f6af006bd4b159cbbf; amp_fef1e8=f4fc07f6-3fb0-4c67-8114-a1beb906e625R...1hf75985a.1hf76uet8.i.8.q; _ga_P1TZCPKF6S=GS1.1.1699974064.1.1.1699975479.60.0.0; _ga=GA1.2.1291438273.1695293925; _ga_0JZG96DZSM=GS1.1.1699977339.2.0.1699977339.60.0.0' \
-H 'origin: https://unified-dev.digit.org' \
-H 'referer: https://unified-dev.digit.org/sanitation-ui/employee/tqm/test-details?id=1013-PQM-2023-11-24-001079' \
-H 'sec-ch-ua: "Google Chrome";v="119", "Chromium";v="119", "Not?A_Brand";v="24"' \
-H 'sec-ch-ua-mobile: ?1' \
-H 'sec-ch-ua-platform: "Android"' \
-H 'sec-fetch-dest: empty' \
-H 'sec-fetch-mode: cors' \
-H 'sec-fetch-site: same-origin' \
-H 'user-agent: Mozilla/5.0 (Linux; Android 6.0; Nexus 5 Build/MRA58N) AppleWebKit/537.36 (KHTML, like Gecko) Chrome/119.0.0.0 Mobile Safari/537.36' \
--data-raw '{"tests":[{"id":"591836e7-c38e-4427-ad0d-2ec1f3d5e73b","testId":"1013-PQM-2023-11-24-001079","testCode":null,"tenantId":"pg.citya","plantCode":"PURI_FSTP","processCode":"FECAL_SLUDGE_MANAGEMENT","stageCode":"COAGULATION","materialCode":"POTABLE_WATER","deviceCode":null,"testCriteria":[{"id":"edbaeafe-6db4-413e-9977-01406dd56c87","testId":"1013-PQM-2023-11-24-001079","criteriaCode":"TSS_LESST_100","resultValue":"20","allowedDeviation":null,"resultStatus":"PENDING","isActive":true,"auditDetails":{"createdBy":"60cf0229-3334-49bd-a83b-7354080ef2fc","lastModifiedBy":"60cf0229-3334-49bd-a83b-7354080ef2fc","createdTime":1700824652571,"lastModifiedTime":1700824879822}}],"status":"PENDING","wfStatus":"PENDINGRESULTS","testType":"LAB_SCHEDULED","scheduledDate":1700888886872,"isActive":true,"documents":[],"additionalDetails":{},"auditDetails":{"createdBy":"60cf0229-3334-49bd-a83b-7354080ef2fc","lastModifiedBy":"60cf0229-3334-49bd-a83b-7354080ef2fc","createdTime":1700824652571,"lastModifiedTime":1700824879822},"workflow":{"action":"UPDATE_RESULT"},"labAssignedTo":null}],"RequestInfo":{"apiId":"Rainmaker","authToken":"e5d10a5d-b262-47fc-a9ee-fc24c3a0de19","userInfo":{"id":721,"uuid":"41488b21-c742-4290-af8e-a2a1dc3749ac","userName":"TQM_DEV_PLANTOPERATOR","name":"Plant operator","mobileNumber":"7281638699","emailId":null,"locale":null,"type":"EMPLOYEE","roles":[{"name":"PQM TP OPERATOR","code":"PQM_TP_OPERATOR","tenantId":"pg.citya"}],"active":true,"tenantId":"pg.citya","permanentCity":null},"msgId":"1701076677904|en_IN","plainAccessRequest":{}}}' \
--compressedPQM_TP_OPERATOR{
"inbox": {
"processSearchCriteria": {
"businessService": [
"PQM"
],
"moduleName": "pqm",
"tenantId": "pg.citya"
},
"moduleSearchCriteria": {
"sortBy": "createdTime",
"plantCodes": [
"ANGUL_FSTP",
"PURI_FSTP"
],
"processCodes": [
"WATER_FILTERING",
"FECAL_SLUDGE_MANAGEMENT"
],
"materialCodes": [
"ARSENIC",
"NA",
"SCREENED_SLUDGE",
"CHLORINE",
"SALT",
"IRON",
"FECAL_SLUDGE",
"EFFLUENTS",
"BIOSOLID",
"POTABLE_WATER"
],
"wfStatus": [
"SCHEDULED",
"PENDINGRESULTS"
],
"fromDate": 1698777000000,
"toDate": 1701368999000
},
"limit": 100,
"offset": 0,
"tenantId": "pg.citya"
},
"RequestInfo": {
"apiId": "Rainmaker",
"authToken": "e5d10a5d-b262-47fc-a9ee-fc24c3a0de19",
"userInfo": {
"id": 721,
"uuid": "41488b21-c742-4290-af8e-a2a1dc3749ac",
"userName": "TQM_DEV_PLANTOPERATOR",
"name": "Plant operator",
"mobileNumber": "7281638699",
"emailId": null,
"locale": null,
"type": "EMPLOYEE",
"roles": [
{
"name": "PQM TP OPERATOR",
"code": "PQM_TP_OPERATOR",
"tenantId": "pg.citya"
}
],
"active": true,
"tenantId": "pg.citya",
"permanentCity": null
},
"msgId": "1701076328474|en_IN",
"plainAccessRequest": {}
}
}curl 'https://unified-dev.digit.org/inbox/v2/_search' \
-H 'authority: unified-dev.digit.org' \
-H 'accept: application/json, text/plain, */*' \
-H 'accept-language: en-US,en;q=0.9' \
-H 'content-type: application/json;charset=UTF-8' \
-H 'cookie: _ga_V2CPZCVTXQ=GS1.1.1695293925.1.1.1695293950.0.0.0; __cuid=59fd9aac25b044f6af006bd4b159cbbf; amp_fef1e8=f4fc07f6-3fb0-4c67-8114-a1beb906e625R...1hf75985a.1hf76uet8.i.8.q; _ga_P1TZCPKF6S=GS1.1.1699974064.1.1.1699975479.60.0.0; _ga=GA1.2.1291438273.1695293925; _ga_0JZG96DZSM=GS1.1.1699977339.2.0.1699977339.60.0.0' \
-H 'origin: https://unified-dev.digit.org' \
-H 'referer: https://unified-dev.digit.org/sanitation-ui/employee/tqm/inbox' \
-H 'sec-ch-ua: "Google Chrome";v="119", "Chromium";v="119", "Not?A_Brand";v="24"' \
-H 'sec-ch-ua-mobile: ?1' \
-H 'sec-ch-ua-platform: "Android"' \
-H 'sec-fetch-dest: empty' \
-H 'sec-fetch-mode: cors' \
-H 'sec-fetch-site: same-origin' \
-H 'user-agent: Mozilla/5.0 (Linux; Android 6.0; Nexus 5 Build/MRA58N) AppleWebKit/537.36 (KHTML, like Gecko) Chrome/119.0.0.0 Mobile Safari/537.36' \
--data-raw '{"inbox":{"processSearchCriteria":{"businessService":["PQM"],"moduleName":"pqm","tenantId":"pg.citya"},"moduleSearchCriteria":{"sortBy":"createdTime","plantCodes":["ANGUL_FSTP","PURI_FSTP"],"processCodes":["WATER_FILTERING","FECAL_SLUDGE_MANAGEMENT"],"materialCodes":["ARSENIC","NA","SCREENED_SLUDGE","CHLORINE","SALT","IRON","FECAL_SLUDGE","EFFLUENTS","BIOSOLID","POTABLE_WATER"],"wfStatus":["SCHEDULED","PENDINGRESULTS"],"fromDate":1698777000000,"toDate":1701368999000},"limit":100,"offset":0,"tenantId":"pg.citya"},"RequestInfo":{"apiId":"Rainmaker","authToken":"e5d10a5d-b262-47fc-a9ee-fc24c3a0de19","userInfo":{"id":721,"uuid":"41488b21-c742-4290-af8e-a2a1dc3749ac","userName":"TQM_DEV_PLANTOPERATOR","name":"Plant operator","mobileNumber":"7281638699","emailId":null,"locale":null,"type":"EMPLOYEE","roles":[{"name":"PQM TP OPERATOR","code":"PQM_TP_OPERATOR","tenantId":"pg.citya"}],"active":true,"tenantId":"pg.citya","permanentCity":null},"msgId":"1701076328474|en_IN","plainAccessRequest":{}}}' \
--compressedPQM_TP_OPERATOR


Provision of urban local bodies (ULBs)/DSO to assign one or more sanitation workers to each request:
Sanitation workers will be made available via integration with the Garima database through API in the workflow.
Since the Garima ID may not be well known to the ULB/DSO, a search functionality is to be made available by entering a phone number.
Preview details of the selected sanitation worker for confirmation.
Capture sanitation worker details if a sanitation worker is not available in the Garima database.
Provide aggregated data around how many requests are served by date via unique Garima IDs by API to UMC.
No linking will be done between the Garima worker and the vendor in Sujog FSM.
Provide enumeration and benefits to sanitation workers.
Identify the percentage of services with evidence of safe practices.
Create UrcConfig.json and add GP data for all the ULBs for which the URC feature needs to be enabled.
Created two adaptors for Garima:
1. Create API
- The adapter calls the UMC API to create records and generate the unique garima ID.
2. Search API
- Get a response from the UMC API based on the search criteria.
Changes made in the FSM Update API
When we update the FSM application, we create a record of Garima in the DIGIT system simultaneously which uses the individual service to create an individual record in the DIGIT database.
Accordingly, one needs to set up the individual service for Garima.
Create a Garima folder in web\micro-ui-internals\packages\modules\fsm\src\pages\employee
Add the following code.
https://github.com/egovernments/digit-ui/blob/900f784b813f0e733ee0b9eae162759345248d42/web/micro-ui-internals/packages/modules/fsm/src/pages/employee/GarimaDetails/index.js#L1C1-L200C30
Add the required Garima custom components and register them.
https://github.com/egovernments/digit-ui/blob/900f784b813f0e733ee0b9eae162759345248d42/web/micro-ui-internals/packages/modules/fsm/src/pageComponents/GarimaPersonalDetails.js#L1C1-L199C38
Register the above custom page components:
Add the redirection URL for the "Add vehicle" action option:
Add the necessary Garima hooks call:
The following localisations need to be added:
Feature
Service Name
PR
Added new component for URC
data/pg/FSM/CommonFieldsConfig.JSON
Create UrcConfig.json to enable URC feature
data/pg/angul/FSM/UrcConfig.json
Enabling overRide for tripAmount
data/pg/FSM/Config.json
Added GP data for specific ulb
data/pg/ulb-name/egov-location/boundary-data.json
Feature
Service Name
Changes
Garima
FSM
https://github.com/egovernments/DIGIT-Dev/commit/5f28f07e9a43597da22703964edb00f8f554c1fc https://github.com/egovernments/DIGIT-Dev/commit/7b325edf26f34aaad0b8a1aa09f132c47232424c https://github.com/egovernments/DIGIT-Dev/commit/0405a900dd8a12de03b60bb0f47ab1733ca03e66 https://github.com/egovernments/DIGIT-Dev/commit/5f44d9c3dc0b7515beb10b53ba4e6c06d0df2833 https://github.com/egovernments/DIGIT-Dev/commit/99f15a522f70f0a44a4335b9492cd4b7d589e0c1 https://github.com/egovernments/DIGIT-Dev/commit/4f16b9e9681ebca19e814ed2ec8cf256cb08946c
FSM
egovio/fsm:FSM1.3Impl-sujog-Odisha-handover-pqm-4f16b9e968-176
egovio/fsm-db:FSM1.3Impl-sujog-Odisha-handover-pqm-4f16b9e968-176
Individual
egovio/individual-db:sujog-individual-d13a5d35fb-199
egovio/individual:sujog-individual-d13a5d35fb-199
Digit-ui
egovio/digit-ui:FSM-Sujog-40157ab-325
FSM
/fsm/v1/_update
/fsm/v1/_searchGarimaWorker
/fsm/v1/_createGarimaWorker
Individual
/individual/v1/_create
/individual/v1/_search
UMC
api/egov/sanitation-worker/search
/api/v1/egov/sanitation-worker/capture
[
{
"code": "ADD_DRIVER_MOBILE_NUMBER",
"message": "Add driver's mobile number",
"module": "rainmaker-fsm",
"locale": "en_IN"
},
{
"code": "ADD_HELPER",
"message": "Add Helper",
"module": "rainmaker-fsm",
"locale": "en_IN"
},
{
"code": "ADD_HELPER_MOBILE_NUMBER",
"message": "Add helper's mobile number",
"module": "rainmaker-fsm",
"locale": "en_IN"
},
{
"code": "ASSIGN_DRIVER",
"message": "Assign driver",
"module": "rainmaker-fsm",
"locale": "en_IN"
},
{
"code": "ASSIGN_HELPER",
"message": "Assign helper",
"module": "rainmaker-fsm",
"locale": "en_IN"
},
{
"code": "ASSIGN_SANIATION_WORKER",
"message": "Assign sanitation worker",
"module": "rainmaker-fsm",
"locale": "en_IN"
},
{
"code": "ES_FSM_ADD_DRIVER_SUCCESS",
"message": "Driver Added Successfully",
"module": "rainmaker-fsm",
"locale": "en_IN"
},
{
"code": "ES_TITLE_DRIVER_DETAILS",
"message": "Driver Details",
"module": "rainmaker-fsm",
"locale": "en_IN"
},
{
"code": "GARIMA_DRIVER",
"message": "Driver",
"module": "rainmaker-fsm",
"locale": "en_IN"
},
{
"code": "FSM_HELPER_LABEL",
"message": "Helper",
"module": "rainmaker-fsm",
"locale": "en_IN"
},
{
"code": "GARIMA_HELPER",
"message": "Helper",
"module": "rainmaker-fsm",
"locale": "en_IN"
}
]


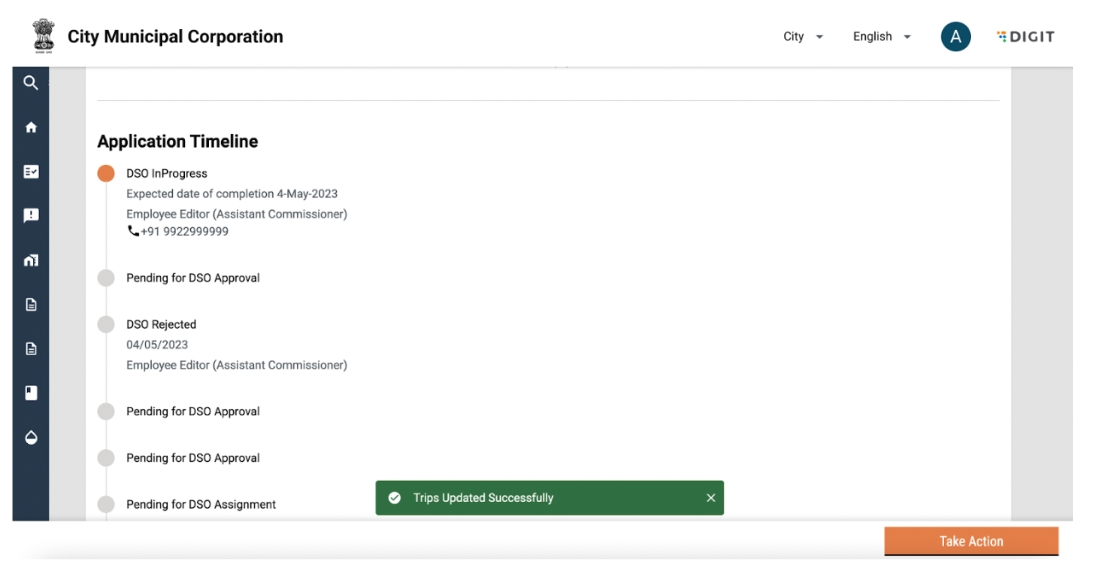
The treatment plant operator is responsible for ensuring that the treatment quality for the plant is as per benchmarks. For this, treatment quality tests need to be performed regularly and any deviations in quality need to be corrected immediately.
The treatment plant operator has the following functionalities:
View the list of upcoming tests: Based on the frequency of testing that is configured on the backend, a testing schedule is generated for the plant. The plant operator can receive timely reminders and can view overdue and upcoming tests.
View test details: Details of upcoming tests can be accessed to verify outputs, parameters, and test due dates.
Update the test status and results: Test status and results against a scheduled test can be updated.
View past test results: A digital record of all past test results uploaded on the platform can be accessed. Sort and filter functionalities make it easy to view all the test results.
Treatment plant operator credentials (login ID and password) can be created for employees via the HRMS. Using this, the treatment plant operator can sign in.
On this page, the following actions can be performed:
Enter username and password.
Select the city for login.
Reset password by clicking on the “Forgot Password” link.
Home Page
The user will land on the home page post-login. The user can perform the following actions:
User Actions
Access treatment quality module (Update test status and results).
Switch between the plants.
Users can view the List of pending tasks: This will show the list of tests pending within the next [X] days. A button for “View All Pending Tasks” will be displayed which will redirect the user to “All Pending Tasks”.
Other actions such as an inbox to view the incoming vehicles for disposal and record incoming vehicles will be available here, based on the functionality assigned.
On clicking on the treatment quality card, the user is redirected to the TQM home page. The user can perform the following actions:
User Actions:
View and take action on upcoming tests using the inbox. The inbox will show a count of upcoming tests beside it.
Past test results: Past test results submitted for the plant can be viewed here.
View performance: This widget shows the performance of the plant in regards to treatment quality and will display the following KPIs:
Test compliance: Compliance percentage of plant with regards to the treatment quality
Percentage of test results passed - The total test results passed/the total test results submitted (for the past 30 days).
Count of alerts raised in the past 30 days.
Distribution of alerts based on the alert category.
Go back to the Landing page using the ‘Back’ button.
Access Help
A help button is available for the user to get a guided view of the page. This is available on every page.
View List of Upcoming Tests
On clicking on the inbox link the user is redirected to the list of upcoming tests. This will show only a list of tests to be completed and updated by the Treatment Plant operator.
User Actions
The total count of upcoming tests is displayed beside the inbox.
View the list of upcoming tests. The following fields will be displayed:
Test ID.
Treatment process
Stage
Output type
Pending date
Status
SLA
Filter tests: On clicking on the filter icon, a pop-up will be displayed. The following filters are available:
Treatment process: The dropdown shows the values for treatment processes configured for the plant. The selected treatment process is displayed here on selection. If not, the field is left blank.
Output type: The dropdown shows values for output types configured for the plant. The selected output type is displayed here on selection. If not, the field is left blank.
Status: The dropdown shows values for the status in the treatment quality workflow. The selected status is displayed here on selection. If not, the field is left blank.
Date range: Selection of date range (calendar view): The selected date range is displayed here on selection. If not, the field is left blank.
On selecting values for the filters above, the user can click on search to filter the inbox.
To clear filters, the user can click on 'Clear'.
To close the pop-up, a user can click on the cross in the top right hand corner of the screen.
Sort: On clicking on sort, a pop-up will be displayed:
Tests can be sorted by the pending date:
Date (Latest First)
Date (Latest Last)
On selecting values for the sort above, the user can click on sort to sort the inbox.
To clear sort, a user can click on clear all.
To close the pop-up, a user can click on the cross in the top right hand corner of the screen.
View Test Details
The test details can be viewed by the user in two ways:
Via the pending tasks.
Via the inbox.
View Test Details Via Pending Tasks
The list of pending tasks can be accessed via the landing page for TQM. This will show the list of tests pending within the next 7 days.
This will show tests in both workflow stages:
Submit Sample
Update Results
Based on the workflow stage, the action for the user will be displayed.
On clicking the “Submit Sample/Update Results” button, the user will be redirected to the test details page.
View Test Details Via Inbox
For test results in the scheduled stage, the "Update status" button will be displayed.
For tests in the pending results stage, the "Update results" button will be displayed.
Update Test Details
On clicking on the "Update Status", the user will be redirected to the test details page.
The test details page will consist of 2 cards.
The first card will display the following fields:
Test ID
Treatment Process
Stage
Output Type
Pending Date
Status
Parameters to be tested along with their unit of measurement
SLA (This will be displayed in red/green based on the SLA. If today>pending date, this is red, If today<pending date, then it is green).
The second card will be based on the test status:
For status tests ‘Scheduled’, the user will be asked to ‘Select a lab’
For status tests “Pending Results”, the user will be asked to "Add test results".
The user can select the lab from the dropdown and click on the "Update Status".
The user can :
Update parameter readings (mandatory fields): Only numerical values can be entered.
Attach documents (non-mandatory).
Submit test results by clicking on the ‘Submit’ button. The button will be deactivated unless all values have been updated. On clicking the submit button, a pop-up will be displayed to the user to confirm submission.
The user can confirm submission by clicking on the ‘Submit’ button.
The user can go back to the test details page by clicking on the “Go back” button.
On submission, the system displays the lab results submitted successfully along with the test ID
The user can see the summary of the test results and whether it has passed/failed based on a comparison between the values entered by the user and the benchmarks.
In case all values are as per the benchmarks, the test results will be displayed as ‘Pass’. All values will be shown in green, and the user receives feedback that all results are as per the benchmarks.
In case one or more values are not as per the benchmarks, the test results will be displayed as ‘Fail’. All values as per the benchmarks will be shown in green. Values not as per the benchmarks will be shown in red. The user is provided with information that the test results are not as per the benchmark.
The user can go back to the home page by clicking on the ‘Back’ button.
View Past Test Results
Past test results can be viewed via the TQM landing page and by clicking on "View Past Results’"
On clicking on the past tests, the user is redirected to the list of the past tests.
User Actions :
View the list of past tests . Details of tge past tests can accessed by clicking on the "View Results".
Filter and sort test.


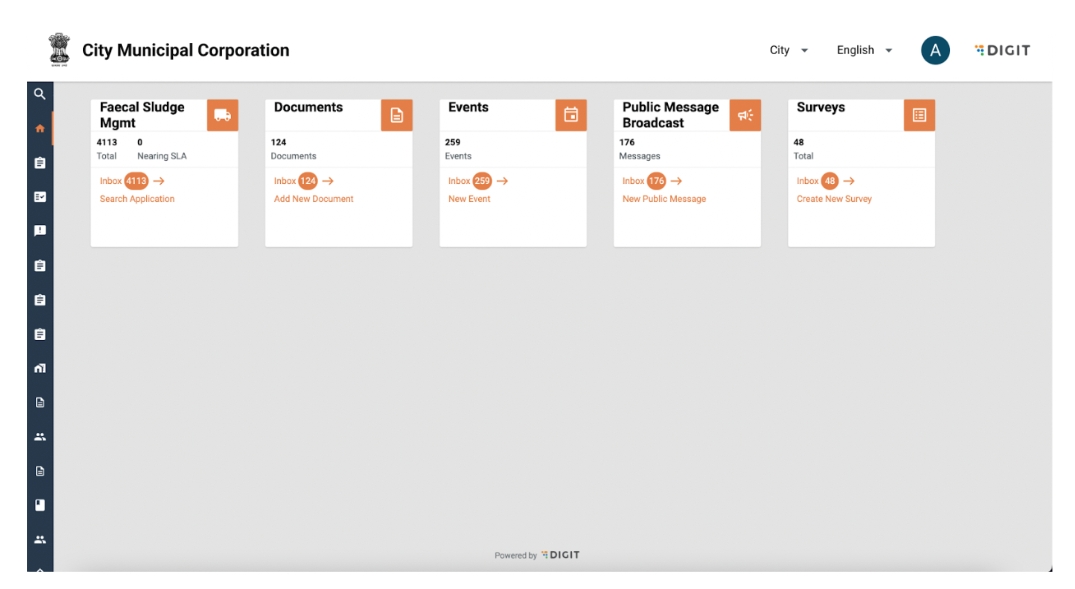
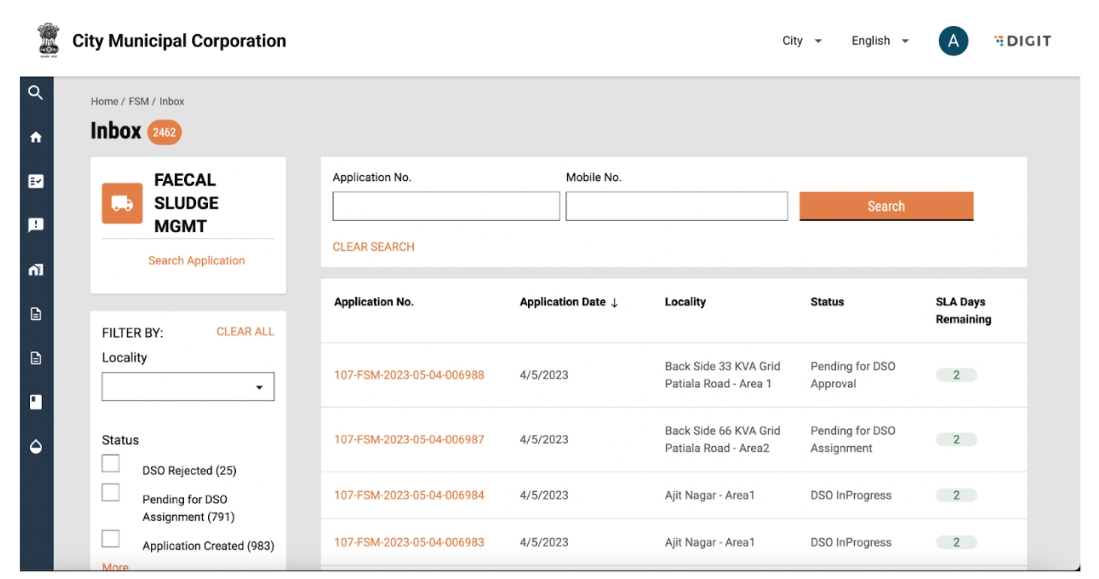
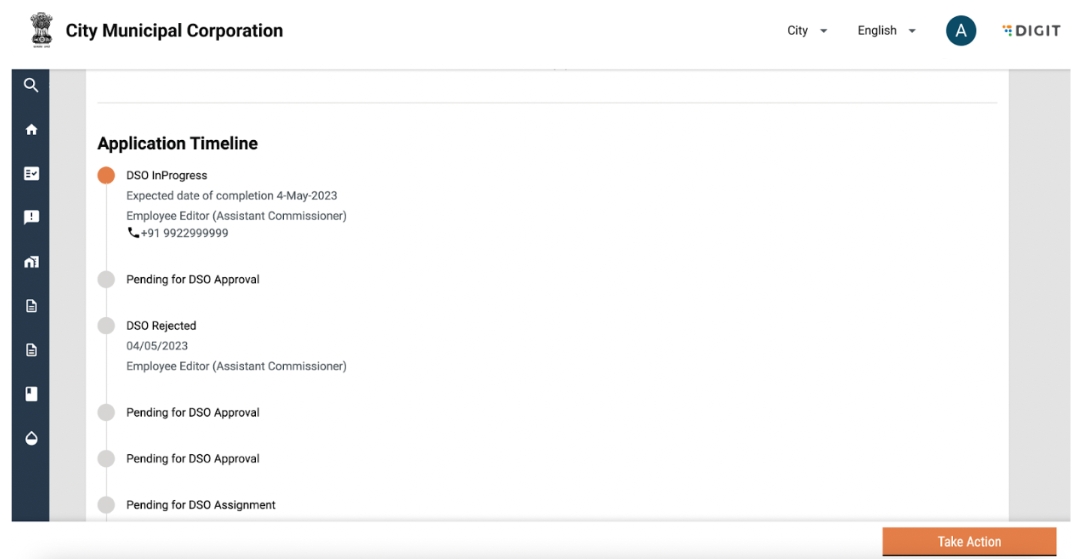
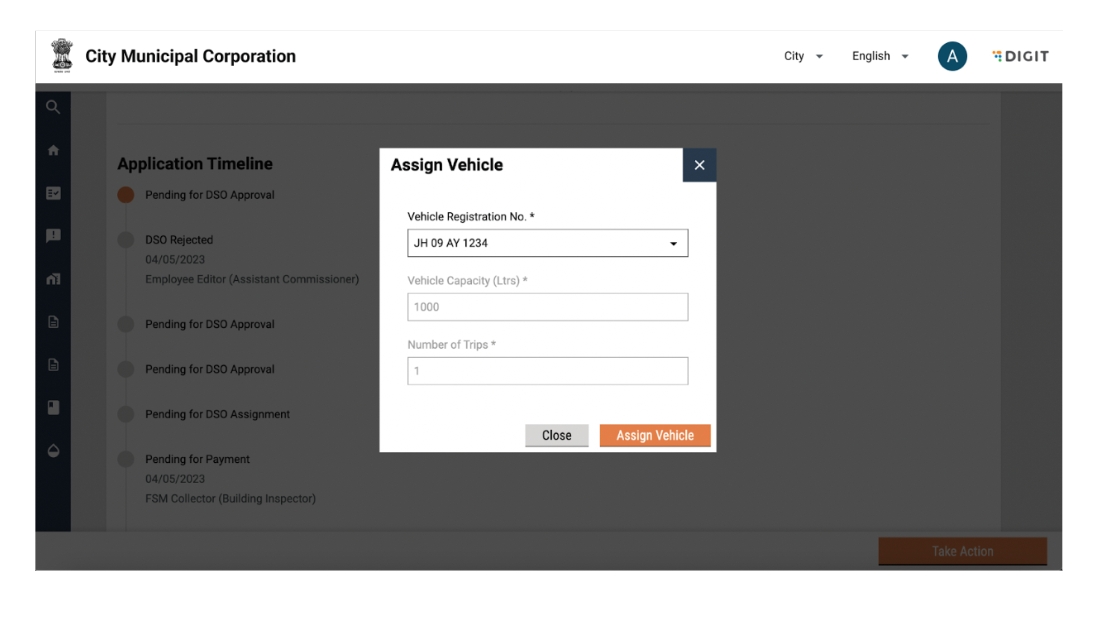
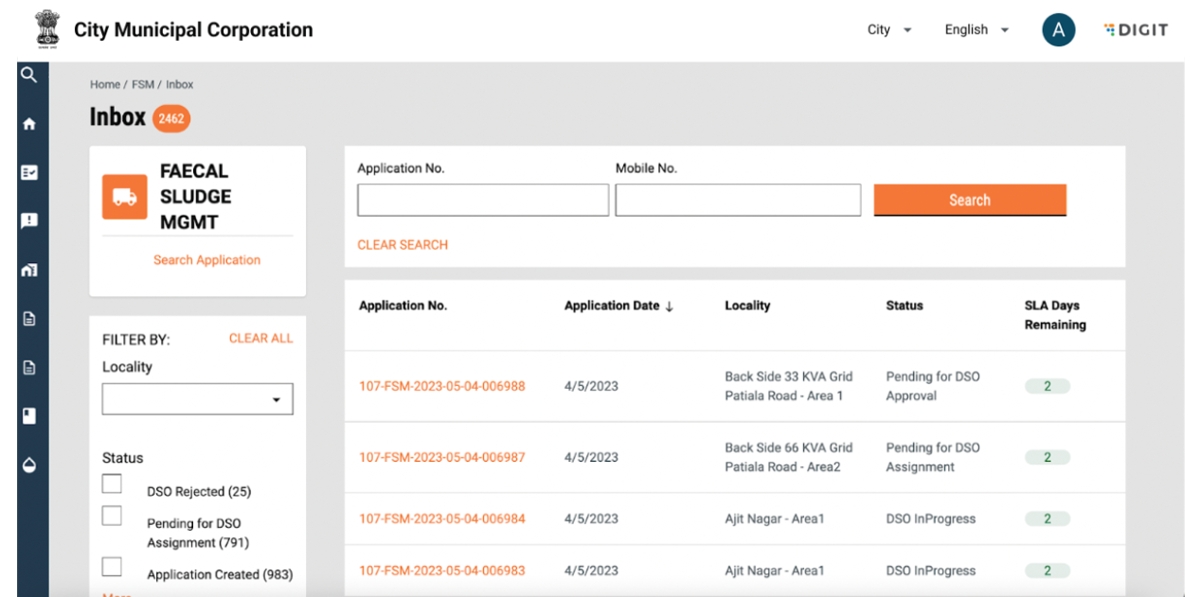

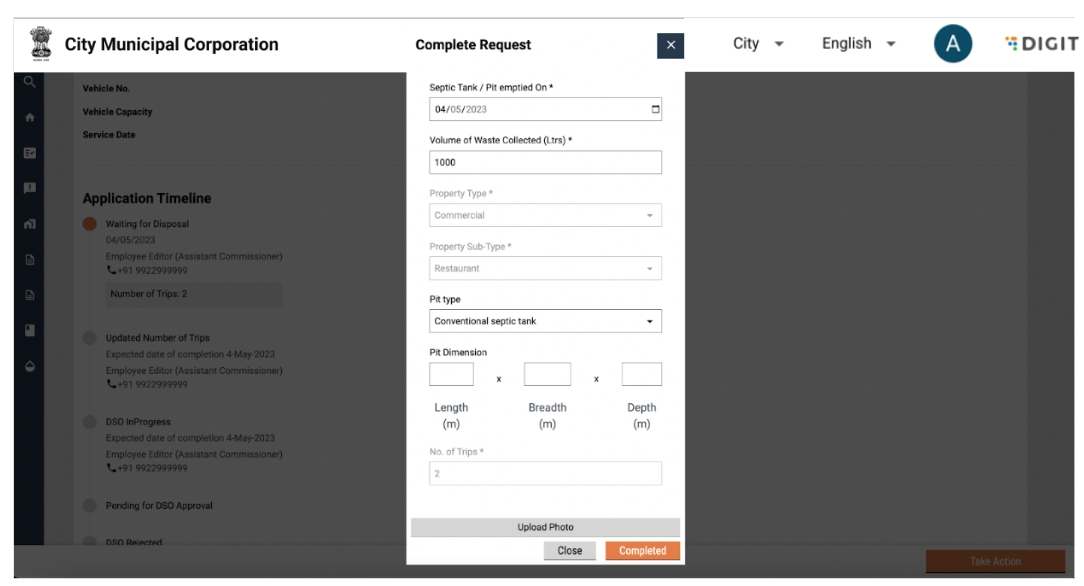
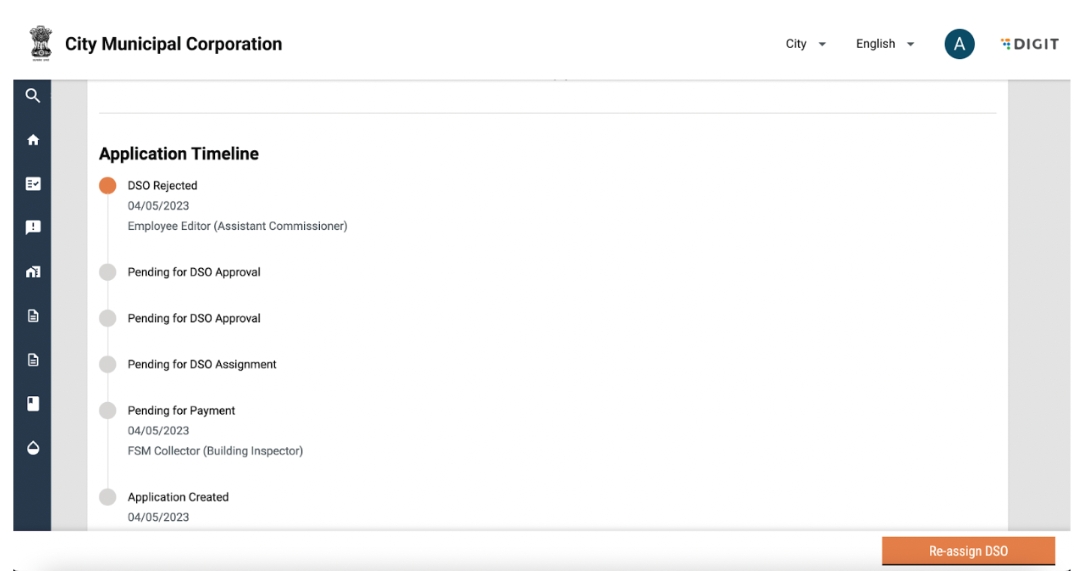
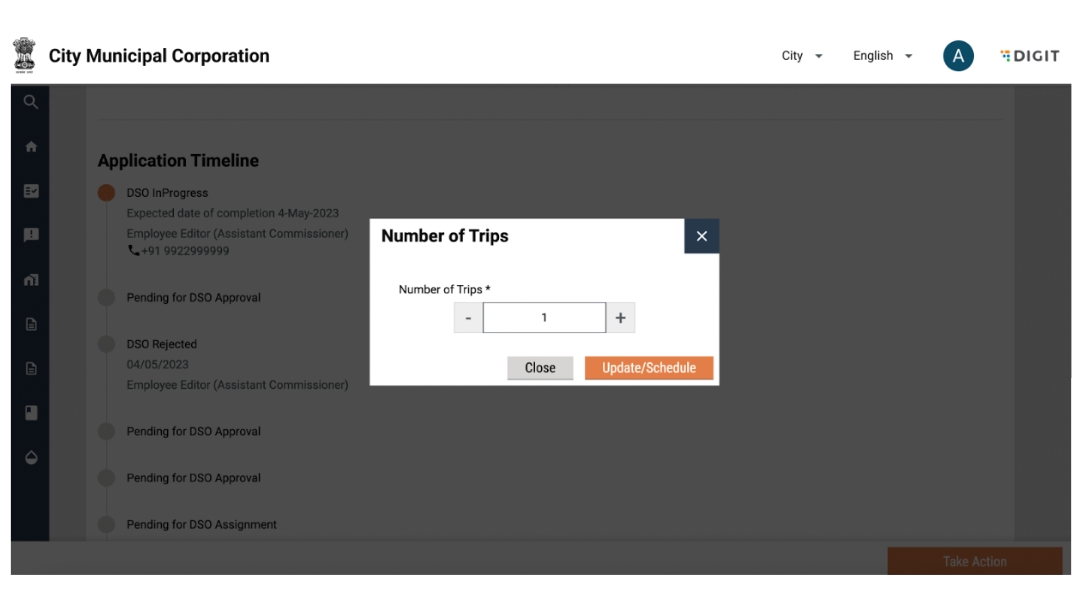
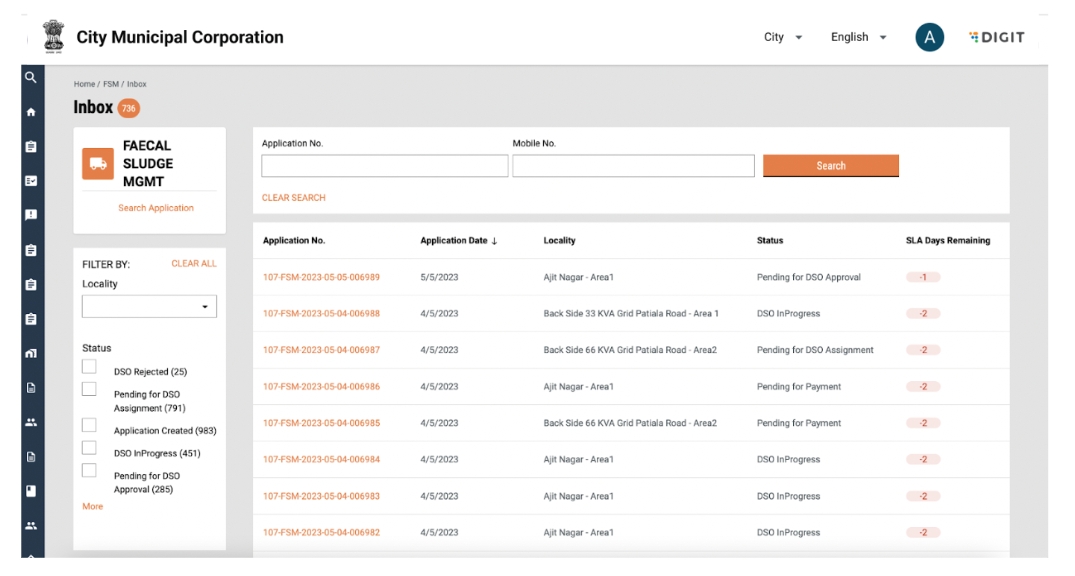
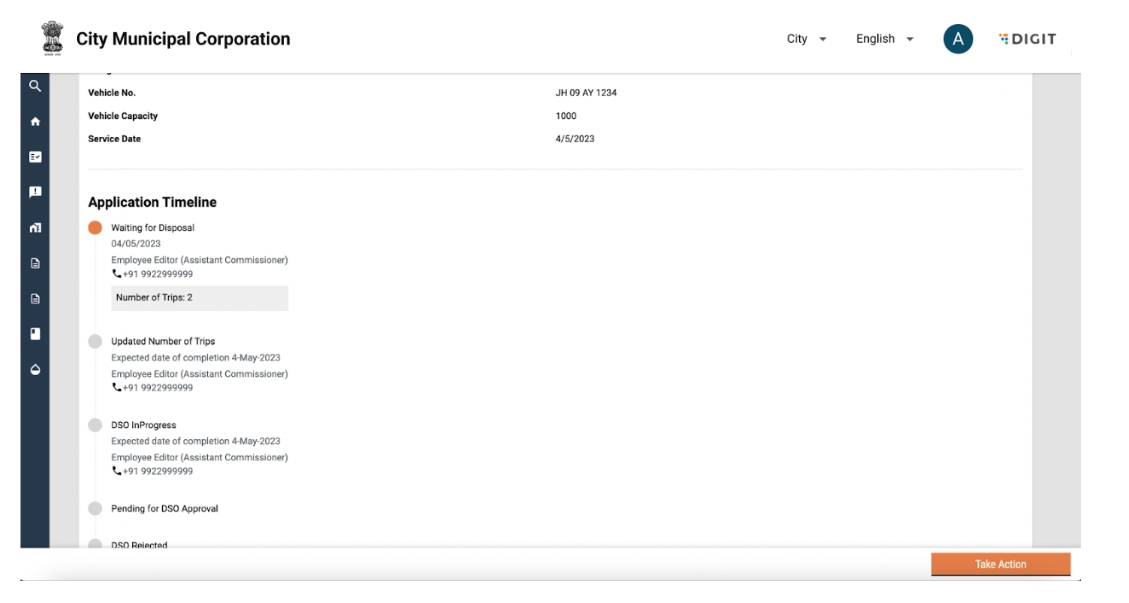
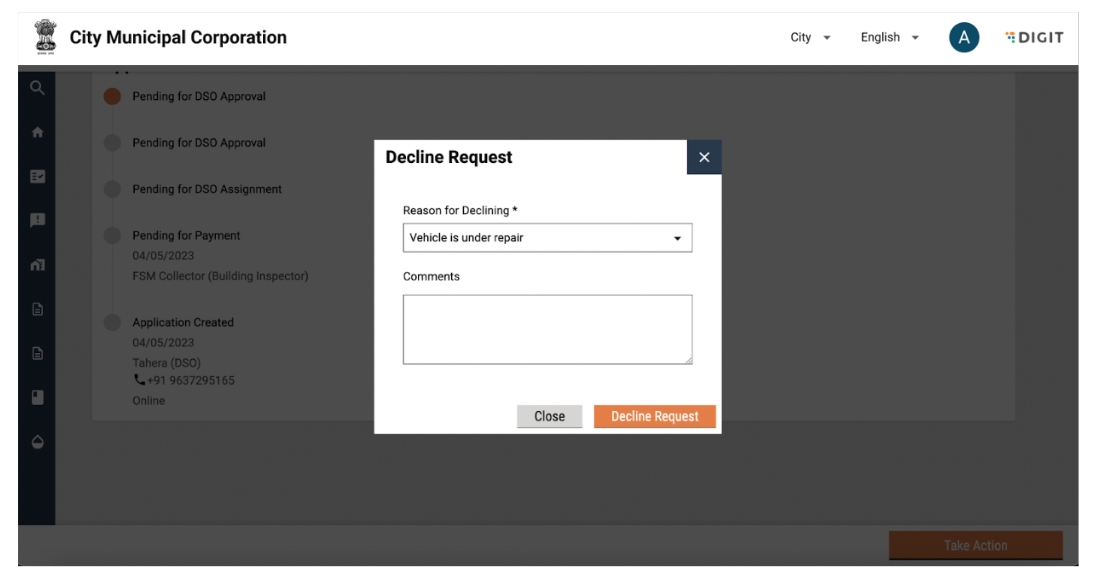


How is the schedule generated?
A scheduler runs for every ‘X’ days and new tests are generated within the treatment plant operator’s login.
Workflow for Treatment Quality Tests
There are 2 statuses:
Update Status
Update Results
Update Status : When the tests are scheduled and pending for status update, the status of the test is 'Scheduled'.
Update Results : Once the status of the tests are updated , the status of the tests will change to “Pending Result”, that is, waiting for the results to be updated.
Verifying against benchmarks and Pass/Fail. The status of the test depends on benchmarks that are pre-defined.
Citizens represent individuals or communities who are the system end-users. The FSM module provides citizens with the scope to apply for desludging services and make the payment for the applied services.
Citizens can do the following:
Language selection
Login
Apply for desludging services
Check application status and vehicle status
Download application acknowledgement
Choose to pay an amount above the minimum advance required and pay the remaining balance post service
Rate the services provided by the urban local bodies (ULBs)
Overview
When the user opens the application, it asks them to first select the language. The selected language is highlighted in orange colour.
On this page, the following actions can be performed:
A user can switch the language.
A user can click on 'Continue' to navigate to the login screen.
Overview
Users are redirected to this screen once they select the preferred language in the previous screen. Users can choose to either register as a new user or login as an existing user.
Register a new user
User Actions
On this page, the following actions can be performed:
A person can register as a new user by entering the mobile number, name and the city.
A person can login as an existing user by clicking on the login button.
A user can choose to continue with Whatsapp to raise a service request.
After the user clicks on "Continue", the page navigates to the "Enter OTP" page.
User actions
On this page, the following actions can be performed:
Enter the OTP received on the given mobile number to login.
The system will prompt for the selection from a list of available cities. Select the city to complete login.
Login as an Existing User
Overview
This is the page one is redirected to when the user clicks on ‘Login’ to login as an existing user.
User Actions
On this page, the following actions can be performed:
Enter mobile number to login as an existing user.
Navigate to register as a new user.
A user can choose to continue with Whatsapp to raise a service request.
After the user clicks on ‘Continue’, the page navigates to the “Enter OTP” page.
User Actions
On this page, the following actions can be performed:
Enter the OTP received on the given mobile number to login.
Once the OTP is entered, users are prompted to choose a location. Using this screen, they can select the location for which they would like to request for services.
User Actions
On this page, the following actions can be performed:
A user can switch the location.
A user can click on 'Continue' to navigate to the login screen.
Overview
After they login, users are redirected to this screen where multiple actions can be performed related to Faecal Sludge Management services.
User Actions
On this page, the following actions can be performed:
Desludging services can be requested by clicking on “Apply for Emptying of Septic Tank/Pit” option on the homepage.
User is redirected to the Service Request Page.
On this page, the following actions can be performed:
Enter “No of Trips” required
Enter “Vehicle Capacity” required.
Skip and Continue if the above information is not available.
On clicking on “Next”, the user is redirected to the Choose Property Type page.
On this page, the following actions can be performed:
Selection of Property Type
Basis Property Type selected, information regarding tentative cost of desludging service is provided.
On clicking on “Next”, the user is redirected to the Choose Property Subtype page.
On this page, the following actions can be performed:
Selection of Property Subtype
On clicking on “Next”, the user is redirected to the Pin Property Location page.
On this page, the following actions can be performed:
Enable the Location finder to allow GPS to track the current location, or, move the pin to the location manually.
Search for location using the search bar.
Skip and Continue if the above information is not available.
If pin location is not selected, the user is redirected to enter Pincode.
On this page, the following actions can be performed:
Entering Pincode.
Skip and Continue if the above information is not available.
On clicking on “Next”, the user is redirected to the Provide Property Address page.
On this page, the following actions can be performed:
Selection of City
Selection of Locality/Mohalla
On clicking on “Next”, the user is redirected to mention whether the property is located in a Slum.
On this page, the following actions can be performed:
Selection of whether property is located in Slum
On clicking on “Next”, the user is redirected to the Provide Name of Slum page. If no is selected, then this page is skipped.
On this page, the following actions can be performed:
Selection of Slum name from dropdown
On clicking on “Next”, the user is redirected to the Provide property address page.
On this page, the following actions can be performed:
Enter Street Name
Enter Door No.
Skip and Continue if above information is not available
On clicking on “Next”, the user is redirected to the Provide Landmark page.
On this page, the following actions can be performed:
Enter Landmark
Skip and Continue if above information is not available.
On clicking on “Next”, the user is redirected to the Pit/Septic Tank Details page.
On this page, the following actions can be performed:
Enter Length of Septic Tank
Enter Breadth of Septic Tank
Enter Depth of Septic Tank
Skip and Continue if the above information is not available.
On clicking on “Next”, the user is redirected to the Upload Pit photo page.
On this page, the following actions can be performed:
Upload Pit Photo
Skip and Continue if the above information is not available.
On clicking on “Next”, the user is redirected to the Select Gender page.
On this page, the following actions can be performed:
Select Gender
Skip and Continue if the above information is not available.
On clicking on “Next”, the user is redirected to the Payment Details page. The page displays Total amount and Minimum amount payable. The advance amount payable field displays the minimum amount payable.
On this page, the following actions can be performed:
Enter advance amount greater than minimum amount payable and lower than total amount
Skip and Continue if the above information is not available
On clicking on “Next”, the user is redirected to the Summary page. The page displays a summary of all the details filled by the user.
On this page, the following actions can be performed:
Click on Change to change any filled details
Click on Submit once the review is complete and the details are satisfactory
On clicking on “Submit”, the user is redirected to the Application Submitted page.
On this page, the following actions can be performed:
Download application receipt by clicking on download button
Go back to the home page.
The system triggers a notification along with the Application No. and details to the registered mobile number. Any subsequent updates and actions on the application also trigger a notification to the applicant.
The system triggers a notification along with the Application No. and details to the registered mobile number. Any subsequent updates and actions on the application also trigger a notification to the applicant.
From the home page, users can access past application history by clicking on the “My Applications” page.
On this page, the following actions can be performed:
Click on ‘My applications’ to view a list of past applications.
On this page, the following actions can be performed:
View details of Applications
Clicking on View redirects the user to Application Details
View details of applications
View current Status of application
On this page, the following actions can be performed:
If the application is on the Payment Pending stage, the user will have the option to make a payment from the View Applications page.
On this page, the following actions can be performed:
Download Acknowledge receipt of application
Make a payment by clicking on the Make Payment button.
The user is redirected to the bill details page which displays the total, advance and due amount.
On this page, the following actions can be performed:
Confirm details and Proceed to pay.
The user is redirected to Select Payment preference.
The system intimates the user that clicking on Pay will redirect them to a third party payment gateway.
On this page, the following actions can be performed:
Select Payment Method.
Click on pay to proceed.
The system displays a payment acknowledgement message along with the Payment Receipt No.
On this page, the following actions can be performed:
Print Payment receipt
If the application is on the Payment Pending stage, the user will have the option to make a payment from the View Applications page.
On this page, the following actions can be performed:
Provide the rating for service by clicking on Rate us.
The user will be redirected to the Provide Feedback page.
On this page, the following actions can be performed:
Selection of overall rating between 1-5 stars
Confirmation on Safety gears used by the operator
Providing additional inputs, if any, using the comments box.
Clicking on submit redirects the user to the confirmation page.
On this page, the following actions can be performed:
Download final payment receipt
Go back to the home page.
Selected tab white bg
Improvement
1
Done
Y
Add button width increase
Improvement
0.5
Done
Y
Dropdown width vendor
Improvement
0.1
Done
Y
Left padding of form
Improvement
0.1
Done
Y
Mobile and other validation spacing
Improvement
0.1
Done
Y
Role details input width should be same(License No)
Improvement
0.5
Done
Y
Delete Icon should be there
Improvement
0.1
Done
Y
Skills Localisation
Improvement
0.1
Done
Y
Dropdown height(upto 6-7 elements without scrolling)
Improvement
0.1
Done
Y
Add Vendor Icon should be before text
Improvement
0.1
Done
Y
Toast message should be up
Improvement
0.5
Done
Y
Delete popup spacing reduce
Improvement
Done
Role details tab compare with figma
Improvement
0.1
Done
Y
photograph compare with figma
Improvement
Done
Y
Icon in add role
Improvement
0.5
Done
Y
space b/w checkboxes
Improvement
0.1
Done
Y
Plus Icon in Details Page should be in circle
Improvement
0.1
Done
Y
FSM Card Icon missing Home Page
Improvement
1
Done
Y
Spacing between sections view worker
Improvement
1
Done
Y
Multiselect chips
Improvement
1
Done
Y
No Driver message check position(toast should touch the footer)
Improvement
0.5
Done
Y
Role details card spacing b/w labels and values
Improvement
0.5
Done
Y
All toasts should be at the bottom(close to either footer or action bar)
Improvement
0.1
Done
Y


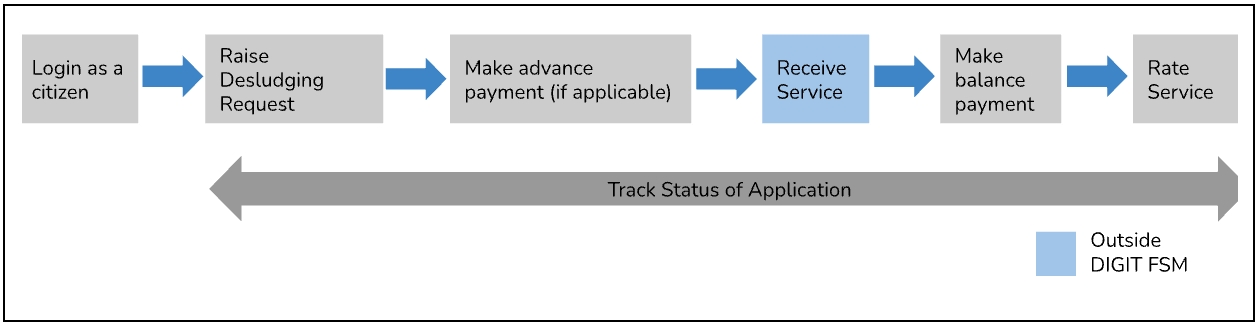
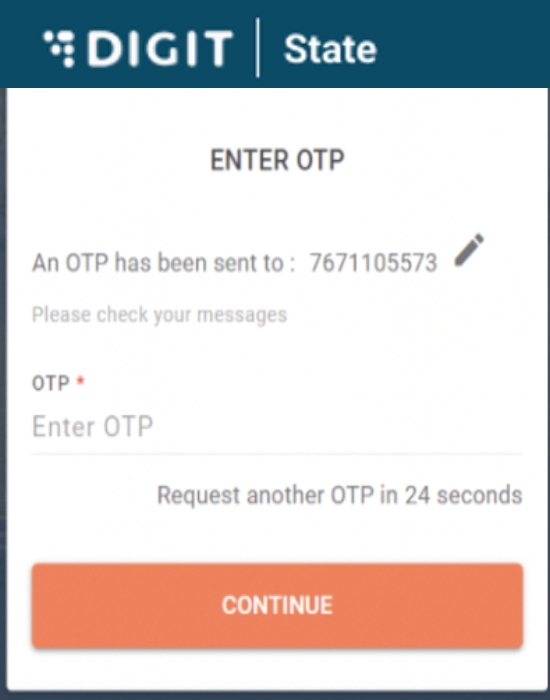
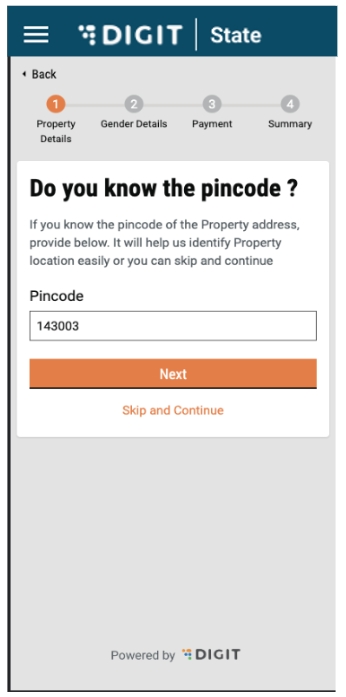
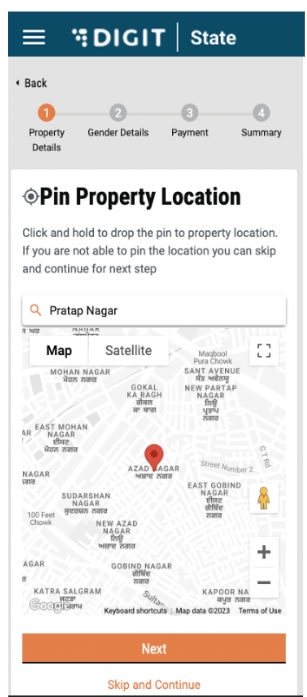
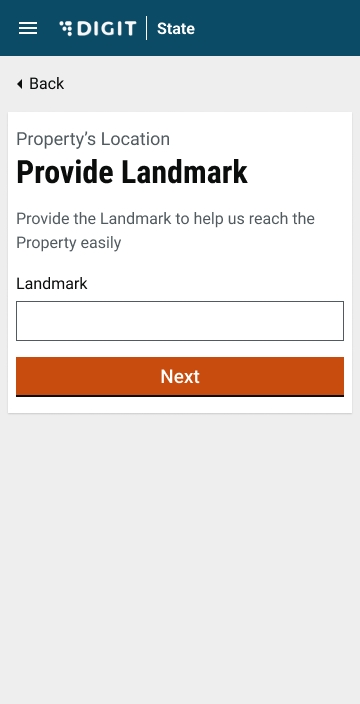

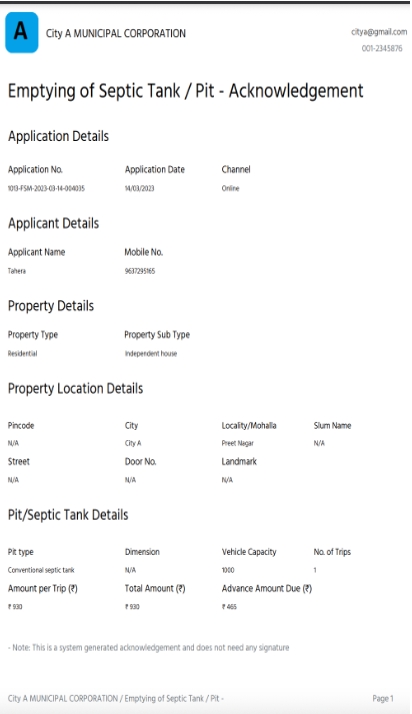
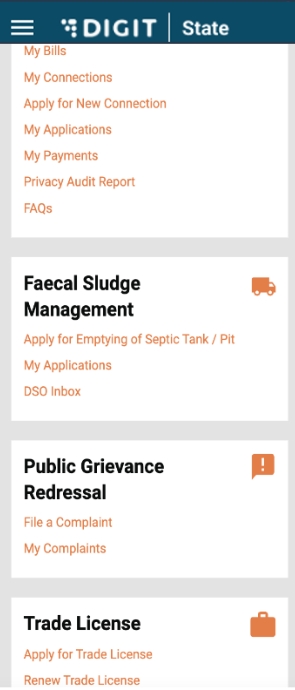
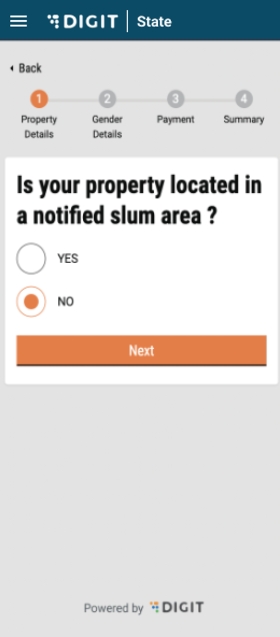
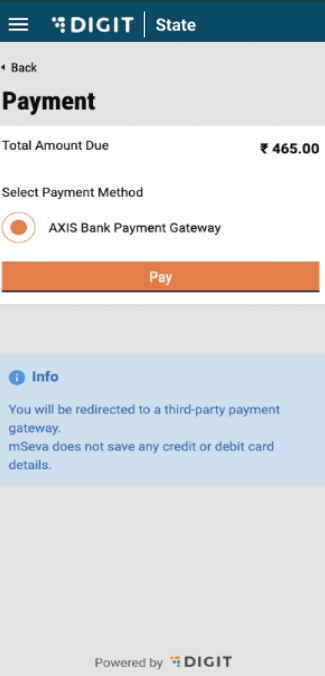
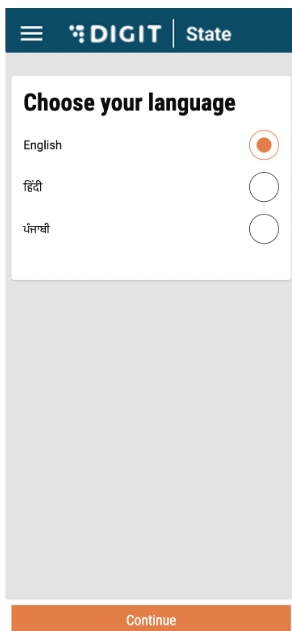
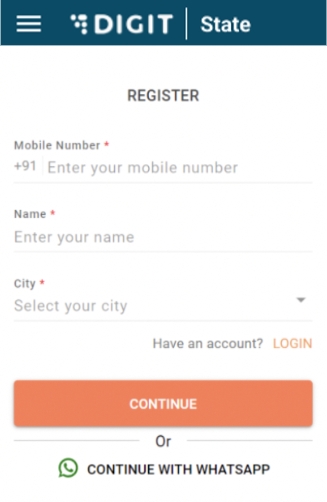
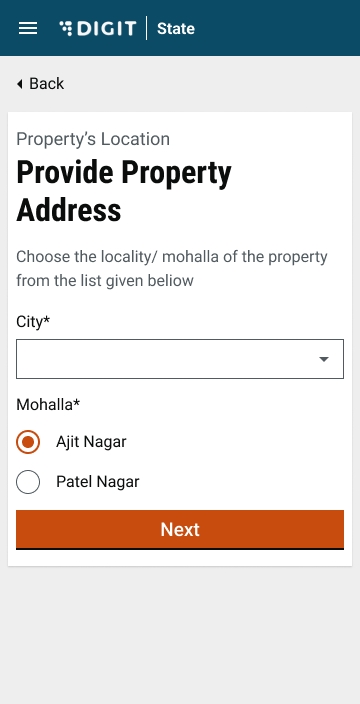
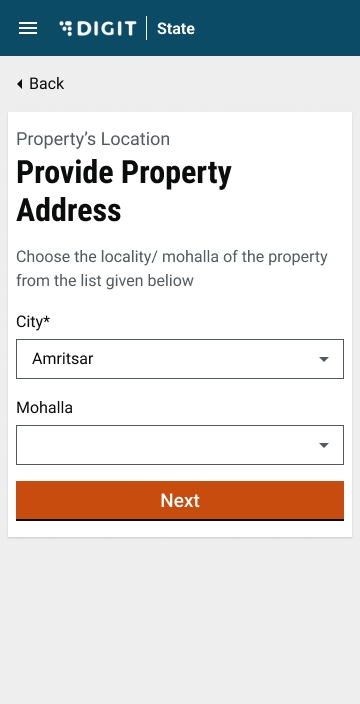
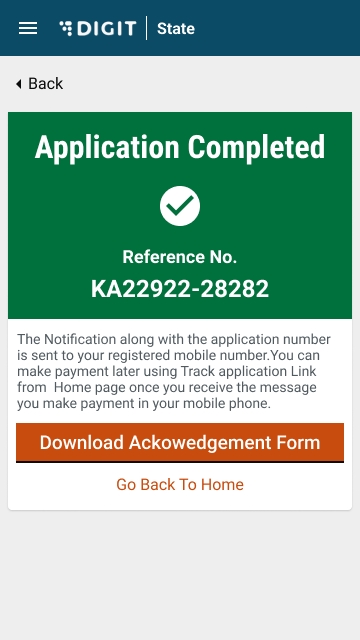
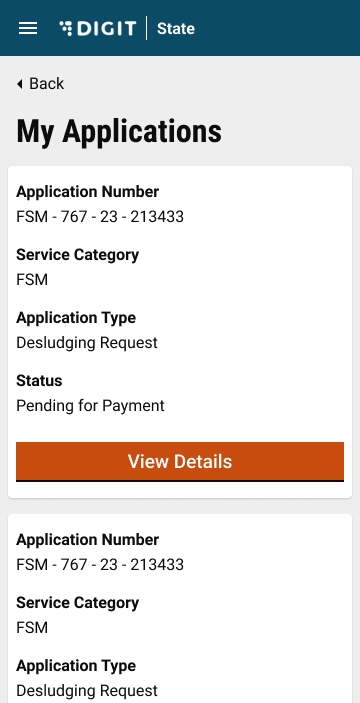
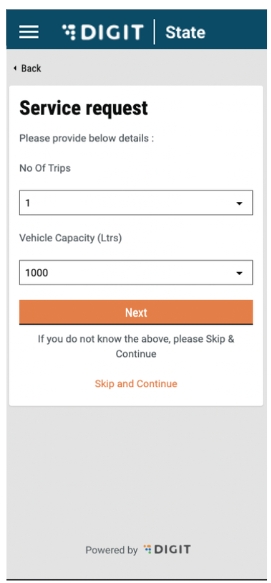
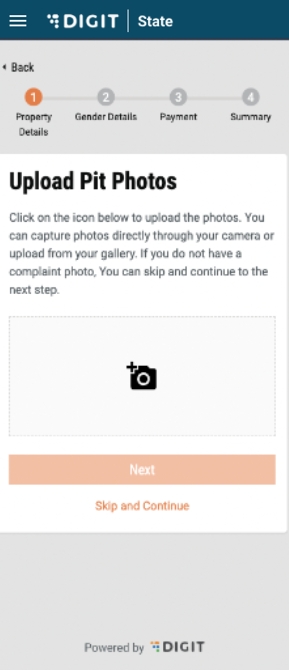
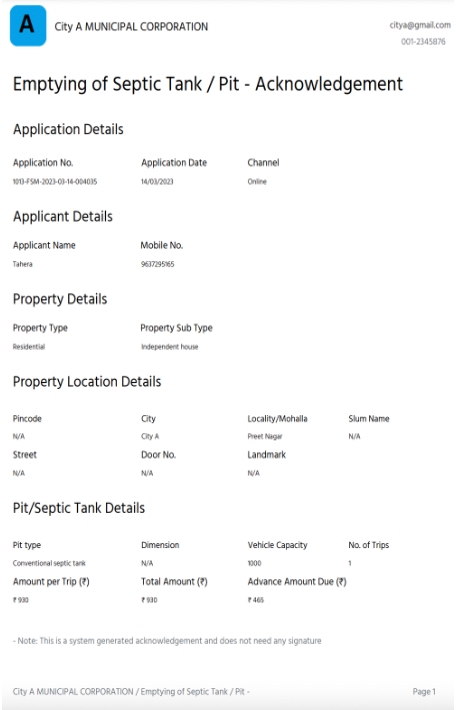
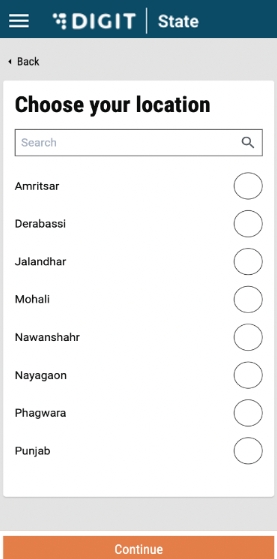
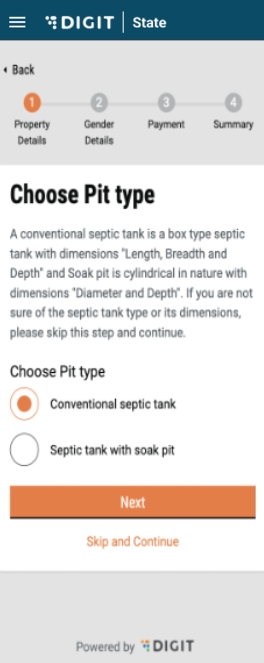
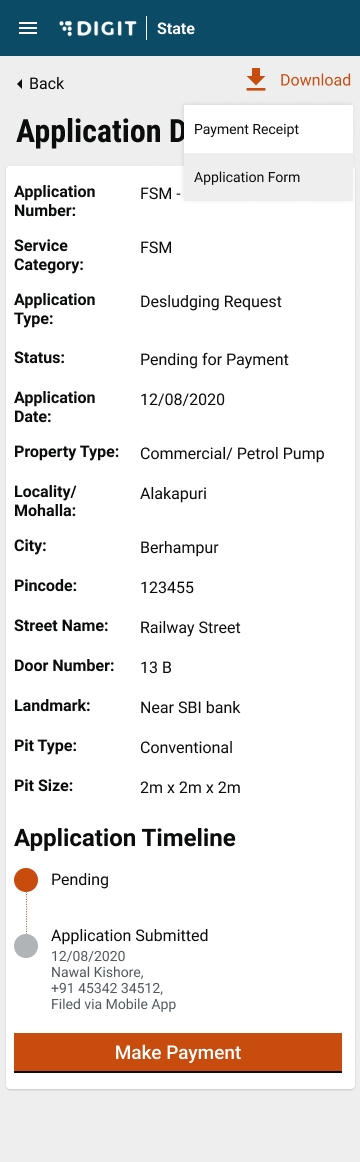
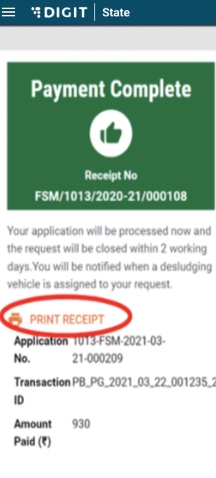
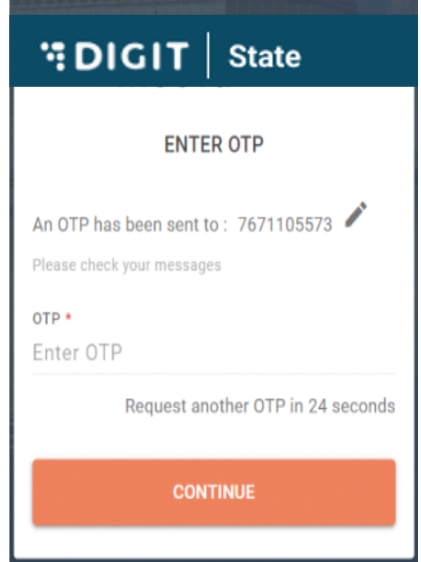
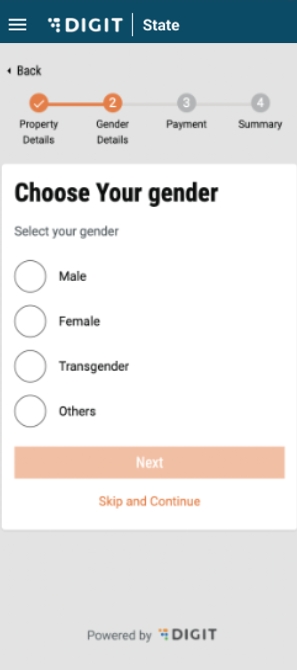
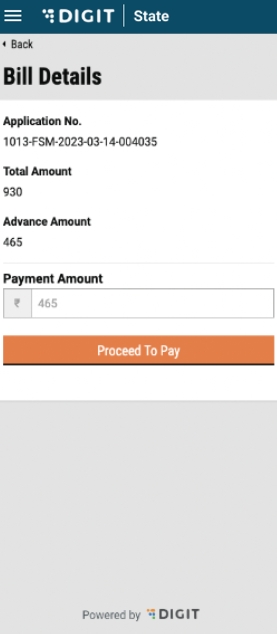
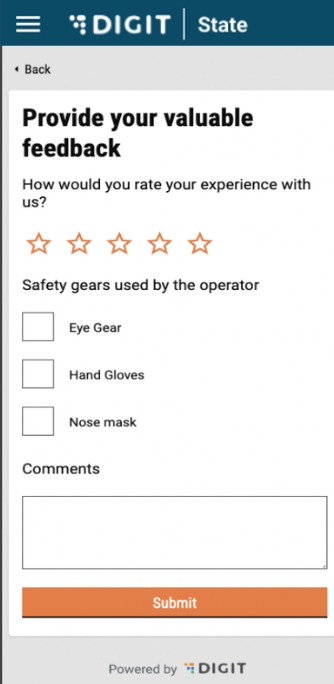

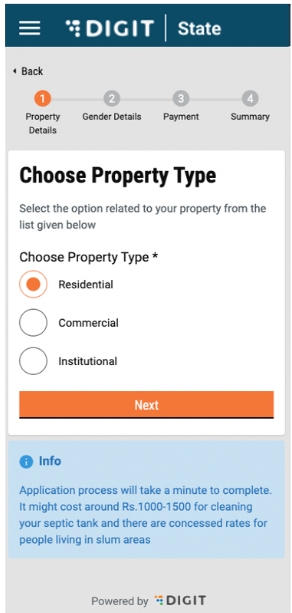

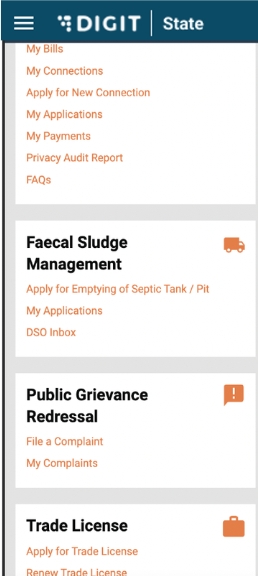
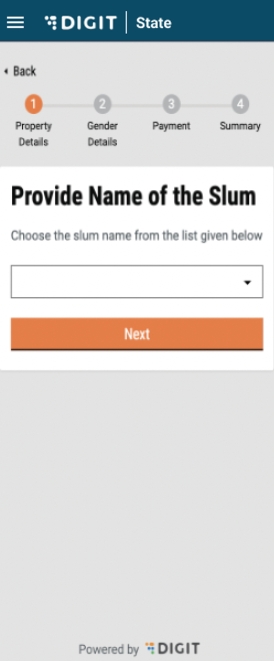
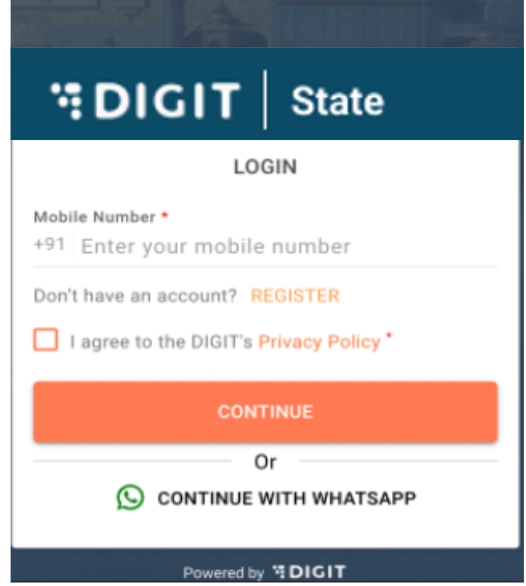

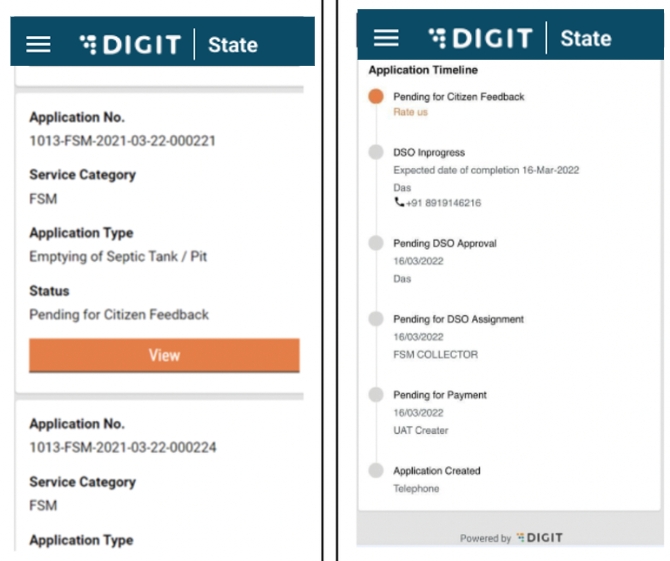
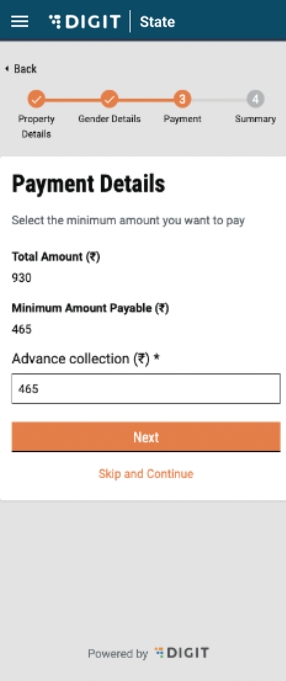

Category
Services
GIT TAGS
Docker Artifact ID
Remarks
Frontend (old UI)
Citizen
citizen:v1.8.0-b078fa041d-97
Employee
employee:v1.8.0-2ac8314b2f-116
DSS dashboard
dss-dashboard:v1.8.0-0d70d60e63-53
Core Services
Encryption
egov-enc-service:v1.1.3-44558a0-3
xState chatbot
xstate-chatbot:v1.1.1-44558a0-2
Searcher
egov-searcher:v1.1.5-72f8a8f87b-16
Payment gateway
egov-pg-service:v1.2.3-ffbb7a6-4
Filestore
egov-filestore-db:v1.3.0-72d8393-4
Zuul - API gateway
zuul:v1.3.1-76bf31f-5
Mail notification
egov-notification-mail:v1.2.0-9fde481-3
SMS notification
egov-notification-sms:v1.1.3-48a03ad7bb-10
Localisation
egov-notification-sms:v1.2.0-9fde481-3
Persist
egov-persister:v1.1.5-3371bc2-5
ID gen
egov-idgen:v1.2.3-44558a0-3
User
egov-user:v1.2.8-9fde481-19
User chatbot
egov-user-chatbot:v1.3.0-6cfa52c1f9-1
MDMS
egov-mdms-service:v1.3.2-44558a0-3
URL shortening
egov-url-shortening:v1.1.2-1715164454-3
Indexer
egov-indexer:v1.1.7-44558a0-3
Report
report:v1.3.4-96b24b0d72-16
Workflow
egov-workflow-v2:v1.3.0-fbea797-11
PDF generator
pdf-service:v1.1.6-96b24b0d72-22
Chatbot
chatbot:v1.1.6-72f8a8f87b-8
Deprecated
Access control
egov-accesscontrol:v1.1.3-72f8a8f87b-24
Location
egov-location:v1.1.5-fbea797-5
OTP
egov-otp:v1.2.3-9fde481-3
User OTP
user-otp:v1.2.0-9fde481-8
NLP engine
nlp-engine:v1.0.0-fbea6fba-21
No changes in the current release.
Egov document-Uploader
egov-document-uploader:v1.1.1-6cfa52c1f9-4
National dshboard ingest
national-dashboard-ingest:v1.0.1-44558a0-3
New service
National dashboard Kafka pipeline
national-dashboard-kafka-pipeline:v1.0.1-44558a0-3
New service
Business Services
Apportion
egov-apportion-service:v1.1.5-72f8a8f87b-5
Collection
collection-services:v1.1.6-c856353983-29
Billing
billing-service:v1.3.4-72f8a8f87b-39
HRMS
egov-hrms-db:v1.2.6-116d8db-9
Dashboard analytics
dashboard-analytics:v1.1.7-1ffb5fa2fd-49
Dashboard ingest
dashboard-ingest:v1.1.4-72f8a8f87b-10
EGF instrument
egf-instrument:v1.1.4-72f8a8f87b-4
EGF master
egf-master:v1.1.3-72f8a8f87b-15
Finance collection Voucher consumer
finance-collections-voucher-consumer:v1.1.6-96b24b0d72-18
Municipal Services
Individual
User event
egov-user-event:v1.2.0-c1e1e8ce24-21
Inbox
inbox:v1.3.1-733167672c-14
Utilities Services
Custom consumer
egov-custom-consumer:v1.1.1-72f8a8f87b-3
egov-pdf:v1.1.2-344ffc814a-37
eDCR
eDCR
egov-edcr:v2.1.1-1815083c26-25
Finance
Finance
egov-finance:v3.0.2-0d0a8db8ff-28
S.No
Section Heading
Chart Heading
Subheading
Definitions (This will appear on the dashboard whenever a user hovers on the metric, wherever applicable).
Chart Type
X-Axis
Y-Axis
Value
Columns
How to calculate
Boundary
Drilldown/Toggle
Comparison KPIs, if any
Show comparison in
Specific to State/ULB/ TRP/all
Tooltip on Hover on Data Point
Input Fields
1
Input
Total incoming sludge
NA
The total incoming sludge from registered and unregistered vehicles.
KPI
NA
NA
Total incoming sludge.
NA
Total incoming sludge = (Volume of waste disposed of for registered vehicles) + (Volume of waste disposed of for unregistered vehicles).
State, Plant ULB
NA
NA
NA
NA
2
Input
Number of incoming trips
NA
The number of trips disposed of at the treatment plant.
KPI
NA
NA
The count of trips to the treatment plant from registered and unregistered vehicles.
NA
Number of trips disposed = Count (Distinct trip ID).
State, Plant ULB
NA
NA
NA
NA
3
Treatment Quality
Overall quality
NA
The percentage of tests where all parameters are as per the benchmarks.
KPI
NA
NA
The percentage of test results meeting the benchmarks.
NA
Overall quality = (Number of tests where all parameters meet benchmarks/ The total number of tests) * 100.
State, Plant ULB
NA
NA
NA
NA
4
Treatment Quality
Compliance
NA
The percentage of tests where results have been recorded.
KPI
NA
NA
The percentage of tests with the status as submitted out of the total tests.
Compliance percentage = (Count of test ID in status 'Submitted'/Count (distinct trip ID) * 100.
State, Plant ULB
NA
NA
NA
NA
5
Alerts
Total alerts
NA
The total alerts raised by the system in the following categories: 1) Test results not as per the benchmark, 2) No reading from the IoT device, 3) Lab results and IoT results not matching.
KPI
NA
NA
Total alerts.
Count (Distinct alert ID).
State, Plant ULB
NA
NA
NA
NA
6
Treatment Quality Plants
Total plants
NA
NA
NA
NA
NA
Count of plants
Count (Distinct plant ID).
State, Plant ULB
NA
NA
NA
NA
7
Treatment Quality Plants
Treatment quality passed
NA
Treatment quality is considered passed if all parameters of both biosolids and effluents are as per the benchmarks for the output of the treatment process in the last test recorded.
NA
NA
NA
The count of plants with treatment quality passed.
Treatment quality for the output type =If(COUNT IF (All parameters meet benchmarks, FALSE) = 0, "Treatment Quality for Output type passed", "Treatment Quality for Output type failed"). Treatment quality for plant passed = =IF(COUNT IF (Treatment quality for output type, FALSE) = 0, " Treatment Quality Passed", "Treatment Quality Failed").
State, Plant ULB
NA
NA
NA
NA
8
Treatment Quality Plants
Treatment quality failed
NA
Treatment quality is considered failed when one or more parameters of biosolids or effluents are not as per the benchmarks for the output of the treatment process in the last test recorded.
NA
NA
NA
The count of plants with treatment quality failed.
Count (Distinct plant ID) - Treatment quality passed.
State, Plant ULB
NA
NA
NA
NA
9
Treatment Quality Plants
NA
NA
NA
Map
NA
NA
Point = Geolocation of plant. Plant icon colour is green if the treatment quality is passed, and red if the treatment quality failed.
Same as 7 and 8
State, Plant ULB
NA
NA
NA
NA
Name of the plant
10
Treatment Quality Plants
NA
NA
NA
Table
NA
NA
NA
Plant Name, Test Result, Compliance %
Test result same as S.No 7 and S.No 8
State, Plant ULB
NA
NA
NA
NA
11
Treatment Quality Plants
NA
NA
NA
Table
NA
NA
NA
Stage, Output Type, Parameters 1...n, Compliance %
Mentioned above
State, Plant ULB
NA
Compliance percentage.
The percentage from the last month.
NA
12
Trend in [Parameter Name] Readings
NA
NA
NA
Multi-line chart
Test dates
Parameter Value
- Value of device reading. - Value of lab results.
NA
NA
Plant
NA
NA
NA
NA
Date Lab result - X Device reading - Y
The FSM Registry allows for the following actions from the frontend for a particular urban local body (ULB):
Add a new sanitation worker, vehicle, vendor.
Edit sanitation worker, vehicle, vendor details.
Enable and disable sanitation workers, vehicles and vendors.
Tag a sanitation worker and vehicle to vendors.
Login as a ULB admin and navigate to the FSM registry by clicking on it.
The following actions can be performed:
View a list of all vendors in the system along with the details of tagged vehicles and sanitation workers.
Search for a vendor using the search box.
Clear search by using the "Clear Search" button.
Enable/disable a vendor by using the toggle.
Sort vendors by creation date.
View total vehicles tagged to the vendor by clicking on the value to “Total Vehicles”.
View active vehicles tagged to the vendor by clicking on the value to “Total Vehicles”.
View total sanitation workers tagged to the vendor by clicking on the value to “Total sanitation workers”.
View active sanitation workers tagged to the vendor by clicking on the value to “Total sanitation workers”.
Add a new vendor, sanitation worker or vehicle by clicking on the ‘Add’ button.
Vendor details can be viewed by clicking on the vendor name in the FSM Registry homepage.
The following actions can be performed:
View vendor details along with tagged vehicles and sanitation workers.
Tag a new vehicle to the vendor by clicking on the “Add Vehicle” button.
Remove a tagged vehicle by clicking on ‘Delete’ on the top right of the vehicle card.
Edit vehicle details by clicking on the ‘Edit’ symbol on the top right of the vehicle card.
Tag a new sanitation worker to the Vendor by clicking on the “Add Sanitation Worker” button.
Remove a tagged sanitation worker by clicking on the ‘Delete’ symbol on the top right of vehicle card.
Edit sanitation worker details by clicking on the ‘Edit’ symbol on the top right of the vehicle card.
The details of a vendor can be edited or a vendor deleted by clicking on the “Take Action” button.
Clicking on the ‘Edit’ button as part of the “Take Action” button will redirect the user to the “Edit Vendor” details page.
The following actions can be performed:
Edit vendor details.
Submit application.
The user will be redirected to the list of vendors, and a snack bar will confirm edit.
A vendor can be deleted by clicking on the “Take Action” button and selecting delete. A pop-up will appear on the screen.
The following actions can be performed:
Confirm delete.
Close pop-up by clicking on the 'Close' button on the pop-up.
Close pop-up by clicking on the cross icon on the top right of the pop-up
The user will be redirected to the list of vendors, and a snack bar will confirm delete.
Multiple vehicles can be tagged to a vendor. It is necessary that a vehicle exists in the system before it can be tagged. A vehicle can be tagged to a vendor by clicking on the “Add Vehicle” button in the vendor details page.
The following actions can be performed:
View vendor details along with tagged vehicles and sanitation workers.
Tag a new vehicle to the vendor by clicking on the “Add Vehicle” button.
Remove a tagged vehicle by clicking on the ‘Delete’ symbol on the top right of vehicle card.
Edit vehicle details by clicking on the ‘Edit’ symbol on the top right of the vehicle card.
Tag a new sanitation worker to the vendor by clicking on the “Add sanitation worker” button.
Remove a tagged sanitation worker by clicking on the ‘Delete’ symbol on the top right of vehicle card.
Edit sanitation worker details by clicking on the ‘Edit’ symbol on the top right of the vehicle card.
The details of a vendor can be edited or a vendor deleted by clicking on the “Take Action” button.
Clicking on “Add Vehicle” will display a pop-up.
Only vehicles that are not tagged to any vendor will be displayed.
The following actions can be performed:
Select vehicle from the dropdown.
Click on 'Submit' to confirm.
Close pop-up by clicking on the Close button on the pop-up.
Close pop-up by clicking on the cross icon on the top right of the pop-up.
The user will be able to see the tagged vehicle in the vehicle details section. The vehicle can be untagged from the vendor by clicking on the delete button against the vehicle details.
Multiple sanitation workers can be tagged to a vendor. It is necessary that a sanitation worker exists in the system before he/she can be tagged. A sanitation worker can be tagged to a vendor by clicking on the “Add sanitation worker” button in the vendor details page.
A pop-up will be displayed with a dropdown to select a sanitation worker. Only sanitation workers that are not tagged to any vendor will be displayed.
The following actions can be performed:
Select sanitation worker from the dropdown.
Click on 'Submit' to confirm.
Close pop-up by clicking on the 'Close' button on the pop-up.
Close pop-up by clicking on the cross icon on the top right of the pop-up
The added sanitation worker details will be displayed. The sanitation worker can be untagged from the vendor by clicking on the delete button against the sanitation worker details.
A new vendor can be added by clicking on the ‘Add’ button on the FSM Registry landing page.
The following actions can be performed:
Add a new vendor by clicking on vendor.
Add a new vehicle by clicking on vehicle.
Add a new sanitation worker by clicking on sanitation worker.
On clicking on vendor, the user will be redirected to the add vendor page.
The following actions can be performed:
Enter vendor name.
Select vendor owner details such as Gender, Date of Birth, Email and Phone number. Each vendor is created with a unique mobile number and hence, an error message will be displayed if the mobile number has been used to create other vendors.
Enter address details.
Submit the application.
Once the user submits an application, a snack bar will confirm the successful addition of a vendor.
Details of the added vendor will be displayed in the vendor list.
The vehicle list can be viewed by clicking on the vehicle tab in the DSM registry.
A list of all vehicles in the system are visible along with the details of the vendor they are tagged to.
User Actions
The following actions can be performed:
View list of all vehicles in the system along with the details of tagged vendor.
Search for a vehicle using the search box.
Clear search by using the “Clear Search” button.
Enable/disable a vehicle by using the toggle.
Sort vehicles by creation date.
Add a new vendor, sanitation worker or vehicle by clicking on the ‘Add’ button.
Vehicle details can be viewed by clicking on the vehicle name.
The following actions can be performed:
View details of the vehicle.
Edit vendor tagging by clicking on the edit icon besides the vendor name.
Remove vendor tagging by clicking on the 'Delete' icon besides the vendor name.
Click on the “Take Action” button to edit or delete a vehicle.
On clicking on the “Take Action” button, the following will be displayed.
The following actions can be performed:
Click on edit to edit the vehicle.
Click on delete to delete the vehicle.
Click anywhere else on the screen to go back to vehicle details.
On clicking on the edit button, the user will be redirected to the “Edit Vehicle” page.
The following actions can be performed:
Edit vehicle details.
Submit edited details.
The user will be redirected to the vehicle details page and the edits will be reflected.
A vehicle can be deleted by clicking on the “Take Action” button and selecting delete.
The following actions can be performed:
Click on edit to edit the vehicle.
Click on delete to delete the vehicle.
Click anywhere else on the screen to go back to vehicle details.
On clicking the delete button, a pop-up will be displayed for confirmation.
The following actions can be performed:
Close pop-up by clicking on the 'Close' button on the pop-up.
Close pop-up by clicking on the cross icon on the top right of the pop-u
Confirm deletion by clicking on the delete button.
On clicking on ‘Delete', the user will be directed to a list of vehicles and a snack bar will be displayed as confirmation.
Apart from tagging a vehicle to a vendor from the vendor details page, tagging can also be done from the vehicle details page by clicking on the add vendor button.
The following actions can be performed:
View details of the vehicle.
Tagging vehicle to a Vendor by clicking on the ‘+’ icon besides “Add New Vendor”.
A pop-up will be displayed with a dropdown to select a vendor.
The following actions can be performed:
Selection of a vendor from the dropdown.
Close pop-up by clicking on the cross icon on the top right of the pop-up.
Close pop-up by clicking on 'Cancel'.
Confirm vendor selection by clicking on 'Submit'.
On clicking submit, the added vendor details will be displayed in the vehicle details page and a snack bar will be displayed for confirmation.
Add a new vehicle by clicking on the Add button on the FSM Registry landing page and select vehicle.
The following actions can be performed:
Add a new vendor by clicking on vendor.
Add a new vehicle by clicking on vehicle.
Add a new sanitation worker by clicking on sanitation worker.
On clicking on ‘Vehicle’, the user will be redirected to the add vehicle page.
The following actions can be performed:
Enter the vehicle registration number. Each vehicle is created with a unique registration number and hence, an error message will be displayed if the registration number has been used to create other vehicles.
Select vehicle details such as model, type, capacity, details of pollution certificate, insurance and road tax.
Submit the application.
Once the user submits an application, a snack bar will confirm the successful addition of a vendor.
Details of the added vehicle will be displayed in the vehicle list.
Login as a ULB admin and navigate to the FSM Registry by clicking on it. Click on the sanitation worker tab. A list of all sanitation workers in the system is visible along with the details of the vendor they are tagged to.
The following actions can be performed:
View the list of all sanitation workers in the system along with the details of tagged vendor.
Search for a sanitation worker using the search box.
Clear search by using the “Clear Search” button.
Enable/disable a sanitation worker by using the toggle.
Sort sanitation workers by creation date.
Add a new vendor, sanitation worker or vehicle by clicking on the ‘Add’ button.
Sanitation worker details can be viewed by clicking on the sanitation worker’s ID.
The following actions can be performed:
View details of the sanitation worker.
Edit vendor tagging by clicking on the edit icon besides the vendor name.
Remove vendor tagging by clicking on the 'Delete' icon beside the vendor name.
Click on the “Take Action” button to edit or delete a sanitation worker.
sanitation worker details can be edited by clicking on the “Take Action" button and selecting edit.
The following actions can be performed:
Click on 'Edit' to edit the sanitation worker.
Click on 'Delete' to delete the sanitation worker.
Click anywhere else on the screen to go back to sanitation worker details.
On clicking the Edit button, the user will be redirected to the “Edit Sanitation Worker” page.
The following actions can be performed:
Submit edited details like professional, role details.
The user will be redirected to the sanitation worker details page and the edits will be reflected.
A sanitation worker can be deleted by clicking on the “Take Action” button and selecting 'Delete'.
The following actions can be performed:
Click on 'Edit' to edit the sanitation worker.
Click on 'Delete' to delete the sanitation worker.
Click anywhere else on the screen to go back to sanitation worker details.
On clicking the 'Delete' button, a pop-up will be displayed for confirmation.
The following actions can be performed:
Close pop-up by clicking on the 'Close' button on the pop-up.
Close pop-up by clicking on the cross icon on the top right of the pop-up.
Confirm deletion by clicking on the 'Delete' button.
On clicking on ‘Delete’, the user will be directed to a list of vehicles and a snack bar will be displayed as confirmation.
Method 1: Apart from tagging a sanitation worker to a vendor from the vendor details page, tagging can also be done from the sanitation worker details page by clicking on the add new vendor button.
The following actions can be performed:
View details of the vehicle.
Tag sanitation worker to a vendor by clicking on the + icon besides the “Add New Vendor”.
A pop-up will be displayed with a dropdown to select a vendor.
The following actions can be performed:
Selection of a vendor from the dropdown.
Close pop-up by clicking on the cross icon on the top right of the pop-up.
Close pop-up by clicking on 'Cancel'.
Confirm vendor selection by clicking on 'Submit'.
On clicking on submit, the added vendor details will be displayed in the sanitation worker details page and a snack bar is displayed for confirmation.
Method 2: A sanitation worker can also be tagged to a vendor from the sanitation worker list page. Select a vendor from the dropdown. The sanitation worker will be tagged to the selected vendor.
Add a new sanitation worker by clicking on the 'Add' button on the FSM Registry landing page and select the sanitation worker.
The following actions can be performed:
Add a new vendor by clicking on vendor.
Add a new vehicle by clicking on vehicle.
Add a new sanitation worker by clicking on sanitation worker.
On clicking on sanitation worker, the user will be redirected to the add sanitation worker page.
The following actions can be performed:
Enter sanitation worker personal details such as Gender, Mobile number, DOB.
Enter the professional details like skills of the sanitation worker.
Click on "Add Role" to define the role for the sanitation worker if the worker is a driver or a helper or a plant operator.
Submit the application.
Once the user submits an application, a snack bar will confirm the successful addition of a vendor. Details of the added sanitation worker will be displayed in the sanitation worker list.
Urban local body (ULB) officials or employees receive the service requests, and are responsible for managing and routing these requests to specific DSOs.
Employees can:
Create desludging application on behalf of citizens.
Collect payments.
Update application/generate demand.
Assign DSO to an application.
Assign sanitation worker to an application.
Re-assign DSO to an application.
Complete or decline request.
Multiple request assignment to a single vehicle.
Manage vendor, driver, and vehicle details.
After landing on the employee URL, the user is prompted to select the language with which they would like to access the system.
On this page, the following actions can be performed:
Selection of language
After the user clicks on ‘Continue’, the page navigates to the ‘Login’ page.
ULB employees are provided with credentials to login to the system. There are role-based access for various steps in the workflow, that is, different individuals can be assigned to create an application, modify applications or manage vendor, driver and vehicle details.
On this page, the following actions can be performed:
Enter username and password.
Select city for login.
Reset password by clicking on the “Forgot Password” link.
On clicking continue, employees are redirected to the FSM home page.
The FSM home page has 3 options:
To create a new application on behalf of the citizen.
View existing pending applications.
Search for historical applications.
On this page, the following actions can be performed:
Navigate to the inbox to view pending actions.
Create a new desludging application.
Search for old applications.
Change language.
Edit profile details by clicking on the user icon on top right hand corner.
Logout by clicking on the user icon on top right hand corner.
Click on "New Desludging Application" to create a new application.
On this page, the following actions can be performed:
Enter application details (Application Channel, Applicant Name, Applicant Mobile Number and Gender).
Enter property details (Property Type and Property Subtype).
Enter location details (Pincode, City, Locality, Whether Slum and slum name, Street Name, Door/House No., Landmark).
Enter pit/septic tank details (Pit Type, Dimensions).
Enter trip details (No. of trips required and vehicle capacity).
On filling the above details, the "Amount per Trip" and "Total Amount" are calculated automatically.
The following actions can be performed:
The advance amount may be edited (above minimum advance amount and below total advance amount).
Click on "Submit Application" to submit the application, and it redirects to a confirmation page.
The following actions can be performed:
Download application acknowledgement receipt.
Go back to the homepage.
An SMS will be triggered to the citizen with an acknowledgement and payment link, if payment is due.
An application created by a citizen through the online channel has to be updated by an employee before confirmation. This application will show with the status “Application Created”.
The following actions can be performed:
Search for an active application using “Application No.” and “Mobile No.”.
Clear search by clicking on “Clear Search”.
View and update applications by clicking on an application number.
Filter applications by ‘Locality’ using the Locality dropdown.
Filter applications by ‘Status’.
Search for past applications by using “Search Application”.
On clicking on an application number, application details are displayed.
The following actions can be performed:
View application details.
On clicking on the update application, application details will be viewed. Details such as locality, number of trips and capacity will be displayed.
Clicking on “Update application” will update the status of the application as “Pending for Payment”.
Desludging applications pending for payment are accessible in the inbox of the user assigned the collector role. The status of the application is reflected in the status column.
The following actions can be performed:
Search for an active application using “Application No.” and “Mobile No.”.
Clear Search by clicking on “Clear Search”.
View and update applications by clicking on an application number.
Filter applications by ‘Lolacilty’ using the locality dropdown.
Filter applications by ‘Status’.
Search for past applications by using “Search Application”.
On clicking on an application number, application details are displayed.
The following actions can be performed:
View application details, including applicant, property and trip details
View application timeline.
Proceed to collect by clicking on the “Collect Payment” button.
A user is redirected to the following screen on clicking on "Collect Payment".
The following actions can be performed:
View collection amount, including total amount and amount per trip.
Enter/update payee details.
Select payment mode.
Gen/G8 receipt details by entering receipt no. and issue date.
Upon clicking on collect, a user is redirected to a confirmation page.
User Actions
The following actions can be performed:
Print payment receipt.
Go back to home by clicking on the “Take Action” button.
The following is the view of the payment receipt.
Open desludging applications are accessible by navigating to the inbox via the FSM homepage. Applications where DSO needs to be assigned will be shown as "Pending for DSO Assignment".
The following actions can be performed:
Search for an active application using “Application No." and “Mobile No.”.
Clear Search by clicking on “Clear Search”.
View and update applications by clicking on an application number.
Filter applications by ‘Locality’ using the locality dropdown.
Filter applications by ‘Status’.
Search for past applications by using “Search Application”.
On clicking on an application number, application details are displayed.
The following actions can be performed:
View application detail.
Assign DSO.
On clicking the "Assign DSO" button, a pop-up will occur.
The following actions can be performed:
Select DSO name via dropdown.
Select expected date of completion.
Close pop-up by clicking on the 'Close' button.
Close pop-up by clicking on the cross icon on the top right of the pop-up.
Clicking on 'Assign' will redirect the user to the application details page and display a snack bar as confirmation. The status of the application will be updated to “Pending for DSO Approval”.
Employees can reassign to other DSOs in case the request has been rejected or declined by the DSO for some reason. Search for applications "Pending for DSO Approval" status.
The following actions can be performed:
Search for an active application using “Application No." and “Mobile No.”.
Clear search by clicking on “Clear Search”.
View and update applications by clicking on an application number.
Filter applications by ‘Localilty’ using the locality dropdown.
Filter applications by ‘Status’.
Search for past applications by using “Search Application”.
On clicking on an application number, application details are displayed.
The following actions can be performed:
View application details.
Click on “Take Action” button.
The take action button has the following options:
Assign vehicle (on behalf of DSO).
Decline request (on behalf of DSO).
Re-assign DSO.
Clicking on “Re-assign DSO” will display the following pop-up.
The following actions can be performed:
Select “Reason for Re-assign”.
Select “DSO Name”.
Update “Expected date of completion”.
Close pop-up by clicking on the 'Close' button on the pop up.
Close pop-up by clicking on the cross icon on the top right of the pop up.
Confirm re-assignment by clicking on the ‘Reassign’ button.
Clicking on 'Assign' will redirect the user to the application details page and display a snack bar as confirmation. The status of the application will remain as “Pending for DSO Approval".
Employees can be assigned the role of the DSO, and can decline a request on behalf of the DSO. Applications can be rejected by an employee when in “Pending for DSO Approval” stage.
User Actions
The following actions can be performed:
Search for an active application using “Application No." and “Mobile No.”.
Clear search by clicking on “Clear Search”.
View and update applications by clicking on an application number.
Filter applications by ‘Localilty’ using the locality dropdown.
Filter applications by ‘Status’.
Search for past applications by using “Search Application”.
On clicking on an application number, application details are displayed.
The following actions can be performed:
View application details.
Click on the “Take Action” button.
The take action button has the following options:
Assign vehicle (on behalf of DSO).
Decline request (on behalf of DSO).
Re-assign DSO.
Clicking on “Decline Request’” will display the following pop-up.
User Actions
The following actions can be performed:
Reason for declining.
Enter comments.
Close pop-up by clicking on the 'Close' button on the pop-up.
Close pop-up by clicking on the cross icon on the top right of the pop-up.
Confirm decline request by clicking on the “Decline Request” button.
A snack bar will confirm decline and the application timeline will be updated to "DSO Rejected".
Employees can be assigned the role of the DSO, and can assign a vehicle and a sanitation worker on behalf of the DSO. A vehicle and a sanitation worker can be assigned when the application is in the “Pending for DSO Approval" stage.
The following actions can be performed:
Search for an active application using “Application No.” and “Mobile No.”
Clear search by clicking on “Clear Search”.
View and update applications by clicking on an application number.
Filter applications by ‘Locality’ using the locality dropdown.
Filter applications by ‘Status’.
Search for past applications by using “Search Application”.
On clicking on an application number, application details are displayed.
The following actions can be performed:
View application details.
Click on the “Take Action” button.
The take action button has the following options:
Assign vehicle (on behalf of DSO).
Assign sanitation worker (on behalf of DSO).
Decline request (on behalf of DSO).
Re-assign DSO.
Clicking on “Assign Vehicle and Sanitation Worker’’ will display the following pop-up.
The following actions can be performed:
Update vehicle registration number.
Update the driver and the sanitation worker.
Choosing a driver is mandatory.
Close pop-up by clicking on the 'Close' button on the pop up.
Close pop-up by clicking on the cross icon on the top right of the pop up.
Confirm decline request by clicking on the 'Assign' button
A snack bar will confirm assignment of vehicle and driver, and the application timeline will be updated to "DSO in Progress".
Once DSO is in progress, the number of trips can be updated. This can be done by both the ULB and the DSO.
The following actions can be performed:
Search for an active application using “Application No.” and “Mobile No.”.
Clear search by clicking on “Clear Search”.
View and update applications by clicking on an application number.
Filter applications by ‘Locality’ using the locality dropdown.
Filter applications by ‘Status’.
Search for past applications by using “Search Application”.
On clicking on an application number, application details are displayed.
The following actions can be performed:
View application details.
Click on the “Take Action” button.
The take action button has the following options:
Complete request.
Update/schedule trips.
Re-assign DSO.
On clicking on Update/Schedule trips, the following pop up is displayed:
The following actions can be performed:
Increase the number of trips by clicking on the + button.
Decrease number of trips by clicking on the - button.
Close pop-up by clicking on the Close button on the pop up.
Close pop-up by clicking on the cross icon on the top right of the pop up.
Confirm update/schedule trips by clicking on the “Update/schedule” button.
A snack bar will confirm the updated number of trips.
Once the service request has been completed and all pending payment has been collected, the same has to be confirmed in the system. This can be done by selecting the “Complete Request” button in the “Take Action” button. On clicking on "Complete Request", the following pop-up is displayed:
The following actions can be performed:
Confirm/update service date.
Confirm/update the volume of waste collected.
Confirm/update pit details.
Upload pit photo
Close pop-up by clicking on the 'Close' button on the pop up.
Close pop-up by clicking on the cross icon on the top right of the pop up
Confirm details by clicking on the ‘Completed' button.
A snack bar will confirm that request has been completed and the status will be updated to “Waiting for Disposal”.


From the FSM Registry page Admins can Search for a Sanitation Worker and go to it's details page by clicking on Sanitation Worker Id
This page shows all the details about a Sanitation worker
Sample Page Screenshot is given below for reference
Admin users will get an action bar at the bottom of the page which has two actions
Edit -> This takes the user to Edit Sanitation worker Page
Delete -> This calls the update Individual API and disables this user ( Soft delete)
A corresponding toast message is shown
After taking delete action page is automatically redirected to the FSM Registry
We are hitting this endpoint "/individual/v1/_search" to fetch Sanitation Worker Details
Refer the curl below:
```powershell
curl --location 'https://unified-dev.digit.org/individual/v1/_search?tenantId=pg.citya&offset=0&limit=100&_=1700205653156' \
--header 'authority: unified-dev.digit.org' \
--header 'accept: application/json, text/plain, */*' \
--header 'accept-language: en-GB,en-US;q=0.9,en;q=0.8' \
--header 'content-type: application/json' \
--header 'cookie: MicrosoftApplicationsTelemetryDeviceId=55de1d9a-a0cf-4d5b-9255-85b5b1493061; MicrosoftApplicationsTelemetryFirstLaunchTime=2023-10-16T06:23:27.369Z; PGADMIN_LANGUAGE=en; _oauth2_proxy=eyJFbWFpbCI6InNoYWlsZXNoLmt1bWFyQGVnb3Zlcm5tZW50cy5vcmciLCJVc2VyIjoic2hhaWxlc2gtZWdvdiJ9|1700033260|CTEqBthhJjZd2eND93q4SwyRXNc=; __cuid=9b7e8966323a4b45aa49cdd35080b492; amp_fef1e8=606c34a4-95cc-4a2b-bb9c-23bcfd531c60R...1hfbmtumv.1hfbmu1bc.37.l.3s' \
--header 'origin: https://unified-dev.digit.org' \
--header 'referer: https://unified-dev.digit.org/works-ui/employee/masters/view-wageseeker?tenantId=pg.citya&individualId=IND-2023-09-25-002330' \
--header 'sec-ch-ua: "Google Chrome";v="119", "Chromium";v="119", "Not?A_Brand";v="24"' \
--header 'sec-ch-ua-mobile: ?0' \
--header 'sec-ch-ua-platform: "Windows"' \
--header 'sec-fetch-dest: empty' \
--header 'sec-fetch-mode: cors' \
--header 'sec-fetch-site: same-origin' \
--header 'user-agent: Mozilla/5.0 (Windows NT 10.0; Win64; x64) AppleWebKit/537.36 (KHTML, like Gecko) Chrome/119.0.0.0 Safari/537.36' \
--data '{
"Individual": {
"roleCodes":["SANITATION_WORKER"],
"mobileNumber":"9494949494",
"individualName":"Dummy1",
"individualId": "IND-2023-11-23-010831"
},
"RequestInfo": {
"apiId": "Rainmaker",
"authToken": "4ff28c82-654f-4403-9f2d-8547b9c35687",
"userInfo": {
"id": 618,
"uuid": "40e3b45a-0f64-4e8c-8768-aab82c095b2d",
"userName": "AUTO1",
"name": "Jagankumar E",
"mobileNumber": "7654376563",
"emailId": null,
"locale": null,
"type": "EMPLOYEE",
"roles": [
{
"name": "HRMS Admin",
"code": "HRMS_ADMIN",
"tenantId": "pg.citya"
},
{
"name": "ESTIMATE VERIFIER",
"code": "ESTIMATE_VERIFIER",
"tenantId": "pg.citya"
},
{
"name": "OFFICER IN CHARGE",
"code": "OFFICER_IN_CHARGE",
"tenantId": "pg.citya"
},
{
"name": "PROJECT CREATOR",
"code": "PROJECT_CREATOR",
"tenantId": "pg.citya"
},
{
"name": "BILL_CREATOR",
"code": "BILL_CREATOR",
"tenantId": "pg.citya"
},
{
"name": "ESTIMATE VIEWER",
"code": "ESTIMATE_VIEWER",
"tenantId": "pg.citya"
},
{
"name": "MB_APPROVER",
"code": "MB_APPROVER",
"tenantId": "pg.citya"
},
{
"name": "MUKTA Admin",
"code": "MUKTA_ADMIN",
"tenantId": "pg.citya"
},
{
"name": "WORK ORDER CREATOR",
"code": "WORK_ORDER_CREATOR",
"tenantId": "pg.citya"
},
{
"name": "ESTIMATE APPROVER",
"code": "ESTIMATE_APPROVER",
"tenantId": "pg.citya"
},
{
"name": "MB_VERIFIER",
"code": "MB_VERIFIER",
"tenantId": "pg.citya"
},
{
"name": "WORK ORDER VERIFIER",
"code": "WORK_ORDER_VERIFIER",
"tenantId": "pg.citya"
},
{
"name": "PROJECT VIEWER",
"code": "PROJECT_VIEWER",
"tenantId": "pg.citya"
},
{
"name": "MB_CREATOR",
"code": "MB_CREATOR",
"tenantId": "pg.citya"
},
{
"name": "MUSTER ROLL VERIFIER",
"code": "MUSTER_ROLL_VERIFIER",
"tenantId": "pg.citya"
},
{
"name": "Localisation admin",
"code": "LOC_ADMIN",
"tenantId": "pg.citya"
},
{
"name": "Employee Common",
"code": "EMPLOYEE_COMMON",
"tenantId": "pg.citya"
},
{
"name": "BILL_VIEWER",
"code": "BILL_VIEWER",
"tenantId": "pg.citya"
},
{
"name": "TECHNICAL SANCTIONER",
"code": "TECHNICAL_SANCTIONER",
"tenantId": "pg.citya"
},
{
"name": "MUSTER ROLL APPROVER",
"code": "MUSTER_ROLL_APPROVER",
"tenantId": "pg.citya"
},
{
"name": "WORK ORDER APPROVER",
"code": "WORK_ORDER_APPROVER",
"tenantId": "pg.citya"
},
{
"name": "ESTIMATE CREATOR",
"code": "ESTIMATE_CREATOR",
"tenantId": "pg.citya"
},
{
"name": "MDMS Admin",
"code": "MDMS_ADMIN",
"tenantId": "pg.citya"
},
{
"name": "MB_VIEWER",
"code": "MB_VIEWER",
"tenantId": "pg.citya"
},
{
"name": "SUPER USER",
"code": "SUPERUSER",
"tenantId": "pg.citya"
}
],
"active": true,
"tenantId": "pg.citya",
"permanentCity": null
},
"msgId": "1700205653156|en_IN",
"plainAccessRequest": {}
}
}'
```When individual is deleted we are making use of individual update "/individual/v1/_update"
Refer to the curl below
```powershell
curl --location 'https://unified-dev.digit.org/individual/v1/_update?_=1700205712385' \
--header 'authority: unified-dev.digit.org' \
--header 'accept: application/json, text/plain, */*' \
--header 'accept-language: en-GB,en-US;q=0.9,en;q=0.8' \
--header 'content-type: application/json' \
--header 'cookie: MicrosoftApplicationsTelemetryDeviceId=55de1d9a-a0cf-4d5b-9255-85b5b1493061; MicrosoftApplicationsTelemetryFirstLaunchTime=2023-10-16T06:23:27.369Z; PGADMIN_LANGUAGE=en; _oauth2_proxy=eyJFbWFpbCI6InNoYWlsZXNoLmt1bWFyQGVnb3Zlcm5tZW50cy5vcmciLCJVc2VyIjoic2hhaWxlc2gtZWdvdiJ9|1700033260|CTEqBthhJjZd2eND93q4SwyRXNc=; __cuid=9b7e8966323a4b45aa49cdd35080b492; amp_fef1e8=606c34a4-95cc-4a2b-bb9c-23bcfd531c60R...1hfbmtumv.1hfbmu1bc.37.l.3s' \
--header 'origin: https://unified-dev.digit.org' \
--header 'referer: https://unified-dev.digit.org/works-ui/employee/masters/modify-wageseeker?tenantId=pg.citya&individualId=IND-2023-09-25-002330' \
--header 'sec-ch-ua: "Google Chrome";v="119", "Chromium";v="119", "Not?A_Brand";v="24"' \
--header 'sec-ch-ua-mobile: ?0' \
--header 'sec-ch-ua-platform: "Windows"' \
--header 'sec-fetch-dest: empty' \
--header 'sec-fetch-mode: cors' \
--header 'sec-fetch-site: same-origin' \
--header 'user-agent: Mozilla/5.0 (Windows NT 10.0; Win64; x64) AppleWebKit/537.36 (KHTML, like Gecko) Chrome/119.0.0.0 Safari/537.36' \
--data '{"Individual":{"tenantId":"pg.citya","name":{"givenName":"Anjali"},"dateOfBirth":"20/09/1990","gender":"FEMALE","mobileNumber":"7007099195","fatherName":"Belram","relationship":"HUSBAND","additionalFields":{"fields":[{"key":"SOCIAL_CATEGORY","value":"SC"}]},"address":[{"id":"2f96f127-825e-4de0-971a-caaab582d186","individualId":"8b8c53ea-9d47-476d-b5ff-fd70aaf1a6d2","tenantId":"pg.citya","city":"pg.citya","doorNo":"NA","street":"NA","type":"PERMANENT","locality":{"code":"SUN01"},"ward":{"code":"B1"}}],"auditDetails":{"createdBy":"1ec60cb3-a0c1-4d24-97ef-7a57f58e820d","lastModifiedBy":"1ec60cb3-a0c1-4d24-97ef-7a57f58e820d","createdTime":1695621659633,"lastModifiedTime":1695621659633},"id":"8b8c53ea-9d47-476d-b5ff-fd70aaf1a6d2","individualId":"IND-2023-09-25-002330","skills":[{"id":"a41c97c7-73ed-4376-af5e-6e0bc2c8fd68","clientReferenceId":null,"individualId":"8b8c53ea-9d47-476d-b5ff-fd70aaf1a6d2","type":"FEMALE_MULIA","level":"UNSKILLED","experience":null,"isDeleted":false,"auditDetails":{"createdBy":"1ec60cb3-a0c1-4d24-97ef-7a57f58e820d","lastModifiedBy":"1ec60cb3-a0c1-4d24-97ef-7a57f58e820d","createdTime":1695621659638,"lastModifiedTime":1695621659638},"code":"UNSKILLED.FEMALE_MULIA"},{"id":"95c91c30-7e26-4187-9626-46b68e4f6ccc","clientReferenceId":null,"individualId":"8b8c53ea-9d47-476d-b5ff-fd70aaf1a6d2","type":"MALE_MULIA","level":"UNSKILLED","experience":null,"isDeleted":false,"auditDetails":{"createdBy":"1ec60cb3-a0c1-4d24-97ef-7a57f58e820d","lastModifiedBy":"1ec60cb3-a0c1-4d24-97ef-7a57f58e820d","createdTime":1695621659638,"lastModifiedTime":1695621659638},"code":"UNSKILLED.MALE_MULIA"},{"id":"47b92eaf-4e31-4513-908d-ad8bd4b4e9dc","clientReferenceId":null,"individualId":"8b8c53ea-9d47-476d-b5ff-fd70aaf1a6d2","type":"SCAVENGER","level":"UNSKILLED","experience":null,"isDeleted":false,"auditDetails":{"createdBy":"1ec60cb3-a0c1-4d24-97ef-7a57f58e820d","lastModifiedBy":"1ec60cb3-a0c1-4d24-97ef-7a57f58e820d","createdTime":1695621659638,"lastModifiedTime":1695621659638},"code":"UNSKILLED.SCAVENGER"}],"rowVersion":1,"identifiers":[{"id":"3491e99d-d9a3-41d5-bdaf-2538fae19ef9","clientReferenceId":"a73d268a-07b6-ab4f-76c6-fe7e3d38188e","individualId":"8b8c53ea-9d47-476d-b5ff-fd70aaf1a6d2","identifierType":"AADHAAR","identifierId":"********7656","isDeleted":false,"auditDetails":{"createdBy":"1ec60cb3-a0c1-4d24-97ef-7a57f58e820d","lastModifiedBy":"1ec60cb3-a0c1-4d24-97ef-7a57f58e820d","createdTime":1695621659637,"lastModifiedTime":1695621659637}}]},"RequestInfo":{"apiId":"Rainmaker","authToken":"17b86f8a-6063-4028-abef-fbf005c1ba75","userInfo":{"id":618,"uuid":"40e3b45a-0f64-4e8c-8768-aab82c095b2d","userName":"AUTO1","name":"Jagankumar E","mobileNumber":"7654376563","emailId":null,"locale":null,"type":"EMPLOYEE","roles":[{"name":"HRMS Admin","code":"HRMS_ADMIN","tenantId":"pg.citya"},{"name":"ESTIMATE VERIFIER","code":"ESTIMATE_VERIFIER","tenantId":"pg.citya"},{"name":"OFFICER IN CHARGE","code":"OFFICER_IN_CHARGE","tenantId":"pg.citya"},{"name":"PROJECT CREATOR","code":"PROJECT_CREATOR","tenantId":"pg.citya"},{"name":"BILL_CREATOR","code":"BILL_CREATOR","tenantId":"pg.citya"},{"name":"ESTIMATE VIEWER","code":"ESTIMATE_VIEWER","tenantId":"pg.citya"},{"name":"MB_APPROVER","code":"MB_APPROVER","tenantId":"pg.citya"},{"name":"MUKTA Admin","code":"MUKTA_ADMIN","tenantId":"pg.citya"},{"name":"WORK ORDER CREATOR","code":"WORK_ORDER_CREATOR","tenantId":"pg.citya"},{"name":"ESTIMATE APPROVER","code":"ESTIMATE_APPROVER","tenantId":"pg.citya"},{"name":"MB_VERIFIER","code":"MB_VERIFIER","tenantId":"pg.citya"},{"name":"WORK ORDER VERIFIER","code":"WORK_ORDER_VERIFIER","tenantId":"pg.citya"},{"name":"PROJECT VIEWER","code":"PROJECT_VIEWER","tenantId":"pg.citya"},{"name":"MB_CREATOR","code":"MB_CREATOR","tenantId":"pg.citya"},{"name":"MUSTER ROLL VERIFIER","code":"MUSTER_ROLL_VERIFIER","tenantId":"pg.citya"},{"name":"Localisation admin","code":"LOC_ADMIN","tenantId":"pg.citya"},{"name":"Employee Common","code":"EMPLOYEE_COMMON","tenantId":"pg.citya"},{"name":"BILL_VIEWER","code":"BILL_VIEWER","tenantId":"pg.citya"},{"name":"TECHNICAL SANCTIONER","code":"TECHNICAL_SANCTIONER","tenantId":"pg.citya"},{"name":"MUSTER ROLL APPROVER","code":"MUSTER_ROLL_APPROVER","tenantId":"pg.citya"},{"name":"WORK ORDER APPROVER","code":"WORK_ORDER_APPROVER","tenantId":"pg.citya"},{"name":"ESTIMATE CREATOR","code":"ESTIMATE_CREATOR","tenantId":"pg.citya"},{"name":"MDMS Admin","code":"MDMS_ADMIN","tenantId":"pg.citya"},{"name":"MB_VIEWER","code":"MB_VIEWER","tenantId":"pg.citya"},{"name":"SUPER USER","code":"SUPERUSER","tenantId":"pg.citya"}],"active":true,"tenantId":"pg.citya","permanentCity":null},"msgId":"1700205712385|en_IN","plainAccessRequest":{}}}'
```When we delete a Sanitation worker who is tagged to a vendor we are updating the worker - vendor tagging to inactive.
Refer to the curl below:
```powershell
curl --location 'http://localhost:3000/vendor/v1/_update?tenantId=pg.citya' \
--header 'Accept: application/json, text/plain, */*' \
--header 'Accept-Language: en-US,en;q=0.9' \
--header 'Connection: keep-alive' \
--header 'Content-Type: application/json;charset=UTF-8' \
--header 'Origin: http://localhost:3000' \
--header 'Referer: http://localhost:3000/sanitation-ui/employee/fsm/registry?selectedTabs=DRIVER' \
--header 'Sec-Fetch-Dest: empty' \
--header 'Sec-Fetch-Mode: cors' \
--header 'Sec-Fetch-Site: same-origin' \
--header 'User-Agent: Mozilla/5.0 (Windows NT 10.0; Win64; x64) AppleWebKit/537.36 (KHTML, like Gecko) Chrome/119.0.0.0 Safari/537.36' \
--header 'sec-ch-ua: "Google Chrome";v="119", "Chromium";v="119", "Not?A_Brand";v="24"' \
--header 'sec-ch-ua-mobile: ?0' \
--header 'sec-ch-ua-platform: "Windows"' \
--data-raw '{
"vendor": {
"id": "ea138945-f35b-42a3-96af-9ded096fb809",
"tenantId": "pg.citya",
"name": "Raj",
"address": {
"tenantId": "pg.citya",
"doorNo": "",
"plotNo": "",
"id": "894f60f2-0d27-4f24-b1ec-a0017920b51a",
"landmark": "",
"city": "CityA",
"district": "CityA",
"region": "CityA",
"state": null,
"country": "in",
"pincode": "",
"additionalDetails": "{\"description\": \"\"}",
"buildingName": "",
"street": "",
"locality": {
"code": "SUN01",
"name": "Ajit Nagar - Area1",
"label": "Locality",
"latitude": "31.63089",
"longitude": "74.871552",
"children": [],
"materializedPath": null
},
"geoLocation": null,
"auditDetails": null
},
"owner": {
"id": 861,
"uuid": "31b14828-1c46-42bb-9364-8f456509c375",
"userName": "6543217890",
"password": null,
"salutation": null,
"name": "Raj",
"gender": "MALE",
"mobileNumber": "6543217890",
"emailId": "[email protected]",
"altContactNumber": null,
"pan": null,
"aadhaarNumber": null,
"permanentAddress": null,
"permanentCity": null,
"permanentPinCode": null,
"correspondenceCity": null,
"correspondencePinCode": null,
"correspondenceAddress": null,
"active": true,
"dob": 1700611200000,
"pwdExpiryDate": 1708695918000,
"locale": null,
"type": "CITIZEN",
"signature": null,
"accountLocked": false,
"roles": [
{
"id": null,
"name": "FSM Desluding Operator",
"code": "FSM_DSO",
"tenantId": "pg"
},
{
"id": null,
"name": "Citizen",
"code": "CITIZEN",
"tenantId": "pg"
}
],
"fatherOrHusbandName": "Raj",
"relationship": "OTHER",
"bloodGroup": null,
"identificationMark": null,
"photo": null,
"createdBy": "715",
"createdDate": 1700820918000,
"lastModifiedBy": "715",
"lastModifiedDate": 1700826327000,
"otpReference": null,
"tenantId": "pg"
},
"vehicles": null,
"drivers": [
{
"id": "f24d113e-c163-4aa1-a1b3-b54807308a40",
"tenantId": "pg.citya",
"name": "pintu",
"owner": {
"id": 820,
"uuid": "fc688f84-6b5c-4da5-ae69-3580d3d81fc6",
"userName": "1111111149",
"password": null,
"salutation": null,
"name": "pintu",
"gender": "MALE",
"mobileNumber": "1111111149",
"emailId": "[email protected]",
"altContactNumber": null,
"pan": null,
"aadhaarNumber": null,
"permanentAddress": null,
"permanentCity": null,
"permanentPinCode": null,
"correspondenceCity": null,
"correspondencePinCode": null,
"correspondenceAddress": null,
"active": true,
"dob": 0,
"pwdExpiryDate": 1706888228000,
"locale": null,
"type": "CITIZEN",
"signature": null,
"accountLocked": false,
"roles": [
{
"id": null,
"name": "FSM Driver",
"code": "FSM_DRIVER",
"tenantId": "pg.citya"
},
{
"id": null,
"name": "FSM Driver",
"code": "FSM_DRIVER",
"tenantId": "pg"
}
],
"fatherOrHusbandName": "pintu",
"relationship": "OTHER",
"bloodGroup": null,
"identificationMark": null,
"photo": null,
"createdBy": "715",
"createdDate": 1699013642000,
"lastModifiedBy": "715",
"lastModifiedDate": 1700827360000,
"otpReference": null,
"tenantId": "pg"
},
"ownerId": "fc688f84-6b5c-4da5-ae69-3580d3d81fc6",
"additionalDetails": null,
"description": null,
"licenseNumber": "12345678999995",
"status": "DISABLED",
"auditDetails": {
"createdBy": "4a747fc5-6a8c-4645-8748-fec35f1b9e17",
"lastModifiedBy": "4a747fc5-6a8c-4645-8748-fec35f1b9e17",
"createdTime": 1698993428899,
"lastModifiedTime": 1700807560471
},
"vendorDriverStatus": "ACTIVE"
}
],
"workers": [
{
"id": "f3104f07-9b62-460d-8b9c-e16a4b6c740f",
"tenantId": "pg.citya",
"vendorId": "ea138945-f35b-42a3-96af-9ded096fb809",
"individualId": "IND-2023-11-23-010844",
"additionalDetails": null,
"auditDetails": {
"createdBy": "4a747fc5-6a8c-4645-8748-fec35f1b9e17",
"lastModifiedBy": "4a747fc5-6a8c-4645-8748-fec35f1b9e17",
"createdTime": 1700801118082,
"lastModifiedTime": 1700803699721
},
"vendorWorkerStatus": "ACTIVE"
},
{
"individualId":"IND-2023-11-23-010831",
"vendorWorkerStatus":"ACTIVE"
}
],
"additionalDetails": {
"description": ""
},
"source": "WhatsApp",
"description": null,
"ownerId": "31b14828-1c46-42bb-9364-8f456509c375",
"agencyType": "ULB",
"paymentPreference": "post-service",
"status": "ACTIVE",
"auditDetails": {
"createdBy": "4a747fc5-6a8c-4645-8748-fec35f1b9e17",
"lastModifiedBy": "4a747fc5-6a8c-4645-8748-fec35f1b9e17",
"createdTime": 1700801118082,
"lastModifiedTime": 1700806527779
}
},
"RequestInfo": {
"apiId": "Rainmaker",
"authToken": "4ff28c82-654f-4403-9f2d-8547b9c35687",
"userInfo": {
"id": 715,
"uuid": "4a747fc5-6a8c-4645-8748-fec35f1b9e17",
"userName": "ADMIN",
"name": "ADMIN",
"mobileNumber": "9035169725",
"emailId": "",
"locale": null,
"type": "EMPLOYEE",
"roles": [
{
"name": "FSM Administrator",
"code": "FSM_ADMIN",
"tenantId": "pg.citya"
}
],
"active": true,
"tenantId": "pg.citya",
"permanentCity": "CityA"
},
"msgId": "1700732793623|en_IN",
"plainAccessRequest": {}
}
}'
```Role Action mapping is done for the above three endpoints for FSM_ADMIN role
FSM_ADMIN


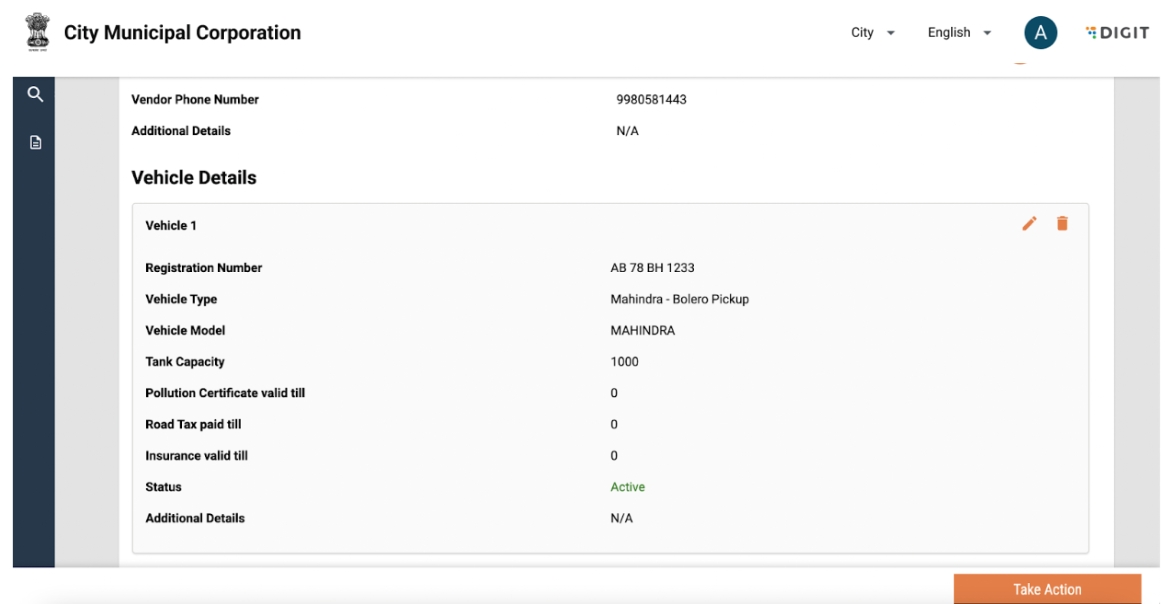
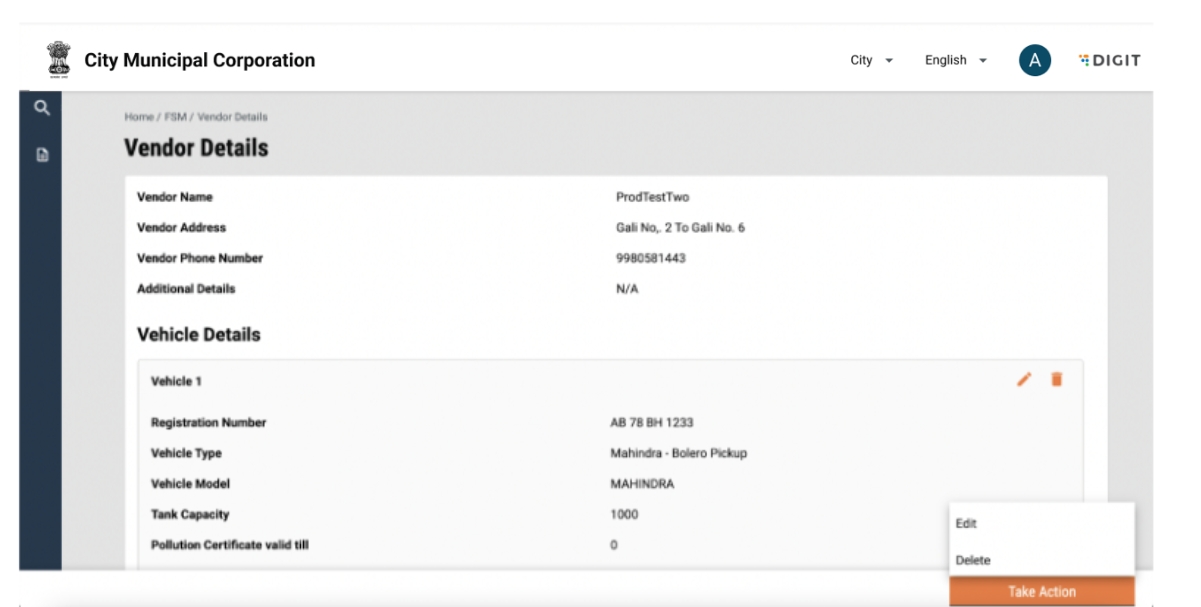
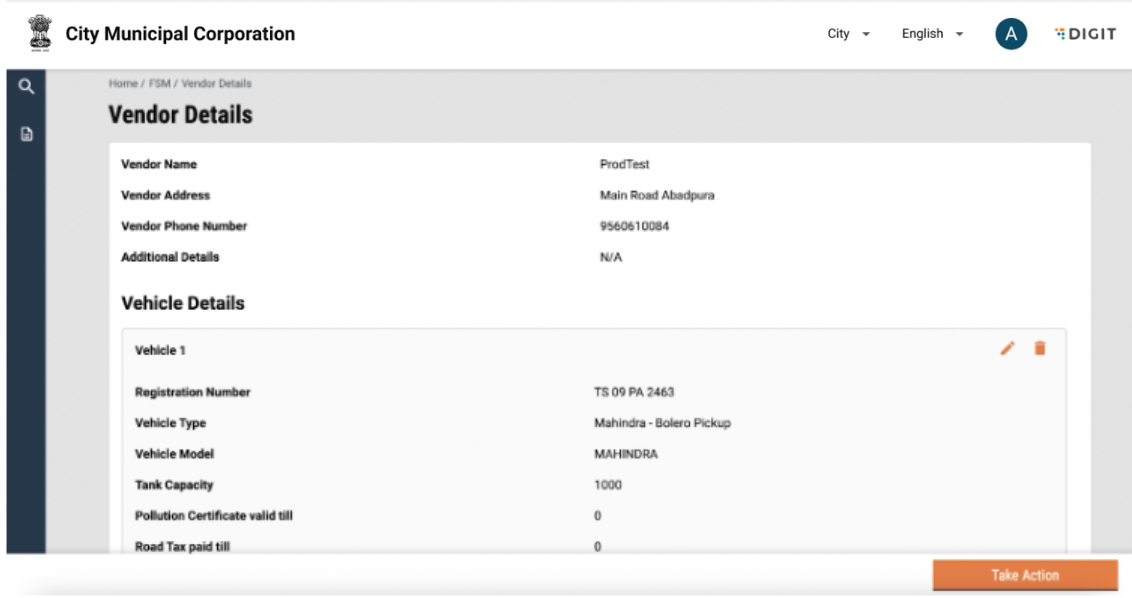
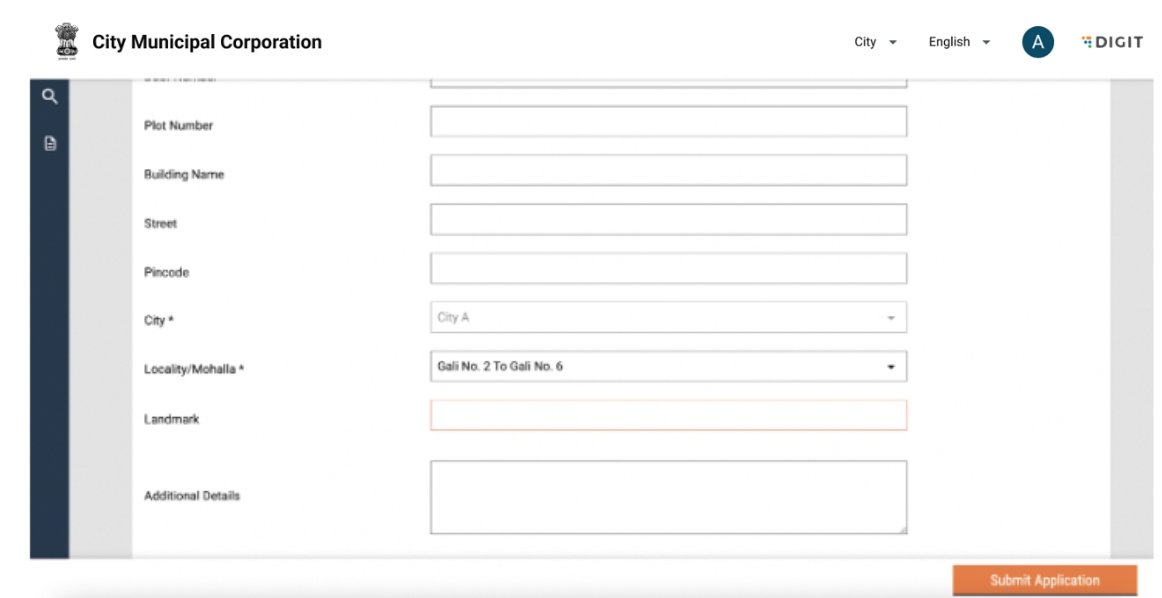
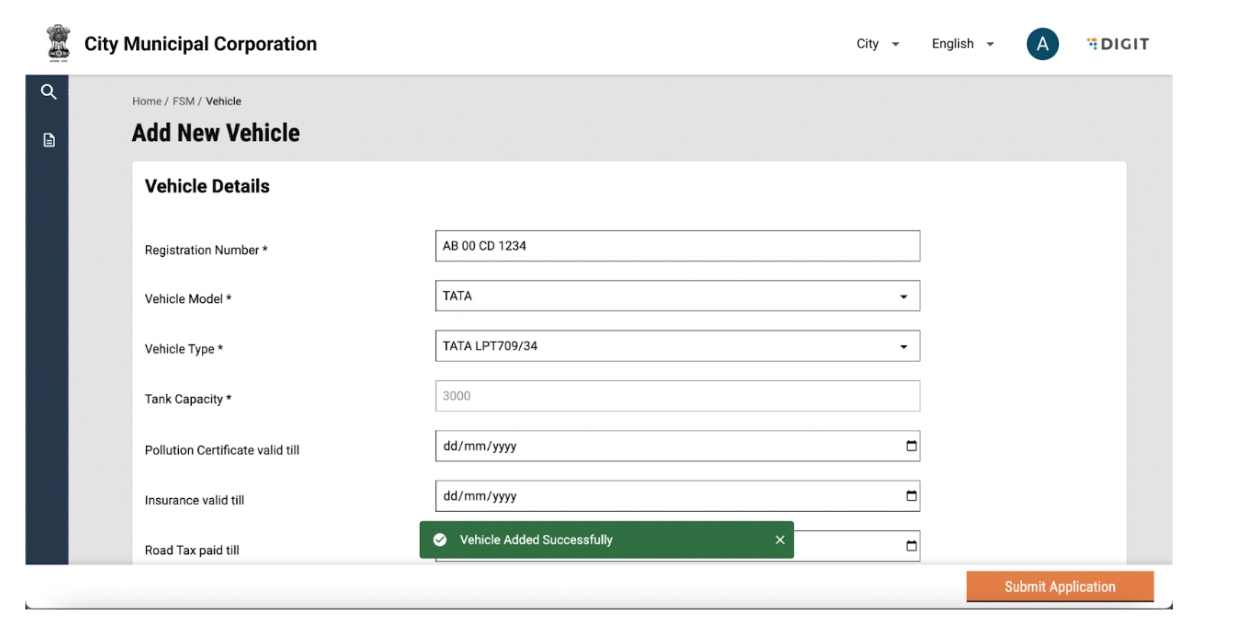

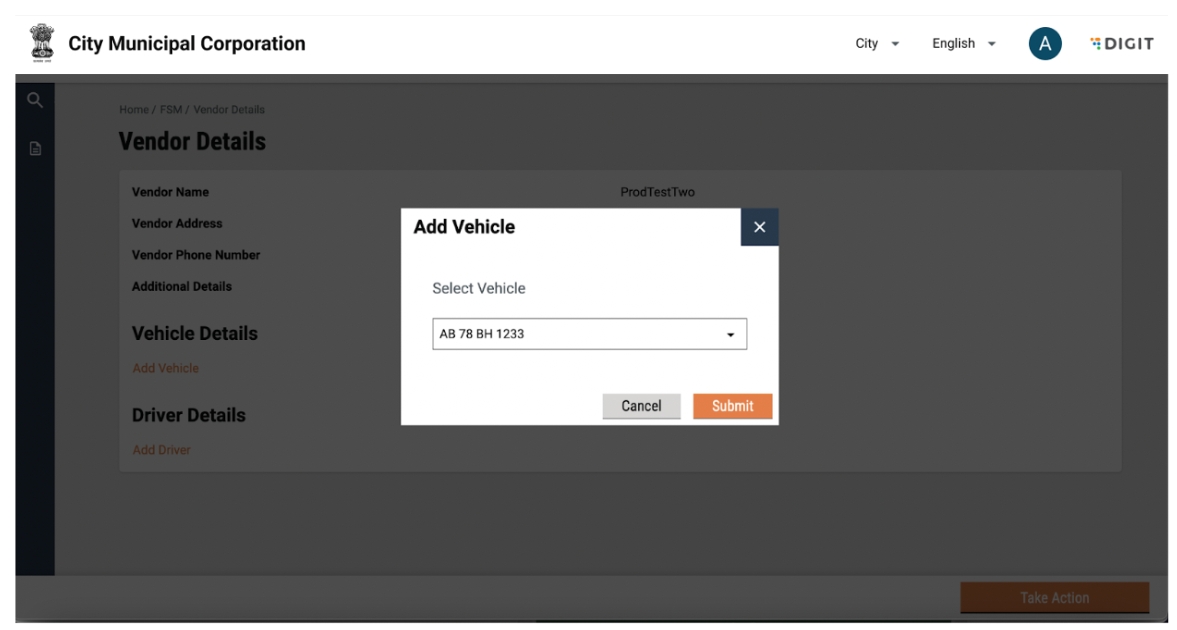
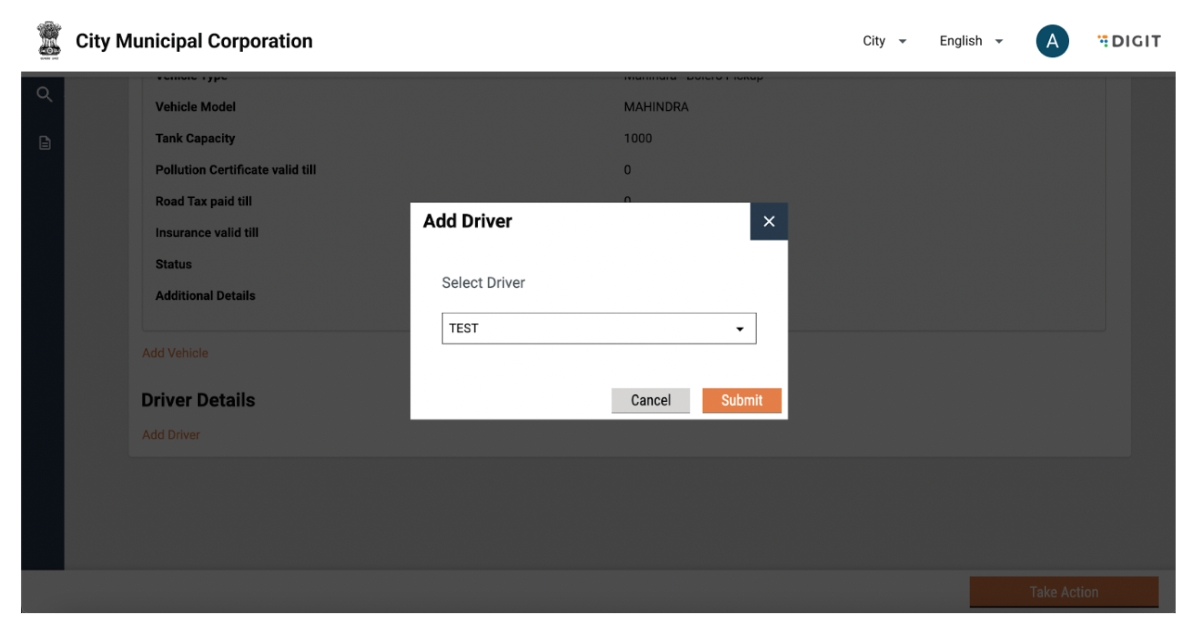
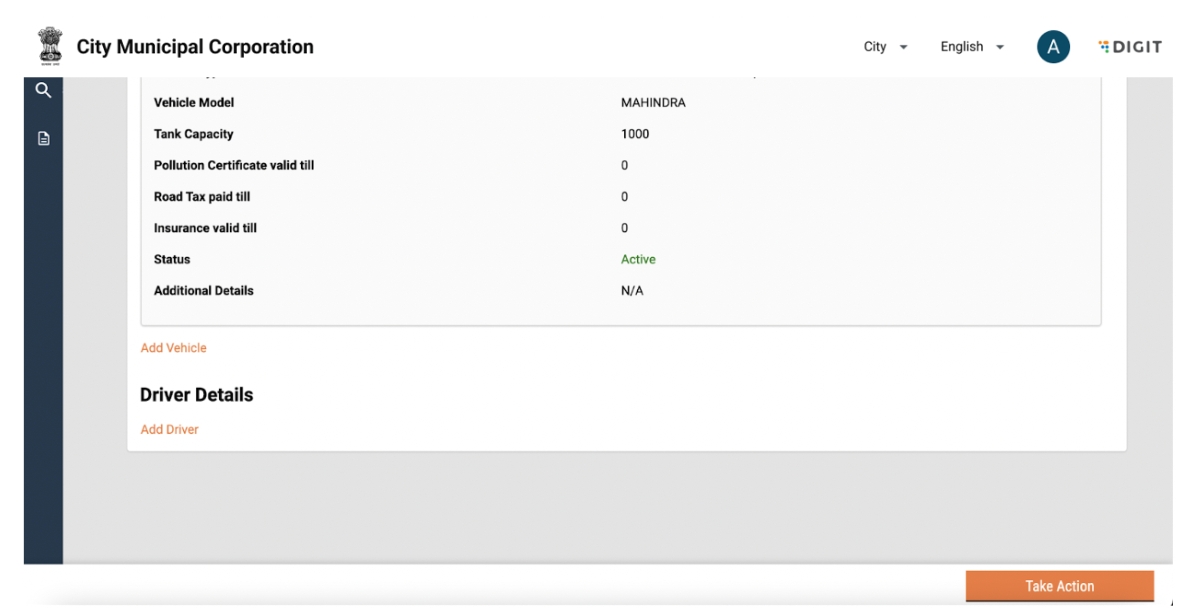

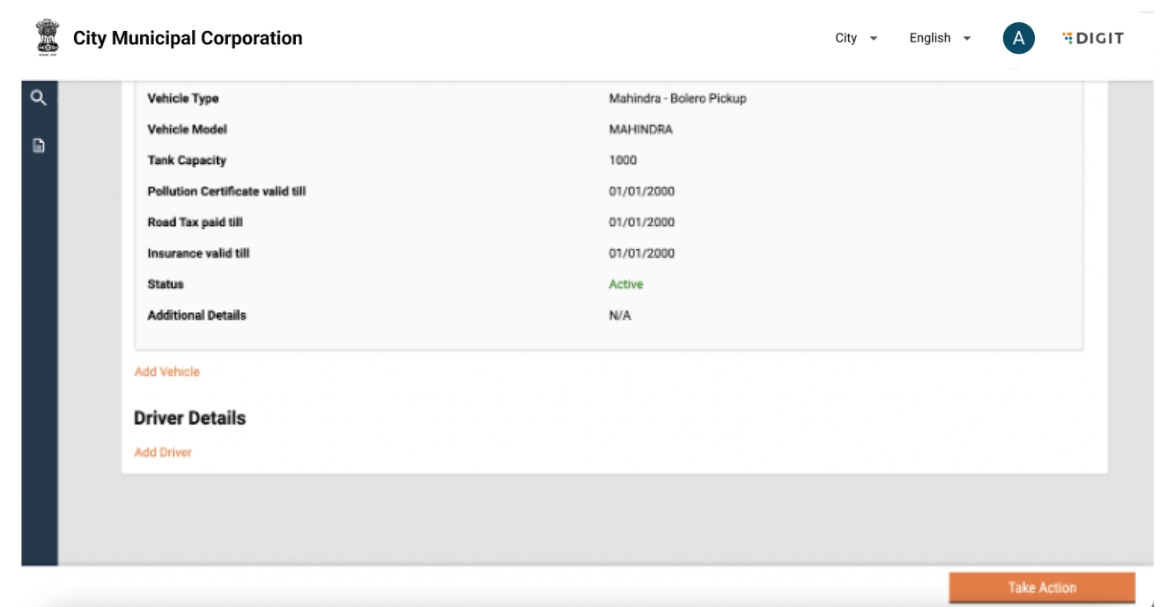


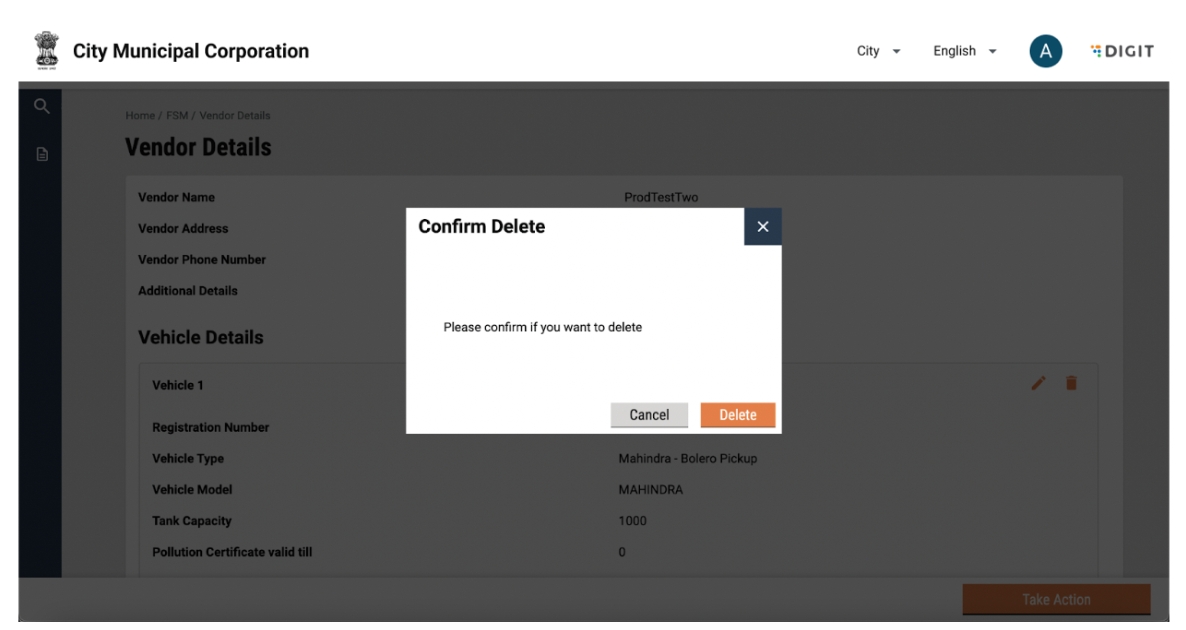
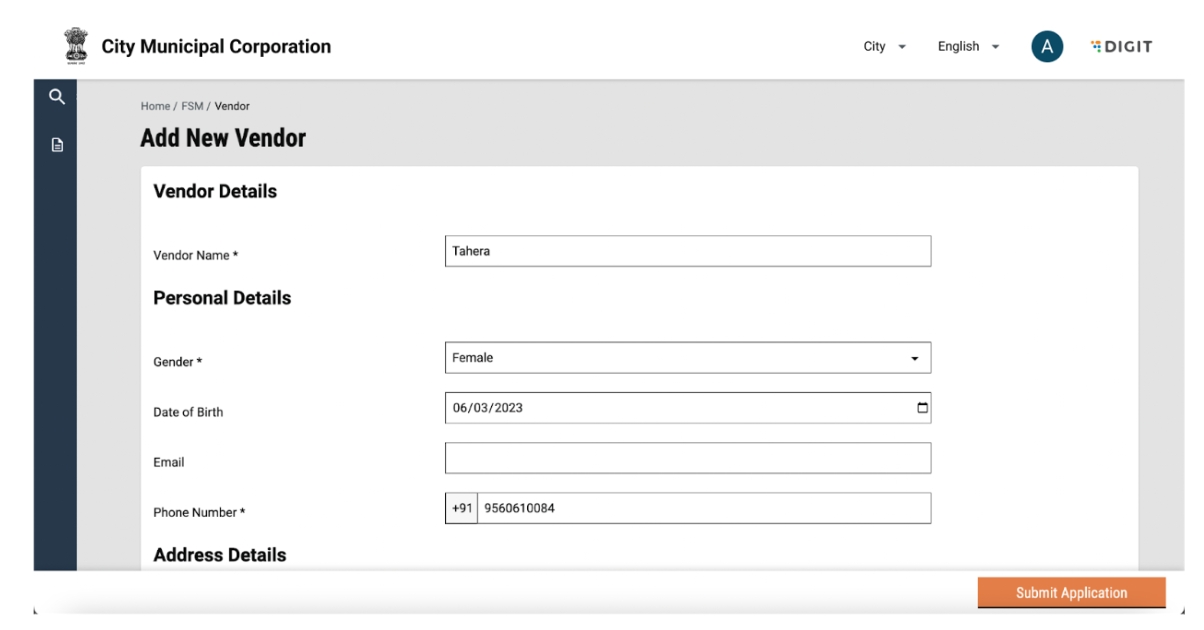
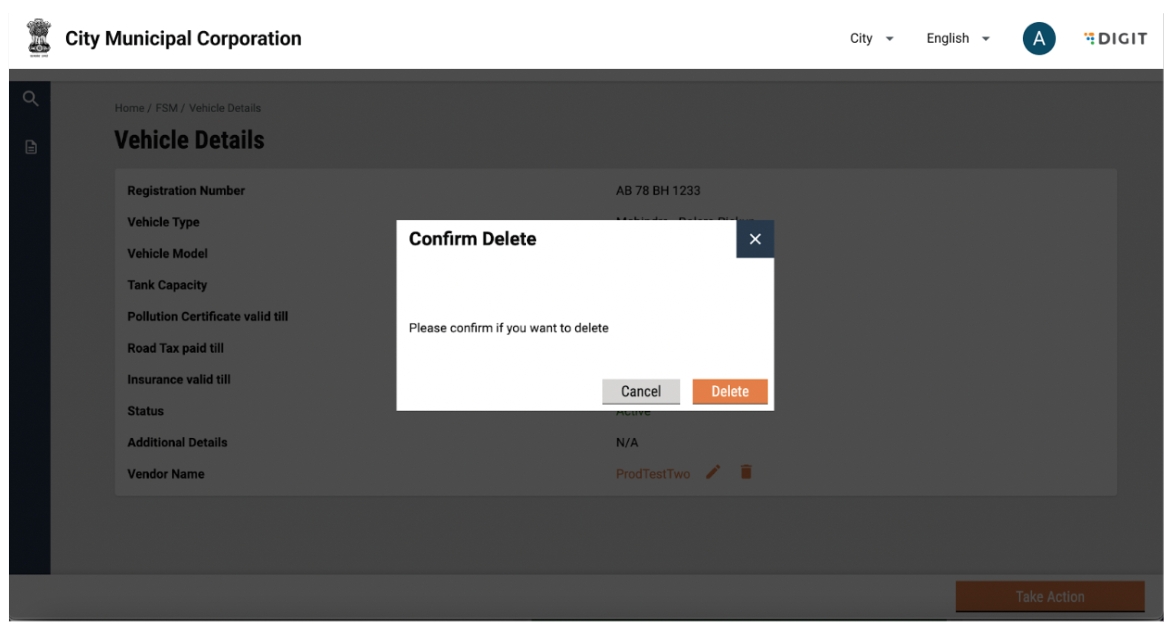
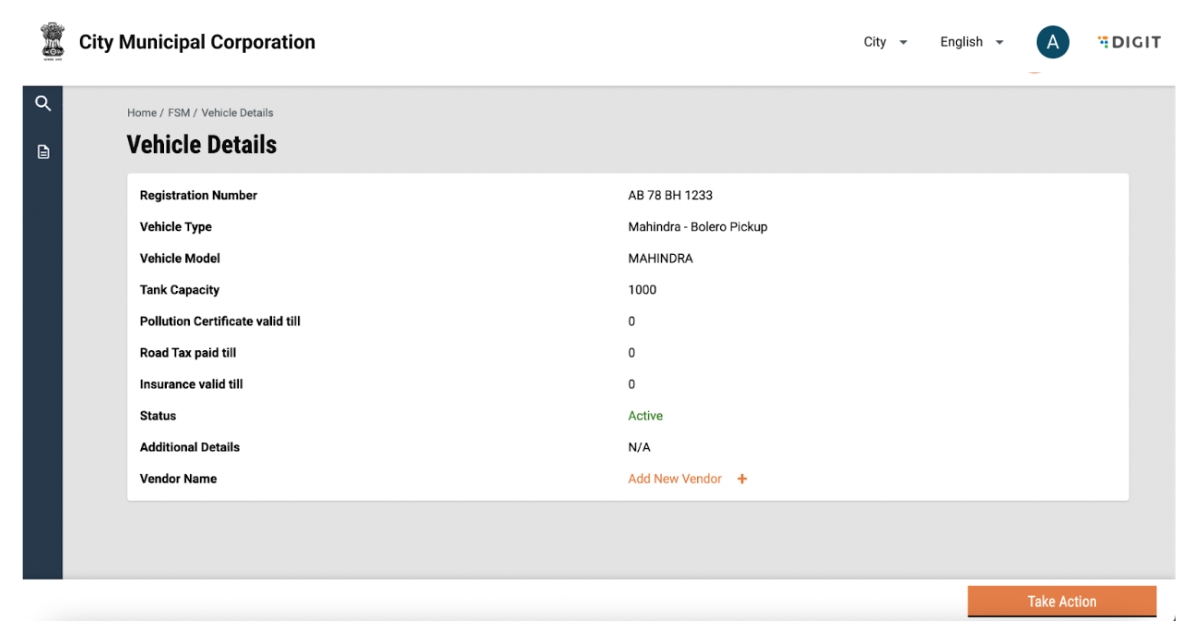
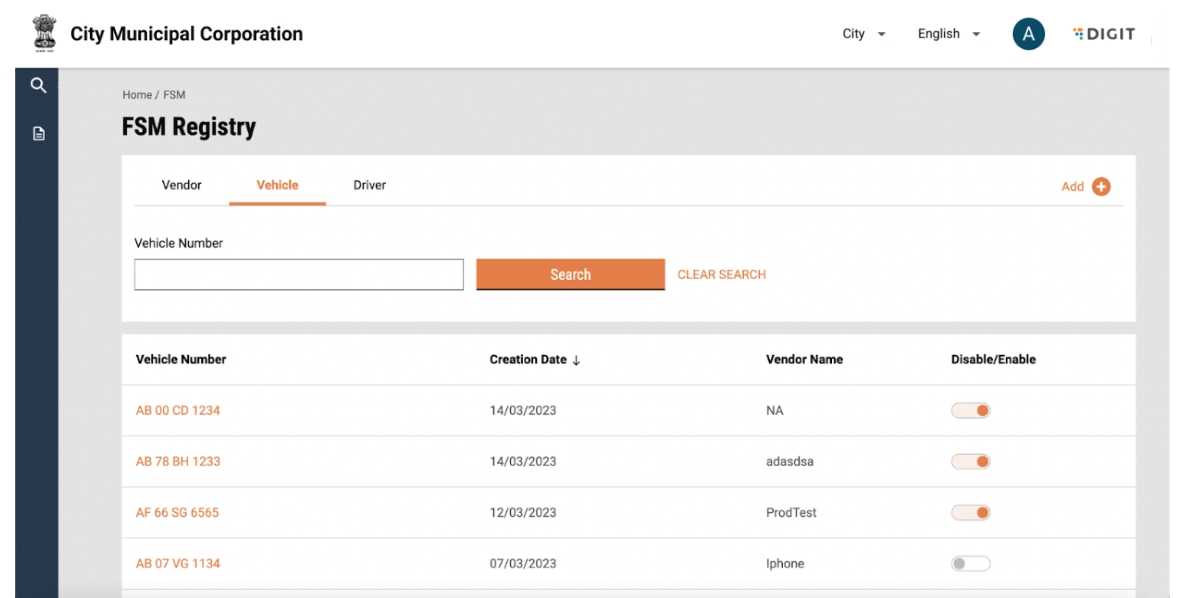
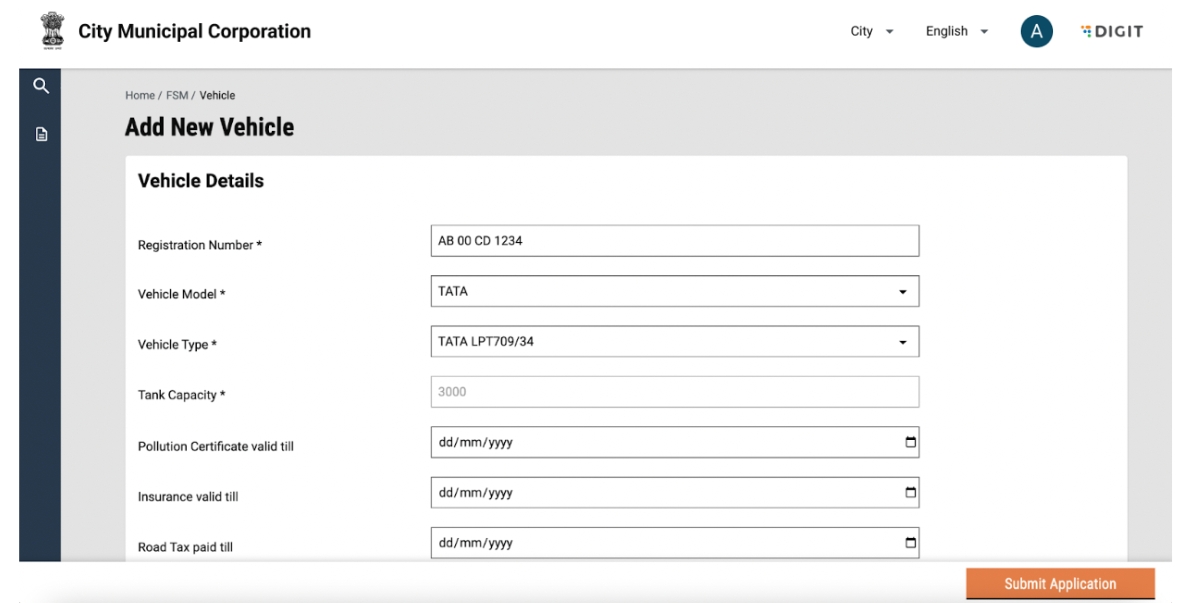
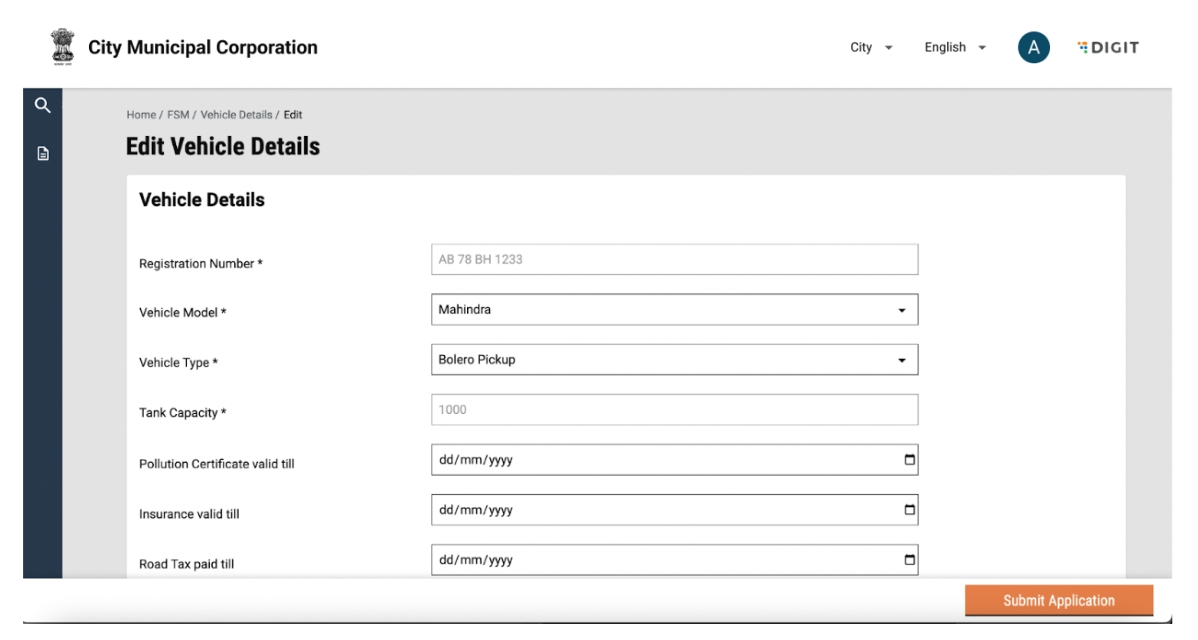
Check left padding for all forms
Improvement
1
Done
Y
Border colour of the view test screen
Improvement
0.5
Done
Y
Result summary bold in view test screen
Improvement
0.1
Done
Y
Back button and help label spacing in the help screen
Improvement
0.1
Done
Y
Powered by DIGIT in sidebar at the bottom
Improvement
0.1
Done
Y
Truck icon change
Improvement
0.5
Done
Y
Role details: Remove colon, and values should not be bold
Improvement
0.1
Done
Y
Pending tasks text color change
Improvement
0.1
Done
Y
Left and right spacing of the notification cards to be equal
Improvement
0.1
Done
Y
The font size for notification subheads to be checked
Improvement
0.1
Done
Y
Empty state for notifications should be according to Figma
Improvement
0.5
Done
Y
Once notifications are cleared for the user, it should not appear when the page is refreshed
Improvement
Backend changes required. Will be done in patch.
View past test results to be left aligned to the icon
Improvement
0.1
Done
Y
On refreshing the page, the input filtered view should remain intact
Improvement
Done
Y
All cards and table to have 4px radius
Improvement
0.5
Done
Y
Spacing between the quality testing icon and text
Improvement
0.1
Done
Y
Width of the column to be increased and the proportion of row height should match Figma
Improvement
0.1
Done
Y
In some test results, the timeline connecting line is missing
Improvement
1
Done
Y
Notifications cards to be responsive
Improvement
1
Done
Y
Submit CTA does not work
Improvement
1
Done
Y
No toast validations on submitting
Improvement
0.5
Done
Y
The placement of the logout popup should be higher
Improvement
0.5
Done
Y
Test date localisation missing
Improvement
0.1
Done
Y
Background image to be changed
Improvement
0.5
In plants dropdown, the hover states should extend to the edges
Improvement
0.5
Done
Y
Inbox rows are not actionable
Improvement
1
Done
Y
Alerts - heading alignment
Improvement
0.5
Done
Y
Inner padding of
cards
Improvement
0.5
Done
Y
Share dropdown should close on clicking outside
Improvement
0.5
Done
Y
Size and alignment of buttons to be fixed
Improvement
1
Done
Y
Localisation missing for CTAs
Improvement
0.5
Done
Y
Once filters are applied, the filters should be retained while re-opening filters as well
Enhancement
Need enhancement in core components. Will be done in patch.
TODO
Need enhancement in core components.
Sort filters should be retained
Enhancement
Need enhancement in core components. Will be done in patch.
TODO
Need enhancement in core components.
On sorting the date column, the filters should also change
Enhancement
Need enhancement in core components. Will be done in patch.
TODO
Need enhancement in core components.
Filter card on the side should be sort
Enhancement
Need enhancement in core components. Will be done in patch.
TODO
Need enhancement in core components.
The urban-rural convergence is an initiative that aims to ensure access to sanitation services to all gram panchayats (GPs) via urban local bodies (ULBs) located closest to them.
A ULB employee creates applications to cater to the sanitation needs of local communities in urban areas. In the same way, they should also cater to the same sanitation needs of rural bodies near that urban region.
They need a provision in a system while creating a new application to either choose local municipalities or urban-supported villages.
Based on their choice they would be able to select either a locality/mohalla or a GP area from the respective master data drop-down list.
The caveat here is that if a ULB employee chooses GP, then the trip amount field should be editable where he/she can fill in any logical amount based on the offline calculation instead of the auto-calculated amount already there in an application in the case of urban bodies.
ULB employees or DSO operators should also be able to edit the number of trips. The final amount should be multiple of the initial amount entered into an application with the number of trips.
Update the MDMS data: boundary-data.json
- Add a new children hierarchy for GP under city which will be parallel to locality. A sample MDMS is attached below:
By default, the 'Urban' option will be pre-selected in the radio button in the above wireframe and the drop-down will have the locality/mohalla master data. If an employee selects “ULB supported village”, then the locality/mohalla drop-down will be replaced by GPs and village drop-down data on the fly.
The system will use the below URL to fetch the localities or GPs and their corresponding villages.
- In the case of localities, one needs to pass boundaryType as “Locality”.
https://dev.digit.org/egov-location/location/v11/boundarys/_search?hierarchyTypeCode=REVENUE&boundaryType=Locality&tenantId=pb.amritsar
- In the case of GP/villages, one needs to pass the boundaryType as “GP”.
https://dev.digit.org/egov-location/location/v11/boundarys/_search?hierarchyTypeCode=REVENUE&boundaryType=GP&tenantId=pb.amritsar
Introduction of a new string column (boundary_type) in the FSM_APPLICATION table to capture (locality or GP) to determine if the application created is for rural or not so that in the near future it will be helpful for the analytics and statistics in dashboards.
- The default value for this column will be locality to support backward compatibility
Adding a vehicle log would also have the option to select urban (default option) or rural. If rural gets selected the text name of an element would be replaced from 'locality' to “Gram Panchayat” for a text field.
Introduction of a new column of string type (boundary_type) in the vehicle_trip table to capture if the vehicle log is created for the GP or not.
- The default value for this column will be Locality to support backward compatibility.
boundary-data.json
{
"tenantId": "pb.amritsar",
"moduleName": "egov-location",
"TenantBoundary": [{
"hierarchyType": {
"code": "REVENUE",
"name": "REVENUE"
},
"boundary": {
"id": 1,
"boundaryNum": 1,
"name": "Angul",
"localname": "Angul",
"longitude": null,
"latitude": null,
"label": "City",
"code": "od.angul",
"children": [{
"id": "2",
"boundaryNum": 1,
"name": "Baniabahal",
"localname": "Baniabahal",
"longitude": null,
"latitude": null,
"label": "Locality",
"code": "VIL1"
},
{
"id": "3",
"boundaryNum": 1,
"name": "Hulurisinga",
"localname": "Hulurisinga",
"longitude": null,
"latitude": null,
"label": "Locality",
"code": "VIL2"
},
{
"id": "4",
"boundaryNum": 1,
"name": "Angul town",
"localname": "Angul town",
"longitude": null,
"latitude": null,
"label": "Locality",
"code": "VIL3"
},
{
"id": "5",
"boundaryNum": 1,
"name": "Other",
"localname": "Other",
"longitude": null,
"latitude": null,
"label": "Locality",
"code": "VIL4"
},
{
"id": 6,
"boundaryNum": 1,
"name": "GP 1",
"localname": "GP1",
"longitude": null,
"latitude": null,
"label": "GP",
"code": "GP1",
"children": [{
"id": 11,
"boundaryNum": 1,
"name": "Village 1",
"localname": "Village local 1",
"longitude": 74.871552,
"latitude": 31.63089,
"label": "Village",
"code": "SUN04",
"pincode": [143001],
"area": "V-Area1",
"children": []
},
{
"id": 12,
"boundaryNum": 1,
"name": "Village 2",
"localname": "Village local 2",
"longitude": null,
"latitude": null,
"label": "Village",
"code": "SUN11",
"pincode": [143001],
"area": "V-Area1",
"children": []
}
]
},
{
"id": 8,
"boundaryNum": 1,
"name": "GP 2",
"localname": "GP2",
"longitude": null,
"latitude": null,
"label": "GP",
"code": "GP2",
"children": [{
"id": 13,
"boundaryNum": 1,
"name": "Village 3",
"localname": "Village local 3",
"longitude": 74.871552,
"latitude": 31.63089,
"label": "Village",
"code": "SUN04",
"pincode": [143001],
"area": "V-Area1",
"children": []
},
{
"id": 14,
"boundaryNum": 1,
"name": "Village 4",
"localname": "Village local 4",
"longitude": null,
"latitude": null,
"label": "Village",
"code": "SUN11",
"pincode": [143001],
"area": "V-Area1",
"children": []
}
]
}
]
}
},
{
"hierarchyType": {
"code": "ADMIN",
"name": "ADMIN"
},
"boundary": {
"id": 1,
"boundaryNum": 1,
"name": "Angul",
"localname": "Angul",
"longitude": null,
"latitude": null,
"label": "City",
"code": "od.angul",
"children": [{
"id": "2",
"boundaryNum": 1,
"name": "Baniabahal",
"localname": "Baniabahal",
"longitude": null,
"latitude": null,
"label": "Locality",
"code": "VIL1"
},
{
"id": "3",
"boundaryNum": 1,
"name": "Hulurisinga",
"localname": "Hulurisinga",
"longitude": null,
"latitude": null,
"label": "Locality",
"code": "VIL2"
},
{
"id": "4",
"boundaryNum": 1,
"name": "Angul town",
"localname": "Angul town",
"longitude": null,
"latitude": null,
"label": "Locality",
"code": "VIL3"
}
]
}
}
]
}UrcConfig.json
To enable URC feature in the UI:
{
"tenantId": "pg.angul",
"moduleName": "FSM",
"urcConfig": [
{
"URCEnable": true,
"villageHierarchyAvailable": true
}
]
}We are keeping the locality hierarchy under the city as it is [No change there]. And the ‘location api’ with boundaryType as 'locality' will be used the same way it's being called currently to get the localities. Below are the API details: https://dev.digit.org/egov-location/location/v11/boundarys/_search?hierarchyTypeCode=REVENUE&boundaryType=Locality&tenantId=pb.amritsar Response:
{
"ResponseInfo": {
"apiId": "org.egov.boundary",
"ver": null,
"ts": "",
"resMsgId": "uief87324",
"msgId": null,
"status": "200 OK"
},
"TenantBoundary": [
{
"hierarchyType": {
"id": null,
"name": "REVENUE",
"code": "REVENUE",
"localName": null,
"tenantId": null,
"createdBy": null,
"createdDate": null,
"lastModifiedBy": null,
"lastModifiedDate": null,
"version": 0,
"new": false
},
"boundary": [
{
"code": "VIL1",
"name": "Baniabahal",
"label": "Locality",
"latitude": null,
"longitude": null,
"area": null,
"pincode": null,
"boundaryNum": 1,
"children": []
},
{
"code": "VIL2",
"name": "Hulurisinga",
"label": "Locality",
"latitude": null,
"longitude": null,
"area": null,
"pincode": null,
"boundaryNum": 1,
"children": []
},
{
"code": "VIL3",
"name": "Angul town",
"label": "Locality",
"latitude": null,
"longitude": null,
"area": null,
"pincode": null,
"boundaryNum": 1,
"children": []
},
{
"code": "VIL4",
"name": "Other",
"label": "Locality",
"latitude": null,
"longitude": null,
"area": null,
"pincode": null,
"boundaryNum": 1,
"children": []
}
],
"tenantId": "pb.amritsar"
}
]
}To get a list of gram panchayats and corresponding villages, pass the boundaryType as 'GP'. Below are the API details: https://dev.digit.org/egov-location/location/v11/boundarys/_search?hierarchyTypeCode=REVENUE&boundaryType=GP&tenantId=pb.amritsar
{
"ResponseInfo": {
"apiId": "org.egov.boundary",
"ver": null,
"ts": "",
"resMsgId": "uief87324",
"msgId": null,
"status": "200 OK"
},
"TenantBoundary": [
{
"hierarchyType": {
"id": null,
"name": "REVENUE",
"code": "REVENUE",
"localName": null,
"tenantId": null,
"createdBy": null,
"createdDate": null,
"lastModifiedBy": null,
"lastModifiedDate": null,
"version": 0,
"new": false
},
"boundary": [
{
"code": "GP1",
"name": "GP 1",
"label": "GP",
"latitude": null,
"longitude": null,
"area": null,
"pincode": null,
"boundaryNum": 1,
"children": [
{
"code": "SUN04",
"name": "Village 1",
"label": "Village",
"latitude": "31.63089",
"longitude": "74.871552",
"area": "V-Area1",
"pincode": [
143001
],
"boundaryNum": 1,
"children": []
},
{
"code": "SUN11",
"name": "Village 2",
"label": "Village",
"latitude": null,
"longitude": null,
"area": "V-Area1",
"pincode": [
143001
],
"boundaryNum": 1,
"children": []
}
]
},
{
"code": "GP2",
"name": "GP 2",
"label": "GP",
"latitude": null,
"longitude": null,
"area": null,
"pincode": null,
"boundaryNum": 1,
"children": [
{
"code": "SUN04",
"name": "Village 3",
"label": "Village",
"latitude": "31.63089",
"longitude": "74.871552",
"area": "V-Area1",
"pincode": [
143001
],
"boundaryNum": 1,
"children": []
},
{
"code": "SUN11",
"name": "Village 4",
"label": "Village",
"latitude": null,
"longitude": null,
"area": "V-Area1",
"pincode": [
143001
],
"boundaryNum": 1,
"children": []
}
]
}
],
"tenantId": "pb.amritsar"
}
]
}Table Name
Column Name
Comments
eg_fsm_application
boundarytype
To capture (locality or GP) to determine if the application created is for rural or not based on the radio button selection.
eg_fsm_address
additionaldetails.gramPanchayat
To store the selected GP while creating an application.
eg_fsm_address
additionaldetails.village
To store the selected village while creating an application.
eg_vehicle_trip
boundarytype
To capture (locality or GP) if the vehicle log is created for GP or not.
To analyse the impact, we deployed a different module (property tax) which points to the same boundary-data mdms.
Expectation:
For FSM Module: Non-URC flow: The locality drop-down should show all the localities as it is (there should be no impact). URC flow: The gram panchayat and village drop-down should show as per the new GP and village added to the MDMS.
For Property Tax Module: The locality drop-down should show all the localities as it is (there should be no impact).
Property Tax Screen:
The locality dropdown in property tax displays the values from the existing location hierarchy itself (there is no impact).
SUJOG FSM (NON-URC)
In FSM, for non-URC, the locality drop-down shows the values from the existing hierarchy itself (there is no impact)..
SUJOG FSM (URC)
GP drop-down In the case of FSM (URC), the gram panchayat and village drop-downs are showing values from the new hierarchy we have configured in the existing MDMS.
Village Dropdown
Pricing
Pricing per trip will be entered by “ULB employees” for each request.
ULB employees will have a free text entry field to enter the price for a request.
In FSTP, there are two scenarios -
Selects a gram panchayat from drop-down but the village is not in the list. In this case, select 'other' in the village and a free text field appears.
Select 'other' in the GP list. In this case, 2 free text fields appear - one for GP and one for village.
If the locality or GP is located outside the city, then select “Outside ULB Limits” and provide the locality/gram panchayat name in the text field.
In the dashboard, add the following chart:
Add pie chart: Applications by source
Pie chart value: Ratio of applications from GP: Ratio of requests from urban areas.
Add toggle for applications and sludge.
Pie chart value: Ratio of sludge disposed from GP: Ratio of sludge from urban areas.
Tooltip: Show total applications and total sludge (See design). Tooltip value to be responsive to toggle between unit, lakh, and crore.
The chart should filter based on the period, district, ULB (dashboard filters).
The chart should have export, share, and download options.
Add bar chart: Number of applications per month from the GP.
Bar chat value: The total number of applications from the GP.
Add toggle for applications and sludge disposed.
Tooltip: Show the total applications and total sludge (See design). Tooltip value to be responsive to toggle between unit, lakh, and crore.
The chart should filter based on the period, district, ULB (dashboard filters).
The chart should have export, share, and download options.


The user interface (UI) design is broken up into the following sections:
Login
Raise a Desludging Request
View Applications
Accept Applications
Payments
Assign Desludging Operator
Assign Vehicle
Complete Request
Rate Services
Manage Vendor, Driver and Vehicle Details
Find the mock-ups below:
When the user opens the application, it first asks them to select the language. The selected language is highlighted in orange color. Once the user selects a language, he/she must click on the ‘Continue’ button which opens the login page.
Users are redirected to this screen once they select the preferred language in the previous screen. The city field is a list with radio buttons based on the tenants that are configured in the instance, and the selected radio button is highlighted in orange. The selection of the city will determine the urban local body (ULB) where the application request is raised.
Once the user selects a location and clicks on continue, the user is redirected to the following screen:
The mobile number entered in the application is for all communication purposes. All SMS communication will be sent to the user on the entered number. A user can also access the history of all past and active transactions using this number. The next button will only be deactivated and will be highlighted once the user has entered a valid number. An error message will be displayed if the number is not 10 digits, or alphabets/special characters are entered.
On clicking ‘Next’, an OTP will be sent to the user, and the user will be redirected to the following screen:
The screen will prompt the user to enter the OTP sent to the registered mobile number. A counter will be displayed on the screen with a countdown on the number of seconds pending post which the OTP has be re-quested. After 30 seconds, a resend button will be visible to the user. The next button will only be deactivated and will be highlighted once the user has entered an OTP. On clicking ‘Next’, the user will be redirected to the FSM landing page. On entering the incorrect OTP, the user will see an error message that says “Invalid OTP”.
When the user opens the application, it asks them to first select the language. The selected language is highlighted in orange color. Once the user selects a language, he/she must click on the ‘Continue’ button which opens the login page.
The user will be provided with a unique system-generated ID and password manually for login.
For an incorrect password, it should show the message “incorrect password” below the password field. If an existing user does not remember his/her password, they must click on “Forgot Password”. This will open a pop-up asking the user to contact the administrator. The ‘OK’ button will collapse the pop-up.
The city field is a dropdown based on the tenets created in the instance. Once all fields are filled, the user can click on ‘Continue’. If any field is not filled, the user will be prompted to fill all fields.
A landing page is available to a citizen on login.
The citizen can apply for desludging requests by clicking on “Apply for Emptying Septic Tank/Pit”. This will redirect the user to the service request page.
The user is prompted to enter the “No. of Trips” and the “Vehicle Capacity”. If the user knows the details, he/she can enter the details and click on ‘Next’. If not, the user also has the option to “Skip and Continue”.
Once the user clicks on ‘Next’, the user is redirected to “Choose Property Type”. A workflow on the top will show the user in which step of the request form he/she is. The radio button for the selected property type will be highlighted with orange. The next button will only be deactivated and will be highlighted once the user has selected a property type.
Based on the property type selected, an information box is displayed to the user informing them about the approximate cost of desludging. On clicking next, the user is prompted to “Choose Property Sub-Type”:
The radio button for the selected property type will be highlighted in orange. The next button will only be deactivated and will be highlighted once the user has selected a property type.
The user is prompted to select the pincode for the property location using the map or search a location using the search bar. The user can also drag the point on the map to the selected location. If the user knows the pin location, he/she can enter the details and click on ‘Next’. If not, the user also has the option to “Skip and Continue”. If the pin location is not selected, the user is redirected to enter the pincode.
The user can enter a 7-digit pincode. If any alphabets/special characters are entered, the user will be prompted with an invalid pincode error. If the user knows the pincode, he/she can enter the details and click on ‘Next’. If not, the user also has the option to “Skip and Continue”.
After this, the user will be redirected to the property address page and he/she will have to select a city and a mohalla. Both of these are dropdowns. The city dropdown is populated based on the tenants created in the system. The list of localities/mohallas will be from the MDMS. The next button will be deactivated and will be highlighted once the user has filled in the details. Once a property address is provided, the user is asked to select whether the property is a slum.
The radio button for the selected option will be highlighted in orange. The next button will only be deactivated and will be highlighted once the user has selected an option. If yes is selected, the user will be redirected to enter the slum name.
The slum name can be selected from a dropdown. The next button will only be deactivated and will be highlighted once the user has selected a slum name. On clicking ‘Next’, the user is redirected to the property address screen.
After this, the user will be redirected to the property address page where he/she will have to enter the “Street Name” and “Door/House No”. The ‘Next’ button will be deactivated and will be highlighted once the user has filled in the details. Once a property address is provided, the user is asked to provide a landmark.
The landmark can be entered by typing in the text box. If the user knows the landmark, he/she can enter the details and click on ‘Next’. If not, the user also has the option to “Skip and Continue”.
The user will be prompted to “Choose Pit type”. The radio button for the selected option will be highlighted in orange. If the user knows the pit type, he/she can enter the details and click on ‘Next’. If not, the user also has the option to “Skip and Continue”.
The user will be prompted to “Upload Pit Photos” by clicking on the camera icon. Once the button is clicked on, the user can choose the camera or select a photo from the gallery. If the user has the photo, he/she can upload the photo and click on ‘Next’. If not, the user also has the option to “Skip and Continue”.
The user will be asked to select gender. The radio button for the selected option will be highlighted in orange. If the user wants to declare their gender, the user can select from Male/Female/Transgender/Others, and click on ‘Next’. If not, the user also has the option to “Skip and Continue”.
The user is redirected to the “Payment Details” page. If an advance has been configured in the backend by the ULB, the advance amount is displayed on the screen. The user can enter the advance amount. If an amount below the advance amount is entered, then an error is displayed. To confirm, the user can click on ‘Next’. The user is then prompted to “Check the Answers”.
A change option is displayed beside each answer. In case the user wants to edit any details, the user can click on the change button and the user will be redirected to that part of the workflow. If not, the user can click on ‘Submit’.
The user is displayed a confirmation message for application submission along with an application number. A download button can be used to download the application receipt as displayed below. The user can also go back home by clicking on the “Go back to home page” button.
A landing page is available to the ULB employee on login.
The employee can apply for desludging requests on behalf of the citizen by clicking on “New Desludging Request”. This will redirect the user to a form.
The user is prompted to enter the mandatory and non mandatory fields. The “Amount per Trip”, “Total Amount” and “Advance Collection” fields are empty, and will be autopopulated once the “Property Type, “Property Sub-type”, “No. of Trips” and “Vehicle Capacity” are filled.
The following validations will be present in the page:
Mobile number to be 10 digits and cannot be alphanumeric or contain special characters.
Advance amount edited cannot be greater than total amount or lesser than minimum amount.
The submit button is greyed out and will only show as active when all mandatory fields are filled.
Once the user submits the form, the user is redirected to a confirmation page. The confirmation page will display a unique application number. A download option to download the application receipts displayed below is also available. The user can go back to the landing page using the “Go Back to Home” button.
A citizen can view his/her applications by redirecting to “My Applications” from their landing page.
The “My Applications” page lists down all the ongoing applications and will display the Application No., Service Category and Application Status. A view button will be made available along with each application. Once the user clicks on ‘View’, they are redirected to the following page:
The user can view all details of the application on the screen. There is an option to download the application receipt and payment receipts using the Download button.
The application timeline below the application shows the history of the application along with details of the date when the workflow step was completed. If the application is in the “Pending for Payment”, the same will be displayed and a corresponding link will be displayed in the “Application Timeline”.
Similarly, if the application is in the “Pending Citizen Feedback” stage, the same will be displayed and a corresponding link will be displayed in the “Application Timeline”.
To view the applications, an employee can navigate to the inbox from the Landing page. The inbox shows a list of all active applications along with their SLAs.
The user can search for an active application using “Application No.” and “Mobile No.” and click on search. This will return the application with the corresponding “Application Number” or the list of applications with the corresponding mobile number. The user can further filter applications based on the criteria on the left hand side, that is, Locality or Status.
To view Past Applications, the user can navigate to Search Applications. Here, users can search for both Active and past applications with the following fields: Application Number, Mobile Number, Status and Locality. On clicking on an application number, the user is redirected to the Application details page.
The user can view all details of the application on the screen. The application timeline below the application shows the history of the application along with details of the date when the workflow step was completed.
The ULB employee can accept and update application details when a citizen has raised a request or rejected it.
This can be done by clicking on the “Update Application” button. Details such as locality, number of trips and capacity will be displayed. Clicking on “Update application” will update the status of the application as “Pending for Payment”.
Clicking on “Reject Application’ will reject the application and the user will be prompted to select a reason for rejection and click on submit. Once the application is updated, it will move to pending for payment status if advance payment is applicable.
If the application is on the “Payment Pending” stage, the user will have the option to make a payment from the “View Applications” page.
The user can make a payment by clicking on the “Make Payment” button. The user is redirected to the bill details page which displays the total, advance, and due amount.
Here, the amount due is prefilled and displayed to the user. If the user is aligned, they can proceed by clicking on “Proceed to Pay”.
All payment methods available and configured will be available here as radio buttons. The selected radio button will be filled in orange to display the selection. The user also receives an intimation that they will be redirected to a third-party site. On completion of the payment, the user is redirected to a payment confirmation page. A ‘Print’ receipt option is available to download the payment receipt.
Desludging applications pending payment is accessible in the inbox of the user assigned the collector role. The status of the application is reflected in the status column.
By clicking on the application number, the user can view application details.
The user will be able to view details of the application along with details of the Amount Per Trip, Total Amount, and amount to be collected. The application details will also display the status as “Pending for Payment”. The user can proceed to collect payment by clicking on the “Collect Payment” button and the user will be redirected to the “Collect Payment” page.
The user will see information about the amount to be collected and further will be required to fill the following information:
Payer Name
Payer Phone number
Additionally, the user will be prompted to select the payment mode using radio buttons. The selected radio button will be highlighted in orange. If the user is getting a physical receipt, then the receipt number can be recorded under the Gen/G8 receipt details.
On clicking the submit button, the user is redirected to the payment confirmation screen. The user can download the payment receipt using the ‘Print’ receipt button or go back to the landing page using the “Take Action” button.
Once the payment (if any) is collected, the ULB employee can assign a desludging operator. Applications where DSO needs to be assigned will be shown as “Pending for DSO Assignment” in the inbox.
By clicking on the application number, the user can view application details.
The user can start the process of assigning a DSO by clicking on the “Assign DSO” button. This will display the following pop-up to the user:
The user can select the DSO via a dropdown. The list of DSOs is populated by matching the vehicle capacity requested to the DSOs with vehicles with the required capacity. An expected date of completion is to be selected. Once all fields are filled, the user can assign the selected DSO. An error message will be displayed if a field is left blank. The user can also go back to the application details page by clicking on the ‘Close’ button.
Once the user clicks on ‘Assign’, the status in the workflow timeline will reflect “Pending for DSO Approval”. For any reason, if the DSO is unavailable to service the request, the request can be reassigned to another DSO. This can be done by clicking on the “Take Action” button and clicking on reassign DSO.
The same fields need to be filled as that for “Assign DSO”. However, the user is required to select a reason for rejection from a list preconfigured in the backend. An error message will be displayed if a field is left blank. On re-assigning a DSO, the user is displayed a snack bar with confirmation.
The user can also go back to the application details page by clicking on the ‘Close’ button.
A vehicle can be assigned by both the ULB and the DSO (or basis roles configured) when the application is in the “Pending for DSO Approval” stage. By clicking on the application number, the user can view application details.
The user can start the process of assigning a vehicle by clicking on the “Assign Vehicle” button. This will display the following pop-up to the user.
The user can select the “Vehicle no.” via a dropdown. The list of vehicles is populated by matching the vehicle capacity requested with the required capacity. The vehicle capacity and number of trips are displayed on the pop-up. An error message will be displayed if the vehicle registration number field is left blank. The user can also go back to the application details page by clicking on the ‘Close’ button.
Once the user clicks on ‘Assign”, the status in the Workflow timeline will reflect the “DSO InProgress” stage.
At any point during service, the DSO or ULB can update the number of trips. This can be done by clicking on the “Take Action” button and selecting the “Update/Schedule Trips” option.
The user can increase or decrease the number of trips by clicking on the plus or minus sign. The number of trips will increase or decrease and be displayed based on the user's action. The user can confirm the updated number of trips by clicking on the Update/Schedule button. The user can also go back to the application details page by clicking on the ‘Close’ button.
A snack bar will confirm the updated number of trips.
Once the service request has been completed and all pending payments have been collected, the same has to be confirmed in the system. This can be done by selecting the “Complete Request” button in the “Take Action” button. On clicking on “Complete Request”, the following pop-up is displayed:
The user is required to fill in the following details:
Date of Service (selected from a calendar)
Volume of Waste collected
Additionally, the user can add optional details such as Pit Type and Pit Dimensions and upload a photo of the Pit. An error message will be displayed if all mandatory fields are not filled.
The user can confirm the completion by clicking on the ‘Completed’ button. The user can also go back to the application details page by clicking on the ‘Close’ button.
if the application is on the Payment Pending stage, the user will have the option to make a payment from the “View Applications” page.
On clicking on ‘View’, the user is redirected to the application details page. The workflow timeline will reflect that the application is pending citizen feedback and a clickable “Rate Us” option is displayed to the user.
Once the user clicks on rate us, the user will be redirected to the following page:
The user can provide feedback by selecting one out of 5 stars and selecting safety gears used via a multi-select box. If either of these fields is not filled, the user is displayed an error when clicking on the submit button. Additional comments may be added by the user.
On clicking the submit button, the user will be redirected to a confirmation page. The user can use the ‘Download’ button to download any payment or acknowledgement receipts from the users.
The FSM Registry allows for the following actions from the frontend for a particular urban local body (ULB):
Add new driver, vehicle, vendor
Edit driver, vehicle, vendor details
Enable and disable drivers, vehicles and vendors
Tag driver and vehicle to vendors.
The user can access the ULB registry by clicking on the FSM Registry link in the landing page.
The landing page of the FSM registry is defaulted to show the list of vendors in the system. A particular vendor can be searched for by entering the Vendor name in the search bar. Search can be cleared by clicking on the “Clear Search” button.
The user can view the number of associated total and active vehicles and drivers against a vendor. The user can view the details of the tagged vehicles and drivers by clicking on the number. The user can enable/disable the vendor using the toggle.
A new vendor, vehicle or driver can be added by clicking on the plus button on the top right of the page.
On clicking the plus button, the user will be prompted to select whether he/she/it/they/them want to add a Vendor, Driver or Vehicle. To add a new Vendor, the user can click on Vendor and the user will be redirected to the “Add Vendor” page.
A new vendor can be added by entering details such as Vendor Name, personal details, including Gender, Date of Birth, Email and Phone number and Address details such as Door No, Pincode and landmark. Each vendor is created with a unique mobile number and hence, an error message will be displayed if the mobile number has been used to create other vendors. An error message will be displayed if all mandatory fields are not filled.
The user can confirm the completion by clicking on the ‘Submit’ button. The user can also go back to the FSM Registry landing page by using the breadcrumbs.
Once the user submits an application, a snack bar will confirm the successful addition of a vendor and details of the added vendor will be displayed in the vendor list.
Vendor details can be viewed by clicking on the vendor name. This will display details such as name, number and address. Details of vehicles and drivers tagged to the vendor will be visible on the screen. The user can go back to the FSM Registry landing page by using the breadcrumbs.
Vendor details can be edited by clicking on the “Take Action" button and selecting edit. Add or edit information and click on “Submit Application”. The changes will reflect on the vendor details page.
A vendor can be deleted by clicking on the “Take Action” button and selecting delete.
A pop-up will be displayed for confirmation. The user can confirm delete by clicking on ‘Delete’ or go back to the vendor details by clicking on ‘Cancel’.
On clicking delete, the user will be redirected to the FSM registry landing page and a snack bar will be displayed confirming that the vendor has been deleted.
Multiple vehicles can be tagged to a vendor. It is necessary that a vehicle exists in the system before it can be tagged. A vehicle can be tagged to a vendor by clicking on the “Add Vehicle” button in the vendor details page.
A pop-up will be displayed with a dropdown to select a vehicle. Only vehicles that are not tagged to any vendor are to be displayed. The user can select the vehicle number and click on submit or go back to the vendor details page by clicking on close.
The added vehicle details will be displayed. The vehicle can be untagged from the vendor by clicking on the delete button against the vehicle details.
Multiple drivers can be tagged to a vendor. It is necessary that a driver exists in the system before it can be tagged. A driver can be tagged to a vendor by clicking on the “Add Driver” button in the vendor details page.
A pop-up will be displayed with a dropdown to select a driver. Only drivers that are not tagged to any vendor will be displayed. The user can select the driver name and click on submit or go back to the vendor details page by clicking on close.
The added driver details will be displayed. The driver can be untagged from the vendor by clicking on the delete button against the driver details.
To view the list of Vehicles, the user can navigate to the Vehicle tab from the FSM Registry landing page.
The user can view the creation date, tagged vendor and status for a vehicle in this page. A particular vehicle can be searched for by entering the vehicle number in the search bar. Search can be cleared by clicking on “Clear Search”. Vehicles can be sorted by creation date, by clicking on the arrow beside the column heading. The user can enable/disable the vehicle using the toggle.
To add a new vehicle, the user can click on vehicle near the plus button and the user will be redirected to the “Add Vehicle” page.
A new vehicle can be added by entering details such as Vehicle Registration number, Model, Type, Capacity, details of pollution certificate, insurance and road tax. Each vehicle is created with a unique registration number and hence, an error message will be displayed if the registration number has been used to create other vehicles. An error message will be displayed if all mandatory fields are not filled.
The user can confirm the completion by clicking on the ‘Submit’ Button. The user can also go back to the FSM Registry landing page by using the breadcrumbs. Once the user submits an application, a snack bar will confirm the successful addition of a vehicle.
Details of the added vehicle will be displayed in the vehicle list.
Vehicle details can be viewed by clicking on the vehicle name. This will display details such as the registration number, vehicle type, make, model, capacity etc. The vendor that the vehicle is tagged to and whether it is active is also displayed in the details.
Vehicle details can be edited by clicking on the “Take Action” button and selecting edit. Add or edit information and click on submit application. The changes will reflect in the vehicle details page.
A vehicle can be deleted by clicking on the “Take Action” button and selecting delete.
A pop-up will be displayed for confirmation. The user can click on delete to confirm to cancel to go back to vehicle details. The vehicle will be deleted.
Apart from tagging a vehicle to a vendor from the vendor details page, tagging can also be done from the vehicle details page by clicking on the add vendor button. The tagging can be edited by clicking on the edit icon beside Vendor name, in case a vendor is already added.
A pop-up will be displayed with a dropdown to select a vendor. The user can select the vendor and click on submit or go back to the vehicle details page by clicking on ‘Cancel’.
The added vendor details will be displayed. The vehicle can be untagged from the vendor by clicking on the delete button against the vendor name. The edit (pencil) button allows you to change the vendor tagging.
To view the list of drivers, the user can navigate to the drivers tab.
The user can view the creation date, tagged vendor, and status for a driver in this page. A particular driver can be searched for by entering the driver name in the search bar. Search can be cleared by clicking on “Clear Search”.
Drivers can be sorted by creation date, by clicking on the arrow beside the column heading. The user can enable/disable the vehicle using the toggle. The user can change the tagging of the Vendor by using the drop down in the “Vendor Name” column.
To add a new driver, the user can click on Driver from the plus button and the user will be redirected to the “Add Driver” page.
A new driver can be added by entering details such as Driver Name, and License number. Each vehicle is created with a unique license number and hence, an error message will be displayed if the license number has been used to create other vehicles. An error message will be displayed if all mandatory fields are not filled.
The user can confirm the completion by clicking on the ‘Submit’ button. The user can also go back to the FSM Registry landing page by using the breadcrumbs. Once the user submits an application, a snack bar will confirm the successful addition of a driver. Details of the added driver will be displayed in the driver list.
Driver details can be viewed by clicking on the driver name. This will display details such as the Name, phone number and license number. The vendor that the driver is tagged to is also displayed in the details.
Driver details can be edited by clicking on the “Take Action” button and selecting edit. The user can add or edit information and click on submit application. The changes will reflect in the driver details page.
A driver can be deleted by clicking on the “Take Action” button and selecting delete.
A pop-up will be displayed for confirmation. The user can click on delete to confirm or view driver details by clicking on cancel. The vehicle will be deleted.
Method 1: Apart from tagging a driver to a vendor from the vendor details page, tagging can also be done from the driver details page by clicking on the add new vendor button.
A pop-up will be displayed with a dropdown to select a vendor. The user can select the vendor and click on submit or go back to the driver details page by clicking on ‘Cancel’.
The added vendor details will be displayed. The vehicle can be untagged from the vendor by clicking on the delete button against the vendor name. The edit (pencil) button allows you to change the vendor tagging.
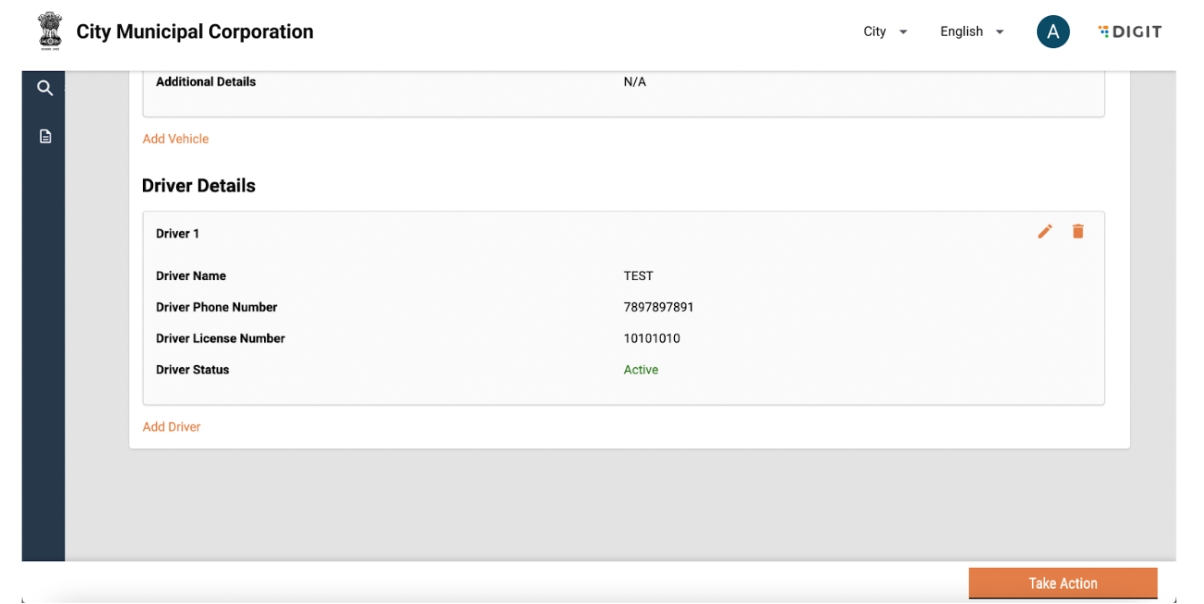
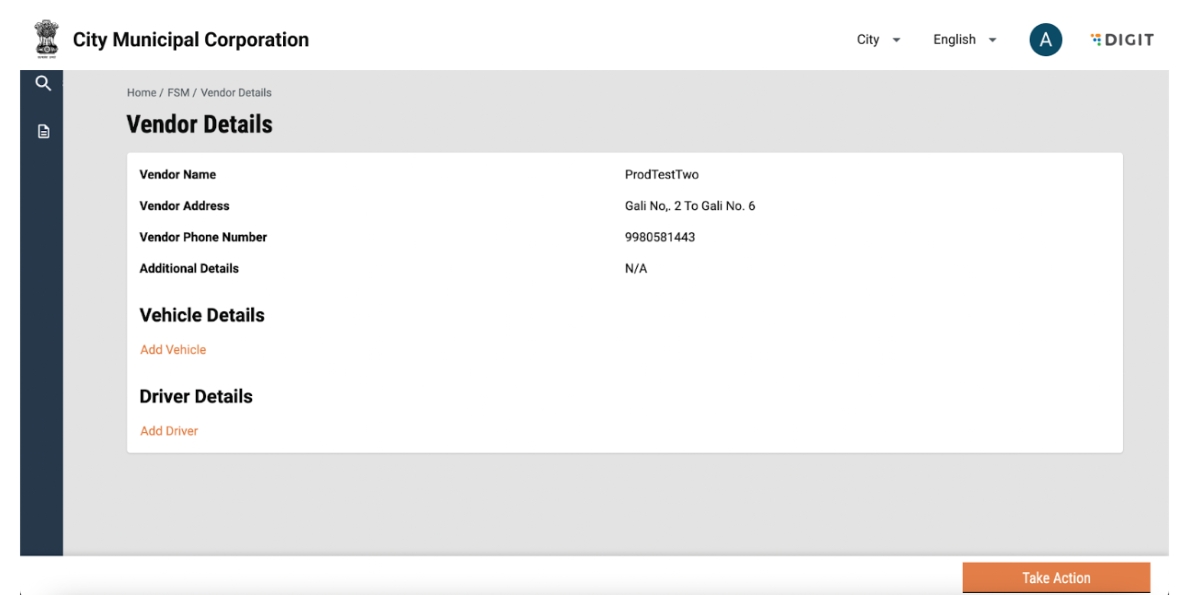

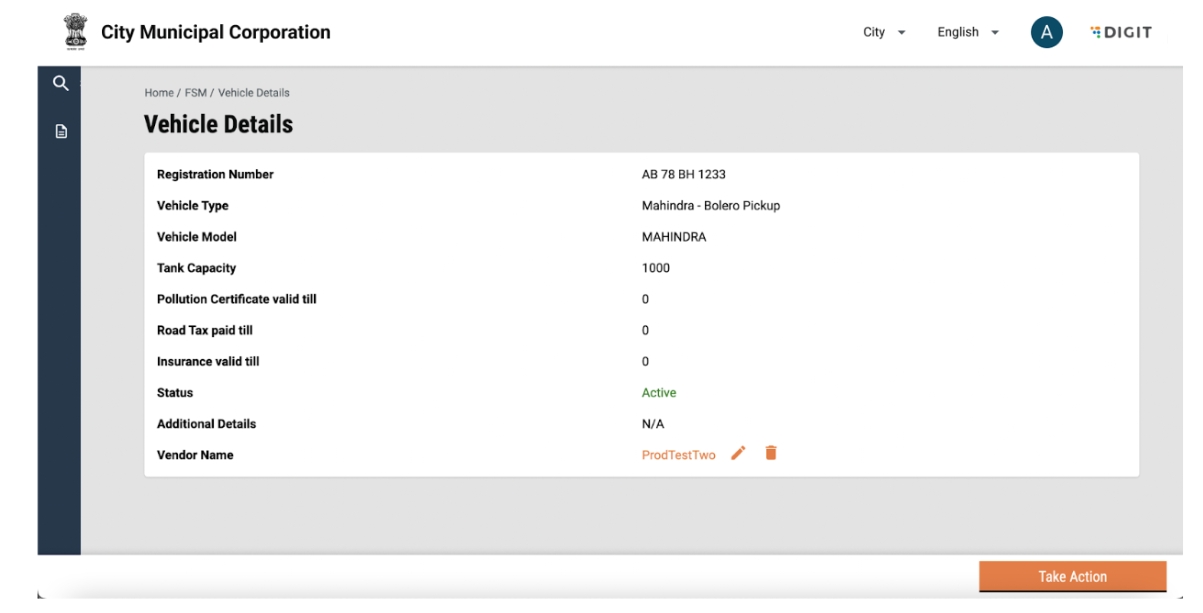

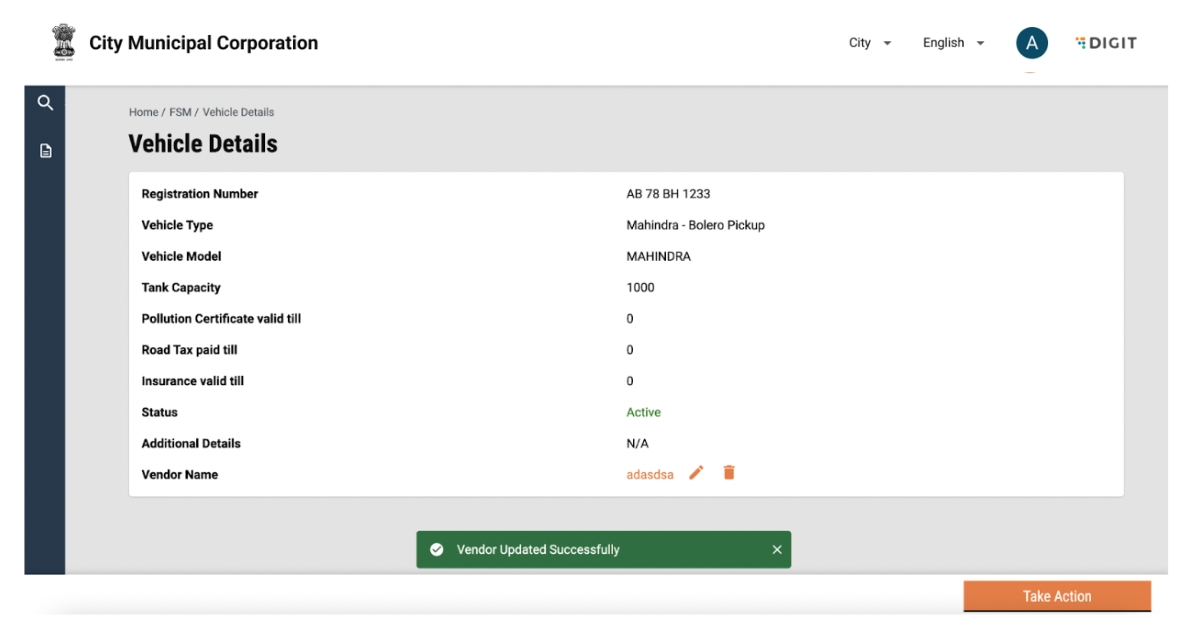
1
Development is completed for all the features that are part of the release.
Yes
@ Pritish.Rath
Code was frozen by 10-01-2024.
2
Test cases are documented by the QA team, and reviewed by the product owners, and test results are updated in the test cases sheet.
Yes
All test cases are reviewed by the Product Owner and results have been updated in the sheet. QA sign-off is given accordingly.
3
The incremental demo of the features showcased during the sprint showcase and feedback is incorporated. If possible, list out the JIRA tickets for feedback.
Yes
Demo given on 20-12-2023 for PQM, and 02-01-2024 for Sanitation Worker.
4
UI/UX audit review by UX architect is completed along with feedback incorporation for any changes in UI/UX.
Yes
@ AndrewJones
UI/UX audit is done and review comments are incorporated.
5
Incremental demos to the product owners are completed as part of the sprint and feedbacks are incorporated.
Yes
Demo given on 20-12-2023 for PQM, and 02-01-2024 for Sanitation Worker.
6
QA sign-off is completed by the QA team and communicated to the product owners. All the tickets' QA sign-off status is updated in JIRA.
Yes
All test cases are reviewed by the Product Owner and QA sign-off is given accordingly.
7
UI, API technical documents are updated for the release along with the configuration documents.
Yes
8
UAT promotion and regression testing from the QA team is completed. QA team has shared the UAT regression test cases with the product owners.
Yes
All test cases are reviewed by the Product Owner.
9
API automation scripts are updated for new APIs or changes to any existing APIs for the release. API automation regression is completed on UAT, the automation test results are analysed, and necessary actions are taken to fix the failure cases. Publish the list of failure use cases with a reason for failure and the resolution taken to fix these failures for the release.
Yes
ULB User: Search, Create, Update PQM Service: Adhoc Create, Search, Update PQM Quality Criteria
Automation script is reviewed by the Tech Lead.
10
The API backward compatibility testing is completed.
Yes
Tested on 05-JAN-2024.
11
The communication is shared with the product owners for the completion of UAT promotion and regression by the QA team. The product owners have to give a product sign-off within one week of this communication.
Yes
UAT sign-off was completed. Sign-off dates 10th JAN 2024 for PQM and Sanitation Worker Welfare.
12
The UAT product sign-off communication is received from the product owners along with the release notes and user guides (if applicable).
Yes
UAT sign-off was completed. Sign-off dates 10th April 2023 for PQM and Sanitation Worker Welfare.
13
The GIT tags and releases are created for the code changes for the release.
Yes
Added a new git tag V1.4
14
Verify whether the release notes are updated.
Yes
15
Verify whether all UAT builds are updated along with the GIT tag details.
Yes
All the budils are added with release tag V1.4
16
Verify whether all MDMS, configs, InfraOps configs are updated.
Yes
17
Verify whether all docs will be published to http://sanitation.digit.org by the Technical Writer as part of the release.
Yes
18
Verify whether all test cases are up to date and updated along with necessary permissions to view the test cases sheet. The test cases sheet is verified by the Test Lead.
Yes
19
Verify whether the UAT credentials sheet is updated with the details of new users and roles, if any.
Yes
20
Verify whether all the localisation data was added in UAT, including Hindi, and updated in the release kits.
Yes
All localisations added as part of the release.
21
Verify whether the product release notes and user guides are updated and published.
Yes
22
The demo of the released features is done by the product team as part of the sprint/release showcase.
Yes
Product showcase done on 10-01-2024 by
23
Technical and product workshops/demos are conducted by the engineering and product teams to the implementation team (Implementation handover).
Yes
Technical and product handover to impel conducted on 24-11-2023, and 04-01-2024. Signoff on handover is given on 11-01-2024
24
Architect sign-off and technical quality report.
Yes
@Pritish.Rath
Signed off on 02-Jan-2024.
25
Success metrics and product roadmap.
Yes
26
Adoption metrics.
Yes
27
Programme roll-out plan.
Yes
28
Implementation checklist.
Yes
29
Implementation roll-out plan.
Yes
30
Gate 2
31
The internal release communication along with all the release artefacts are shared by the engineering/product teams.
32
Plan for upgrading the staging/demo instance with the release product - within 2-4 weeks based on the period where no demos are planned from staging for the previous version of the released product.
33
The release communication to partners is shared by the GTM team and the webinar is arranged by the GTM team after the release communication - within 2-4 weeks of the release.


The urban-rural convergence is an initiative that aims to ensure access of sanitation services to all Gram Panchayats(GPs) via Urban Local Bodies (ULBs) located closest to them.
As a ULB employee, They are creating applications to cater the sanitation needs of local communities in Urban areas. The same way they should also cater the same sanitation needs to rural bodies which are nearby to that urban region.
They need a provision into a system while creating a new application to either choose local municipalities or urban supported villages.
Based on their choice they would be able to select either locality/mohalla or Gram Panchayat(GP) area from the respective master data drop down list.
The caveat here is if an ULB employee chooses GP then the trip amount field should be an editable field where he/she can fill any logical amount based on their own offline calculation instead of auto calculated amount that is already there in an application in case of Urban bodies.
ULB employees or DSO Operation should also be able to edit the no. of trips and the final amount should be multiple of the initial amount entered into an application with no. of trips.
Need to update mdms data: boundary-data.json
Need to add a new children hierarchy for GP under City which will be parallel to Locality. A sample MDMS is attached below in this document.
By Default “Urban” option will be pre-selected in the radio button in the above wireframe and the drop-down will have the locality/mohalla master data. In case if employee selects “ULB supported village” then the locality/mohalla dropdown will be replaced by GPs and Village drop-down data on the fly.
System will use the below URL to fetch the localities or GPs and their corresponding villages.
In the case of localities, need to pass boundaryType as “Locality”.
https://dev.digit.org/egov-location/location/v11/boundarys/_search?hierarchyTypeCode=REVENUE&boundaryType=Locality&tenantId=pb.amritsar
In the case of GP/villages, need to pass the boundaryType as “GP”.
https://dev.digit.org/egov-location/location/v11/boundarys/_search?hierarchyTypeCode=REVENUE&boundaryType=GP&tenantId=pb.amritsar
Introduction of a new string column (boundary_type) in the FSM_APPLICATION table to capture (Locality or GP) to determine if the application created is for RURAL or not so that in the near future it will be helpful for the analytics and statistics in Dashboards.
Default value for this column will be Locality to support backward compatibility
Add Vehicle log would also have the option to select Urban (Default option) or Rural. If Rural gets selected the text name of an element would be replaced from “Locality” to “Gram Panchayat” for a text field.
Introduction of a new column of string type (boundary_type) in vehicle_trip table to capture if the vehicle log is created for GP or not.
Default value for this column will be Locality to support backward compatibility.
Sample MDMS
boundary-data.json
{
"tenantId": "pb.amritsar",
"moduleName": "egov-location",
"TenantBoundary": [{
"hierarchyType": {
"code": "REVENUE",
"name": "REVENUE"
},
"boundary": {
"id": 1,
"boundaryNum": 1,
"name": "Angul",
"localname": "Angul",
"longitude": null,
"latitude": null,
"label": "City",
"code": "od.angul",
"children": [{
"id": "2",
"boundaryNum": 1,
"name": "Baniabahal",
"localname": "Baniabahal",
"longitude": null,
"latitude": null,
"label": "Locality",
"code": "VIL1"
},
{
"id": "3",
"boundaryNum": 1,
"name": "Hulurisinga",
"localname": "Hulurisinga",
"longitude": null,
"latitude": null,
"label": "Locality",
"code": "VIL2"
},
{
"id": "4",
"boundaryNum": 1,
"name": "Angul town",
"localname": "Angul town",
"longitude": null,
"latitude": null,
"label": "Locality",
"code": "VIL3"
},
{
"id": "5",
"boundaryNum": 1,
"name": "Other",
"localname": "Other",
"longitude": null,
"latitude": null,
"label": "Locality",
"code": "VIL4"
},
{
"id": 6,
"boundaryNum": 1,
"name": "GP 1",
"localname": "GP1",
"longitude": null,
"latitude": null,
"label": "GP",
"code": "GP1",
"children": [{
"id": 11,
"boundaryNum": 1,
"name": "Village 1",
"localname": "Village local 1",
"longitude": 74.871552,
"latitude": 31.63089,
"label": "Village",
"code": "SUN04",
"pincode": [143001],
"area": "V-Area1",
"children": []
},
{
"id": 12,
"boundaryNum": 1,
"name": "Village 2",
"localname": "Village local 2",
"longitude": null,
"latitude": null,
"label": "Village",
"code": "SUN11",
"pincode": [143001],
"area": "V-Area1",
"children": []
}
]
},
{
"id": 8,
"boundaryNum": 1,
"name": "GP 2",
"localname": "GP2",
"longitude": null,
"latitude": null,
"label": "GP",
"code": "GP2",
"children": [{
"id": 13,
"boundaryNum": 1,
"name": "Village 3",
"localname": "Village local 3",
"longitude": 74.871552,
"latitude": 31.63089,
"label": "Village",
"code": "SUN04",
"pincode": [143001],
"area": "V-Area1",
"children": []
},
{
"id": 14,
"boundaryNum": 1,
"name": "Village 4",
"localname": "Village local 4",
"longitude": null,
"latitude": null,
"label": "Village",
"code": "SUN11",
"pincode": [143001],
"area": "V-Area1",
"children": []
}
]
}
]
}
},
{
"hierarchyType": {
"code": "ADMIN",
"name": "ADMIN"
},
"boundary": {
"id": 1,
"boundaryNum": 1,
"name": "Angul",
"localname": "Angul",
"longitude": null,
"latitude": null,
"label": "City",
"code": "od.angul",
"children": [{
"id": "2",
"boundaryNum": 1,
"name": "Baniabahal",
"localname": "Baniabahal",
"longitude": null,
"latitude": null,
"label": "Locality",
"code": "VIL1"
},
{
"id": "3",
"boundaryNum": 1,
"name": "Hulurisinga",
"localname": "Hulurisinga",
"longitude": null,
"latitude": null,
"label": "Locality",
"code": "VIL2"
},
{
"id": "4",
"boundaryNum": 1,
"name": "Angul town",
"localname": "Angul town",
"longitude": null,
"latitude": null,
"label": "Locality",
"code": "VIL3"
}
]
}
}
]
}UrcConfig.json
To enable URC feature in UI
{
"tenantId": "pg.angul",
"moduleName": "FSM",
"urcConfig": [
{
"URCEnable": true,
"villageHierarchyAvailable": true
}
]
}We are keeping the Locality hierarchy under the City as it is [No change there]. And the ‘location api’ with boundaryType as “Locality” will be used the same way it's being called currently to get the localities. Below are the api details: https://dev.digit.org/egov-location/location/v11/boundarys/_search?hierarchyTypeCode=REVENUE&boundaryType=Locality&tenantId=pb.amritsar Response:
{
"ResponseInfo": {
"apiId": "org.egov.boundary",
"ver": null,
"ts": "",
"resMsgId": "uief87324",
"msgId": null,
"status": "200 OK"
},
"TenantBoundary": [
{
"hierarchyType": {
"id": null,
"name": "REVENUE",
"code": "REVENUE",
"localName": null,
"tenantId": null,
"createdBy": null,
"createdDate": null,
"lastModifiedBy": null,
"lastModifiedDate": null,
"version": 0,
"new": false
},
"boundary": [
{
"code": "VIL1",
"name": "Baniabahal",
"label": "Locality",
"latitude": null,
"longitude": null,
"area": null,
"pincode": null,
"boundaryNum": 1,
"children": []
},
{
"code": "VIL2",
"name": "Hulurisinga",
"label": "Locality",
"latitude": null,
"longitude": null,
"area": null,
"pincode": null,
"boundaryNum": 1,
"children": []
},
{
"code": "VIL3",
"name": "Angul town",
"label": "Locality",
"latitude": null,
"longitude": null,
"area": null,
"pincode": null,
"boundaryNum": 1,
"children": []
},
{
"code": "VIL4",
"name": "Other",
"label": "Locality",
"latitude": null,
"longitude": null,
"area": null,
"pincode": null,
"boundaryNum": 1,
"children": []
}
],
"tenantId": "pb.amritsar"
}
]
}To get a List of Gram Panchayats and corresponding villages, we will pass boundaryType as “GP”. Below are the api details: https://dev.digit.org/egov-location/location/v11/boundarys/_search?hierarchyTypeCode=REVENUE&boundaryType=GP&tenantId=pb.amritsar
{
"ResponseInfo": {
"apiId": "org.egov.boundary",
"ver": null,
"ts": "",
"resMsgId": "uief87324",
"msgId": null,
"status": "200 OK"
},
"TenantBoundary": [
{
"hierarchyType": {
"id": null,
"name": "REVENUE",
"code": "REVENUE",
"localName": null,
"tenantId": null,
"createdBy": null,
"createdDate": null,
"lastModifiedBy": null,
"lastModifiedDate": null,
"version": 0,
"new": false
},
"boundary": [
{
"code": "GP1",
"name": "GP 1",
"label": "GP",
"latitude": null,
"longitude": null,
"area": null,
"pincode": null,
"boundaryNum": 1,
"children": [
{
"code": "SUN04",
"name": "Village 1",
"label": "Village",
"latitude": "31.63089",
"longitude": "74.871552",
"area": "V-Area1",
"pincode": [
143001
],
"boundaryNum": 1,
"children": []
},
{
"code": "SUN11",
"name": "Village 2",
"label": "Village",
"latitude": null,
"longitude": null,
"area": "V-Area1",
"pincode": [
143001
],
"boundaryNum": 1,
"children": []
}
]
},
{
"code": "GP2",
"name": "GP 2",
"label": "GP",
"latitude": null,
"longitude": null,
"area": null,
"pincode": null,
"boundaryNum": 1,
"children": [
{
"code": "SUN04",
"name": "Village 3",
"label": "Village",
"latitude": "31.63089",
"longitude": "74.871552",
"area": "V-Area1",
"pincode": [
143001
],
"boundaryNum": 1,
"children": []
},
{
"code": "SUN11",
"name": "Village 4",
"label": "Village",
"latitude": null,
"longitude": null,
"area": "V-Area1",
"pincode": [
143001
],
"boundaryNum": 1,
"children": []
}
]
}
],
"tenantId": "pb.amritsar"
}
]
}
Table Name
Column Name
Comments
eg_fsm_application
boundarytype
to capture (Locality or GP) in order to determine if the application created is for RURAL or not based on the radio button selection
eg_fsm_address
additionaldetails.gramPanchayat
To store the selected GP while creating an application.
eg_fsm_address
additionaldetails.village
To store the selected village while creating an application.
eg_vehicle_trip
boundarytype
to capture (Locality or GP) if the vehicle log is created for GP or not.
To analyze the impact, we deployed a different module(property tax) which is also pointing to same boundary-data mdms.
Expectation:
For FSM Module: Non-URC flow : Locality dropdown should show all the localities as it is. [There should be no impact] URC flow : GramPanchayat and Village dropdown should show as per new GP and village added to the MDMS.
For Property Tax Module: Locality dropdown should show all the localities as it is. [There should be no impact]
Property Tax Screen
The locality dropdown in Property tax is displaying the values from existing location hierarchy itself. NO IMPACT.
SUJOG FSM (NON-URC)
In FSM, for non-URC the locality dropdown is showing values from the existing hierarchy itself. [NO IMPACT]
SUJOG FSM (URC)
GP Dropdown In case of FSM(URC), the grampanchayat and village dropdown are showing values from the new hierarchy we have configured in the existing mdms.
Village Dropdown
Pricing
Pricing per trip will be entered by “ULB employees” for each request
ULB employee will have a free text entry field to enter price for a request.
In FSTP,there are two scenerios -
Selects a Gram panchayat from drop down but village is not in the list. In this case, Selects other in village and a free text field appears.
Selects 'other' in GP list. In this case, 2 free text fields appear - one for GP and one for Village.
If the locality or GP is located outside the city,then select “Outside ULB Limits” and provide Locality / Grama Panchayat name in text field.
In the dashboard, add the following chart:
Add pie chart: Applications by Source
Pie Chart Value: Ratio of Applications from GP: Ratio of requests from Urban Areas
Add toggle for Applications and Sludge
Pie Chart Value: Ratio of Sludge Disposed from GP: Ratio of Sludge from Urban Areas
Tooltip: Show Total Applications and Total Sludge (See design). Tooltip value to be responsive to toggle between Unit, Lac and Crore
Chart should filter basis time period, district, ulb (dashboard filters)
Chart should have export, share and download options.
Add Bar chart: No. of applications per month from Gram Panchayat
Bar Chat Value: Total Number of applications from Gram Panchayat
Add toggle for Applications and Sludge Disposed
Tooltip: Show Total Applications and Total Sludge (See design). Tooltip value to be responsive to toggle between Unit, Lac and Crore
Chart should filter basis time period, district, ulb (dashboard filters)
Chart should have export, share and download options.
REFERENCE DOCS :
https://drive.google.com/drive/folders/1kXiz2-95M1raWNujmGAshI2okYvwMtUg?usp=drive_link


FSM Service Faecal sludge management (FSM) is a system that enables citizen to raise a request for septic tank cleaning with there ULB’s directly or indirectly reaching out to ULB counter. Citizen can track the application, make a payment for the charges and rate the service. Actions & Role Action Mapping : Add Role-Action mapping for the API’s in MDMS. Following are the required entries. They should be mapped to both CITIZEN and appropriate employee roles.
MDMS Actions & Role Action Mapping for FSM
:
FSM Calculator Service
FSM Calculator is a system that enables FSM Admin to create billing slab for the FSM application(s) with different combination of propertyType , slum , tank capacity and etc..
MDMS Actions & Role Action Mapping for FSM Calculator:
:
Vendor Service
Vendor Registry is a system that enables ULBEmployees to create and search Vendor i.e Desluding Operator (DSO) and driver entities with appropriate vehicle Entities for FSM Application. This document contains the details about how to setup the Vendor and describe the functionalities provided.
MDMS Actions & Role Action Mapping for Vendor
Vehicle Service
Vehicle Registry is a system that enables ULB Employees to create and search Vehicle Entities and schedule Vehicle Trip for FSM Application and track the VehicleTrip.
MDMS Actions & Role Action Mapping for Vendor
{
"id": {{PLACEHOLDER1}},
"name": "Create FSM Application",
"url": "/fsm/v1/_create",
"displayName": "Apply FSM",
"orderNumber": 0,
"enabled": false,
"serviceCode": "FSM",
"code": "null",
"path": ""
},
{
"id": {{PLACEHOLDER2}},
"name": "Search FSM Application",
"url": "/fsm/v1/_search",
"displayName": "Search FSM Appliacations",
"orderNumber": 1,
"enabled": false,
"serviceCode": "FSM",
"code": "null",
"path": ""
},
{
"id": {{PLACEHOLDER3}},
"name": "Update FSM Application",
"url": "/fsm/v1/_update",
"displayName": "Update FSM",
"orderNumber": 0,
"enabled": false,
"serviceCode": "FSM",
"code": "null",
"path": ""
},
{
"id": {{PLACEHOLDER4}},
"name": "FSM Application Charge Payment Search",
"url": "/collection-services/payments/FSM.TRIP_CHARGES/_search",
"displayName": "FSM Application Charge Payment Search",
"orderNumber": 1,
"parentModule": "",
"enabled": false,
"serviceCode": "",
"code": "null",
"path": ""
},
{
"id": {{PLACEHOLDER5}},
"name": "FSM Application Audit Search",
"url": "/fsm/v1/_audit",
"displayName": "FSM Application Audit serach",
"orderNumber": 1,
"parentModule": "",
"enabled": false,
"serviceCode": "",
"code": "null",
"path": ""
},
{
"id": {{PLACEHOLDER7}},
"name": "Create FSTP FSTPOperator Mapping",
"url": "/fsm/plantmap/v1/_create",
"displayName": "Create FSTP FSTPOperator Map",
"orderNumber": 0,
"enabled": false,
"serviceCode": "FSM",
"code": "null",
"path": ""
},
{
"id": {{PLACEHOLDER8}},
"name": "Update FSTP FSTPOperator Mapping",
"url": "/fsm/plantmap/v1/_update",
"displayName": "Update FSTP FSTPOperator Map",
"orderNumber": 0,
"enabled": false,
"serviceCode": "FSM",
"code": "null",
"path": ""
},
{
"id": {{PLACEHOLDER9}},
"name": "Search FSTP FSTPOperator Mapping",
"url": "/fsm/plantmap/v1/_search",
"displayName": "Search FSTP FSTPOperator Map",
"orderNumber": 0,
"enabled": false,
"serviceCode": "FSM",
"code": "null",
"path": ""
},
{
"id": {{PlaceHolder10}},
"name": "Inbox Search ofr uI",
"url": "/inbox/v1/_search",
"displayName": "Inbox Search",
"orderNumber": 0,
"enabled": false,
"serviceCode": "inbox",
"code": "null",
"path": ""
}
displayName
Roles
Create FSM Application
CITIZEN, FSM_CREATOR_EMP, FSM_SWACHH_SATHI
Search FSM Application
CITIZEN,FSM_DSO,FSM_CREATOR_EMP,FSM_SWACHH_SATHI,FSM_EDITOR_EMP,FSM_ADMIN,FSM_DSO,FSM_DRIVER,FSM_COLLECTOR,FSM_VIEW_EMP,FSM_EMP_FSTPO
Update FSM Application
CITIZEN,FSM_EDITOR_EMP,FSM_ADMIN,FSM_DSO,FSM_DRIVER
FSM Application Charge Payment Search
FSM_ADMIN,FSM_DSO,FSM_DRIVER,FSM_COLLECTOR,FSM_EDITOR_EMP,CITIZEN,FSM_VIEW_EMP
FSM Application Audit Search
CITIZEN, FSM_CREATOR_EMP, FSM_EDITOR_EMP, FSM_VIEW_EMP, FSM_ADMIN, FSM_DSO, FSM_DRIVER, FSM_EMP_FSTPO, FSM_COLLECTOR
Create FSTP FSTPOperator Mapping
FSM_ADMIN
Update FSTP FSTPOperator Mapping
FSM_ADMIN,FSM_EMP_FSTPO
Search FSTP FSTPOperator Mapping
CITIZEN
Inbox Search ofr uI
FSM_EMP_FSTPO,FSM_COLLECTOR,FSM_EDITOR_EMP,FSM_VIEW_EMP,FSM_CREATOR_EMP,FSM_ADMIN,FSM_DSO
Link
/fsm/v1/_create
/fsm/v1/_update
/fsm/v1/_search
/fsm/v1/_audit
/fsm/v1/_plainsearch
/fsm/plantmap/v1/_create
/fsm/plantmap/v1/_update
/fsm/plantmap/v1/_search
/inbox/v1/_search
/fsm/v1/_schedular
[
{
"id": {{PLACEHOLDER1}},
"name": "FSM BillingSlab Create",
"url": "/fsm-calculator/v1/billingSlab/_create",
"displayName": "FSM BillingSlab Create",
"orderNumber": 1,
"parentModule": "",
"enabled": false,
"serviceCode": "",
"code": "null",
"path": ""
},
{
"id": {{PLACEHOLDER2}},
"name": "FSM BillingSlab Update",
"url": "/fsm-calculator/v1/billingSlab/_update",
"displayName": "FSM BillingSlab Update",
"orderNumber": 1,
"parentModule": "",
"enabled": false,
"serviceCode": "",
"code": "null",
"path": ""
},
{
"id": {{PLACEHOLDER3}},
"name": "FSM BillingSlab Search",
"url": "/fsm-calculator/v1/billingSlab/_search",
"displayName": "FSM BillingSlab Search",
"orderNumber": 1,
"parentModule": "",
"enabled": false,
"serviceCode": "",
"code": "null",
"path": ""
}
]displayName
Roles
FSM BillingSlab Create
SUPERUSER,FSM_ADMIN
FSM BillingSlab Update
FSM_CREATOR_EMP,FSM_EDITOR_EMP,FSM_ADMIN,FSM_DSO,SUPERUSER
FSM BillingSlab Search
FSM_CREATOR_EMP,FSM_EDITOR_EMP,FSM_DSO,CITIZEN,SUPERUSER
Link
fsm-calulator/v1/_calculate
fsm-calculator/v1/_estimate
fsm-calculator/v1/billingSlab/_create
fsm-calculator/v1/billingSlab/_update
fsm-calculator/v1/billingSlab/_search
fsm-calculator/v1/_cancellationfee
fsm-calculator/v1/_advancebalancecalculate
{
"id": {{PLACEHOLDER1}},
"name": "Create Vendor/DSO",
"url": "/vendor/v1/_create",
"displayName": "Create Vehicle",
"orderNumber": 0,
"enabled": false,
"serviceCode": "vendor",
"code": "null",
"path": ""
},
{
"id": {{PLACEHOLDER2}},
"name": "Search Vendor/DSO",
"url": "/vendor/v1/_search",
"displayName": "Search Vendor",
"orderNumber": 1,
"enabled": false,
"serviceCode": "vendor",
"code": "null",
"path": ""
},
{
"id": {{PLACEHOLDER6}},
"name": "Update Vendor/DSO",
"url": "/vendor/v1/_update",
"displayName": "Update Vendor",
"orderNumber": 0,
"enabled": false,
"serviceCode": "vendor",
"code": "null",
"path": ""
},
{
"id": {{PLACEHOLDER3}},
"name": "Vendor Driver Create",
"url": "/Vendor/driver/v1/_create",
"displayName": "Vendor Driver Create",
"orderNumber": 1,
"parentModule": "",
"enabled": false,
"serviceCode": "vendor",
"code": "null",
"path": ""
},
{
"id": {{PLACEHOLDER4}},
"name": "Vendor Driver Update",
"url": "/Vendor/driver/v1/_update",
"displayName": "Vendor Driver Update",
"orderNumber": 1,
"parentModule": "",
"enabled": false,
"serviceCode": "vendor",
"code": "null",
"path": ""
},
{
"id": {{PLACEHOLDER5}},
"name": "Vendor Driver Search",
"url": "/Vendor/driver/v1/_search",
"displayName": "Vendor Driver Search",
"orderNumber": 1,
"parentModule": "",
"enabled": false,
"serviceCode": "vendor",
"code": "null",
"path": ""
}Actions
Roles
Create Vendor/DSO
SUPERUSER,FSM_ADMIN
Search Vendor/DSO
FSM_ADMIN,FSM_DSO,FSM_EDITOR_EMP,FSM_VIEW_EMP,FSM_EMP_FSTPO,CITIZEN,FSM_COLLECTOR,FSM_CREATOR_EMP,FSM_REPORT_VIEWER,FSM_DASHBOARD_VIEWERFSM_DRIVER,FSM_CREATOR_EMP,SUPERUSER
Update Vendor/DSO
FSM_EMP_FSTPO,FSM_ADMIN,SUPERUSER
Vendor Driver Create
FSM_ADMIN,FSM_CREATOR_EMP,FSM_DSO,FSM_EDITOR_EMP,FSM_VIEW_EMP,FSM_EMP_FSTPO
Vendor Driver Update
FSM_ADMIN,FSM_CREATOR_EMP,FSM_DSO,FSM_EDITOR_EMP,FSM_VIEW_EMP,FSM_EMP_FSTPO
Vendor Driver Search
FSM_ADMIN,FSM_CREATOR_EMP,FSM_DSO,FSM_EDITOR_EMP,FSM_VIEW_EMP,FSM_EMP_FSTPO
Link
/vendor/v1/_create
/vendor/v1/_search
/vendor/v1/_plainsearch
/vendor/v1/_update
/vendor/driver/v1/_create
/vendor/driver/v1/_update
/vendor/driver/v1/_search
{
"id": {{PLACEHOLDER1}},
"name": "Create Vehicle Application",
"url": "/vehicle/v1/_create",
"displayName": "Create Vehicle",
"orderNumber": 0,
"enabled": false,
"serviceCode": "vehicle",
"code": "null",
"path": ""
},
{
"id": {{PLACEHOLDER2}},
"name": "Search Vehicle Application",
"url": "/vehicle/v1/_search",
"displayName": "Search Vehicle",
"orderNumber": 1,
"enabled": false,
"serviceCode": "vehicle",
"code": "null",
"path": ""
},
{
"id": {{PLACEHOLDER3}},
"name": "Vehicle Trip Search",
"url": "/vehicle/trip/v1/_search",
"displayName": "Vehicle Trip Search",
"orderNumber": 1,
"parentModule": "",
"enabled": false,
"serviceCode": "",
"code": "null",
"path": ""
},
{
"id": {{PLACEHOLDER4}},
"name": "Vehicle Trip Update",
"url": "/vehicle/trip/v1/_update",
"displayName": "Vehicle Trip Update",
"orderNumber": 1,
"parentModule": "",
"enabled": false,
"serviceCode": "",
"code": "null",
"path": ""
},
{
"id": {{PLACEHOLDER5}},
"name": "Vehicle Trip Create",
"url": "/vehicle/trip/v1/_create",
"displayName": "Vehicle Trip Create",
"orderNumber": 1,
"parentModule": "",
"enabled": false,
"serviceCode": "vehicle",
"code": "null",
"path": ""
},
{
"id": {{PLACEHOLDER6}},
"name": "Update Vehicle Application",
"url": "/vehicle/v1/_update",
"displayName": "Update Vehicle",
"orderNumber": 0,
"enabled": false,
"serviceCode": "vehicle",
"code": "null",
"path": ""
}displayName
Roles
Create Vehicle Application
FSM_ADMIN
Search Vehicle Application
FSM_ADMIN,FSM_DSO,FSM_EDITOR_EMP,FSM_VIEW_EMP,FSM_EMP_FSTPO,FSM_CREATOR_EMP
Vehicle Trip Search
FSM_EMP_FSTPO,FSM_EDITOR_EMP,FSM_CREATOR_EMP,FSM_ADMIN
Vehicle Trip Update
FSM_EMP_FSTPO
Update Vehicle Application
FSM_ADMIN
Vehicle Trip Create
FSM_EMP_FSTPO
Link
vehicle/v1/_create
vehicle/v1/_search
/vehicle/v1/_plainsearch
/vehicle/trip/v1/_create
vehicle/trip/v1/_update
vehicle/trip/v1/_search
/vehicle/trip/v1/_plainsearch
vehicle/v1/_update


This document shows the preparation of the mdms changes be to done for data loading.
To add data in tenant/tenants.json - For showing the tenant at login screen Sample Data :
DETAILS
DESCRIPTION
DATA FROM ULB
Name of ULB
(E.g.: Berhampur Municipal Corporation or Balasore Municipality or Banki NAC)
ANGUL MUNICIPALITY
ULB Census Code (Optional)
->
PIN codes covered within ULB Boundary (separate by commas)
(Eg.: 759001, 759013)
759122, 759132, 759123, 759143
District Name
->
ANGUL
District Code (Optional)
->
Helpline Phone numbers for Septic tank cleaning
(Write both Landline with Code and Mobile No. if you have, separated by commas.) (Eg.: 0674-234563, 91-9876786543)
14420
ULB's full postal Address
->
AT/PO-AMLAPADA, DIST-ANGUL, PIN-759122
ULB Email Address
->
Example : Create a json for new ulb and Add required details given.
{
"code": "od.angul",
"name": "Angul",
"description": "Angul",
"logoId": "https://digitaldesksujog051120.blob.core.windows.net/assets/Logos/odlogo.png",
"imageId": null,
"domainUrl": "https://sujog.odisha.gov.in",
"type": "CITY",
"twitterUrl": null,
"facebookUrl": null,
"emailId": "[email protected]",
"OfficeTimings": {
"Mon - Fri": "9.00 AM - 6.00 PM",
"Sat": "9.00 AM - 12.00 PM"
},
"pincode": [
759122,
759132,
759123,
759143
],
"city": {
"name": "Angul",
"localName": null,
"districtCode": "Angul",
"districtName": "Angul",
"regionName": "Angul",
"ulbGrade": "Angul Municipality",
"longitude": 0,
"latitude": 0,
"shapeFileLocation": null,
"captcha": null,
"code": "ANG",
"ddrName": "Angul",
"wsBillHeaderLine1": "OFFICE OF THE AE/JE",
"wsBillHeaderLine2": "PUBLIC HEALTH ENGINEERING ORGANIZATION : Angul",
"districtTenantCode": "od.angul"
},
"address": "AT/PO-Amlapada,Dist-Angul, Pin-759122",
"contactNumber": "",
"helpLineNumber": "14420"
}Adding in tenant/citymodule.json - To enable ulb to create application,add new tenant code in FSM module.
{
"module": "FSM",
"code": "FSM",
"active": true,
"tenants": [
{
"code": "pg.citya"
},
{
"code": "pg.angul"
}
]
}Adding FSTP details in FSM/FSTPPlantInfo.json Required Details:
DETAILS
DESCRIPTION
DATA FROM ULB
FSTP Plant Address
->
NUAMAUSA, PANCHAMAHALLA, ANGUL, 759132
B.2. FSTP Installed Capacity in Kilo-Liters
(Eg.: 45 KLD)
18 KLD
B.3. Plant Operation Timing Duration
(Eg.: 09:00 AM - 08:00 PM)
9.00AM-5.00PM
Eg.
{
"PlantCode": "ANG_001",
"PlantName": "ANGUL Plant",
"active": true,
"PlantType": "SeTP",
"PlantLocation": "ANGUL",
"PlusCode": "R3RW+7JQ",
"PlantOperationalTimings": "09.00am-05.00pm",
"PlantOperationalCapacityKLD": "18",
"ULBS": "pg.angul"
}
Field Name
Description
Comments
Plus code
Copy paste the plus code of the plant location
Go to google maps , search for the plant and in the left panel you will have option to copy the plus code of the location.
Plus code is a simple digital address based out of latitude and longitude
Unique Code for Plant
This will be an unique code for the SeTP plant
For example : If the plant is the ANGUL Plant then the there can be 3 alphabets to identify the city "ANG_001 "
001 - is a running sequence number for a state.If the first row is 001 the second row can be 002.
If the second row plant is from PURI then the code can be "PURI_002"
Creating Boundary data for Gram Panchayat in ULBNAME/egov-location/boundary-data.json The GP details will be given in Annexure-5,in hierarchyType - REVENUE ,add GP data after locality data. The json format of GP is :
{
"id": 6,
"boundaryNum": 1,
"name": "GP 1",
"localname": "GP1",
"longitude": null,
"latitude": null,
"label": "GP",
"code": "GP1",
"children": [
{
"id": 11,
"boundaryNum": 1,
"name": "Village 1",
"localname": "Village local 1",
"longitude": 74.871552,
"latitude": 31.63089,
"label": "Village",
"code": "VIL1",
"pincode": [
143001
],
"area": "V-Area1",
"children": []
},
{
"id": 12,
"boundaryNum": 1,
"name": "Village 2",
"localname": "Village local 2",
"longitude": null,
"latitude": null,
"label": "Village",
"code": "VIL2",
"pincode": [
143001
],
"area": "V-Area1",
"children": []
}
]
},Example:
{
"tenantId": "pg.rourkela",
"moduleName": "egov-location",
"TenantBoundary": [
{
"hierarchyType": {
"code": "REVENUE",
"name": "REVENUE"
},
"boundary": {
"id": 1,
"boundaryNum": 1,
"name": "Rourkela",
"localname": "Rourkela",
"longitude": null,
"latitude": null,
"label": "City",
"code": "pg.rourkela",
"children": [
{
"id": "2",
"boundaryNum": 1,
"name": "Pradhanpalli",
"localname": "Pradhanpalli",
"longitude": null,
"latitude": null,
"label": "Locality",
"code": "VIL1"
},
{
"id": "3",
"boundaryNum": 1,
"name": "Other",
"localname": "Other",
"longitude": null,
"latitude": null,
"label": "GP",
"code": "OTH1",
"children": []
}
]
}
}
]
}Steps to create the jsons of GP data -
The GP data is given in excel format.
Copy all the GP’s list and make an excel with format given below
id
boundaryNum
name
localname
longitude
latitude
label
code
10
1
Kodama
Kodama
null
null
GP
GUD5
11
1
M K Rai
M K Rai
null
null
GP
GUD6
12
1
Madhubana
Madhubana
null
null
GP
GUD7
The name and localname is the GP name provided
The label is always GP and boundaryNum is 1.
Id is unique for each GP and should be in sequential order.
Provide a proper format of GP code according to GPname.
Convert the excel data into json using excel-json online converter.
Add the GP data after locality data in boundary-data.json file .
Check the format once,change id into string if it is in integer format.
Add "children": [] for each GP separately after converting to json.
Adding Slum Details in ULBNAME/FSM/Slum.json The name of the slums will be provided.The format of slum adding in mdms is:
{
"name": "slumname",
"active": true,
"code": "CODE001",
"locality": "VIL1"
}
Steps To Create the jsons of Slum data : The slum data is provided in excel format.
Make an excel with with given format
name
active
code
locality
Adibasi Sahi(Poda khaman)
true
ANAN001
VIL1
Badaharijan Sahi
true
ANAN002
VIL1
Add all the slums in name field
change the code according to ulb name
add locality VIL1 according to boundary-data.
convert the excel data into json using excel to json converter.
create a folder of a respective tenant and inside it add slum.json file in FSM folder.
Adding New Vehicles in VehicleMakeModel Before pushing the vehicle data,new vehicle should be added in mdms.
Vehicle Make
Eg.: Swaraj, Eicher, Mahindra etc. ->
Mahindra
Vehicle Model
Eg.: Truck, Tractor, Pick Up etc. ->
Truck
GPS Tracker is present in vehicle?
YES or NO ->
No
Cesspool Tank Capacity (in Litres)
->
1000
Eg. new vehicle add
{
"code": "MAHINDRA",
"name": "Mahindra",
"active": true
},
{
"code": "MAHINDRA.TRUCK",
"name": "Truck",
"active": true,
"make": "MAHINDRA",
"capacity": "1000"
}The code should be different for each vehicle and in format make.name .
Billing-slab pricing preparation For adding the rate slabs(pricing) of vehicles,consider different combination of propertyType , slum and tank capacity.
Required combination of property types and Sub-property types added in MDMS :
RESIDENTIAL and RESIDENTIAL.SUB-PROPERTY_TYPE
INSTITUTIONAL and INSTITUTIONAL.SUB-PROPERTY_TYPE
COMMERCIAL and COMMERCIAL.SUB-PROPERTY_TYPE
Sample Data for pricing :
Name of the ULB: (Write in right side box)
Anandapur Municipality
Details
Description
Vehicle-1
Vehicle-2
Cesspool Tank Capacity (in Litres)
->
1000
3000
Per trip Pricing for Residential properties
->
1000
2000
Per trip Pricing for Commercial properties
->
1000
3000
Per trip Pricing for Institutional properties
->
1000
2000
Per trip Pricing for Slum areas
->
800
1500
Steps to make billing-slab data: A. Create an excel file in given format
tenantId
capacityFrom
capacityTo
propertyType
slum
price
status
od.anandapur
0
1000
RESIDENTIAL
YES
1000
ACTIVE
od.anandapur
0
1000
RESIDENTIAL.INDEPENDENT_HOUSE
NO
800
ACTIVE
B. Consider all property types and sub-property type present in mdms with slum YES and with slum NO.
C. for capacity 1000L,the pricing is given as
For slum NO :
RESIDENTIAL and RESIDENTIAL.SUB-PROPERTY_TYPE - 1000
INSTITUTIONAL and INSTITUTIONAL.SUB-PROPERTY_TYPE - 1000
COMMERCIAL and COMMERCIAL.SUB-PROPERTY_TYPE - 1000
For slum YES(Per trip Pricing for Slum areas) :
RESIDENTIAL and RESIDENTIAL.SUB-PROPERTY_TYPE - 800
INSTITUTIONAL and INSTITUTIONAL.SUB-PROPERTY_TYPE - 800
COMMERCIAL and COMMERCIAL.SUB-PROPERTY_TYPE - 800
D. for capacity 3000L,the pricing is given as
For slum NO :
RESIDENTIAL and RESIDENTIAL.SUB-PROPERTY_TYPE - 2000
INSTITUTIONAL and INSTITUTIONAL.SUB-PROPERTY_TYPE - 2000
COMMERCIAL and COMMERCIAL.SUB-PROPERTY_TYPE - 3000
For slum YES(Per trip Pricing for Slum areas) :
RESIDENTIAL and RESIDENTIAL.SUB-PROPERTY_TYPE - 1500
INSTITUTIONAL and INSTITUTIONAL.SUB-PROPERTY_TYPE - 1500
COMMERCIAL and COMMERCIAL.SUB-PROPERTY_TYPE - 1500
E. After creating the excel file by considering the combinations,convert the excel file into json.
F. Push the same json file in billing slab api using runner.
The data templates contains Annexures which will be provided by the Program Team.
Annexure -1 : ULB and FSTP data.
Annexure -2 : Cesspool Vehicles
Annexure -3 : Slum Within ULB
Annexure -4 : Zero Pricing Property
Annexure -5 : GP Tagging and Pricing
Annexure -1 : ULB and FSTP data This Annexure contains the names and contact details provided for -
FSM Executive(Sl. No. A6) : CREATOR, COLLECTOR, EDITOR, DASHBOARD VIEWER, FSSM REGISTRY
FSM TRP(Sl. No. B7) : SUBMIT/DECLINE TRIPS, ADD VEHICLE LOG
Sl. No. A1 - A4 : ULB Details added in tenant/tenants.json file in mdms
Sl. No. B1 - B6 : FSTP Details added in FSM/FSTPPlantInfo.json file in mdms
Sl. No.
DETAILS
EXAMPLE
DESCRIPTION
A1
Name of ULB
(E.g.: Berhampur Municipal Corporation or Balasore Municipality or Banki NAC)->
Anandapur Municipality
A2
Helpline Phone numbers for Septic tank cleaning
(Write Landline with Code. Eg.: 0674-234563, 14420)->
14420
(Write 10 digit Mobile No. Eg.: 9876786543)->
8249735088
A3
ULB's full postal Address
->
Anandapur Municipality
A4
ULB's Latitude and Longitude
(E.g.: 20.2961° N, 85.8245° E)->
21.19076,86.130399
A5
ULB Commissioner / Executive Officer (EO) Details
Name of Commissioner / EO
->
Asok Kumar Rout
WhatsApp Phone No. of Commissioner / EO
->
9999999921
Official Email Id of Commissioner / EO
->
A6
ULB - FSSM Executive Details
(The designated role should be nominated by the EO/Commissioner)
(This person is responsible for taking desludging service requests from citizens, collecting payments, assigning cesspool vehicles which are registered at ULB (both ULB and Private) and taking further action on the requests. The designated role should be nominated by the EO/Commisioner and will be responsible to update the desludging requests on SUJOG-FSSM platform received via various channels. This role should have accessibility to the designated phone number/14420/ULB counter/single window, IT infrastructure (computer, internet, printer) etc.)
Name of FSSM Executive
->
Sk Sahabaz Alam Quadri
WhatsApp Phone No. of FSSM Executive
->
9999999922
Official Email Id of FSSM Executive
->
B1
FSTP's full postal Address
->
Salapda near MCC 2 ward no -12 Anandapur Municipality
B2
FSTP's Latitude and Longitude
(E.g.: 20.2961° N, 85.8245° E)->
21.19076,86.130399
B3
FSTP Installed Capacity in Kilo-Liters
(Eg.: 45 KLD)->
10 KLD
B4
Plant Operation Timing Duration
(Eg.: 09:00 AM - 08:00 PM)->
9.00 AM - 5.00 PM
B5
Name of SHG / ALF / CLF operating the Plant
->
MAA TARINI WSHG
B6
Is the FSTP serving the nearby Gram Panchayats?
(Write "Yes" OR "No". If "Yes", then how many Gram Panchayats) (Eg.: Yes-15 GPs OR No)->
Yes-81GPs
B7
FSTP - TRP Details
(Lab Technician)
Name of FSTP TRP
->
Rashmita Ojha
WhatsApp Phone No. of FSTP TRP
->
9999999923
Official Email ID of the FSTP TRP
->
NA
Annexure -2 : Cesspool Vehicles
Name of the ULB: (Write in right side box)
Anandapur Municipality
Details
Description
Vehicle-1
C. Cesspool Vehicle Details of ULB
Cesspool Vehicle Registration No.
->
OD09J7874
Vehicle Ownership
ULB or Private
ULB
Vehicle Owner's Name
If owner is ULB, mention the ULB name (E.g.: Banki NAC). If owner is Private Party, mention the name of Private Party's Company name (E.g.: Ram Infra Pvt. Ltd.) or Person name (E.g.: Ramesh Sahu).->
Anandapur Municipality
Mode of Operation
ULB Owned & ULB Operated or ULB Owned & Privately Operated or Privately Owned and Privately Operated ->
ULB owned & ULB opereted
Whether Cesspool Vehicle is registered with ULB?
YES or NO ->
YES
Cesspool Contractor's Name
->
NIPS
Cesspool Contractor's Phone No.
->
9988998898
Cesspool Driver's Name
->
DIPU MUKHI
Cesspool Driver's Phone No.
->
9988675561
Cesspool Driver's License No.
->
OR0920040025878
Cesspool Vehicle Insurance No.
->
3379/331735/000/00
Pollution Certificate No.
->
Yes
Vehicle Make
Eg.: Swaraj, Eicher, Mahindra etc. ->
Mahindra
Vehicle Model
Eg.: Truck, Tractor, Pick Up etc. ->
Truck
GPS Tracker is present in vehicle?
YES or NO ->
No
Cesspool Tank Capacity (in Litres)
->
1000
Per trip Pricing for Residential properties
->
1000
Per trip Pricing for Commercial properties
->
1000
Per trip Pricing for Institutional properties
->
1000
Per trip Pricing for Slum areas
->
1000
The Contractor Details are the DSO/Vendor/Cesspool Operator details can be added from vendor api or FSM Registery to add dso in the portal.The driver and vehicle is assigned to the dso.
Vehicle Make,Model and Vehicle Tank capacity is added in MDMS under VehicleMakeModel.json file within Vehicle folder in mdms-repo.
According to Tank Capacity,Property Type,Sub-property Type and Slums,the pricing is defined in billing-slab.
Annexure -3 : Slum Within ULB The ULB can configure zero pricing for slums at a ULB level - all applications raised from slums would be required to pay zero application fees When creating an application, the default Slum Name is set to 'NONE'. If the user resides in a slum area, they have the option to select a specific Slum Name as follows:
Open the Septic tank emptying request.
In the 'Slum Name' field, you will find 'NONE' as the default value.
If you live in a slum area, click on the 'Slum Name' field to open a dropdown menu.
From the dropdown menu, select your specific slum area from the available options.
By selecting the appropriate slum name, you can accurately specify your residential location within the application.
Name of the ULB: (Write in right side box)
Anandapur Municipality
D. Slum List of ULB
Sl No.
Name of the Slum in the ULB
1
Birbal Kolha Sahi
2
Dehury Sahi
3
Panda Sahi
4
Bauti Sahi
5
Dahanibania Sahi
6
Bandirigadia Harijan Sahi
7
Mukhi Sahi
8
Majhi Harijan Sahi
9
Hadi Sahi
10
Gouda Sahi
11
Kolha Sahi
12
Badaharijan Sahi
13
lndira Colony
14
Saunti Sahi
15
Janara Harijan Sahi
16
Nala Sahi
17
Harijan Sahi near Gotha
18
Adibasi Sahi(Poda khaman)
19
Dehury Sahi (Podakhaman)
20
Mukhi Sahi (Podakhaman)
21
Deury Sahi, Sailong
22
Sarat Kumar Sahoo
The slum details are added in specific ulb folder(anandapur/FSM/Slum.json).
Annexure -4 : Zero Pricing Property In Zero Pricing Property,ULB can opt for zero-price application based on some criteria(like slum, property, sub-property, capacity etc.) which is configurable in MDMS & billing_slab table .In case of zero-pricing, no demand will be generated and collection step will get skipped.
Eg. For Institutional.Temple,the price will be 0.
Name of the ULB (Write in right side box)
Anandapur Municipality
E. Zero Pricing Properties of ULB
Sl No.
Property Type
Property Sub Type (Mention here the name of the properties under each category as mentioned in the left-hand side column.) E.g.: CT, PT, Collector's Office etc.
1
Institutional
CT,PT, Temple, Govt. High School, Govt. Hospital, Govt. School
2
Commercial
3
Slum
Annexure -5 : GP Tagging and Pricing When creating a new application, users can choose between local municipalities or urban supported villages. Based on their choice, they can select either a locality/mohalla or a Gram Panchayat (GP) area from the respective dropdown list. If a ULB employee selects GP, they can manually input a trip amount based on offline calculations, instead of using the auto-calculated amount available for urban areas. ULB employees and DSO Operation personnel should also be able to edit the number of trips, and the final amount must be a multiple of the initial amount entered in the application based on the number of trips.
Sl No.
Name of the Gram Panchayat tagged to ULB
1
BAILO
2
BAUNSAGARH
3
BELABAHALI
4
BUDHIKUDA
5
DHAKOTHA
6
GAYALAMUNDA
7
HARIDAPAL
8
JALASUAN
9
KANTIPAL
10
KATHAKATA
11
KODAPADA
12
KOLIMATI
13
MANOHARPUR
14
MOCHINDA
15
PANASADIHA
The data related to Gram Panchayat are added in mdms under specific ulb folder(Example. anandapur/egov-location/boundary-data.json to show in the ui.


Sanitation workers provide an invaluable service that many of us notice only when confronted with locked, blocked, or filthy toilets; overflowing septic tanks; or beaches contaminated with sewage. These workers are vital to the proper functioning of the sanitation systems that underpin daily life, and we need many more of them to achieve the ambitious agenda of Sustainable Development Goal (SDG) 6. Yet sanitation workers are often invisible and too often subject to conditions that expose them to the worst consequences of poor sanitation: debilitating infections, injuries, social stigma, and even death in their daily work. Workers’ rights need to be recognised; workers need freedom and support to organise as a labor force; and their working conditions need to be improved and progressively formalised to safeguard health and labor rights to ensure decent working conditions, as called for by SDG 8.
Sanitation workers range from permanent public or private employees with health benefits, pensions, and clear legal protections to some of the most marginalised, poor, and abused members of society who take on low-grade, labor-intensive, and dangerous work. For those employed informally, their work is financially precarious, with poor pay and few benefits. Sanitation workers often suffer weak legal protection, missing or weak standard operating procedures, and weak enforcement and oversight of laws and policies protecting their rights and health.
Who is a Sanitation Worker?
The term sanitation workers refers to all people — employed or otherwise — responsible for cleaning, maintaining, operating, or emptying a sanitation technology at any step of the sanitation chain. This includes toilet cleaners and caretakers in domestic, public, and institutional settings; those who empty pits and septic tanks once full and other faecal sludge handlers; those who clean sewers and manholes; and those who work at sewage and faecal waste treatment and disposal sites (Dalberg Advisors 2017; WHO 2018).
Key challenges associated with sanitation workers are as follows:
Multiple occupational and environmental hazards.
Weak legal protection of an invisible workforce.
Financial insecurity.
Social stigma and discrimination.
There have been considerable initiatives taken in India towards sanitation worker welfare. Some of these include:
Institutionalisation of safety practices through the implementation of ERSU.
Loan financing via the National Safai Karamcharis Finance & Development Corporation (NSKFDC) for entrepreneurship and alternate skill development.
Training and skill development programmes towards safe sanitation.
For the implementation and execution of the above initiatives, the first step is to recognise sanitation workers as individuals entitled to safety, benefits and rights with specific skill-sets and capabilities. In certain states (Odisha, Tamil Nadu, and Maharashtra, to name a few), a database of sanitation workers is created through the generation of unique IDs. These aim to provide a formal identity to sanitation workers and further serve as a base for welfare programmes including medical coverage and student fee reimbursement. Training provided to these individuals, ensures that only trained professionals participate in the sanitation value chain. The second step is to monitor the participation of sanitation workers in service delivery to ensure safe sanitation by ensuring defined safety protocols are followed, and ensuring participation of trained sanitation workers in service delivery.
Keeping this in mind, Sanitation Worker Welfare will be introduced as an extension to DIGIT Sanitation.
V1: Introduction of sanitation worker database and recording participation of sanitation workers in service delivery.
V2: Implementation of the ERSU process on DIGIT.
Sanitation Worker Welfare will be rolled out across 2 versions:
Goal
Category
Objective
How will it be measured via the product?
How will we know this is successful?
Zero deaths, diseases, and environmental contamination resulting from poor sanitation.
Primary
To ensure every sanitation worker has a valid identity so as to enable distribution of benefits.
Number of sanitation workers registered in the system.
Increase in the number of sanitation Workers enrolled in the system over time.
Zero deaths, diseases, and environmental contamination resulting from poor sanitation.
Secondary
To ensure only trained sanitation workers service requests.
The percentage of requests serviced by trained sanitation.
Increase in the percentage of requests serviced by trained sanitation.
The following is the scope of V1 for Sanitation Worker Welfare:
Maintaining a list of unique sanitation workers in DIGIT Sanitation through a sanitation worker registry:
Viewing list
Adding a sanitation worker
Updating details
Disabling sanitation worker
Tagging sanitation workers to vendors
Recording participation of sanitation workers in service delivery by tagging sanitation workers to requests:
Tagging multiple sanitation workers to a request
Editing tagged sanitation workers
SMS to sanitation Worker in case of request assignment
Report
With the implementation of the sanitation worker database, we aim to create a unique, verifiable database of sanitation workers, each with a unique ID.
Specifications:
Type
Mandatory
Editable (Y/N)
Unique within a tenant (Y/N)
Unique within an instance (Y/N)
Validation
Sanitation worker name
Free text
Y
N
N
N
N
Sanitation worker ID
Autogenerated
Y
N
Y
Y
N
Skills
Array, Multiselect
Y
Y
N
N
N (examples of these are Driving, Lab Operations, Plant Maintenance etc)
Tenant ID
Array, Multiselect
Y
Y
N
N
N (one sanitation worker may be performing roles in multiple tenants)
Roles
Array/Multiselect
Y
Y
N
N
N (examples of this is driver, helper, treatment plant operator, lab operator)
Gender
Array
N
Y
N
N
N
DOB
Date
N
Y
N
N
Must be minimum (Today - 18 years)
Email address
Free text (Email format)
N
Y
N
N
Follow email format
Phone number
Number
Y
N
N
N
Must have 10 digits
Status
Boolean
Y
Y
N
N
N
Employment type
Array (Fixed/Contractual)
Y
Y
N
N
N
Employer
Array (ULB/Vendor)
Y
Y
N
N
N
Vendor name
Array (Populated based on vendors in the ULB)
Y
Y
N
N
N
Photograph
File
N
Y
N
N
File size
Sanitation workers can be managed via the FSM Registry implemented as part of V1.3. The FSM Registry allows for ULB admins to manage the list of vendors, vehicles and drivers.
Changes required:
Backend table
As Is
With sanitation worker registry
Action
Driver Table
Driver details are currently stored in the driver table in FSM.
Driver details will be fetched from the sanitation worker table.
Deactivate driver table.
Sanitation Worker Table
NA
Sanitation worker details will be stored in the sanitation worker table.
Create sanitation worker table.
Driver Vehicle Table
Currently, drivers and vehicles are mapped in the driver vehicle table in FSM.
There will be no driver vehicle mapping. Each transaction will be assigned to sanitation workers/drivers from the frontend.
Deactivate driver vehicle mapping table.
Sanitation Worker and Vendor Mapping
NA
Sanitation workers will be mapped to a vendor.
Create a sanitation worker vendor mapping table.
The following functionality will be available to the user via the frontend to manage sanitation worker database:
View list of sanitation workers
Adding a sanitation worker
Updating details
Disabling sanitation worker
Tagging sanitation workers to vendors
Entities
Actions
Create
Read
Search
Update
Delete
Deactivate
Sanitation Worker
X
Assign sanitation workers to a request:
Along with assigning a vehicle, the DSO will assign sanitation workers to a request. The sanitation workers will be assigned either by entering the unique SW ID or the phone number of the sanitation worker. If the unique SW ID/phone no. exists in the database, details of the sanitation worker, that is, name, phone number, SW ID, and photograph to be displayed on the screen for the DSO to confirm. In case the Garima ID/phone number does not exist, an error message will be displayed.
A DSO may assign one to many sanitation workers to a request. However, entering a minimum of one sanitation worker to a request is mandatory.
Specifications:
Updating Application | DSO in Progress
1.1 Tagging Sanitation Worker to Request
Attribute
Type
Mandatory (Y/N)
Comments
SW ID (8 Digits)/Phone number
BIGINT
Y
Post assigning vehicles, the “Take Action” button will show an option to assign sanitation workers.
Search by entering Garima ID and phone number of the sanitation worker.
View of details fetched via API:
Name
Garima ID
Phone no.
Photograph
Confirm sanitation workers.
It is mandatory to add atleast 1 sanitation worker to a request.
Edit of sanitation worker/workers possible by deleting a sanitation worker.
Notification to Sanitation Worker
An SMS notification will be triggered to the sanitation worker when a request is assigned to them with the citizen name and phone number.
Add a new sanitation worker by clicking on the ‘Add’ button on the FSM registry landing page and select Sanitation Worker User Actions. The following actions can be performed:
Add a new vendor by clicking on vendor.
Add a new vehicle by clicking on vehicle.
Add a new sanitation worker by clicking on sanitation worker.
On clicking on “Sanitation Worker”, the user will be redirected to the add the sanitation worker page.
User Actions
The following actions can be performed:
Enter the sanitation workers details. The fields are mentioned in the functional specifications table.
Go back by using the breadcrumbs.
Once the user submits an application, a snack bar will confirm the successful addition of a sanitation worker.
Details of the added sanitation worker will be displayed in the sanitation worker list on the top.
Login as an ULB admin and navigate to the FSM Registry by clicking on it. Click on the sanitation worker tab.A list of all sanitation workers in the system are visible along with the details of the vendor they are tagged to.
User Actions
The following actions can be performed:
View list of all sanitation workers in the system along with the details of tagged vendors.
Search for a sanitation worker using the search box. Results should be displayed in case of part match.
Clear search by using the “Clear Search” button
Enable/disable a sanitation worker by using the toggle.
Sort sanitation workers by creation date.
Add a new vendor, sanitation worker or vehicle by clicking on the ‘Add’ button.
Sanitation worker details can be viewed by clicking on the sanitation worker’s name. All details of the sanitation worker captured while creating a sanitation worker will be displayed here.
User Actions
The following actions can be performed:
View details of the sanitation worker.
Edit vendor tagging by clicking on the edit icon besides the vendor name.
Remove vendor tagging by clicking on the delete icon beside the vendor name.
Click on the “Take Action” button to edit or delete a vehicle.
Sanitation worker details can be edited by clicking on the “Take Action" button and selecting edit.
User Actions The following actions can be performed:
Click on edit to edit the sanitation worker.
Click on delete to delete the sanitation worker.
Click anywhere else on the screen to go back to the sanitation worker details.
On clicking the Edit button, the user will be redirected to the “Edit Sanitation Worker” page.
User Actions
The following actions can be performed:
Edit sanitation worker details.
Click on ‘Submit’.
The user will be redirected to the sanitation worker details page and the edits will be reflected.
The user will be redirected to the sanitation worker details page and the edits will be reflected. can be deleted by clicking on the “Take Action” button. The user will be redirected to the sanitation worker details page, and the edits will be reflected in the details page and selecting delete.
User Actions
The following actions can be performed:
Click on Edit to edit the sanitation worker.
Click on Delete to delete the sanitation worker.
Click anywhere else on the screen to go back to the sanitation worker details.
On clicking the ‘Delete’ button, a pop-up will be displayed for confirmation.
The following actions can be performed:
Close the pop-up by clicking on the ‘Close’ button on the pop-up.
Close the pop-up by clicking on the cross icon on the top right of the pop-up.
Confirm deletion by clicking on the ‘Delete’ button.
On clicking on ‘Delete’, the user will be directed to a list of SW and a snack bar will be displayed as confirmation.
Method 1:
Apart from tagging a sanitation worker to a vendor from the sanitation worker details page, tagging can also be done from the sanitation worker details page by clicking on the add new vendor button.
User Actions
The following actions can be performed:
View details of the sanitation worker.
Tag SW to a vendor by clicking on the + icon besides the “Add New Vendor”.
A pop-up will be displayed with a dropdown to select a vendor.
User Actions
The following actions can be performed:
Selection of a vendor from the dropdown.
Close pop-up by clicking on the cross icon on the top right of the pop-up.
Close pop-up by clicking on ‘Cancel’.
Confirm vendor selection by clicking on ‘Submit’.
On clicking on submit, the added vendor details will be displayed in the sanitation worker details page and a snack bar is displayed for confirmation.
Method 2:
A sanitation worker can also be tagged to a vendor from the sanitation worker list page. Select a vendor from the dropdown. The sanitation worker will be tagged to the selected vendor.
The DSO assigns a sanitation worker by clicking on the “Take Action” button and clicking an option of adding a vehicle and sanitation workers.
A pop-up is displayed. The user can perform the following actions:
Select a vehicle number from dropdown. This is mandatory.
Assign a driver by typing the name or the sanitation worker ID in the search field. A list of matching results will be displayed and the user can select one. On selection, the name and sanitation worker will be displayed in the field. The driver can be edited by editing the field and retyping the name of the sanitation. This is mandatory
Assign helpers by typing the name or sanitation worker ID. A list of matching results will be displayed and the user can select multiple. The selected sanitation workers will be displayed below the field and the user can remove them by clicking on the cross beside their name. This is non mandatory.
The user can confirm the assignment by clicking on confirm.
The user can close the pop-up by clicking on the cross icon on the top right hand side of the pop up or clicking on the cancel button. No entered details will be saved in this case.
The assign button will only be activated once the vehicle and driver is selected.
Part search to be enabled for both fields.
Sanitation worker details are displayed in the application in the DSO details section:
Driver: Name and sanitation worker ID.
Sanitation 1: Name and sanitation worker ID.
If there are more than 1 sanitation worker assigned, multiple rows for sanitation workers will be visible. Driver and sanitation worker fields will not be displayed unless they are assigned.
Login for sanitation workers to accept/decline requests.
Login access via sanitation worker registry: Sanitation worker registries will contain information on drivers and treatment plant operators, who participate in the DIGIT sanitation workflow. Ideally, login for the product for the role should be via the registry. However, this will not be implemented.
Verification of whether the job roles tagged to the sanitation worker are the actual roles they are performing on field.
Verification of whether the correct sanitation worker is tagged to the request.
Verification of training status of sanitation workers will be maintained by the partner agency and we are dependent on them to compute the percentage.
Multiple sanitation workers service a request. Only a subset of them are assigned in the system.
Sanitation worker safety is of national importance. The national mandate for the same is issued under “Emergency Response Sanitation Unit (ERSU)”. The Urban Management Centre (UMC) is leading the implementation of ERSU across Odisha. As part of ERSU, UMC along with the state of Odisha has also rolled out a programme for “Sanitation worker benefits” called 'Garima' whose main objective is to identify, monitor and support sanitation workers and their families.
eGov is collaborating with UMC on “Sanitation worker safety” for Odisha, which includes building platform and product capabilities for Garima. The objective of of the collaboration between eGov and UMC through an integration with Garima is to create a record of service delivery to:
Provide enumeration and benefits to sanitation workers
Identify the percentage of services with evidence of safe practices
eGov, through its DIGIT FSM platform implemented in Odisha can serve as a data capturing layer for the above and provide access of this information to UMC. The following will be the scope of work across the partnership:
The Sanitation Worker Welfare module v1.0 will be rolled out to Orissa as part of Sujog v1.4. Click here to know more.
Workbench Setup
For the loading of data, the following will be required:
State-level user for workbench (to allow for loading of state data).
Urban local body (ULB)-level users for workbench (to allow for loading of ULB-specific data). One user for the workbench with access to all ULBs can also be created and the user can navigate across the ULB to upload data for each ULB
ULB employees are provided with credentials to log in to the system. Role-based access for various steps in the workflow, that is, different individuals can be assigned to create an application, modify applications, or manage vendor, driver, and vehicle details.
User actions
On this page, the following actions can be performed:
Enter username and password.
Select a city for login.
Reset your password by clicking on the “Forgot Password” link.
On clicking continue, employees are redirected to the Workbench home page
For the proper working of the platform, the following benchmark rules should be configured. If any other benchmark rules are configured, the system will not function:
Inbox
Click on “Add Master Data” to add a new benchmark rule
Inbox
Click on “Add Master Data” to create new a Quality Test Lab
Inbox
Click on “Add Master Data” to create new a material
Inbox
Click on “Add Master Data” to create a new parameter
Inbox
Click on “Add Master Data” to create a plant configuration
Inbox
Click on “Add Master Date” to create a plant type
Inbox
Click on “Add Master Data” to create a new process type
Inbox
Click on “Add Master Data” to create a new unit
Inbox
Click on “Add Master Data” to create new Waste Type
Inbox
Click on “Add Master Data” to create a new source type
Inbox
Click on “Add Master Data” to add a new stage
Inbox
Click on “Add Master Data” to create a new process
Once the plant is created, the plant user mapping has to be done through the backend. If there is already an FSM instance created and running, then the V1 of codes for plant and ULB has to be taken for V2 and the backend team will have to create the plants using the same codes.
Inbox
Click on “Add Master Data” to add a new plant
Inbox
Click on “Add Master Data” to add a new quality criteria
Inbox
Click on “Add Master Data” to add a new test standard


All the below configurations are in order, and the same order should be followed while creating a new test standard:
BenchmarkRule
QualityTestLab
Material
Parameter
PlantConfig
PlantType
ProcessType
Unit
WasteType
SourceType
Stage
Process
Plant
QualityCriteria
TestStandard
Duplications are not allowed.
Common user actions for the below configuration:
Users can view a list of configurations.
Users can add a new configuration.
Users can edit a configuration.
Users can enable or disable a configuration.
Configuration
Which level this has to be defined?
Definition
Benchmark rule
State
The rules according to which a test value should be tested. (For example, Greater than, less than, equal to).
Quality Test Lab
ULB
Quality Test Lab is the laboratory where the testing is happening.
This can be configured accordingly if it is in-house or the ULB-Geo Corporation.
Material
State
Material is a physical substance for which the quality monitoring is done. For example: Effluent or raw water.
Parameter
State
Criteria used to measure te input and the output for a job. Each parameter will have a unit of measurement.
Plant configuration
State
Configuration details for a particular plant.
Plant type
State
The classification of plant based on their processing.
Process type
State
Defines the type of process.
Unit
State
The unit for measuring this particular parameter
Waste type
State
The classification of waste materials based on their characteristics or origin.
Source type
State
The origin of this particular test standard.
Stage
State
Each step within the treatment process. Each job may have one or many input quality parameters, and one or many output quality parameters.
Process
State
Sequential series of steps required to translate input to output.
Plant
State
Respective Plant for which Test Standards are created
Quality criteria
State
The quality criteria which is applicable for the unique combination of plant, process, stage and material.
Test standard
ULB
A combination of a parameter, acceptable benchmark of the parameter and its frequency of testing. For example, ph >= 7 tested weekly.
Code
Name
LSTOREQ
Less Than Or Equals
GTROREQ
Greater Than Or Equals
NEQ
Not Equals
EQ
Equals
OSD
Outside Range
BTW
Between
LST
Less Than
GTR
Greater Than
Field
Description
Example
Code
Alphanumeric or numeric representation assigned to uniquely identify the field.
JATNI_In_House Puri_Third_Party
Name
Textual or human-readable identity given to a record.
Jatni in-house lab, Puri third-party lab
Field
Description
Example
Code
Alphanumeric or numeric representation assigned to uniquely identify the field.
MM_01 MM_02
Name
Textual or human-readable identity given to a record.
Effluent Treated effluent
Field
Description
Example
Code
Alphanumeric or numeric representation assigned to uniquely identify the field.
PP_01 PP_02
Name
Textual or human-readable identity given to a record.
COD BOD
Description
Details or explanation for a record.
Chemical oxygen demand, Biological oxygen demand
Field
Description
Example
Code
Alphanumeric or numeric representation assigned to uniquely identify the field.
DEFAULT_CONFIGURATION
Lab test escalation days
The number of days after which a scheduled test that is still pending requires escalation.
Decided by the state and the programme team to configure these days.
Pending tests to display within days
The number of days within which pending tests, assessments, or evaluations should be displayed or considered.
Decided by the state and the programme team to configure these days.
Field
Description
Example
Code
Alphanumeric or numeric representation assigned to uniquely identify the field.
FECAL_SLUDGE_TREATMENT_PLANT CO_TREATMENT_PLANT
Name
Textual or human-readable identity given to a record
Faecal sludge treatment plant Co-treatment plant
Description
Details or explanation for a record.
Any description related to the plant.
Field
Description
Example
Code
Alphanumeric or numeric representation assigned to uniquely identify the field.
FECAL_SLUDGE_TREATMENT 5_STAGE_WATER_TREATMENT
Name
Textual or human-readable identity given to a record
Faecal sludge treatment, 5-stage water treatment
Field
Description
Example
Code
Alphanumeric or numeric representation assigned to uniquely identify the field.
MGPL DC
Name
Textual or human-readable identity given to a record.
Mg per liter Degree celsius
Field
Description
Example
Code
Alphanumeric or numeric representation assigned to uniquely identify the field.
FECAL_SLUDGE MEDICAL_INFECTIOUS_WASTE
Name
Textual or human-readable identity given to a record.
Faecal sludge Medical infectious waste
Field
Description
Example
Code
Alphanumeric or numeric representation assigned to uniquely identify the field.
LAB_ADHOC LAB_SCHEDULED
Name
Textual or human-readable identity given to a record.
Adhoc tests Scheduled tests
Description
Details or explanation for a record.
Any explanation regarding the tests
Field
Description
Example
Code
Alphanumeric or numeric representation assigned to uniquely identify the field.
OUTLET_OF_POLISHING_POND
Name
Textual or human-readable identity given to a record.
Outlet of Polishing Pond
Input material
Materials provided as an input to a dtage
Effluent faecal sludge Decided by the state and the programme team to configure the input and output material based on the data collected.
Output material
Materials provided as an output to a stage
Treated effluent Decided by the state and the programme team to configure the input and output material based on the data collected.
Description
Details or explanation for a record.
Description of the stage.
Field
Description
Example
Code
Alphanumeric or numeric representation assigned to uniquely identify the field.
FECAL_SLUDGE_TREATMENT_PROCESS
Name
Textual or human-readable identity given to a record.
Faecal sludge treatment process
Process Type
Defines the type of process. Here the previously defined process type has to be entered.
Faecal sludge treatment
Order
Order can be a number for which the stage can be defined. This is a non-mandatory field.
1
Stage Code
A list of stages that come under a particular process. Here the previously defined stage has to entered.
Outlet of polishing pond
Waste Type
The classification of waste materials based on their characteristics or origin. Here the previously defined waste type has to entered.
Faecal Sludge
Description
Details or explanation for a record.
Description regarding the process can be entered.
Field
Description
Example
ULBs
The respective ULBs the plant belongs to.
od.berhampur od.dhenkanal
Code
The plant code this is the same code from V1.
BEHR_001 DHKL_001
Name
Textual or human-readable identity given to a record.
BeMC Plant Dhenkanal Plant
PlusCode
This is the geo-location of the plant.
7PJQ+Q8 Kusumi, Odisha
Latitude
Latitude of the plant.
Longitude
Longitude of the plant.
Plant Type
The classification of plant based on their processing. Note: Here the previously defined plant type has to entered
Faecal sludge treatment plant
Process
A list of process that happen under a particular plant. Note: Here the previously defined process has to entered.
Faecal sludge treatment process
Waste type
The classification of waste materials based on their characteristics or origin. Note: Here the previously defined waste type has to entered.
Faecal sludge Medical infectious waste
Description
Details or explanation for a record.
Can be the description of a plant.
Plant Configuration
Configuration details for a particular plant. Note: Here the previously defined plant configuration has to entered. This is also a mandatory field
DEFAULT_CONFIGURATION
Plant Location
Location of the plant.
Plant Operational timings
Timings of the plant.
Plant Operational Capacity KLD
Total capacity of the plant.
Field
Description
Example
Code
Alphanumeric or numeric representation assigned to uniquely identify the field.
COD_MGPL
Unit Of Measurement
The unit for measuring this particular parameter Note: Here the previously defined units will be shown in the dropdown and the respectives can be selected.
MGPL
Paramaeter
Anything that is measurable as an input/output for a particular stage. Note: Whatever the quality criteria is entered, the previously defined parameter is shown in the drop-down and the respectives can be selected.
COD
Benchmark rule
The rules according to which a test value should be tested. (For example, Greater than, less than, equals to).
This is entered as per the master data collected.
Benchmark values
Specific numbers on which the benchmark rule is applied for a test value.
This is entered as per the master data collected.
Allowed deviation
The acceptable difference from the benchmark values.
This is entered as per the master data collected.
Field
Description
Example
Code
Alphanumeric or numeric representation assigned to uniquely identify the field.
TEST_PURI_QM1
Plant code
Plant Code for which this Test Standard is registered. NOTE: The plant codes must match the above added plant codes for Plant
BEHR_001
DHKL_001
Stage code
Stage Code for which this Test Standard is registered.
Outlet of polishing pond
Process code
Process Code for which this Test Standard is registered.
Fecal Sludge Management
Material code
Material Code for which this Test Standard is registered
Effluent
Frequency
The frequency at which this test standard should be scheduled.
Decided by the state and the programme team to configure the input and output material based on the data collected. For example: 14.
Source type
The origin of this particular test standard.
Lab
Quality criteria
The quality criteria which is applicable for the unique combination of plant, process, stage and material.
COD BOD TSS


FSM home breadcrumb title all should align
Improvement
2
Done
Y
Y
All text alignment should be left for FSM registry table
Improvement
2
Done
Disable button alignment, Figure our dropdown
Antriksh will share design
The date of vehicle creation camel case needs to be fixed
Improvement
0.5
Done
Y
Alignment of breadcrumbs and title should be out of the card and left
Improvement
3
Done
Y
Vehicle details title and second card should be aligned
Improvement
2
Done
Y
Remove the break line in the FSM details page
Improvement
2
Follow Design same as New Desludging Application
Done
Y
Spacing between section header, field above and field below
(+91) in every mobile input field need to be added if it is not major changes
Improvement
16
91 Should be every where there is mobile number field
Done
Some are in old format and some are in new format
Look at entire application and check where gaps are
The rupee symbol needs to be removed from the left side and symbols should be left aligned
Improvement
2
Done
Rupee is still coming on the left hand side in application form
Also look at the entire application and check where gaps are
Add vendor card need to be alligned for vehicle
Improvement
3
Done
Add vendor pop-up close circle need to follow the Figma design, pop-up does not align for text properly
Improvement
2
Done
Update trips, add driver, add vendor, add driver modal cancel icon need to be corrected
Improvement
2
Done
Remove top padding in vendor/vehicle/driver details screen
Improvement
2
Done
Vendor/driver/vehicle details screen title-breadcrumb-card should be aligned properly
Improvement
4
Done
Vendor/driver/vehicle edit screen title-breadcrumb-card should be aligned properly
Improvement
Done
Vendor/driver/vehicle edit screen title should be outside card
Improvement
Done
Vehicle number search box in the vehicle tab should check the correct format
Improvement
2
Done
HOME SCREEN REMOVE
Improvement
2
Done
Pincode validation
Improvement
16
Done
Roles permission for FSM inbox links are not proper
Improvement
3
Done
In collector screen, error for incorrect phone number is showing as Payment_Invalid_Mobile
Localisation
0.15
Done
Sorting FSM inbox should follow common inbox for vendor/driver/vehicle tab -backend
Improvement
12
Done
Sorting FSM inbox should follow common inbox for vendor/driver/vehicle tab- UI
Improvement
12
Done
The vendor name dropdown UI sould be according to the Figma link and align left
Improvement
18
Done
Show only go back to home if has only go back to home else show take action + If only one action is present in take action, then show only the action name
Improvement
12
Done
Redirection from SMS for payment, Showing as ES_PAYMENT_DETAILS_TOTAL AMOUNT and ES_PAYMENT_DETAILS_ADV_AMOUNT
Localisation
Done
Wherever input text does not match validation, error message needs to show in real-time
Improvement
40
Blocker
Todo
Change is redirected to a page in form and then the entire form restarts. Expected action: Change button should go to required page and then Next button should go back to the same page
Improvement
Common Issue in Every Module. Antriksh, Jagan and team is looking into it
Different terminologies found for Payment Method. In the Generate Receipt page (Payment mode -> Cash, Cheque, Credit/Debit Card) where as In Complete Request Page (Payment Received -> Paid In Cash, Paid at Counter, Net Banking).
Improvement
Need Clarity on what method should be populated?
Receipt capacity instead of type
Improvement
Dependency on Backend PDF Service
Todo
Vehicly type and payment sections should be separate
Improvement
Dependency on Backend PDF Service
Todo
Receipt needs to be redesigned
Dependency of Core Team. Since Receipt is a core services
FSM registry table should be common component
Improvement
16
Already common component is using
Todo
Either we can keep the option for the advanced amount and full amount in collect page for citizen, or remove the option <Tahera will get back on this
Improvement
Addressed in Frontendedback section of advance pay
Todo
Will be covering in Advance Pay Section
Pay Now and Pay Later looks a little confusing. Check the localisation with other modules
Improvement
Addressed in Frontendedback section of advance pay
Todo
Will be covering in Advance Pay Section
After clicking pay now, it is showing advance amount which looks a little confusing. Need to check with PO
Improvement
Addressed in Frontendedback section of advance pay
Todo
Will be covering in Advance Pay Section
Login error message "This MobileNumber Already Register as UserName in System. Pls try Another UserName"/ Reword to "This Mobile Number Already Register in the System. Please try Another UserName"
Improvement
1
Core team work
Todo
Test the entire product
Todo
Scroll up to the field
Improvement
12
Todo
Next button should be disabled when data is not filled; next button usage is currently inconsistent
Improvement
View application screen for citizen should have data in the same format as the acknowledgement receipt
Improvement
new UI has to be developed on figma first


Attribute
Type
Mandatory
Comments
Validation Required?
Treatment Process ID
Numeric
Y
Auto-generated numeric value which will act as a unique identifier for a process flow
N, this value should be system generated
Process Name
Text
Y
This is the commonly used identifier for the process flow
Max characters - 256
Status
Array
Y
Status of the process flow
Active/Inactive, Single Select
Treatment Process Type
Array
Y
The dropdown will be auto populated basis the list of waste maintained in the MDMS
Single Select
Treatment Process Subtype
Array
Y
The dropdown will be auto populated basis the list of waste maintained in the MDMS
Single Select
Attribute
Type
Mandatory
Comments
Validation Required?
Plant ID
Numeric
Y
Auto-generated numeric value which will act as a unique identifier for a plan.
Auto-generated
Plant Name
Text
Y
This is the commonly used identifier for the plant
Maximum charatcters - 128
Plant Type
Array
Y
Single select only, faecal sludge, solid waste, co-treatment
Tenant Id
Text
Y
Status
Array
Y
Status of the plant
Active/inactive, single select
Geolocation
Latitude-Longitude
Y
Capture the exact latitude-longitude
Attribute
Type
Mandatory
Comments
Validation Required?
Stage ID
Numeric
Y
Auto-generated numeric value which will act as a unique identifier for a Job ID
Auto-generated
Stage Name
Text
Y
This is the commonly-used identifier for the Job
Maximum characters - 128
Minimum xharacters - NA
Status
Boolean
Y
Status of the stage
Active/inactive, single select
Input Quality Measurement Required
Boolean
Y
This selection will allow the user to set up if the input quality for the particular input type needs to be monitored. A user should be able to enable and disable input quality measurement requirement independently for each type
Yes/no, single select
Output Type
Array
Y
The dropdown will be auto-populated basis the list of output types
Multi-select
Output Quality Measurement Required
Boolean
Y
This selection will allow the user to set up if the output quality for the particular job needs to be monitored. A user should be able to enable and disable the output quality measurement requirement independently for each type
Yes/no, single select
Attribute
Type
Mandatory
Validation
Quality Parameter
Array
Y
Selecting from the predefined of the above-mentioned quality parameters and standards.
single select
Quality Parameter Unit of Measurement
Array
Y
Selection of the unit of measurement (mg/L, Absolute value etc). Single select
Benchmark Rule
Array
Y
Options include X>=,<=R, =<Y and >=Z, single select
Benchmark Value
Numeric
Y
Entered by user, numeric only
Testing Frequency - Manual (Days)
Numeric
Y
Selecting a custom frequency range for laboratory testing based on consent to operate, numeric only
Monitoring Frequency - Quality Sensor (Days)
Numeric
N
Selecting a custom frequency
Note: Should be optional if the ULB/state choses not to have sensor-based monitoring. Numeric only
Attribute
Type
Required?
Comments
Configuration Date
Datetime
Y
Device Type
Text
Y
Selection from the device master data
[“GPS Sensor”, “pH Sensor”, “Accelerometer”, “Light Sensor”]
Plant
Text
Y
Treatment Process
Text
Y
Stage
Text
Y
Output Type
Text
Y
Parameters
Array
Y
The parameters are monitored by the device
Monitoring Frequency
Numeric
Y
Custom frequency for the device
Calibration Date
Datetime
Y
Input from the user about any change in the calibration/maintenance of the device
Calibration Accuracy
Array
Y
Range to indicate the permissible deviation in the accuracy
IsConnected?
Boolean
Y
To indicate the connectivity of the device
Connectivity History
?
Y
Date-wise device audit log to know the connectivity status
Verification History
?
Date-wise device verification log to know the days when device input was verified with laboratory results
Attribute
Type
Mandataroy
Validation
Test ID
Alphanumeric
View only
Auto-generated on the creation of schedule
Plant Name
Text
View only
Auto-populated on the creation of schedule
Treatment Process
Text
View only
Auto-populated on the creation of schedule
Treatment Process Type
Text
View only
Auto-populated on the creation of schedule
Stage
Text
View only
Auto-populated on the creation of schedule
Output Type
Text
View only
Auto-populated on the creation of schedule
Test Type
Array
Lab/IoT, auto-selected to Lab
Parameter 1…n
Text
View only
Auto-populated on the creation of schedule
Testing Date
Date
View only
Date calculated through the predefined laboratory testing schedule
SLA
Numeric
View only
Difference between the current date and testing date: The compliance to a testing schedule can be checked through this field. However, the actions based on failed/successful compliance falls under vendor management, which is not in scope currently and will be taken up separately under vendor management
Status
Text
View only
Status to be auto set to ‘Scheduled’
Attribute
Type
Required?
Comments
Test ID
Numeric
Y
Auto-generated by system
Plant Name
Array
View only
Auto-populated on the creation of schedule, single select for on-demand test
Treatment Process
Array
View only
Auto-populated on the creation of schedule, single select for on-demand test
Treatment Process Type
Array
View only
Auto-populated on the creation of schedule, single select for on-demand test
Stage
Array
View only
Auto-populated on the creation of schedule, single select for on-demand test
Output Type
Array
View only
Auto-populated on the creation of schedule, single select for on-demand test
Test Type
Array
Lab/IoT, auto-selected to lab for on demand
Lab Submitted to
Text
Y
This will not be required in case test type = IoT
Quality Parameter 1
Numeric
Y
Validation to be applied at impel
Quality Parameter 2
Numeric
Y
Validation to be applied at impel
Quality Parameter 3
Numeric
Y
Validation to be applied at impel
Quality Parameter n
Numeric
Y
Validation to be applied at impel
Collection Time
Date
Y
This is the date-time during which the user updates status to pending Results. for IoT, this is the time sensor records reading
Attachment
Document
Y
For a given collection location, photo or PDF proof of laboratory result mentioning the information of above-mentioned parameters
Attribute
Type
Required?
Comments
Alert DateTime
Datetime
Y
Auto-captured based on date-time
Alert Type
Text
Y
Auto-captured
Lab test results not as per the benchmark
Plant Name
Text
Y
Process Name
Text
Y
Process Type
Text
Y
Parameter 1…n
Text
Y
UoM
Text
Y
Benchmark
Number
Y
Results
Number
Y
Test Type
Text
Y
Auto-selected to lab/IoT, or both
Attribute
Type
Required?
Comments
Alert DateTime
Datetime
Y
Auto captured based on date-time
Alert Type
Text
Y
Auto captured
No reading received from the device
Plant Name
Text
Y
Process Name
Text
Y
Process Type
Text
Y
Device ID
Numeric
Y


The user will land on the home page post login. The following actions can be performed by the user:
The plant name is visible on the top right hand corner of the screen.
A help button is available for the user to get a guided view of the page. This is available on every page.
Cards are viewable for the following modules:
a. Vehicle log module (record incoming vehicles)
b. Treatment quality module
c. View dashboard
Clicking on each of these cards will take the user to the Homepage for the specific module.
List of pending tasks: This will show the list of tests pending within the next [X] days. The next action item in the task workflow will be displayed beside a pending task for a user to take prompt action. A button for “View All Pending Tasks” will be displayed which will redirect the user to “All Pending Tasks”.
On clicking on the treatment quality card, the user is redirected to the TQM home page. The following actions can be performed by the user:
View and take action on upcoming tests using the inbox. The inbox will show a count of upcoming tests beside it.
View past test results: Past results from both lab and IoT devices will be displayed here.
View IoT readings: The user can access the record of IoT readings here.
Sensor Monitoring: The user can access a list of IoT devices along with their status here.
View dashboard: The user will be directed to the treatment quality dashboard.
View performance: This widget will show the performance of the plant in regards to treatment quality and will display the following KPIs:
a. Test compliance: Compliance percentage of plant with regards to the treatment quality and its comparison to state level compliance percentage.
b. Last treatment quality result - Pass/fail and date of the test.
c. Count of alerts raised in the past 30 days.
d. Distribution of alerts based on the alert category.
Go back to the Landing page using the back button.
A help button is available for the user to get a guided view of the page. This is available on every page.
View List of Upcoming Tests
On clicking on inbox, the user is redirected to the list of upcoming tests. This will show only a list of lab tests. The user can perform the following tasks:
Total count of upcoming tests are displayed beside the inbox in brackets.
View list of upcoming tests. The following will be the fields displayed:
Total count of upcoming tests are displayed beside the inbox in brackets.
View list of upcoming tests. The following will be the fields displayed:
a. Test ID.
b. Treatment process (in case there is only 1 treatment process for the plant, this field will not be displayed).
c. Stage: This will display the process stage where the sample is to be collected from.
d. Output type: Biosolids/effluents.
e. Pending date: This is the test date as per schedule.
f. Status: status of the test.
g. SLA: Show difference between test due date and today.
An action item available based on the next status in the workflow will be displayed:
a. For test results in the scheduled stage, update status will be displayed.
b. For tests in the pending results stage, update results will be displayed.
Filter tests: On clicking on filter, a pop-up will be displayed:
a. The following filters are available:
Treatment process: (In case there is only 1 treatment process for the plant, this field will not be displayed). This will be a dropdown showing the values for treatment processes configured for the plant. The selected treatment process is displayed here on selection. If not, the field is left blank.
Output type: This will be a dropdown showing values for output types configured for the plant. The selected output type is displayed here on selection. If not, the field is left blank.
Status: This will be a dropdown showing values for the status in the treatment quality workflow. The selected status is displayed here on selection. If not, the field is left blank.
Date range: Selection of date range (calendar view): Selected date range is displayed here on selection. If not, the field is left blank.
b. On selecting values for the filters above, a user can click on filter to filter the inbox.
c. To clear filters, a user can click on clear all.
d. To close the pop-up, a user can click on the cross on the top right hand corner of the screen.
Sort: On clicking on sort, a pop-up will be displayed:
a. Tests can be sorted by the pending date:
Date (Latest first)
Date (Latest Last)
b. On selecting values for sort above, the user can click on sort to sort the inbox.
c. To clear sort, a user can click on clear all.
d. To close the pop-up, a user can click on the cross on the top right hand corner of the screen.
Go back to the landing page using the back button.
A help button is available for the user to get a guided view of the page. This is available on every page.
View Test Details
Test Details can be viewed by the user in 2 ways:
Via the pending tasks.
Via inbox.
View Test Details Via Pending Tasks
The list of pending tasks can be accessed via the landing page for TQM. This will show the list of tests pending within the next [X] days.
The next action item in the task workflow will be displayed as a button beside a pending task for a user to take prompt action. On clicking on the button, the user will be redirected to the test details page.
View Test Details Via Inbox
A list of tests can be accessed on the inbox. An action item is available based on the next status in the workflow will be displayed:
For test results in the scheduled stage, the update status will be displayed.
For tests in the pending results stage, the update results will be displayed.
On clicking on the action item, the user will be redirected to the test details page.
The test details page will consist of 2 cards:
The first card will display the following fields:
Test ID
Treatment Process
Stage
Output Type
Pending Date
Status
Parameters to be tested along with their unit of measurement
SLA (This will be displayed in Red/green basis SLA. If today>Pending date, this is red, If today<pending date, then green).
The second card will be based on the test status:
For tests in status ‘Scheduled’, the user will be asked to select a lab.
For tests in status “Pending Results”, the user will be asked to add test results
The user can go back using the back button - The redirection will be based on the page the user has accessed the test details page from. A help button is available for the user to get a guided view of the page. This is available on every page.
Update Tests
Tests can be updated by the user from the test details page. The test details page will display the next action item for the user based on the workflow test. For tests with the wWorkflow status ‘Scheduled’, the user will be prompted to confirm if sample has been submitted to the lab for testing.
The user can perform the following actions:
Select a lab from a dropdown list configured in the MDMS.
Update status of the test. The button will be deactivated if Lab is not selected, and will only be activated once selection is made. Once the user clicks on update status, he/she is redirected back to the page from which test details were accessed and a snack bar confirms the status update and the action Item button shows updated next step.
In case an update of status fails, the user will remain on the same page and a failure message will be displayed to the user.
For tests with the workflow status “Pending Status”, the user will be prompted to fill test results.
The user can perform the following actions:
Update parameter readings (mandatory fields) The following validations will be applied:
a. Only numerical values will be viewable here. In case of non numerical values, the following error message is displayed “Only numeric values allowed. Please input in the required format”.
Attach documents (non-mandatory): The following validations will be applied:
a. Only files in the following formats will be supported: .png, .jpg. .pdf. In case a file of unsupported format is selected, the following error will be displayed “The file type is not supported. Please upload in the following formats: .pdf, .png, .jpg”.
b. File size of maximum X mb allowed. In case file size is larger than permitted value, the following error will be displayed “The file size is too large. Please upload a file below x mbs”.
Submit test results by clicking on the ‘Submit’ button. The button will be deactivated if all is not selected, and will only be activated once selection is made. On clicking the submit button, a pop-up will be displayed to the user to confirm submission.
The following actions will be made available to the user:
Confirm submission by clicking on the ‘Submit’ button.
Go back to the test details page by clicking on the “Go back” button.
On clicking the submit button and failure to submit test results, the user will remain on the same page and a failure message will be displayed.
On clicking the submit button and successful submission of the test results, the user will be redirected to the summary page and a snack bar will confirm the submission.
At this stage, the user will be displayed the summary of test results and whether it has passed/failed based on a comparison between the values entered by the user and the benchmarks. In case all values are as per the benchmarks, the test results will be displayed as ‘Pass’. All values will be shown in green and the user receives feedback that all results are as per benchmarks. The user can go back to the home page by clicking on the ‘Back’ button.
In case one or more values are not as per the benchmarks, the test results will be displayed as ‘Fail’. All values as per benchmarks will be shown in green. Values not as per the benchmarks are shown in red. The user is provided with information that the test results are not as per benchmark. The user can go back to the Home page by clicking on the ‘Back’ button.
View Past Test Results
Past test results (both IoT and Lab) can be viewed via the TQM landing page and by clicking on past tests.
On clicking on past tests, the user is redirected to the list of past tests.
The user can perform the following tasks:
View the list of past tests. The following will be the fields displayed:
a. Test ID.
b. Treatment process (in case there is only 1 treatment process for the plant, this field will not be displayed).
c. Stage: This will display the process stage where the sample is to be collected from.
d. Output type: Biosolids/effluents
e. Pending date: This is the test date as per schedule.
f. Test result: Pass/fail.
2. View test details: The user can view test details by clicking on “View Results” button on each card.
Filter tests: On clicking on Filter, a pop-up will be displayed. The following filters are available:
i. Treatment process: (in case there is only 1 treatment process for the plant, this field will not be displayed). This will be a dropdown showing values for Treatment Processes configured for the plant. The selected treatment process is displayed here on selection. If not, the field is left blank.
ii. Output type: This will be a dropdown showing values for the output types configured for the plant. The selected output type is displayed here on selection. If not, the field is left blank.
iii. Test type: This will be a dropdown showing values for the test type (IoT/Lab). The selected test type is displayed here on selection. If not, the field is left blank.
iv. Date range: The selection of date range (calendar view) - The selected date range is displayed here on selection. If not, the field is left blank.
On selecting values for filters above, the user can click on filter to filter the inbox. To clear filters, the user can click on clear all. To close the pop-up, a user can click on the cross on the top right hand corner of the screen. On selection of the filter, the selected filter is displayed on the screen. On clicking the cross button near the displayed filter, the filter is removed.
Sort: On clicking on sort, a pop-up will be displayed:
a. Tests can be sorted by the pending date:
Date (Latest first)
Date (Latest last)
b. On selecting values for sort above, the user can click on sort to sort the inbox.
c. To clear sort, the user can click on clear all.
d. To close the pop-up, the user can click on the cross on the top right hand corner of the screen.
In case filters/sort/search is applied and the user navigates to the test details page, on going back, the values of the filters/sort/search should remain the same.
The user can download the list of tests, filtered by selection in Excel and PDF format.
Go back to the Landing page using the back button.
A help button is available for the user to get a guided view of the page. This is available on every page.
On clicking the “View Results” button, the user will be redirected to the test summary page.
The page will have 2 cards:
The first card will display the following fields:
Test ID.
Treatment Process.
Stage.
Output Type.
Test Type.
Lab Name/Device ID: This will show Lab Name/Device ID based on the Test type.
Test submitted on.
Test Results: Pass/Fail.
The second card will display the following fields:
Parameters, their unit of measurement and the values of the parameters recorded. The values will be read/green basis whether they are as per benchmarks or not.
The user can go back to the list of tests by clicking on the ‘Back’ button, both on the top and bottom of the page.
View IoT Readings
IoT readings can be viewed via the TQM landing page and clicking on view IoT readings.
On clicking on View IoT readings, the user is redirected to the view tests page filter on test type: IoT.
The functionality of the page remains the same as the “View Past Tests” page.
Sensor Monitoring
Sensor monitoring can be accessed by clicking on the sensor monitoring link on the TQM landing page.
On clicking on sensor monitoring, the list of IoT devices are displayed.
The following details are displayed on the page:
Total number of IoT devices is displayed beside the page heading in brackets.
A card is available for each device. The following details will be displayed:
- Device ID.
- Treatment Process.
- Stage.
- Output Type.
- Last Calibrated Date.
- Device Status.
- Verification Status.
- Last Verification Date.
- Parameters that the device monitors.
The user can perform the following actions:
Filter devices: On clicking on filter, a pop-up will be displayed.
a. The following filters are available:
i. Treatment process: (in case there is only 1 treatment process for the plant, this field will not be displayed). This will be a dropdown showing values for the treatment processes configured for the plant. The selected treatment process is displayed here on selection. If not, the field is left blank.
ii. Output type: This will be a dropdown showing values for the output types configured for the plant. The selected output type is displayed here on selection. If not, the field is left blank.
iii. Device status: This will be a radio button showing active/inactive
iv. Parameters: This will be a multi-select displaying all parameters configured on the backend.
b. On selecting values for filters above, the user can click on filter to filter the inbox.
c. To clear filters, the user can click on clear all.
d. To close the pop up, the user can click on the cross on the top right hand corner of the screen.
e. On selection of the filter, the selected filter is displayed on the screen. On clicking the cross button near the displayed filter, the filter is removed.
Search: On clicking on search, a pop-up will be displayed.
a. The user can search a device by device ID. Part search to be enabled.
View Dashboard
Dashboards can be accessed by clicking on the “View Dashboards” link on the TQM landing page.
Navigation:
On landing on the dashboard, the user can navigate across the treatment process types to view the dashboard specific to the treatment process type.
Filter:
Date range: Users should be able to filter based on the date range basis which dashboard is to be filtered.
Other functionalities:
Share:
Users should be able to share a filtered dashboard over WhatsApp in an image format.
Users should be able to share filtered charts/tables over WhatsApp in an image format.
Download:
Users should be able to download the filtered dashboard in PDF and image formats.
Users should be able to download filtered charts/tables in PDF and image formats.
Metrics:
Total incoming sludge: The sum of the total sludge that is disposed of at the plant for the selected time period.
Number of trips: A count of the total incoming vehicles at the treatment plant for the selected time period.
Overall quality: The number of tests where all parameters are as per the benchmarks as compared to the total number of test results recorded.
Compliance percentage: The percentage of tests where results have been recorded.
Total alerts: A count of the total alerts raised of the following types: Test results not as per the benchmark, no reading from the IoT device, and lab results and IoT results not matching.
Treatment Quality Overview:
KPIs:
Total tests - A count of the total tests for the filtered date range.
A count of tests that have passed treatment quality.
A count of tests that have failed the treatment quality.
Table:
Heading - Name of the plant.
Table displaying the following fields:
a. Stage, output type, value of parameters, and compliance percentage.
b. Button to view the trends for a particular stage.
Toggle to toggle between IoT readings and lab results.
Trends of parameter readings:
This chart will be available once the user clicks on the view trend button in the table button.
The table shows the trend for one parameter over time, and provides a view of the benchmark for comparison. A toggle is available to navigate between the parameters. Detailed metric details for the Treatment Quality Monitoring dashboard are viewable below:
Section Heading
Chart Heading
Subheading
Definitions ((This will appear on the dashboard whenever a user hovers on the metric wherever applicable))
Chart Type
X-Axis
Y-Axis
Value
Columns
How to calculate
Boundary
Dtill down/Toggle
Comparsion KPIs, if any
Show comparison in
Specific to State/ULB/ TRP/all
Tooltip on Hover on Data Point
Input Fields
1
Input
Total Incoming Sludge
NA
Total Incoming sludge from registered and unregistered vehicles
KPI
NA
NA
Total Incoming Sludge
NA
Total incoming sludge = (Volume of Waste Disposed for Registered Vehicles) + (Volume of Waste Disposed for Unregistered Vehicles)
State, Plant ULB
NA
NA
NA
NA
2
Input
# incoming trips
NA
Number of trips disposed at the Treatment plant
KPI
NA
NA
Count of Trips to the Treatment plant from registered and unregistered vehicles
NA
Number of trips disposed = Count(DISTINCT Trip ID)
State, Plant ULB
NA
NA
NA
NA
3
Treatment Quality
Overall Quality
NA
% of tests where all parameters are as per benchmarks
KPI
NA
NA
% of test results meeting benchmarks
NA
Overall Quality = (Number of tests where all parameters meet benchmarks / Total number of tests) * 100
State, Plant ULB
NA
NA
NA
NA
4
Treatment Quality
Compliance
NA
% of tests where results have been recorded
KPI
NA
NA
% of tests with Status as submitted out of total tests
Compliance % = (Count of Test ID in status 'Submitted' / Count (Distinct Trip ID) * 100
State, Plant ULB
NA
NA
NA
NA
5
Alerts
Total Alerts
NA
Total Alerts raised by the system in the following categories: 1) Test Results not as per benchmark 2) No reading from IoT device 3) Lab results and IoT results not matching
KPI
NA
NA
Total Alerts
Count(DISTINCT AlertID)
State, Plant ULB
NA
NA
NA
NA
6
Treatment Quality Plants
Total Plants
NA
NA
NA
NA
NA
Count of Plants
Count (Distinct PlantID)
State, Plant ULB
NA
NA
NA
NA
7
Treatment Quality Plants
Treatment Quality Passed
NA
Treatment quality is considered passed if all parameters of both Biosolids and Effluents are as per benchmarks for the output of the Treatment Process in the last test recorded.
NA
NA
NA
Count of Plants with Treatment Quality Passed
Treatment Quality for Output type =IF(COUNTIF(All Parameters Meet Benchmarks, FALSE) = 0, "Treatment Quality for Output type passed ", "Treatment Quality for Output type failed") Treatment Quality for Plant passed = =IF(COUNTIF(Treatment Quality for Output type, FALSE) = 0, " Treatment Quality Passed ", "Treatment Quality Failed")
State, Plant ULB
NA
NA
NA
NA
8
Treatment Quality Plants
Treatment Quality Failed
NA
Treatment quality is considered failed when 1 or more parameters of Biosolids or Effluents are not as per benchmarks for the output of the Treatment Process in the last test recorded.
NA
NA
NA
Count of Plants with Treatment Quality Failed
Count (Distinct PlantID) - Treatment Quality Passed
State, Plant ULB
NA
NA
NA
NA
9
Treatment Quality Plants
NA
NA
NA
Map
NA
NA
Point = Geolocation of Plant Plant Icon Colour - Green if Treatment Quality Passed, Red if Treatment Quality Failed
Same as 7 and 8
State, Plant ULB
NA
NA
NA
NA
Name of Plant
10
Treatment Quality Plants
NA
NA
NA
Table
NA
NA
NA
Plant Name, Test Result, Compliance %
Test Result Same as S.No 7 and S.No 8
State, Plant ULB
NA
NA
NA
NA
11
Treatment Quality Plants
NA
NA
NA
Table
NA
NA
NA
Stage, Output Type, Parameters 1...n, Compliance %
Mentioned above
State, Plant ULB
NA
Compliance %
% from last month
NA
12
Trend in [Parameter Name] Readings
NA
NA
NA
Multi-Line Chart
Test Dates
Parameter Value
- Value of Device Reading - Value of Lab results
NA
NA
Plant
NA
NA
NA
NA
Date Lab result - X Device Reading - Y
A card for Treatment Quality Monitoring will be made available on the landing page of the employee.
The treatment quality contain the following:
a. An overview of the total pending tests and how many are nearing SLA.
b. View upcoming tests using the inbox. The inbox will show a count of upcoming tests beside in brackets.
c. View past test results: Past results from both lab and IoT devices will be displayed here.
d. View IoT readings: The user can access the record of IoT readings here.
e. Sensor monitoring: The user can access a list of IoT devices along with their status here.
f. View dashboard: The user will be directed to the treatment quality dashboard.
Clicking on each of these links will take the user to the specific page.
Notifications: This will show the list of alerts regarding TQM. Currently, this will display the tests that have crossed SLA for greater than 7 days. The user can view the details of the test by clicking on the “View Details” button. The user can dismiss the notification by clicking on the cross button.
Rest of the functionality will remain the same as the current ULB employee landing page.
View List of Upcoming Tests
On clicking on Inbox, the user is redirected to the list of upcoming tests. This will show only a list of lab tests. The user can perform the following tasks:
The total count of upcoming tests are displayed beside the inbox in brackets.
View a list of upcoming tests. The list of upcoming tests will be sorted by the pending date, where the test with the highest SLA is displayed first. The following fields will be displayed:
a. Test ID
b. Plant Name
c. Treatment Process
d. Pending Date: This is the test date as per schedule
e. Status: Status of the test
f. SLA: Show difference between test due date and today. This will be displayed in red if test due date<today and in green if today>test due date.
The user can view test details by clicking on the test ID.
Filter tests: Filters are displayed on the left hand panel of the screen. The following filters are available:
i. Treatment process: This will be multi-select showing values for the treatment processes configured for the ULB. The selected treatment process will be displayed as a tick on the multi-select box. If not, it is left blank.
ii. Stages: This will be a dropdown showing values for stages configured for the plant. The selected stage is displayed here on selection. If not, the field is left blank.
iii. Status: This will be a multi-select showing values for the status in the treatment quality workflow.
On selecting values for filters above, the user can click on filter to filter the inbox. To clear filters, the user can click on the refresh icon on the top right of the filter panel.
Sort: Tests can be sorted by the pending date by clicking on the date column.
Search:
a. Tests can be searched using the following:
i. Test ID.
ii. Plant Name.
b. Part search to be enabled for both.
c. Users can fill either test ID or plant or both and click on the search button.
d. Users can clear search by clicking on the clear search link.
In case filters/sort/search is applied and the user navigates to the test details page, on going back, the values of the filters/sort/search should remain the same.
Redirecting to other links in the TQM module: Users can redirect to other pages in the TQM module via the links provided on the top left of the page. The following links will be displayed:
a. View Past Results
b. View IoT Results
c. Sensor Monitoring
d. View Dashboard
View Test Details
A test details page can be accessed by clicking on the test ID in the inbox. The test details page will consist of the following fields:
The following information will be displayed. In case the information on any field is not available such as the lab name/value against parameters based on the status of the test, the value against the fields will be displayed as “To be Updated”
- Test ID
- Plant Name
- Treatment Process
- Stage
- Output Type
- Test Type
- Test Scheduled on
- Status
- Lab Name
- Sample submitted on
- Test results submitted on
- SLA (This will be displayed in red/green based on the SLA. If today>pending date, this is red, If today<pending date, then green for open tests. For closed tests, SLA will be displayed).
- Table containing the following details:
i. S.No
ii. Parameter
iii. UoM
iv. Benchmark
v. Value Recorded - The value will be displayed in red/green based on comparison to the benchmark
vi. Overall Test results - Pass/Fail
- Attached documents, if any. The user should be able to view the document by clicking on the document icon. No icon will be present if documents are not attached.
- Test Timeline
The user can go back using the breadcrumbs of the page.
The user can download the test report by clicking on the 'Download' button.
View Past Test Results
Past test results (both IoT and Lab) can be viewed via the TQM landing page and clicking on past tests.
On clicking on past test results, the user is redirected to the list of past tests.
The user can perform the following tasks:
View the list of past tests. The results will be sorted on the test date. The following will be the fields displayed:
a. Test ID
b. Plant
c. Treatment Process (in case the there is only 1 treatment process for the plant, this field will not be displayed).
d. Test Type
e. Test Date: This is the date the test results are updated
f. Test Result: Pass/Fail
View test details: The user can view test details by clicking on the “Test ID” link in each row.
Search tests: The user can search based on the following:
i Test ID: Input text field, part search should be enabled.
ii. Plant: Dropdown of list of plants in the ULB.
iii. Treatment process: Dropdown of list oftTreatment Process in the ULB.
iv. Test type: This will be a dropdown showing values for the test type (IoT/Lab). The selected test type is displayed here on selection. If not, the field is left blank.
v. Date range: Selection of date range (calendar view): The selected date range is displayed here on selection. If not, the field is left blank.
On selecting values for search above, the user can click on search to filter the inbox. To clear search and view all past tests, the user can click on “Clear Search”.
Sort: Tests can be sorted by the pending date by clicking on the date column.
In case filters/sort/search is applied and the user navigates to the test details page, on going back, the values of the filters/sort/search should remain the same.
Download test results in Excel and PDF formats using the download button.
The user can go back using the breadcrumbs on the top of the page. In case the user has navigated to the test details page from the past test results list, on clicking back, the user should be redirected to the test details page.
On clicking on any test ID button, the user will be redirected to the test details page (same as redirection from the inbox).
View IoT Readings
IoT readings can be viewed via the TQM landing page and clicking on “View IoT Reading”.
On clicking on IoT readings, the user is redirected to the list of past tests, with the search on test type selected as IoT and the results filtered for IoT readings only. All other functionality will remain the same.
Sensor Monitoring
The list of devices can be viewed via the TQM landing page and by clicking on ‘Sensor Monitoring’’.
On clicking on sensor monitoring, the user is redirected to the list of devices.
The user can perform the following:
View total devices: The total number of IoT devices is displayed beside the page heading in brackets.
A row is available for each device. The following details will be displayed:
- Device ID
- Plant
- Treatment Process
- Stage
- Output Type
- Device Status
- Parameters: One or multiple parameters that the device is monitoring.
The user can perform the following actions:
a. Search Devices: On clicking on the filter, a pop up will be displayed. The following filters are available:
Device ID: Part search should be available here.
Plant: Dropdown based on plants configured in the MDMS.
Treatment process: Dropdown-based on the treatment process type.
Stage: Dropdown-based stage of selected treatment process.
Output type: This will be a drop down showing values for Output types configured for the plant.
Device status: Dropdown contains active/Inactive as options.
b. On selecting values for filters above, the user can click on Search to filter the inbox.
c. To clear search, the user can click on clear all.
Record Test Result
Since actors such as PCB might conduct adhoc tests, a provision will be provided to the user to record test results without a schedule. A user can record test results by clicking on the “Add Test Result” link on the card.
Clicking on the “Add Test Result” button will redirect the user to the “Add Test Result” page.
The following fields need to be entered by the user:
Plant Name: This is a dropdown based on the list of plants available in the system. For a state level user, this should display all plants in the state. For a ULB, it should also display the names tagged to the ULB.
Treatment Process: This is a dropdown based on the list of treatment processes in the plant selected.
Treatment Stage: This is a dropdown based on the list of stages in the treatment process selected.
Output Type: This is a dropdown based on the output types available in the stage
Values against parameters. Atlease 1 parameter needs to be filled for the submit button to be enabled. If no parameter is filled and the user clicks on the submit button, an error message is displayed as a snack bar.
Attachments, if any.
Once the user clicks on the Submit button, the test results page is displayed.
This is the same as the “View Test Results” page with the following changes:
TesttType will be displayed as Lab.
Status, lab name and SLA field are not displayed.
Workflow will not be displayed.
The user can go back to the “Add Test Results” page via the breadcrumbs.
The TQM Dashboard will be made available to both the ULB employee and the state employee, and can be accessed by clicking on the dashboard link on the landing page.
On clicking on the dashboard, the user is directed to the dashboard view.
The access to data in the dashboard will be based on the following roles:
ULB admin will be able to view the dashboard for all plants in the ULB.
A state admin will be able to view the dashboard for all plants in the ULB.
Navigation:
On landing on the dashboard, the user can navigate across the treatment process types to view the dashboard specific to the treatment process type.
Filters:
Date range: Users should be able to filter based on the date range.
ULB: Users should be able to filter based on the ULB. For a ULB employee, the ULB is auto-selected to the ULB the plant and employee is tagged to. For a state user, all ULBs are available.
Plant: Users should be able to filter based on the plant. For ULB employees, plants tagged to the ULB to which the employee belongs should be available in the dropdown. For state users, all plants are available.
Other functionalities:
Share:
- Users should be able to share a filtered dashboard over WhatsApp in an image format.
- Users should be able to share filtered charts/tables over WhatsApp in an image format.
Download:
- Users should be able to download the filtered dashboard in PDF and image formats.
- Users should be able to download the filtered charts/tables in PDF and image formats.
Metrics
Overall KPIs:
The dashboard will display the following KPIs:
Total incoming sludge: The sum of the total sludge that is disposed of at the plant for the selected time period.
Number of trips: A count of total incoming vehicles at the treatment plant for the selected time period.
Overall quality: The number of tests where all parameters are as per benchmarks as compared to the total number of test results recorded.
Compliance percentage: The percentage of tests where results have been recorded
Total alerts: A Count of total alerts raised of the following types: Test results not as per benchmark, the number reading from IoT device, and lab results and IoT results not matching.
Treatment quality overview:
KPIs:
Total plants - A count of the unique plants for the particular treatment process.
Count of plants who have passed the treatment quality as per the last recorded test.
Count of plants who have failed the treatment quality as per the last recorded test.
Treatment quality is said to have passed if all parameters for final output(s) of a treatment process are as per benchmarks. Treatment quality is said to have failed if 1 or more parameters for final output(s) of a treatment process is not as per benchmarks.
Map:
A map view of the location of each plant will be displayed as part of the dashboard. Plants here will be colour coded, based on whether it has passed/failed the treatment quality. (Red = failed, Green = passed).
Table:
A table will be available to plant-wise details of test results (pass/fail), and the compliance percentage. This will be as per the last test result. The user will also be able to see a change in compliance percentage compared to the last month. A drilldown will be made available for a plant via this table. For TRP users and ULBs, where only 1 plant is tagged for the process type, the drilled table is automatically visible.
On drilldown, the following is viewable to the user:
Heading - Name of plant.
Table displaying the following fields:
a. Stage, output type, value of parameters, and compliance percentage.
b. Button to view the trends for a particular stage.
Toggle to toggle between IoT readings and lab results.The selected test type will appear highlighted.
If there are multiple process flows, then the user can switch between process flows by using the buttons. The selected process flow will appear highlighted.
Trends of parameter readings:
This chart will be available once the user clicks on the view trend button in the table button.
The table shows the trend for one parameter over time and provides a view of the benchmark for comparison. A toggle is available to navigate between parameters.
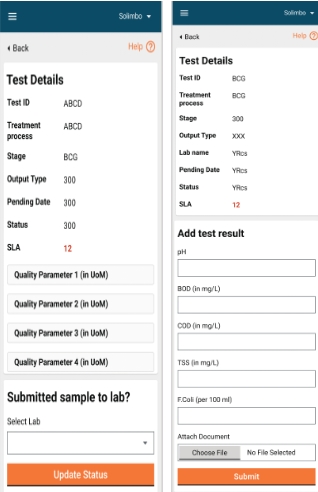
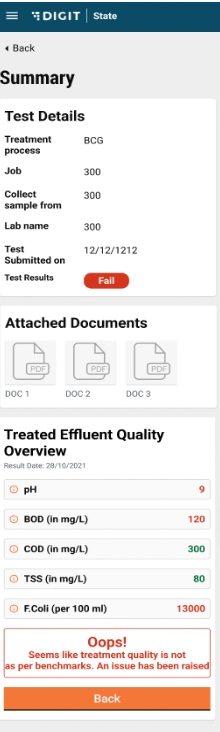
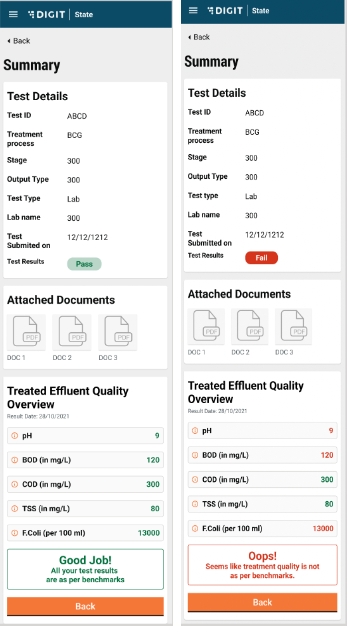
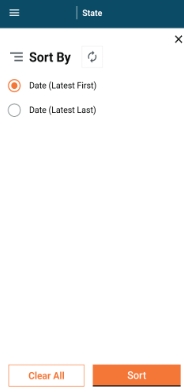
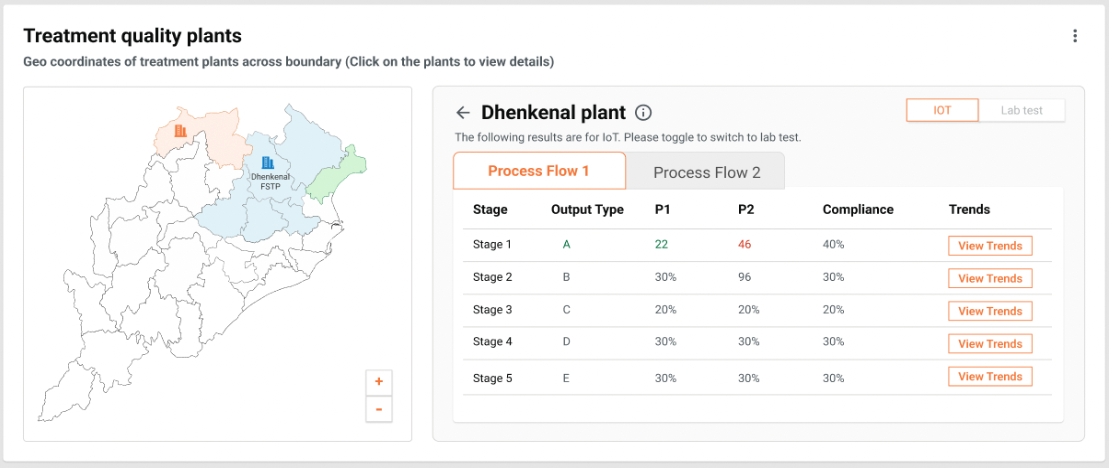
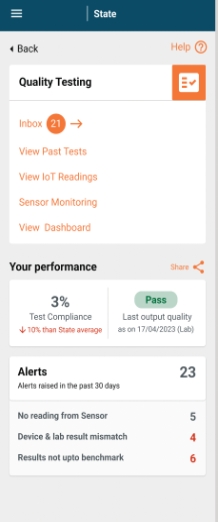

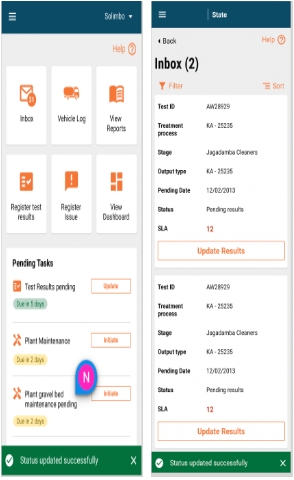
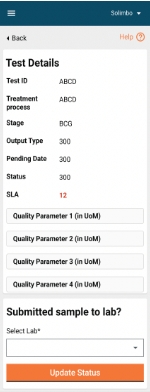
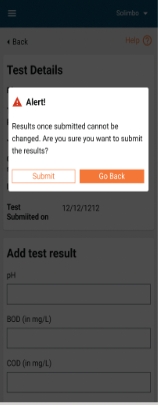
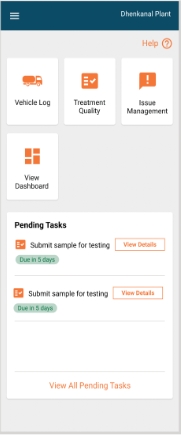
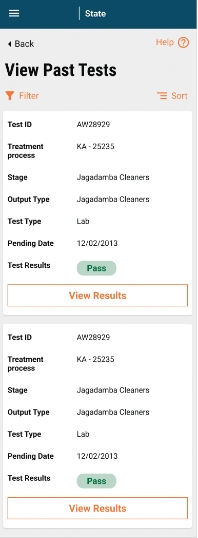
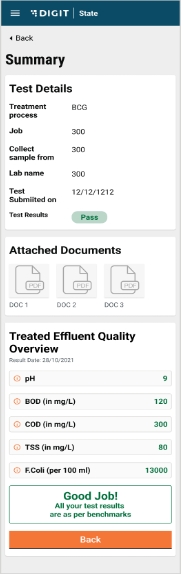


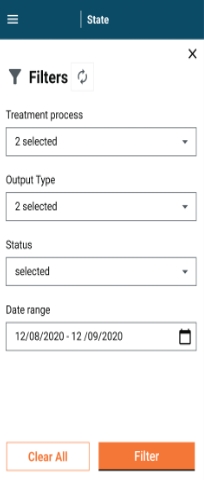
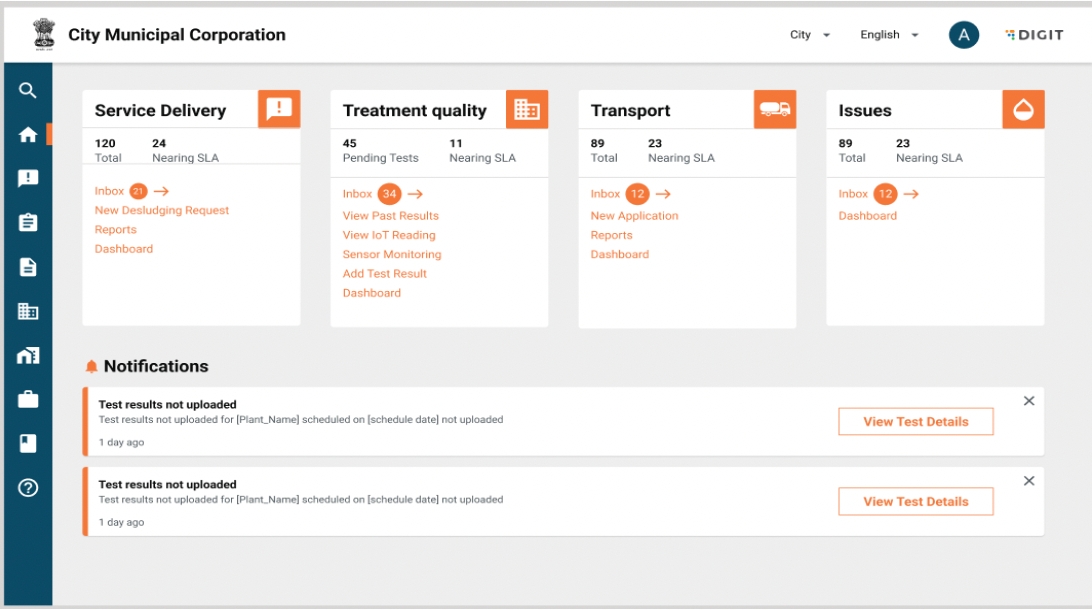
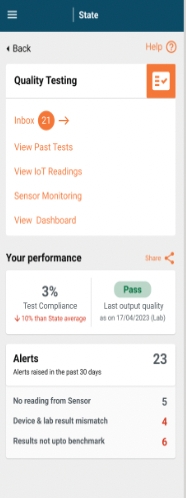
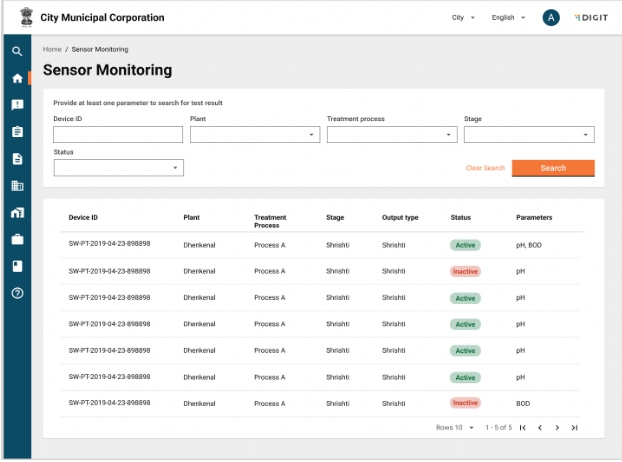
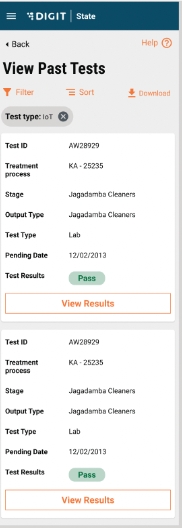
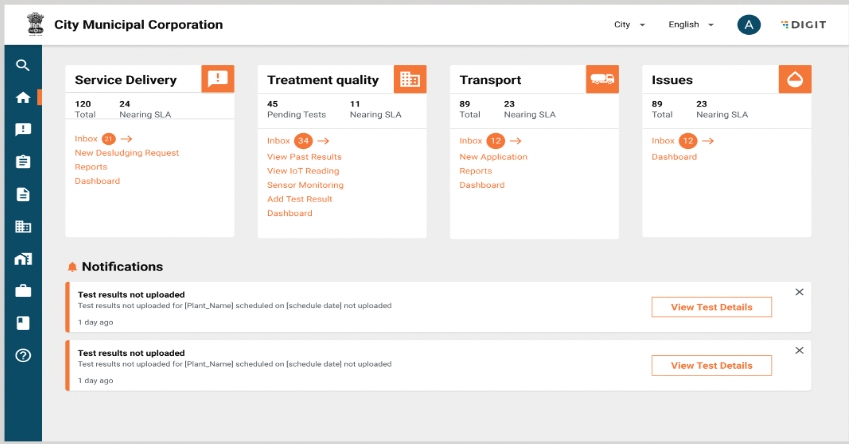
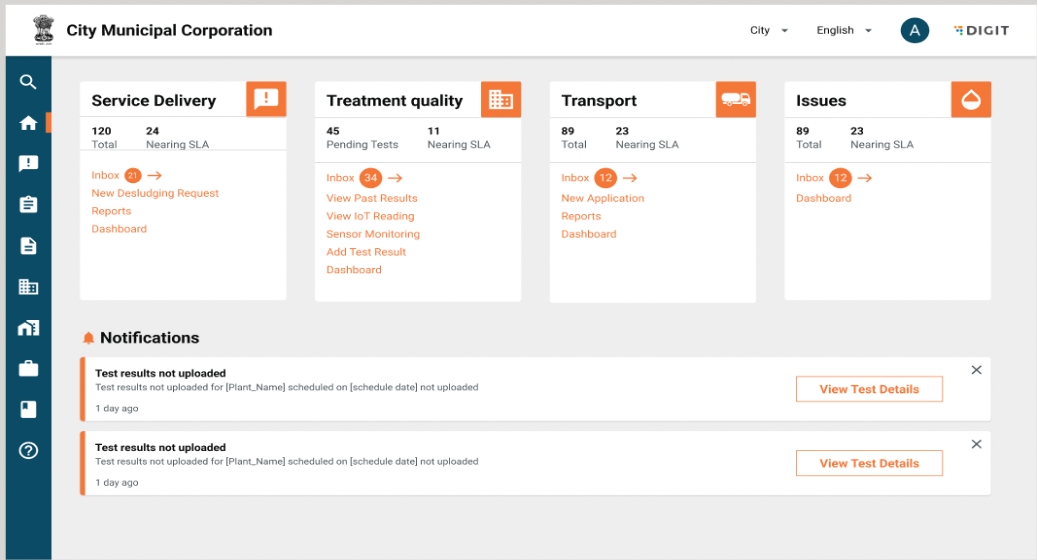
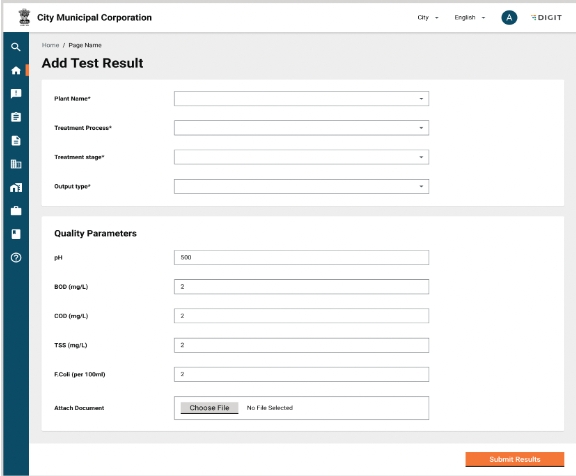
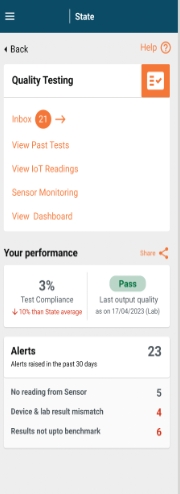
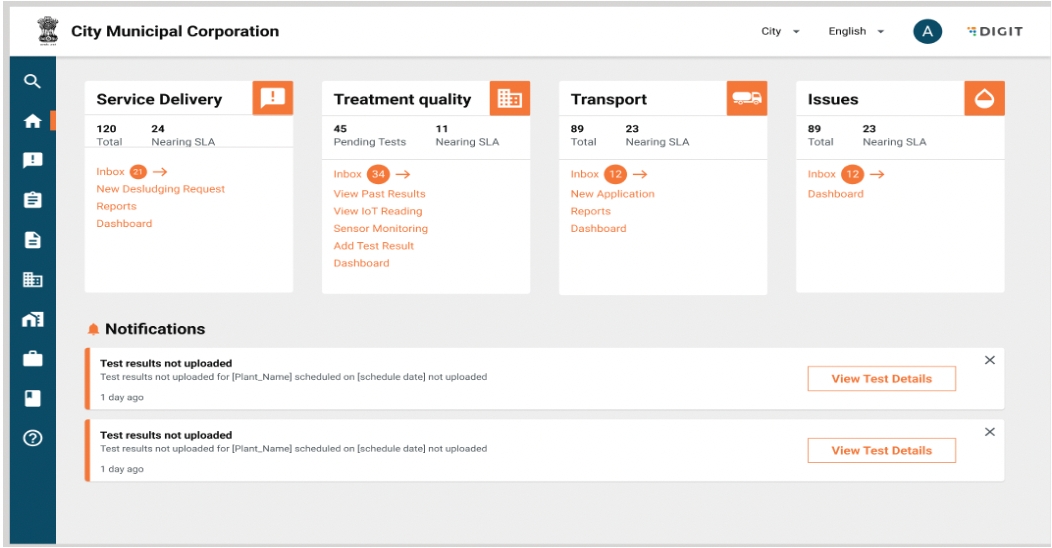
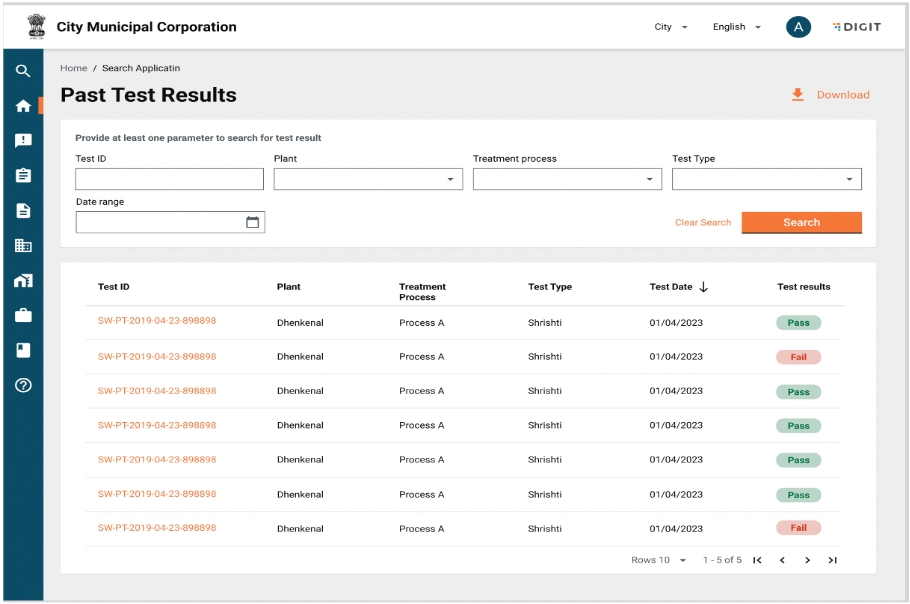

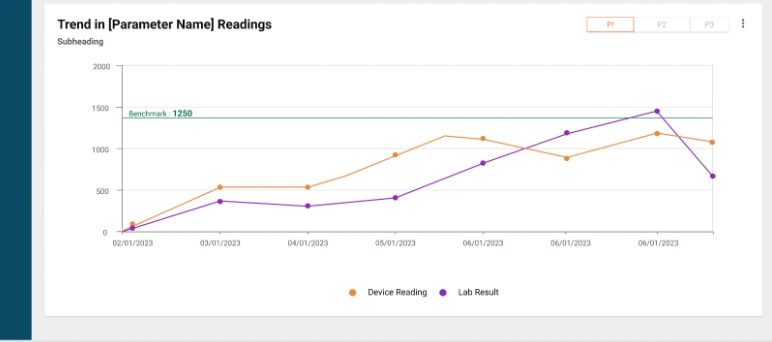
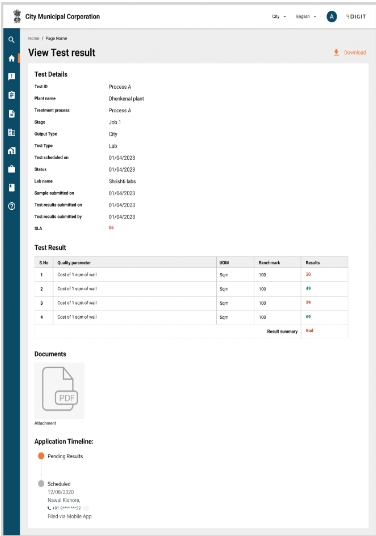
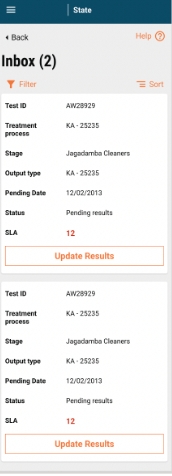
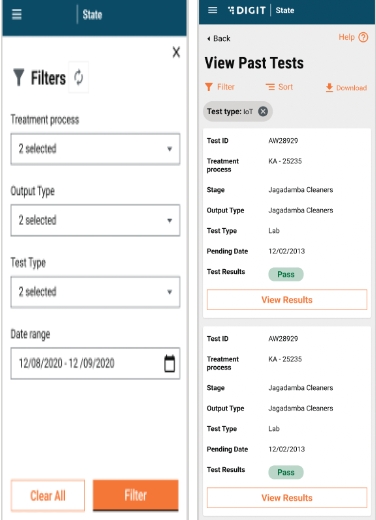
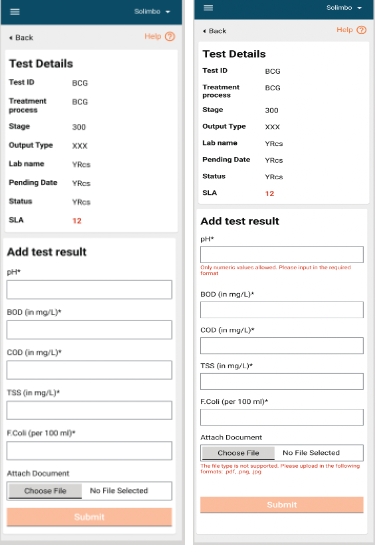
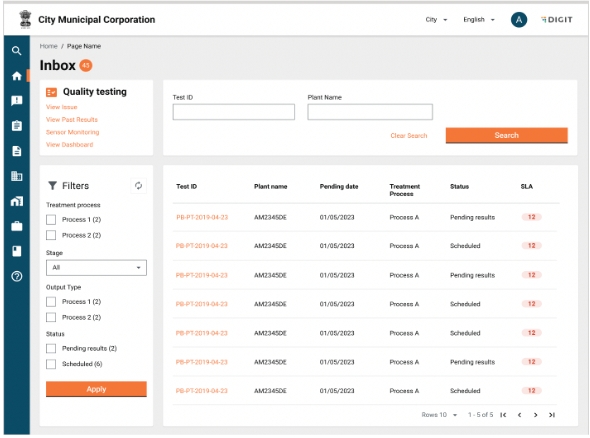
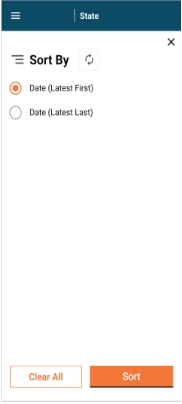
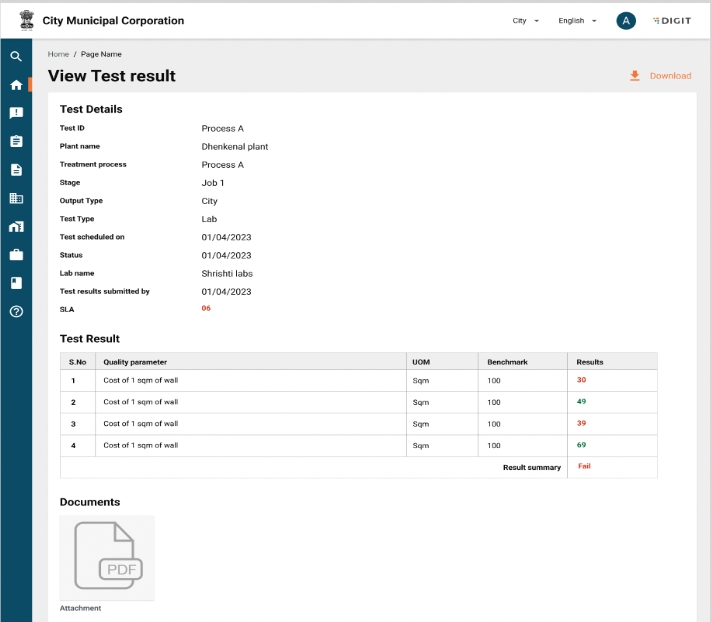
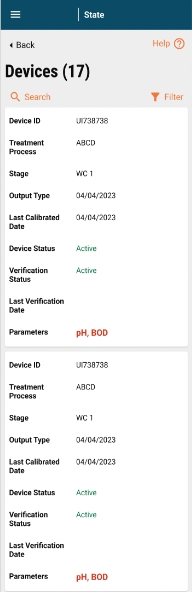
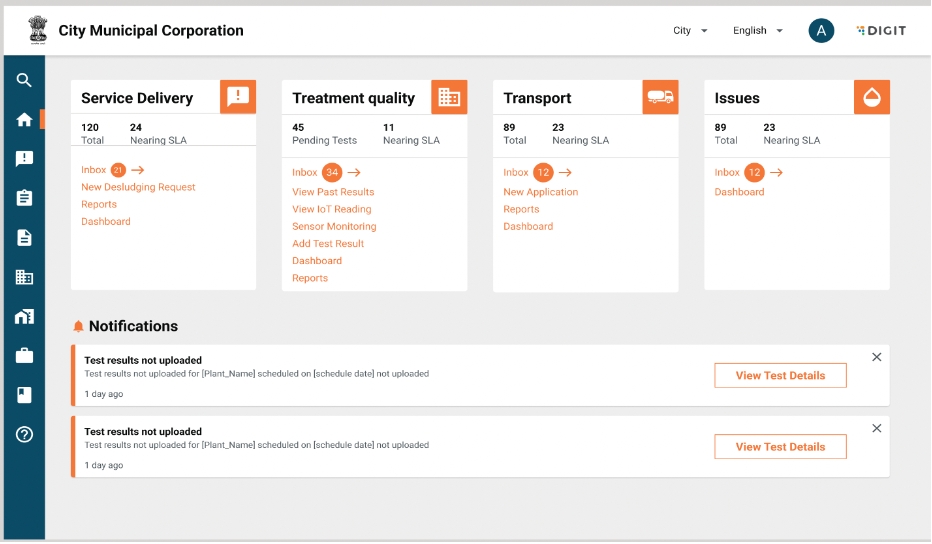
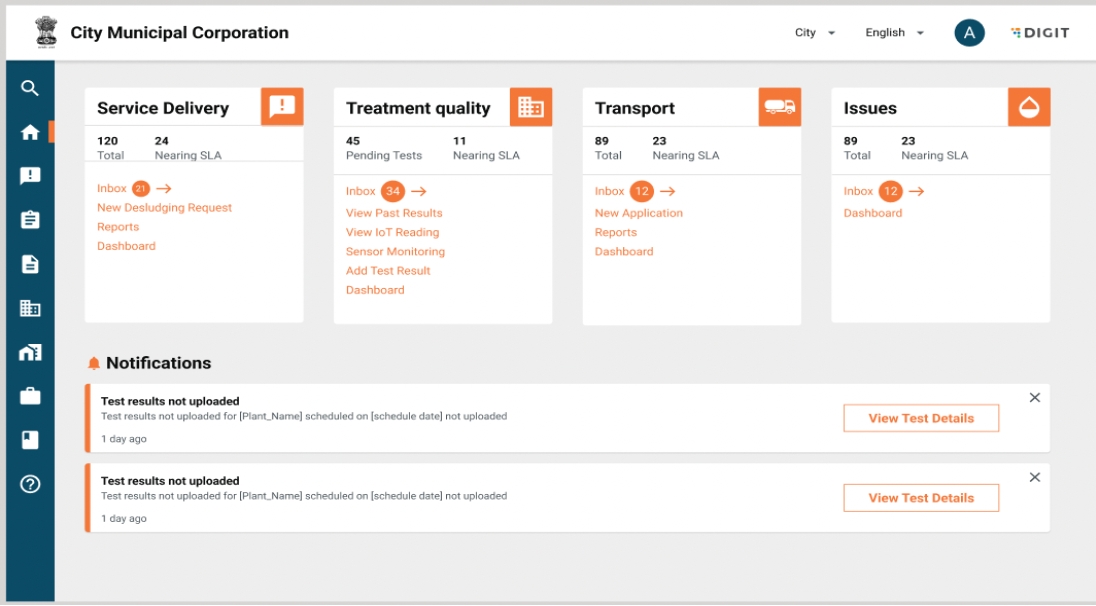
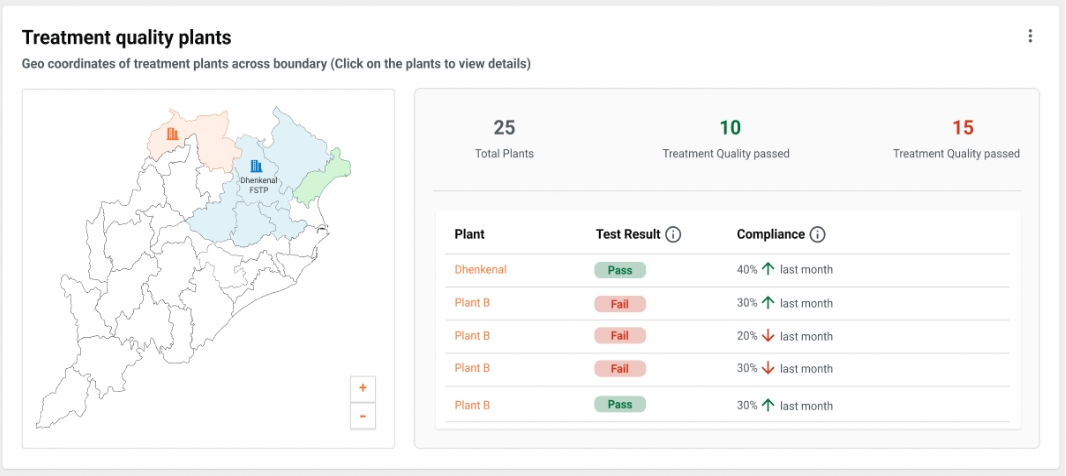
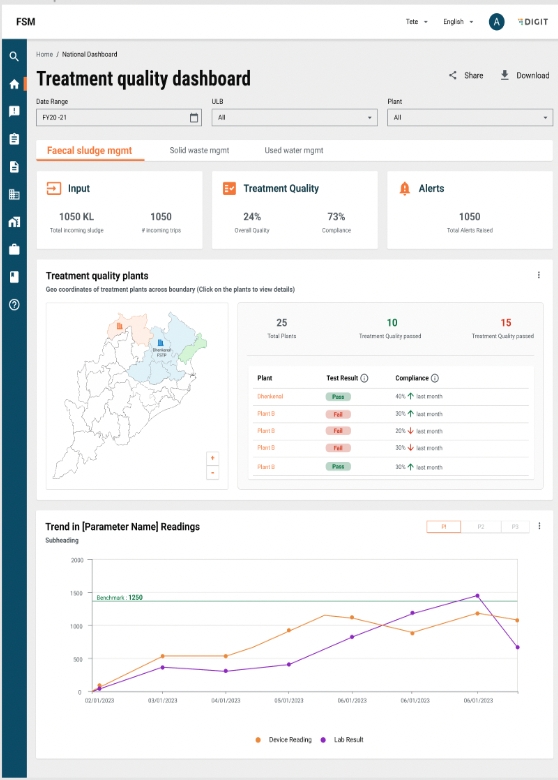
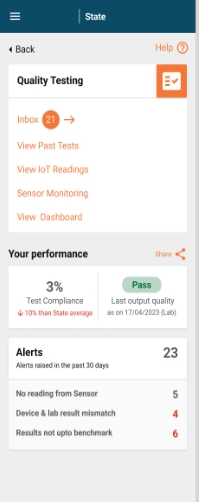
DSS has two sides to it: One being the process in which the data is pooled to ElasticSearch, and the other being the way it is fetched, aggregated, computed, transformed and sent across. As this revolves around a variety of data sets, there is a need for making this configurable so that, if a new scenario is introduced, then it is a configuration away from getting the newly-introduced scenario involved in this flow of process.
This document explains the steps on how to define the configurations for the analytics side of DSS for FSM.
Analytics: Micro-service that is responsible for building, fetching, aggregating, and computing the data on ElasticSearch to a consumable data response, which will be later used for visualisations and graphical representations.
Analytics contains multiple configurations. We need to add the changes related to FSM in this dashboard-analytics. Here is the location: configs/egov-dss-dashboards/dashboard-analytics at qa · egovernments/configs Below is a list of configurations that need to be changed to run FSM successfully.
Chart API Configuration
Master Dashboard Configuration
Role Dashboard Mappings Configuration
Chart API Configuration
Each visualisation has its own properties, and comes from different data sources (sometimes it is a combination of different data sources).
In order to configure each visualisation and their properties, we have a chart API configuration document. In this, the visualisation code, which happens to be the key, will have its properties configured as a part of configuration, and are easily changeable.
Here is the sample ChartApiConfiguration.json data for FSM.
"fsmTotalrequest": {
"chartName": "DSS_FSM_TOTAL_REQUESTS",
"queries": [
{
"module": "FSM",
"indexName": "fsm",
"aggrQuery": "{\"aggs\":{\"AGGR\":{\"filter\":{\"bool\":{\"must_not\":[{\"term\":{\"Data.fsm.tenantId.keyword\":\"pb.testing\"}}]}},\"aggs\":{\"Total Application\":{\"value_count\":{\"field\":\"Data.fsm.@timestamp\"}}}}}}",
"requestQueryMap": "{\"wardId\" : \"Data.ward.name.keyword\", \"tenantId\" : \"Data.tenantData.code\" , \"district\" : \"Data.tenantData.city.districtCode\"}",
"dateRefField": "Data.fsm.@timestamp"
}
],
"chartType": "metric",
"valueType": "number",
"action": "",
"drillChart": "none",
"aggregationPaths": [
"Total Application"
],
"insight": {
"chartResponseMap" : "totalApplication",
"action" : "differenceOfNumbers",
"upwardIndicator" : "positive",
"downwardIndicator" : "negative",
"textMessage" : "$indicator$value% than last $insightInterval",
"colorCode" : "#228B22",
"insightInterval" : "year",
"isRoundOff": true
},
"_comment": " FSM Total Applications"
},
"totalSludgeTreated": {
"chartName": "DSS_FSM_TOTAL_SLUDGE_TREATED",
"queries": [
{
"module": "FSM",
"indexName": "vehicletrip",
"aggrQuery": "{\"aggs\":{\"AGGR\":{\"filter\":{\"bool\":{\"must_not\":[{\"term\":{\"Data.vehicleTrip.tenantId.keyword\":\"pb.testing\"}}]}},\"aggs\":{\"Total Sludge Collection\":{\"sum\":{\"script\":{\"source\":\"(doc['Data.vehicleTrip.volumeCarried'].value)/1000.0\"}}}}}}}",
"requestQueryMap": "{\"wardId\" : \"Data.ward.name.keyword\", \"tenantId\" : \"Data.tenantData.code\" , \"district\" : \"Data.tenantData.city.districtCode\"}",
"dateRefField": "Data.vehicleTrip.@timestamp"
}
],
"chartType": "metric",
"valueType": "number",
"action": "",
"drillChart": "none",
"aggregationPaths": [
"Total Sludge Collection"
],
"insight": {
"chartResponseMap" : "totalSludgeTreated",
"action" : "differenceOfNumbers",
"upwardIndicator" : "positive",
"downwardIndicator" : "negative",
"textMessage" : "$indicator$value% than last $insightInterval",
"colorCode" : "#228B22",
"insightInterval" : "year",
"isRoundOff": true
},
"_comment": " FSM Total Sludge Treated"
},
"avgFSMCostRequest": {
"chartName": "DSS_FSM_AVG_FSM_COST_OR_REQ",
"queries": [
{
"module": "FSM",
"indexName": "fsm",
"aggrQuery": "{\"aggs\":{\"AGGR\":{\"filter\":{\"bool\":{\"must_not\":[{\"term\":{\"Data.tenantId.keyword\":\"pb.testing\"}}],\"must\":[{\"term\":{\"Data.payments.paymentDetails.businessService.keyword\":\"FSM.TRIP_CHARGES\"}}]}},\"aggs\":{\"Average Collection\":{\"avg\":{\"field\":\"Data.payments.paymentDetails.bill.billDetails.amountPaid\"}}}}}}",
"requestQueryMap": "{\"wardId\" : \"Data.ward.name.keyword\", \"tenantId\" : \"Data.tenantData.code\" , \"district\" : \"Data.tenantData.city.districtCode\"}",
"dateRefField": "Data.fsm.@timestamp"
}
],
"chartType": "metric",
"valueType": "amount",
"action": "",
"drillChart": "none",
"isRoundOff": true,
"aggregationPaths": [
"Average Collection"
],
"insight": {
"chartResponseMap" : "averageCollection",
"action" : "differenceOfNumbers",
"upwardIndicator" : "positive",
"downwardIndicator" : "negative",
"textMessage" : "$indicator$value% than last $insightInterval",
"colorCode" : "#228B22",
"insightInterval" : "year",
"isRoundOff": true
},
"_comment": " FSM Average Collection"
},
"totalCollectioninLacs": {
"chartName": "DSS_FSM_TOTAL_COLLECTION",
"queries": [
{
"module": "FSM",
"indexName": "fsm",
"aggrQuery": "{\"aggs\":{\"AGGR\":{\"filter\":{\"bool\":{\"must_not\":[{\"term\":{\"Data.tenantId.keyword\":\"pb.testing\"}}],\"must\":[{\"term\":{\"Data.payments.paymentDetails.businessService.keyword\":\"FSM.TRIP_CHARGES\"}}]}},\"aggs\":{\"Total Collection\":{\"sum\":{\"field\":\"Data.payments.paymentDetails.bill.billDetails.amountPaid\"}}}}}}",
"requestQueryMap": "{\"wardId\" : \"Data.ward.name.keyword\", \"tenantId\" : \"Data.tenantData.code\" , \"district\" : \"Data.tenantData.city.districtCode\"}",
"dateRefField": "Data.fsm.@timestamp"
}
],
"chartType": "metric",
"valueType": "amount",
"action": "",
"drillChart": "none",
"documentType": "_doc",
"aggregationPaths": [
"Total Collection"
],
"insight": {
"chartResponseMap" : "totalCollection",
"action" : "differenceOfNumbers",
"upwardIndicator" : "positive",
"downwardIndicator" : "negative",
"textMessage" : "$indicator$value% than last $insightInterval",
"colorCode" : "#228B22",
"insightInterval" : "year",
"isRoundOff": true
},
"_comment": " FSM Total Collection"
},
"slaCompliance": {
"chartName": "DSS_FSM_SLA_COMPLIANCE",
"queries": [
{
"module": "FSM",
"indexName": "fsm",
"aggrQuery": "{\"aggs\":{\"AGGR\":{\"filter\":{\"bool\":{\"must_not\":[{\"term\":{\"Data.service.tenantId.keyword\":\"pb.testing\"}}]}},\"aggs\":{\"Closed With In Sla\":{\"filter\":{\"bool\":{\"must\":[{\"terms\":{\"Data.fsm.applicationStatus.keyword\":[\"COMPLETED\",\"CITIZEN_FEEDBACK_PENDING\"]}},{\"script\":{\"script\":{\"source\":\"doc['Data.fsm.auditDetails.lastModifiedTime'].value - doc['Data.fsm.auditDetails.createdTime'].value < params.threshold\",\"lang\":\"painless\",\"params\":{\"threshold\":172800000}}}}]}},\"aggs\":{\"count\":{\"terms\":{\"field\":\"Data.fsm.tenantId.keyword\"},\"aggs\":{\"tenant_count\":{\"value_count\":{\"field\":\"Data.fsm.tenantId.keyword\"}}}}}},\"Total Applications\":{\"terms\":{\"field\":\"Data.fsm.tenantId.keyword\"},\"aggs\":{\"tenant_count\":{\"value_count\":{\"field\":\"Data.fsm.tenantId.keyword\"}}}}}}}}",
"requestQueryMap": "{\"wardId\" : \"Data.ward.name.keyword\", \"tenantId\" : \"Data.tenantData.code\" , \"district\" : \"Data.tenantData.city.districtCode\"}",
"dateRefField": "Data.fsm.@timestamp"
}
],
"chartType": "metric",
"valueType": "percentage",
"drillChart": "none",
"documentType": "_doc",
"action": "percentage",
"isRoundOff": true,
"aggregationPaths": [
"Closed With In Sla",
"Total Applications"
],
"insight": {
"chartResponseMap" : "slaCompliance",
"action" : "differenceOfNumbers",
"upwardIndicator" : "positive",
"downwardIndicator" : "negative",
"textMessage" : "$indicator$value% than last $insightInterval",
"colorCode" : "#228B22",
"insightInterval" : "year",
"isRoundOff": true
},
"_comment": " SLA Compliance"
},
"citizenAvgRating": {
"chartName": "DSS_FSM_CITIZEN_AVG_RATING",
"queries": [
{
"module": "FSM",
"indexName": "fsm",
"aggrQuery": "{\"aggs\":{\"AGGR\":{\"filter\":{\"bool\":{\"must_not\":[{\"term\":{\"Data.fsm.tenantId.keyword\":\"pb.testing\"}}],\"must\":[{\"terms\":{\"Data.fsm.applicationStatus.keyword\":[\"COMPLETED\"]}},{\"term\":{\"Data.history.action.keyword\":\"RATE\"}},{\"exists\":{\"field\":\"Data.history\"}},{\"range\":{\"Data.history.rating\":{\"gte\":1}}}]}},\"aggs\":{\"Citizen Average Rating\":{\"avg\":{\"script\":\"int sum = 0;int count =0;if(params['_source']['Data']['history']!=null){ for (item in params['_source']['Data']['history']) {if(item.rating!=null){ sum += item.rating;} }} return sum;\"}}}}}}",
"requestQueryMap": "{\"wardId\" : \"Data.ward.name.keyword\", \"tenantId\" : \"Data.tenantData.code\" , \"district\" : \"Data.tenantData.city.districtCode\"}",
"dateRefField": "Data.fsm.@timestamp"
}
],
"chartType": "metric",
"valueType": "number",
"action": "",
"drillChart": "none",
"documentType": "_doc",
"aggregationPaths": [
"Citizen Average Rating"
],
"postAggregationTheory": "",
"insight": {},
"_comment": " Citizen Average rating"
},
"fsmCollectionByUsageType": {
"chartName": "DSS_FSM_COLLECTION_BY_USAGE_TYPE",
"queries": [
{
"module": "FSM",
"dateRefField": "Data.fsm.@timestamp",
"requestQueryMap": "{\"wardId\" : \"Data.ward.name.keyword\", \"tenantId\" : \"Data.tenantData.code\" , \"district\" : \"Data.tenantData.city.districtCode\"}",
"indexName": "fsm",
"aggrQuery": "{\"aggs\":{\"AGGR\":{\"filter\":{\"bool\":{\"must_not\":[{\"term\":{\"Data.fsm.tenantId.keyword\":\"pb.testing\"}}]}},\"aggs\":{\"Usage Type\":{\"terms\":{\"field\":\"Data.fsm.propertyUsage.keyword\"},\"aggs\":{\"Assessed Properties\":{\"sum\":{\"field\":\"Data.payments.paymentDetails.bill.billDetails.amountPaid\"}}}}}}}}"
}
],
"chartType": "pie",
"valueType": "amount",
"action": "",
"documentType": "_doc",
"drillChart": "none",
"aggregationPaths": [
"Usage Type"
],
"insight": {
},
"_comment": " "
},
"fsmTotalCumulativeCollection": {
"chartName": "DSS_FSM_TOTAL_CUMULATIVE_COLLECTION",
"queries": [
{
"module": "FSM",
"dateRefField": "Data.fsm.@timestamp",
"requestQueryMap": "{\"wardId\" : \"Data.ward.name.keyword\", \"tenantId\" : \"Data.tenantData.code\" , \"district\" : \"Data.tenantData.city.districtCode\"}",
"indexName": "fsm",
"aggrQuery": "{\"aggs\":{\"AGGR\":{\"filter\":{\"bool\":{\"must_not\":[{\"term\":{\"Data.fsm.tenantId.keyword\":\"pb.testing\"}}]}},\"aggs\":{\"Total Collection\":{\"date_histogram\":{\"field\":\"Data.fsm.@timestamp\",\"interval\":\"intervalvalue\"},\"aggs\":{\"Count\":{\"sum\":{\"field\":\"Data.payments.paymentDetails.bill.billDetails.amountPaid\"}}}}}}}}"
}
],
"chartType": "line",
"valueType": "amount",
"action": "",
"drillChart": "none",
"documentType": "_doc",
"aggregationPaths": [
"Total Collection"
],
"isCumulative": true,
"interval": "month",
"insight": {
},
"_comment": " "
},
"fsmTopUlbByPerformance": {
"chartName": "DSS_FSM_TOP_ULB_BY_PERFORMANCE",
"queries": [
{
"module": "FSM",
"dateRefField": "Data.fsm.@timestamp",
"requestQueryMap": "{\"wardId\" : \"Data.ward.name.keyword\", \"tenantId\" : \"Data.tenantData.code\" , \"district\" : \"Data.tenantData.city.districtCode\"}",
"indexName": "fsm",
"aggrQuery": "{\"aggs\":{\"AGGR\":{\"filter\":{\"bool\":{\"must_not\":[{\"term\":{\"Data.fsm.tenantId.keyword\":\"pb.testing\"}}]}},\"aggs\":{\"Closed With In Sla\":{\"filter\":{\"bool\":{\"must\":[{\"terms\":{\"Data.fsm.applicationStatus.keyword\":[\"COMPLETED\",\"CITIZEN_FEEDBACK_PENDING\"]}},{\"script\":{\"script\":{\"source\":\"doc['Data.fsm.auditDetails.lastModifiedTime'].value - doc['Data.fsm.auditDetails.createdTime'].value < params.threshold\",\"lang\":\"painless\",\"params\":{\"threshold\":172800000}}}}]}},\"aggs\":{\"count\":{\"terms\":{\"field\":\"Data.fsm.tenantId.keyword\"},\"aggs\":{\"tenant_count\":{\"value_count\":{\"field\":\"Data.fsm.tenantId.keyword\"}}}}}},\"Total Applications\":{\"terms\":{\"field\":\"Data.fsm.tenantId.keyword\"},\"aggs\":{\"tenant_count\":{\"value_count\":{\"field\":\"Data.fsm.tenantId.keyword\"}}}}}}}}"
}
],
"chartType": "perform",
"valueType": "percentage",
"drillChart": "none",
"documentType": "_doc",
"drillChart": "ulbTopDrillChart",
"action": "percentage",
"plotLabel": "DSS_COMPLETION_RATE",
"isRoundOff": true,
"order": "desc",
"limit": 3,
"aggregationPaths": [
"Closed With In Sla",
"Total Applications"
],
"isCumulative": false,
"interval": "month",
"insight": {
},
"_comment": ""
},
"ulbTopDrillChart": {
"chartName": "DSS_FSM_ULB_PERFORMANCE",
"queries": [
{
"module": "FSM",
"dateRefField": "Data.fsm.@timestamp",
"requestQueryMap": "{\"wardId\" : \"Data.ward.name.keyword\", \"tenantId\" : \"Data.tenantData.code\" , \"district\" : \"Data.tenantData.city.districtCode\"}",
"indexName": "fsm",
"aggrQuery": "{\"aggs\":{\"AGGR\":{\"filter\":{\"bool\":{\"must_not\":[{\"term\":{\"data.fsm.tenantId.keyword\":\"pb.testing\"}}]}},\"aggs\":{\"ULB\":{\"terms\":{\"field\":\"Data.fsm.tenantId.keyword\",\"size\":1000,\"order\":{\"_count\":\"desc\"}},\"aggs\":{\"TotalRequests\":{\"value_count\":{\"field\":\"Data.fsm.tenantId.keyword\"}},\"ClosedWithInSLA\":{\"filter\":{\"bool\":{\"must\":[{\"terms\":{\"Data.fsm.applicationStatus.keyword\":[\"COMPLETED\",\"CITIZEN_FEEDBACK_PENDING\"]}},{\"script\":{\"script\":{\"source\":\"doc['Data.fsm.auditDetails.lastModifiedTime'].value - doc['Data.fsm.auditDetails.createdTime'].value < params.threshold\",\"lang\":\"painless\",\"params\":{\"threshold\":172800000}}}}]}},\"aggs\":{\"valueCount\":{\"value_count\":{\"field\":\"Data.fsm.tenantId.keyword\"}}}},\"ClosedOutsideSLA\":{\"filter\":{\"bool\":{\"must\":[{\"terms\":{\"Data.fsm.applicationStatus.keyword\":[\"COMPLETED\",\"CITIZEN_FEEDBACK_PENDING\"]}},{\"script\":{\"script\":{\"source\":\"doc['Data.fsm.auditDetails.lastModifiedTime'].value - doc['Data.fsm.auditDetails.createdTime'].value > params.threshold\",\"lang\":\"painless\",\"params\":{\"threshold\":172800000}}}}]}},\"aggs\":{\"valueCount\":{\"value_count\":{\"field\":\"Data.fsm.tenantId.keyword\"}}}},\"CitizenAverageRating\":{\"filter\":{\"bool\":{\"must\":[{\"terms\":{\"Data.fsm.applicationStatus.keyword\":[\"COMPLETED\"]}},{\"term\":{\"Data.history.action.keyword\":\"RATE\"}},{\"exists\":{\"field\":\"Data.history\"}},{\"range\":{\"Data.history.rating\":{\"gte\":1}}}]}},\"aggs\":{\"CitizenAvgRating\":{\"avg\":{\"script\":\"int sum = 0;int count =0;if(params['_source']['Data']['history']!=null){ for (item in params['_source']['Data']['history']) {if(item.rating!=null){ sum += item.rating;} }} return sum;\"}}}}}}}}}}"
}
],
"filterKeys": [
{"key": "tenantId", "column": "ULB"}
],
"isPostResponseHandler": true,
"chartType": "table",
"valueType": "number",
"action": "",
"documentType": "_doc",
"drillChart": "none",
"plotLabel":"ULB",
"aggregationPaths": [
"TotalRequests",
"ClosedWithInSLA",
"ClosedOutsideSLA",
"CitizenAverageRating"
],
"pathDataTypeMapping": [
{
"TotalRequests" : "number"
},
{
"ClosedWithInSLA" : "number"
},
{
"ClosedOutsideSLA" : "number"
},
{
"CitizenAverageRating" : "number"
}
],
"isCumulative": true,
"interval": "month",
"insight": {
},
"_comment": " "
},
"fsmBottomUlbByPerformance": {
"chartName": "DSS_FSM_BOTTOM_ULB_BY_PERFORMANCE",
"queries": [
{
"module": "FSM",
"dateRefField": "Data.fsm.@timestamp",
"requestQueryMap": "{\"wardId\" : \"Data.ward.name.keyword\", \"tenantId\" : \"Data.tenantData.code\" , \"district\" : \"Data.tenantData.city.districtCode\"}",
"indexName": "fsm",
"aggrQuery": "{\"aggs\":{\"AGGR\":{\"filter\":{\"bool\":{\"must_not\":[{\"term\":{\"Data.fsm.tenantId.keyword\":\"pb.testing\"}}]}},\"aggs\":{\"Closed With In Sla\":{\"filter\":{\"bool\":{\"must\":[{\"terms\":{\"Data.fsm.applicationStatus.keyword\":[\"COMPLETED\",\"CITIZEN_FEEDBACK_PENDING\"]}},{\"script\":{\"script\":{\"source\":\"doc['Data.fsm.auditDetails.lastModifiedTime'].value - doc['Data.fsm.auditDetails.createdTime'].value < params.threshold\",\"lang\":\"painless\",\"params\":{\"threshold\":172800000}}}}]}},\"aggs\":{\"count\":{\"terms\":{\"field\":\"Data.fsm.tenantId.keyword\"},\"aggs\":{\"tenant_count\":{\"value_count\":{\"field\":\"Data.fsm.tenantId.keyword\"}}}}}},\"Total Applications\":{\"terms\":{\"field\":\"Data.fsm.tenantId.keyword\"},\"aggs\":{\"tenant_count\":{\"value_count\":{\"field\":\"Data.fsm.tenantId.keyword\"}}}}}}}}"
}
],
"chartType": "perform",
"valueType": "percentage",
"drillChart": "none",
"documentType": "_doc",
"drillChart": "ulbBottomDrillChart",
"action": "percentage",
"isRoundOff": true,
"plotLabel": "DSS_COMPLETION_RATE",
"order": "asc",
"limit": 3,
"aggregationPaths": [
"Closed With In Sla",
"Total Applications"
],
"isCumulative": false,
"interval": "month",
"insight": {
},
"_comment": ""
},
"ulbBottomDrillChart": {
"chartName": "DSS_FSM_ULB_PERFORMANCE",
"queries": [
{
"module": "FSM",
"dateRefField": "Data.fsm.@timestamp",
"requestQueryMap": "{\"wardId\" : \"Data.ward.name.keyword\", \"tenantId\" : \"Data.tenantData.code\" , \"district\" : \"Data.tenantData.city.districtCode\"}",
"indexName": "fsm",
"aggrQuery": "{\"aggs\":{\"AGGR\":{\"filter\":{\"bool\":{\"must_not\":[{\"term\":{\"data.fsm.tenantId.keyword\":\"pb.testing\"}}]}},\"aggs\":{\"ULB\":{\"terms\":{\"field\":\"Data.fsm.tenantId.keyword\",\"size\":1000,\"order\":{\"_count\":\"asc\"}},\"aggs\":{\"TotalRequests\":{\"value_count\":{\"field\":\"Data.fsm.tenantId.keyword\"}},\"ClosedWithInSLA\":{\"filter\":{\"bool\":{\"must\":[{\"terms\":{\"Data.fsm.applicationStatus.keyword\":[\"COMPLETED\",\"CITIZEN_FEEDBACK_PENDING\"]}},{\"script\":{\"script\":{\"source\":\"doc['Data.fsm.auditDetails.lastModifiedTime'].value - doc['Data.fsm.auditDetails.createdTime'].value < params.threshold\",\"lang\":\"painless\",\"params\":{\"threshold\":172800000}}}}]}},\"aggs\":{\"valueCount\":{\"value_count\":{\"field\":\"Data.fsm.tenantId.keyword\"}}}},\"ClosedOutsideSLA\":{\"filter\":{\"bool\":{\"must\":[{\"terms\":{\"Data.fsm.applicationStatus.keyword\":[\"COMPLETED\",\"CITIZEN_FEEDBACK_PENDING\"]}},{\"script\":{\"script\":{\"source\":\"doc['Data.fsm.auditDetails.lastModifiedTime'].value - doc['Data.fsm.auditDetails.createdTime'].value > params.threshold\",\"lang\":\"painless\",\"params\":{\"threshold\":172800000}}}}]}},\"aggs\":{\"valueCount\":{\"value_count\":{\"field\":\"Data.fsm.tenantId.keyword\"}}}},\"CitizenAverageRating\":{\"filter\":{\"bool\":{\"must\":[{\"terms\":{\"Data.fsm.applicationStatus.keyword\":[\"COMPLETED\"]}},{\"term\":{\"Data.history.action.keyword\":\"RATE\"}},{\"exists\":{\"field\":\"Data.history\"}},{\"range\":{\"Data.history.rating\":{\"gte\":1}}}]}},\"aggs\":{\"CitizenAvgRating\":{\"avg\":{\"script\":\"int sum = 0;int count =0;if(params['_source']['Data']['history']!=null){ for (item in params['_source']['Data']['history']) {if(item.rating!=null){ sum += item.rating;} }} return sum;\"}}}}}}}}}}"
}
],
"filterKeys": [
{"key": "tenantId", "column": "ULB"}
],
"isPostResponseHandler": true,
"chartType": "table",
"valueType": "number",
"action": "",
"documentType": "_doc",
"drillChart": "none",
"plotLabel":"ULB",
"aggregationPaths": [
"TotalRequests",
"ClosedWithInSLA",
"ClosedOutsideSLA",
"CitizenAverageRating"
],
"pathDataTypeMapping": [
{
"TotalRequests" : "number"
},
{
"ClosedWithInSLA" : "number"
},
{
"ClosedOutsideSLA" : "number"
},
{
"CitizenAverageRating" : "number"
}
],
"isCumulative": true,
"interval": "month",
"insight": {
},
"_comment": " "
},
"fsmCapacityUtilization": {
"chartName": "DSS_FSTP_CAPACITY_UTILIZATION",
"queries": [
{
"module": "FSM",
"dateRefField": "Data.vehicleTrip.@timestamp",
"requestQueryMap": "{\"wardId\" : \"Data.ward.name.keyword\", \"tenantId\" : \"Data.tenantData.code\" , \"district\" : \"Data.tenantData.city.districtCode\"}",
"indexName": "vehicletrip",
"aggrQuery": "{\"aggs\":{\"AGGR\":{\"filter\":{\"bool\":{\"must_not\":[{\"term\":{\"Data.vehicleTrip.tenantId.keyword\":\"pb.testing\"}}]}},\"aggs\":{\"Capacity Utilization\":{\"date_histogram\":{\"field\":\"Data.vehicleTrip.@timestamp\",\"interval\":\"month\"},\"aggs\":{\"Count\":{\"sum\":{\"script\":{\"source\":\"(doc['Data.vehicleTrip.volumeCarried'].value)/1000.0\"}}}}}}}}}"
}
],
"chartType": "line",
"valueType": "amount",
"action": "",
"isRoundOff": true,
"documentType": "_doc",
"drillChart": "none",
"aggregationPaths": [
"Capacity Utilization"
],
"isCumulative": true,
"interval": "month",
"insight": {
},
"_comment": " "
},
"fsmMonthlyWasteCal": {
"chartName": "DSS_FSM_MONTHLY_WASTE_CAL",
"queries": [
{
"module": "FSM",
"dateRefField": "Data.vehicleTrip.@timestamp",
"requestQueryMap": "{\"wardId\" : \"Data.ward.name.keyword\", \"tenantId\" : \"Data.tenantData.code\" , \"district\" : \"Data.tenantData.city.districtCode\"}",
"indexName": "vehicletrip",
"aggrQuery": "{\"aggs\":{\"AGGR\":{\"filter\":{\"bool\":{\"must_not\":[{\"term\":{\"Data.vehicleTrip.tenantId.keyword\":\"pb.testing\"}}]}},\"aggs\":{\"Septage Dumped At Plant\":{\"date_histogram\":{\"field\":\"Data.vehicleTrip.@timestamp\",\"interval\":\"month\"},\"aggs\":{\"Count\":{\"sum\":{\"script\":{\"source\":\"(doc['Data.vehicleTrip.volumeCarried'].value)/1000.0\"}}}}},\"Septage Collected\":{\"date_histogram\":{\"field\":\"Data.vehicleTrip.@timestamp\",\"interval\":\"month\"},\"aggs\":{\"Count\":{\"sum\":{\"script\":{\"source\":\"(doc['Data.vehicleTrip.tripDetails.volume'].value)/1000.0\"}}}}}}}}}"
}
],
"chartType": "line",
"valueType": "number",
"action": "",
"isRoundOff": true,
"documentType": "_doc",
"drillChart": "none",
"aggregationPaths": [
"Septage Collected",
"Septage Dumped At Plant"
],
"isCumulative": false,
"interval": "month",
"insight": {
},
"_comment": " "
},
"fsmTopDsoByPerformance": {
"chartName": "DSS_FSM_TOP_DSO_BY_PERFORMANCE",
"queries": [
{
"module": "FSM",
"dateRefField": "Data.fsm.@timestamp",
"requestQueryMap": "{\"wardId\" : \"Data.ward.name.keyword\", \"tenantId\" : \"Data.tenantData.code\" , \"district\" : \"Data.tenantData.city.districtCode\"}",
"indexName": "fsm",
"aggrQuery": "{\"aggs\":{\"AGGR\":{\"filter\":{\"bool\":{\"must_not\":[{\"term\":{\"Data.fsm.tenantId.keyword\":\"pb.testing\"}}]}},\"aggs\":{\"Raised\":{\"terms\":{\"field\":\"Data.vendor.name.keyword\",\"size\":3,\"order\":{\"_count\":\"desc\"}},\"aggs\":{\"Count\":{\"value_count\":{\"field\":\"Data.vendor.name.keyword\"}}}},\"Closed Within SLA\":{\"terms\":{\"field\":\"Data.vendor.name.keyword\",\"size\":3,\"order\":{\"_count\":\"desc\"}},\"aggs\":{\"Count\":{\"filter\":{\"bool\":{\"must\":[{\"terms\":{\"Data.fsm.applicationStatus.keyword\":[\"COMPLETED\",\"CITIZEN_FEEDBACK_PENDING\"]}},{\"script\":{\"script\":{\"source\":\"doc['Data.fsm.auditDetails.lastModifiedTime'].value - doc['Data.fsm.auditDetails.createdTime'].value < params.threshold\",\"lang\":\"painless\",\"params\":{\"threshold\":172800000}}}}]}},\"aggs\":{\"valueCount\":{\"value_count\":{\"field\":\"Data.vendor.name.keyword\"}}}}}},\"Closed Outside SLA\":{\"terms\":{\"field\":\"Data.vendor.name.keyword\",\"size\":3,\"order\":{\"_count\":\"desc\"}},\"aggs\":{\"Count\":{\"filter\":{\"bool\":{\"must\":[{\"terms\":{\"Data.fsm.applicationStatus.keyword\":[\"COMPLETED\",\"CITIZEN_FEEDBACK_PENDING\"]}},{\"script\":{\"script\":{\"source\":\"doc['Data.fsm.auditDetails.lastModifiedTime'].value - doc['Data.fsm.auditDetails.createdTime'].value > params.threshold\",\"lang\":\"painless\",\"params\":{\"threshold\":172800000}}}}]}},\"aggs\":{\"valueCount\":{\"value_count\":{\"field\":\"Data.vendor.name.keyword\"}}}}}}}}}}"
}
],
"chartType": "line",
"valueType": "number",
"action": "",
"drillChart": "dsoTopDrillChart",
"documentType": "_doc",
"aggregationPaths": [
"Raised",
"Closed Within SLA",
"Closed Outside SLA"
],
"isCumulative": false,
"interval": "month",
"insight": {
},
"_comment": ""
},
"dsoTopDrillChart": {
"chartName": "DSS_FSM_DSO_PERFORMANCE",
"queries": [
{
"module": "FSM",
"dateRefField": "Data.fsm.@timestamp",
"requestQueryMap": "{\"wardId\" : \"Data.ward.name.keyword\", \"tenantId\" : \"Data.tenantData.code\" , \"district\" : \"Data.tenantData.city.districtCode\"}",
"indexName": "fsm",
"aggrQuery": "{\"aggs\":{\"AGGR\":{\"filter\":{\"bool\":{\"must_not\":[{\"term\":{\"data.fsm.tenantId.keyword\":\"pb.testing\"}}]}},\"aggs\":{\"DSOName\":{\"terms\":{\"field\":\"Data.vendor.name.keyword\",\"size\":1000,\"order\":{\"_count\":\"desc\"}},\"aggs\":{\"TotalRequest\":{\"value_count\":{\"field\":\"Data.vendor.name.keyword\"}},\"ClosedWithinSLA\":{\"filter\":{\"bool\":{\"must\":[{\"terms\":{\"Data.fsm.applicationStatus.keyword\":[\"COMPLETED\",\"CITIZEN_FEEDBACK_PENDING\"]}},{\"script\":{\"script\":{\"source\":\"doc['Data.fsm.auditDetails.lastModifiedTime'].value - doc['Data.fsm.auditDetails.createdTime'].value < params.threshold\",\"lang\":\"painless\",\"params\":{\"threshold\":172800000}}}}]}},\"aggs\":{\"valueCount\":{\"value_count\":{\"field\":\"Data.vendor.name.keyword\"}}}},\"ClosedOutsideSLA\":{\"filter\":{\"bool\":{\"must\":[{\"terms\":{\"Data.fsm.applicationStatus.keyword\":[\"COMPLETED\",\"CITIZEN_FEEDBACK_PENDING\"]}},{\"script\":{\"script\":{\"source\":\"doc['Data.fsm.auditDetails.lastModifiedTime'].value - doc['Data.fsm.auditDetails.createdTime'].value > params.threshold\",\"lang\":\"painless\",\"params\":{\"threshold\":172800000}}}}]}},\"aggs\":{\"valueCount\":{\"value_count\":{\"field\":\"Data.vendor.name.keyword\"}}}},\"CitizenAverageRating\":{\"filter\":{\"bool\":{\"must\":[{\"terms\":{\"Data.fsm.applicationStatus.keyword\":[\"COMPLETED\"]}},{\"term\":{\"Data.history.action.keyword\":\"RATE\"}},{\"exists\":{\"field\":\"Data.history\"}},{\"range\":{\"Data.history.rating\":{\"gte\":1}}}]}},\"aggs\":{\"CitizenAvgRating\":{\"avg\":{\"script\":\"int sum = 0;int count =0;if(params['_source']['Data']['history']!=null){ for (item in params['_source']['Data']['history']) {if(item.rating!=null){ sum += item.rating;} }} return sum;\"}}}}}}}}}}"
}
],
"filterKeys": [
{"key": "dsoName", "column": "DSOName"}
],
"isPostResponseHandler": true,
"chartType": "table",
"valueType": "number",
"action": "",
"documentType": "_doc",
"drillChart": "none",
"plotLabel":"DSOName",
"aggregationPaths": [
"TotalRequest",
"ClosedWithinSLA",
"ClosedOutsideSLA",
"CitizenAverageRating"
],
"pathDataTypeMapping": [
{
"TotalRequest" : "number"
},
{
"ClosedWithinSLA" : "number"
},
{
"ClosedOutsideSLA" : "number"
},
{
"CitizenAverageRating" : "number"
}
],
"isCumulative": true,
"interval": "month",
"insight": {
},
"_comment": " "
},
"fsmBottomDsoByPerformance": {
"chartName": "DSS_FSM_BOTTOM_DSO_BY_PERFORMANCE",
"queries": [
{
"module": "FSM",
"dateRefField": "Data.fsm.@timestamp",
"requestQueryMap": "{\"wardId\" : \"Data.ward.name.keyword\", \"tenantId\" : \"Data.tenantData.code\" , \"district\" : \"Data.tenantData.city.districtCode\"}",
"indexName": "fsm",
"aggrQuery": "{\"aggs\":{\"AGGR\":{\"filter\":{\"bool\":{\"must_not\":[{\"term\":{\"Data.fsm.tenantId.keyword\":\"pb.testing\"}}]}},\"aggs\":{\"Raised\":{\"terms\":{\"field\":\"Data.vendor.name.keyword\",\"size\":3,\"order\":{\"_count\":\"asc\"}},\"aggs\":{\"Count\":{\"value_count\":{\"field\":\"Data.vendor.name.keyword\"}}}},\"Closed Within SLA\":{\"terms\":{\"field\":\"Data.vendor.name.keyword\",\"size\":3,\"order\":{\"_count\":\"asc\"}},\"aggs\":{\"Count\":{\"filter\":{\"bool\":{\"must\":[{\"terms\":{\"Data.fsm.applicationStatus.keyword\":[\"COMPLETED\",\"CITIZEN_FEEDBACK_PENDING\"]}},{\"script\":{\"script\":{\"source\":\"doc['Data.fsm.auditDetails.lastModifiedTime'].value - doc['Data.fsm.auditDetails.createdTime'].value < params.threshold\",\"lang\":\"painless\",\"params\":{\"threshold\":172800000}}}}]}},\"aggs\":{\"valueCount\":{\"value_count\":{\"field\":\"Data.vendor.name.keyword\"}}}}}},\"Closed Outside SLA\":{\"terms\":{\"field\":\"Data.vendor.name.keyword\",\"size\":3,\"order\":{\"_count\":\"asc\"}},\"aggs\":{\"Count\":{\"filter\":{\"bool\":{\"must\":[{\"terms\":{\"Data.fsm.applicationStatus.keyword\":[\"COMPLETED\",\"CITIZEN_FEEDBACK_PENDING\"]}},{\"script\":{\"script\":{\"source\":\"doc['Data.fsm.auditDetails.lastModifiedTime'].value - doc['Data.fsm.auditDetails.createdTime'].value > params.threshold\",\"lang\":\"painless\",\"params\":{\"threshold\":172800000}}}}]}},\"aggs\":{\"valueCount\":{\"value_count\":{\"field\":\"Data.vendor.name.keyword\"}}}}}}}}}}"
}
],
"chartType": "line",
"valueType": "number",
"action": "",
"drillChart": "dsoBottomDrillChart",
"documentType": "_doc",
"aggregationPaths": [
"Raised",
"Closed Within SLA",
"Closed Outside SLA"
],
"isCumulative": false,
"interval": "month",
"insight": {
},
"_comment": ""
},
"dsoBottomDrillChart": {
"chartName": "DSS_FSM_DSO_PERFORMANCE",
"queries": [
{
"module": "FSM",
"dateRefField": "Data.fsm.@timestamp",
"requestQueryMap": "{\"wardId\" : \"Data.ward.name.keyword\", \"tenantId\" : \"Data.tenantData.code\" , \"district\" : \"Data.tenantData.city.districtCode\"}",
"indexName": "fsm",
"aggrQuery": "{\"aggs\":{\"AGGR\":{\"filter\":{\"bool\":{\"must_not\":[{\"term\":{\"data.fsm.tenantId.keyword\":\"pb.testing\"}}]}},\"aggs\":{\"DSOName\":{\"terms\":{\"field\":\"Data.vendor.name.keyword\",\"size\":1000,\"order\":{\"_count\":\"asc\"}},\"aggs\":{\"TotalRequest\":{\"value_count\":{\"field\":\"Data.vendor.name.keyword\"}},\"ClosedWithinSLA\":{\"filter\":{\"bool\":{\"must\":[{\"terms\":{\"Data.fsm.applicationStatus.keyword\":[\"COMPLETED\",\"CITIZEN_FEEDBACK_PENDING\"]}},{\"script\":{\"script\":{\"source\":\"doc['Data.fsm.auditDetails.lastModifiedTime'].value - doc['Data.fsm.auditDetails.createdTime'].value < params.threshold\",\"lang\":\"painless\",\"params\":{\"threshold\":172800000}}}}]}},\"aggs\":{\"valueCount\":{\"value_count\":{\"field\":\"Data.vendor.name.keyword\"}}}},\"ClosedOutsideSLA\":{\"filter\":{\"bool\":{\"must\":[{\"terms\":{\"Data.fsm.applicationStatus.keyword\":[\"COMPLETED\",\"CITIZEN_FEEDBACK_PENDING\"]}},{\"script\":{\"script\":{\"source\":\"doc['Data.fsm.auditDetails.lastModifiedTime'].value - doc['Data.fsm.auditDetails.createdTime'].value > params.threshold\",\"lang\":\"painless\",\"params\":{\"threshold\":172800000}}}}]}},\"aggs\":{\"valueCount\":{\"value_count\":{\"field\":\"Data.vendor.name.keyword\"}}}},\"CitizenAverageRating\":{\"filter\":{\"bool\":{\"must\":[{\"terms\":{\"Data.fsm.applicationStatus.keyword\":[\"COMPLETED\"]}},{\"term\":{\"Data.history.action.keyword\":\"RATE\"}},{\"exists\":{\"field\":\"Data.history\"}},{\"range\":{\"Data.history.rating\":{\"gte\":1}}}]}},\"aggs\":{\"CitizenAvgRating\":{\"avg\":{\"script\":\"int sum = 0;int count =0;if(params['_source']['Data']['history']!=null){ for (item in params['_source']['Data']['history']) {if(item.rating!=null){ sum += item.rating;} }} return sum;\"}}}}}}}}}}"
}
],
"filterKeys": [
{"key": "dsoName", "column": "DSOName"}
],
"isPostResponseHandler": true,
"chartType": "table",
"valueType": "number",
"action": "",
"documentType": "_doc",
"drillChart": "none",
"plotLabel":"DSOName",
"aggregationPaths": [
"TotalRequest",
"ClosedWithinSLA",
"ClosedOutsideSLA",
"CitizenAverageRating"
],
"pathDataTypeMapping": [
{
"TotalRequest" : "number"
},
{
"ClosedWithinSLA" : "number"
},
{
"ClosedOutsideSLA" : "number"
},
{
"CitizenAverageRating" : "number"
}
],
"isCumulative": true,
"interval": "month",
"insight": {
},
"_comment": " "
},
"fsmTotalReqByDistrict": {
"chartName": "DSS_FSM_TOTAL_REQ_BY_DISTRICT",
"queries": [
{
"module": "FSM",
"dateRefField": "Data.fsm.@timestamp",
"requestQueryMap": "{\"wardId\" : \"Data.ward.name.keyword\", \"tenantId\" : \"Data.tenantData.code\" , \"district\" : \"Data.tenantData.city.districtName\"}",
"indexName": "fsm",
"aggrQuery": "{\"aggs\":{\"AGGR\":{\"filter\":{\"bool\":{\"must_not\":[{\"term\":{\"Data.fsm.tenantId.keyword\":\"pb.testing\"}}]}},\"aggs\":{\"Open_Req\":{\"filter\":{\"bool\":{\"must_not\":[{\"terms\":{\"Data.fsm.applicationStatus.keyword\":[\"COMPLETED\",\"CITIZEN_FEEDBACK_PENDING\"]}}]}},\"aggs\":{\"OpenReq\":{\"value_count\":{\"field\":\"Data.fsm.tenantId.keyword\"}}}},\"Closed_Req\":{\"filter\":{\"bool\":{\"must\":[{\"terms\":{\"Data.fsm.applicationStatus.keyword\":[\"COMPLETED\",\"CITIZEN_FEEDBACK_PENDING\"]}}]}},\"aggs\":{\"ClosedReq\":{\"value_count\":{\"field\":\"Data.fsm.tenantId.keyword\"}}}},\"TotalReq\":{\"value_count\":{\"field\":\"Data.fsm.tenantId.keyword\"}},\"Closed_With_In_Sla\":{\"filter\":{\"bool\":{\"must\":[{\"terms\":{\"Data.fsm.applicationStatus.keyword\":[\"COMPLETED\",\"CITIZEN_FEEDBACK_PENDING\"]}},{\"script\":{\"script\":{\"source\":\"doc['Data.fsm.auditDetails.lastModifiedTime'].value - doc['Data.fsm.auditDetails.createdTime'].value < params.threshold\",\"lang\":\"painless\",\"params\":{\"threshold\":172800000}}}}]}},\"aggs\":{\"ClosedWithInSla\":{\"value_count\":{\"field\":\"Data.fsm.tenantId.keyword\"}}}},\"TotalCollection\":{\"sum\":{\"field\":\"Data.payments.paymentDetails.bill.billDetails.amountPaid\"}}}}}}"
}
],
"isMdmsEnabled": true,
"filterKeys": [
{"key": "tenantId", "column": "District"}
],
"chartType": "xtable",
"valueType": "number",
"isRoundOff": true,
"drillChart": "fsmTotalReqByTenant",
"plotLabel": "District",
"excludedColumns": ["ClosedWithInSla"],
"computedFields": [
{
"postAggregationTheory" : "",
"actionName": "PercentageComputedField",
"fields" : ["ClosedReq", "TotalReq"],
"newField" : "CompletionRateIn%",
"_comments": "fields are field names picked from its aggregation query to use post aggregation newField value with given new field name "
},
{
"postAggregationTheory" : "",
"actionName": "PercentageComputedField",
"fields" : ["ClosedWithInSla","TotalReq"],
"newField" : "SLAAchievedIn%",
"_comments": "fields are field names picked from its aggregation query to use post aggregation newField value with given new field name "
}
],
"chartSpecificProperty": {
"XtableColumnOrder":[
"S.N.",
"District",
"OpenReq",
"ClosedReq",
"TotalReq",
"CompletionRateIn%",
"SLAAchievedIn%",
"TotalCollection"
]
},
"insight": {
},
"_comment": " "
},
"fsmTotalReqByTenant": {
"chartName": "DSS_FSM_TOTAL_REQ_BY_ULB",
"queries": [
{
"module": "FSM",
"dateRefField": "Data.fsm.@timestamp",
"requestQueryMap": "{\"wardId\" : \"Data.ward.name.keyword\", \"tenantId\" : \"Data.tenantData.code\" , \"district\" : \"Data.tenantData.city.districtName\"}",
"indexName": "fsm",
"aggrQuery": "{\"aggs\":{\"AGGR\":{\"filter\":{\"bool\":{\"must_not\":[{\"term\":{\"Data.fsm.tenantId.keyword\":\"pb.testing\"}}]}},\"aggs\":{\"ULBs\":{\"terms\":{\"field\":\"Data.fsm.tenantId.keyword\",\"size\":1000},\"aggs\":{\"Open_Req\":{\"filter\":{\"bool\":{\"must_not\":[{\"terms\":{\"Data.fsm.applicationStatus.keyword\":[\"COMPLETED\",\"CITIZEN_FEEDBACK_PENDING\"]}}]}},\"aggs\":{\"OpenReq\":{\"value_count\":{\"field\":\"Data.fsm.tenantId.keyword\"}}}},\"Closed_Req\":{\"filter\":{\"bool\":{\"must\":[{\"terms\":{\"Data.fsm.applicationStatus.keyword\":[\"COMPLETED\",\"CITIZEN_FEEDBACK_PENDING\"]}}]}},\"aggs\":{\"ClosedReq\":{\"value_count\":{\"field\":\"Data.fsm.tenantId.keyword\"}}}},\"TotalReq\":{\"value_count\":{\"field\":\"Data.fsm.tenantId.keyword\"}},\"Closed_With_In_Sla\":{\"filter\":{\"bool\":{\"must\":[{\"terms\":{\"Data.fsm.applicationStatus.keyword\":[\"COMPLETED\",\"CITIZEN_FEEDBACK_PENDING\"]}},{\"script\":{\"script\":{\"source\":\"doc['Data.fsm.auditDetails.lastModifiedTime'].value - doc['Data.fsm.auditDetails.createdTime'].value < params.threshold\",\"lang\":\"painless\",\"params\":{\"threshold\":172800000}}}}]}},\"aggs\":{\"ClosedWithInSla\":{\"value_count\":{\"field\":\"Data.fsm.tenantId.keyword\"}}}},\"TotalCollection\":{\"sum\":{\"field\":\"Data.payments.paymentDetails.bill.billDetails.amountPaid\"}}}}}}}}"
}
],
"filterKeys": [
{"key": "tenantId", "column": "ULB"}
],
"chartType": "xtable",
"valueType": "number",
"isRoundOff": true,
"drillChart": "fsmTotalReqByWard",
"plotLabel": "ULB",
"excludedColumns": ["ClosedWithInSla"],
"computedFields": [
{
"postAggregationTheory" : "",
"actionName": "PercentageComputedField",
"fields" : ["ClosedReq", "TotalReq"],
"newField" : "CompletionRateIn%",
"_comments": "fields are field names picked from its aggregation query to use post aggregation newField value with given new field name "
},
{
"postAggregationTheory" : "",
"actionName": "PercentageComputedField",
"fields" : ["ClosedWithInSla","TotalReq"],
"newField" : "SLAAchievedIn%",
"_comments": "fields are field names picked from its aggregation query to use post aggregation newField value with given new field name "
}
],
"chartSpecificProperty": {
"XtableColumnOrder":[
"S.N.",
"ULB",
"OpenReq",
"ClosedReq",
"TotalReq",
"CompletionRateIn%",
"SLAAchievedIn%",
"TotalCollection"
]
},
"insight": {
},
"_comment": " "
},
"fsmTotalReqByWard": {
"chartName": "DSS_FSM_TOTAL_REQ_BY_WARD",
"queries": [
{
"module": "FSM",
"dateRefField": "Data.fsm.@timestamp",
"requestQueryMap": "{\"wardId\" : \"Data.ward.name.keyword\", \"tenantId\" : \"Data.tenantData.code\" , \"district\" : \"Data.tenantData.city.districtCode\"}",
"indexName": "fsm",
"aggrQuery": "{\"aggs\":{\"AGGR\":{\"filter\":{\"bool\":{\"must_not\":[{\"term\":{\"Data.fsm.tenantId.keyword\":\"pb.testing\"}}]}},\"aggs\":{\"Ward\":{\"terms\":{\"field\":\"Data.ward.name.keyword\",\"size\":1000},\"aggs\":{\"Open_Req\":{\"filter\":{\"bool\":{\"must_not\":[{\"terms\":{\"Data.fsm.applicationStatus.keyword\":[\"COMPLETED\",\"CITIZEN_FEEDBACK_PENDING\"]}}]}},\"aggs\":{\"OpenReq\":{\"value_count\":{\"field\":\"Data.fsm.tenantId.keyword\"}}}},\"Closed_Req\":{\"filter\":{\"bool\":{\"must\":[{\"terms\":{\"Data.fsm.applicationStatus.keyword\":[\"COMPLETED\",\"CITIZEN_FEEDBACK_PENDING\"]}}]}},\"aggs\":{\"ClosedReq\":{\"value_count\":{\"field\":\"Data.fsm.tenantId.keyword\"}}}},\"TotalReq\":{\"value_count\":{\"field\":\"Data.fsm.tenantId.keyword\"}},\"Closed_With_In_Sla\":{\"filter\":{\"bool\":{\"must\":[{\"terms\":{\"Data.fsm.applicationStatus.keyword\":[\"COMPLETED\",\"CITIZEN_FEEDBACK_PENDING\"]}},{\"script\":{\"script\":{\"source\":\"doc['Data.fsm.auditDetails.lastModifiedTime'].value - doc['Data.fsm.auditDetails.createdTime'].value < params.threshold\",\"lang\":\"painless\",\"params\":{\"threshold\":172800000}}}}]}},\"aggs\":{\"ClosedWithInSla\":{\"value_count\":{\"field\":\"Data.fsm.tenantId.keyword\"}}}},\"TotalCollection\":{\"sum\":{\"field\":\"Data.payments.paymentDetails.bill.billDetails.amountPaid\"}}}}}}}}"
}
],
"filterKeys": [
{"key": "wardId", "column": "Ward"},
{"key": "ulbId", "column": "ULB"}
],
"chartType": "xtable",
"valueType": "number",
"isRoundOff": true,
"drillChart": "none",
"action": "",
"documentType": "_doc",
"plotLabel": "Ward",
"excludedColumns": ["ClosedWithInSla"],
"computedFields": [
{
"postAggregationTheory" : "",
"actionName": "PercentageComputedField",
"fields" : ["ClosedReq", "TotalReq"],
"newField" : "CompletionRateIn%",
"_comments": "fields are field names picked from its aggregation query to use post aggregation newField value with given new field name "
},
{
"postAggregationTheory" : "",
"actionName": "PercentageComputedField",
"fields" : ["ClosedWithInSla","TotalReq"],
"newField" : "SLAAchievedIn%",
"_comments": "fields are field names picked from its aggregation query to use post aggregation newField value with given new field name "
}
],
"chartSpecificProperty": {
"XtableColumnOrder":[
"S.N.",
"Ward",
"OpenReq",
"ClosedReq",
"TotalReq",
"CompletionRateIn%",
"SLAAchievedIn%",
"TotalCollection"
]
},
"insight": {
},
"_comment": " "
},
"fsmVehicleLogReportByDDR": {
"chartName": "DSS_FSM_VECHILE_LOG_REPORT",
"queries": [
{
"module": "FSM",
"dateRefField": "Data.vehicleTrip.@timestamp",
"requestQueryMap": "{\"wardId\" : \"Data.ward.name.keyword\", \"tenantId\" : \"Data.tenantData.code\" , \"district\" : \"Data.tenantData.city.districtName\"}",
"indexName": "vehicletrip",
"aggrQuery": "{\"aggs\":{\"AGGR\":{\"filter\":{\"bool\":{\"must_not\":[{\"term\":{\"data.vehicleTrip.tenantId.keyword\":\"pb.testing\"}}]}},\"aggs\":{\"NoOfTrips\":{\"value_count\":{\"field\":\"Data.vehicleTrip.@timestamp\"}},\"TotalSeptageCollected\":{\"sum\":{\"script\":{\"source\":\"(doc['Data.vehicleTrip.tripDetails.volume'].value)/1000.0\"}}},\"TotalSeptageDumped\":{\"sum\":{\"script\":{\"source\":\"(doc['Data.vehicleTrip.volumeCarried'].value)/1000.0\"}}},\"CapacityUtilization\":{\"sum\":{\"script\":{\"source\":\"(doc['Data.vehicleTrip.volumeCarried'].value)/1000.0\"}}}}}}}"
}
],
"isMdmsEnabled": true,
"filterKeys": [
{"key": "tenantId", "column": "District"}
],
"isPostResponseHandler": true,
"chartType": "xtable",
"valueType": "number",
"action": "",
"isRoundOff": true,
"documentType": "_doc",
"drillChart": "fsmVehicleLogReportByTenant",
"plotLabel":"District",
"aggregationPaths": [
"NoOfTrips",
"TotalSeptageCollected",
"TotalSeptageDumped",
"CapacityUtilization"
],
"pathDataTypeMapping": [
{
"NoOfTrips" : "number"
},
{
"TotalSeptageCollected" : "number"
},
{
"TotalSeptageDumped" : "number"
},
{
"CapacityUtilization" : "number"
}
],
"isCumulative": true,
"interval": "month",
"insight": {
},
"_comment": " "
},
"fsmVehicleLogReportByTenant": {
"chartName": "DSS_FSM_VECHILE_LOG_REPORT",
"queries": [
{
"module": "FSM",
"dateRefField": "Data.vehicleTrip.@timestamp",
"requestQueryMap": "{\"wardId\" : \"Data.ward.name.keyword\", \"tenantId\" : \"Data.tenantData.code\" , \"district\" : \"Data.tenantData.city.districtName\"}",
"indexName": "vehicletrip",
"aggrQuery": "{\"aggs\":{\"AGGR\":{\"filter\":{\"bool\":{\"must_not\":[{\"term\":{\"data.vehicleTrip.tenantId.keyword\":\"pb.testing\"}}]}},\"aggs\":{\"ULBs \":{\"terms\":{\"field\":\"Data.vehicleTrip.tenantId.keyword\",\"size\":1000},\"aggs\":{\"NoOfTrips\":{\"value_count\":{\"field\":\"Data.vehicleTrip.@timestamp\"}},\"TotalSeptageCollected\":{\"sum\":{\"script\":{\"source\":\"(doc['Data.vehicleTrip.tripDetails.volume'].value)/1000.0\"}}},\"TotalSeptageDumped\":{\"sum\":{\"script\":{\"source\":\"(doc['Data.vehicleTrip.volumeCarried'].value)/1000.0\"}}},\"CapacityUtilization\":{\"sum\":{\"script\":{\"source\":\"(doc['Data.vehicleTrip.volumeCarried'].value)/1000.0\"}}}}}}}}}"
}
],
"filterKeys": [
{"key": "tenantId", "column": "Boundary"}
],
"isPostResponseHandler": true,
"chartType": "xtable",
"valueType": "number",
"action": "",
"isRoundOff": true,
"documentType": "_doc",
"drillChart": "fsmVehicleLogReportByVehicleNo",
"plotLabel":"Boundary",
"aggregationPaths": [
"NoOfTrips",
"TotalSeptageCollected",
"TotalSeptageDumped",
"CapacityUtilization"
],
"pathDataTypeMapping": [
{
"NoOfTrips" : "number"
},
{
"TotalSeptageCollected" : "number"
},
{
"TotalSeptageDumped" : "number"
},
{
"CapacityUtilization" : "number"
}
],
"isCumulative": true,
"interval": "month",
"insight": {
},
"_comment": " "
},
"fsmVehicleLogReportByVehicleNo": {
"chartName": "DSS_FSM_VECHILE_LOG_REPORT",
"queries": [
{
"module": "FSM",
"dateRefField": "Data.vehicleTrip.@timestamp",
"requestQueryMap": "{\"wardId\" : \"Data.ward.name.keyword\", \"tenantId\" : \"Data.tenantData.code\" , \"district\" : \"Data.tenantData.city.districtCode\"}",
"indexName": "vehicletrip",
"aggrQuery": "{\"aggs\":{\"AGGR\":{\"filter\":{\"bool\":{\"must_not\":[{\"term\":{\"data.vehicleTrip.tenantId.keyword\":\"pb.testing\"}}]}},\"aggs\":{\"Vehicle Reg No\":{\"terms\":{\"field\":\"Data.vehicleTrip.vehicle.registrationNumber.keyword\",\"size\":1000},\"aggs\":{\"NoOfTrips\":{\"value_count\":{\"field\":\"Data.vehicleTrip.@timestamp\"}},\"TotalSeptageCollected\":{\"sum\":{\"script\":{\"source\":\"(doc['Data.vehicleTrip.tripDetails.volume'].value)/1000.0\"}}},\"TotalSeptageDumped\":{\"sum\":{\"script\":{\"source\":\"(doc['Data.vehicleTrip.volumeCarried'].value)/1000.0\"}}},\"CapacityUtilization\":{\"sum\":{\"script\":{\"source\":\"(doc['Data.vehicleTrip.volumeCarried'].value)/1000.0\"}}},\"TankCapacity\":{\"sum\":{\"script\":{\"source\":\"(doc['Data.vehicleTrip.vehicle.tankCapacity'].value)/1000.0\"}}}}}}}}}"
}
],
"filterKeys": [
{"key": "registrationNumber", "column": "Vehicle_No"},
{"key": "wardId", "column": "Ward"},
{"key": "ulbId", "column": "ULB"}
],
"isPostResponseHandler": true,
"chartType": "xtable",
"valueType": "number",
"action": "",
"isRoundOff": true,
"documentType": "_doc",
"drillChart": "none",
"plotLabel":"Vehicle_No",
"aggregationPaths": [
"NoOfTrips",
"TotalSeptageCollected",
"TotalSeptageDumped",
"CapacityUtilization",
"TankCapacity"
],
"pathDataTypeMapping": [
{
"NoOfTrips" : "number"
},
{
"TotalSeptageCollected" : "number"
},
{
"TotalSeptageDumped" : "number"
},
{
"CapacityUtilization" : "number"
},
{
"TankCapacity" : "number"
}
],
"isCumulative": true,
"interval": "month",
"insight": {
},
"_comment": " "
}Click here to check the complete configuration
Master Dashboard Configuration is the main configuration which defines as which are the Dashboards which are to be painted on screen.
It includes all the Visualizations, their groups, the charts which comes within them and even their dimensions as what should be their height and width.
{
"name": "DSS_FSM_DASHBOARD",
"id": "fsm",
"isActive": "",
"style": "linear",
"visualizations": [
{
"row": 1,
"name": "DSS_REVENUE",
"vizArray": [
{
"id": 311,
"name": "DSS_OVERVIEW",
"dimensions": {
"height": 450,
"width": 4
},
"vizType": "metric-collection",
"label": "DSS_OVERVIEW",
"noUnit": true,
"isCollapsible": false,
"charts": [
{
"id": "fsmTotalrequest",
"name": "DSS_FSM_TOTAL_REQUESTS",
"code": "",
"chartType": "metric",
"filter": "",
"headers": []
},
{
"id": "totalSludgeTreated",
"name": "DSS_FSM_TOTAL_SLUDGE_TREATED",
"code": "",
"chartType": "metric",
"filter": "",
"headers": []
},
{
"id": "avgFSMCostRequest",
"name": "DSS_FSM_AVG_FSM_COST_OR_REQ",
"code": "",
"chartType": "metric",
"filter": "",
"headers": []
},
{
"id": "totalCollectioninLacs",
"name": "DSS_FSM_TOTAL_COLLECTION",
"code": "",
"chartType": "metric",
"filter": "",
"headers": []
},
{
"id": "slaCompliance",
"name": "DSS_FSM_SLA_COMPLIANCE",
"code": "",
"chartType": "metric",
"filter": "",
"headers": []
},
{
"id": "citizenAvgRating",
"name": "DSS_FSM_CITIZEN_AVG_RATING",
"code": "",
"chartType": "metric",
"filter": "",
"headers": []
}
]
},
{
"id": 322,
"name": "DSS_FSM_TOTAL_CUMULATIVE_COLLECTION",
"dimensions": {
"height": 450,
"width": 6
},
"vizType": "chart",
"label": "",
"noUnit": true,
"isCollapsible": false,
"charts": [
{
"id": "fsmTotalCumulativeCollection",
"name": "Monthly",
"code": "",
"chartType": "line",
"filter": "",
"headers": []
}
]
}
]
},
{
"row": 2,
"name": "DSS_REVENUE",
"vizArray": [
{
"id": 321,
"name": "DSS_FSM_TOP_ULB_BY_PERFORMANCE",
"dimensions": {
"height": 250,
"width": 3
},
"vizType": "performing-metric",
"label": "",
"noUnit": false,
"isCollapsible": false,
"charts": [
{
"id": "fsmTopUlbByPerformance",
"name": "Monthly",
"code": "",
"chartType": "bar",
"filter": "",
"headers": []
}
]
},
{
"id": 322,
"name": "DSS_FSM_BOTTOM_ULB_BY_PERFORMANCE",
"dimensions": {
"height": 250,
"width": 3
},
"vizType": "performing-metric",
"label": "",
"noUnit": false,
"isCollapsible": false,
"charts": [
{
"id": "fsmBottomUlbByPerformance",
"name": "Monthly",
"code": "",
"chartType": "bar",
"filter": "",
"headers": []
}
]
},
{
"id": 323,
"name": "DSS_FSM_COLLECTION_BY_USAGE_TYPE",
"dimensions": {
"height": 250,
"width": 4
},
"vizType": "chart",
"label": "",
"noUnit": false,
"isCollapsible": false,
"charts": [
{
"id": "fsmCollectionByUsageType",
"name": "DSS_FSM_COLLECTION_BY_USAGE_TYPE",
"code": "",
"chartType": "donut",
"filter": "",
"headers": []
}
]
}
]
},
{
"row": 3,
"name": "DSS_REVENUE",
"vizArray": [
{
"id": 325,
"name": "DSS_FSTP_CAPACITY_UTILIZATION",
"dimensions": {
"height": 450,
"width": 5
},
"vizType": "chart",
"label": "",
"noUnit": true,
"isCollapsible": false,
"charts": [
{
"id": "fsmCapacityUtilization",
"name": "Monthly",
"code": "",
"chartType": "line",
"filter": "",
"headers": []
}
]
},
{
"id": 326,
"name": "DSS_FSM_MONTHLY_WASTE_CAL",
"dimensions": {
"height": 450,
"width": 5
},
"vizType": "chart",
"label": "",
"noUnit": true,
"isCollapsible": false,
"charts": [
{
"id": "fsmMonthlyWasteCal",
"name": "Monthly",
"code": "",
"chartType": "bar",
"filter": "",
"headers": []
}
]
}
]
},
{
"row": 4,
"name": "DSS_REVENUE",
"vizArray": [
{
"id": 327,
"name": "DSS_FSM_TOP_DSO_BY_PERFORMANCE",
"dimensions": {
"height": 450,
"width": 5
},
"vizType": "chart",
"label": "",
"noUnit": true,
"isCollapsible": false,
"charts": [
{
"id": "fsmTopDsoByPerformance",
"name": "Monthly",
"code": "",
"chartType": "horizontalBar",
"filter": "",
"headers": []
}
]
},
{
"id": 329,
"name": "DSS_FSM_BOTTOM_DSO_BY_PERFORMANCE",
"dimensions": {
"height": 450,
"width": 5
},
"vizType": "chart",
"label": "",
"noUnit": true,
"isCollapsible": false,
"charts": [
{
"id": "fsmBottomDsoByPerformance",
"name": "Monthly",
"code": "",
"chartType": "horizontalBar",
"filter": "",
"headers": []
}
]
}
]
},
{
"row": 5,
"name": "DSS_REVENUE",
"vizArray": [
{
"id": 339,
"name": "DSS_FSM_TOTAL_REQ_BY_DISTRICT",
"dimensions": {
"height": 350,
"width": 10
},
"vizType": "chart",
"label": "",
"noUnit": false,
"isCollapsible": true,
"charts": [
{
"id": "fsmTotalReqByDistrict",
"name": "DSS_FSM_TOTAL_REQ_BY_DISTRICT",
"code": "",
"chartType": "table",
"filter": "",
"headers": [],
"tabName": "Boundary"
}
]
}
]
},
{
"row": 6,
"name": "DSS_REVENUE",
"vizArray": [
{
"id": 331,
"name": "DSS_FSM_VECHILE_LOG_REPORT",
"dimensions": {
"height": 350,
"width": 10
},
"vizType": "chart",
"label": "",
"noUnit": false,
"isCollapsible": true,
"charts": [
{
"id": "fsmVehicleLogReportByDDR",
"name": "DSS_FSM_VECHILE_LOG_REPORT",
"code": "",
"chartType": "table",
"filter": "",
"headers": [],
"tabName": "Boundary"
}
]
}
]
}
]
},Click here for the complete configuration.
The master dashboard configuration, which was explained earlier, holds the list of dashboards that are available.
Given the instance where role action mapping is not maintained in the application service, this configuration will act as Role - Dashboard Mapping Configuration. In this, each role is mapped against the dashboard which they are authorised to see. This was used earlier when the role action mapping of eGov was not integrated. Later, when the role action mapping started controlling the dashboards to be seen on the client side, this configuration was only used to enable the dashboards for viewing.
{
"_comment": "Holds mapping for each role with and its associated dashboards",
"roles" : [
{
"_comment":"This role is super role which can access all the available dashboards: [other/new roles are suppose to be added]",
"roleId": 6,
"roleName" : "Admin",
"isSuper" : "",
"orgId": "",
"dashboards": [
{
"name": "Facial Sludge Management",
"id": "fsm"
}
]
},
{
"_comment":"This role is super role which can access all the available dashboards: [other/new roles are suppose to be added]",
"roleId": 7,
"roleName" : "Commissioner",
"isSuper" : "",
"orgId": "",
"dashboards": [
{
"id": "ulb-fsm"
}
]
}
]
}Click here to check the configuration
common-masters/uiCommonConstants.json
"fsm":{
"routePath":"/dashboard/fsm",
"isOrigin":true
},
"ulb-fsm":{
"routePath":"/dashboard/ulb-fsm",
"isOrigin":true
}Click here to check the complete configuration.
roleaction.json
{
"rolecode": "STADMIN",
"actionid": {{PlaceHolder1}},
"actioncode": "",
"tenantId": "pb"
}
{
"rolecode": "STADMIN",
"actionid": {{PlaceHolder2}},
"actioncode": "",
"tenantId": "pb"
},
{
"rolecode": "EMPLOYEE",
"actionid": {{PlaceHolder2}},
"actioncode": "",
"tenantId": "pb"
},
{
"rolecode": "UC_EMP",
"actionid": {{PlaceHolder2}},
"actioncode": "",
"tenantId": "pb"
},Click here to check the complete configuration.
Action test.json:
{
"id": {{PlaceHolder1}},
"name": "DSS Dashboard Config Facial Sludge Management",
"url": "/dashboard-analytics/dashboard/getDashboardConfig/fsm",
"parentModule": "",
"displayName": "DSS",
"orderNumber": 0,
"enabled": false,
"serviceCode": "DSS",
"code": "null",
"path": ""
},
{
"id": {{PlaceHolder2}},
"name": "DSS Dashboard Charts",
"url": "/dashboard-analytics/dashboard/getChartV2",
"parentModule": "",
"displayName": "DSS",
"orderNumber": 0,
"enabled": false,
"serviceCode": "DSS",
"code": "null",
"path": ""
},
Click here to check the complete configuration.
FSM-DSS Consists of multiple graphs which represent the data of FSM. Each graph has its own configuration which will describe the chart and its type.
DSS Consists of following charts in FSM:
Overview
Total Cumulative Collection
Top ULB By Performance
Bottom ULB by Performance
FSM Collection by Usage Type
FSTP - Capacity Utilization
Monthly Septage Collected
Top DSO By Performance
Bottom DSO By Performance
Desludging Request Report
Vehicle Log Report
Overview graph contains multiple data information as below in the selected time period.
Total requests: Which represents the number of FSM applications.
Total sludge treated: This represents the total sludge dumped at the yard in KL.
Average FSM cost: This represents the average collection amount for the FSM applications.
Total collection: This represents the total collection amount for the FSM applications.
SLA compliance: This represents the total SLA achieved in percentage.
Average citizen rating: This represents the citizen average rating value.
This graph contains the collection amount information in the monthly base as a cumulative line graph. This will change as per the denomination amount filter selection.
Line - This graph/chart is data representation on date histograms or date groupings.
This graph represents the ULBs based on the SLA achieved in bar chart representation with the percentage of SLA achieved in ascending order. This chart also contains the drill-down to give the complete information regarding each ULB.
Drill chart: If there is a drill-down on the visualisation, then the code of the drill-down visualisation is added here. This will be used by client service to manage drill-downs.
This chart consists of a drill-down, so, we gave the drill-down chart key as a reference in this chart (as shown in the picture above).
Here is the drill down chart config params.
Table chart sample: This chart comes with 2 kinds: Table and xtable.
The table type allows aggregated fields added as available in the query keys. Hence, to extract the values based on the key, aggegationPaths needs to add along with their data type as in pathDataTypeMapping.
This graph represents the ULB’s based on the SLA achieved in bar chart representation with the percentage of SLA achieved in descending order. This chart also contains the drill-down to give the complete information regarding each ULB.
When you click on "Show More," you will navigate to a tabular chart of the bottom ULB by performance.
This graph shows the collection amount based on the usage/property type, and this amount will change as per the denomination filter change. This also shows the percentage of the top four properties; the remaining properties will go under the 'Others' category.
This graph is in the line chart representation, and shows the data in cumulative format. It contains the information about the waste collecting plant capacity utilisation in percentage as well as the total waste dumped at plant in KL at the top of the graph.
This graph shows the data in horizontal bar representation, and the bars contain data monthly wide as well as non-cumulative data. This graph contains the monthly information of septage collected and dumped at the plant in KL.
This graph represents the DSOs based on the number of DSO requests and on SLA achievement in bar chart representation in ascending order. This chart also contains the drill-down to give the complete information regarding each DSO.
When you click on "Show More", you can see the details of the available DSOs under the selected ULB.
This graph represents the DSOs based on the number of DSO requests and on SLA achievement in bar chart representation in descending order. This chart also contains the drill-down to give the complete information regarding each DSO.
This is the bottom DSO drill-down chart which represents the table chart type.
When you click on "Show More", you can see the details of the available DSOs under the selected ULB.
This tabular chart representation graph shows multiple FSM information, such as the number of open application requests, closed requests, total requests, completion rate in percentage, SLA achieved in percentage, and total collection amount. This table shows the data at the district-level and also has the drill-down chart from each district to ULB, as well from ULB to the ward-level data for the same.
The xtable type allows you to add multiple computed fields with the aggregated fields dynamically added.
To add multiple computed columns, computedFields [] where actionName (IComputedField<T> interface), fields [] names as in exist in query key, newField as name to appear for computation must be defined.
chartSpecificProperty: This is specific to FSM-DSS, and it is used to achieve the xtable column order along with the computed fields. This property is not used in any other module till now.
When you click on any district name, you will see the drill-down charts, which will represent that specific district data.
When you click on the ULB, you will navigate towards under that specific ULB and each ward will show the data specific to that ward.
This table shows the data of vehicle trips, and it includes the number of trips, total septage collected, total septage dumped, and capacity utilisation in percentage. This graph also contains the drills-downs from district to ULB and from ULB to the vehicle level, which shows the vehicle number.
When you click on any district name, you will see the drill-down charts, which will represent the data specific to that district.
When you click on any boundary/ULB, you will navigate to the specific vehicle details which will be as shown below.
isRoundOff: This property is introduced to round-off the decimal values. For example, if the value is 25.43 by using isRoundOff property in configuration, you will get it 25. If value is 22.56, the round-off value will be 23. This can be used for insights configuration as well as overview graph.
Key (Example: fsmTotalrequest): This is the visualisation code. This key will be referred to in further visualisation configurations. This is the key which will be used by the client application to indicate which visualisation is needed for display.
chartName: The name of the chart which has to be used as a label on the dashboard. The name of the chart will be a detailed name. In this configuration, the name of the chart will be the code of localisation which will be used by the client side.
queries: Some visualisations are derived from a specific data source, while some others are derived from different data sources and are combined together to get a meaningful representation. The queries of aggregation, which are to be used to fetch out the right data in the right aggregated format, are configured here.
queries.module: The module/domain level on which the query should be applied on. Faecal Sludge Management is FSM.
queries.indexName: The name of the index on which the query has to be executed is configured here.
queries.aggrQuery: The aggregation query in itself is added here. Based on the module and the index name specified, this query is attached to the filter part of the complete search request and then executed against that index.
queries.requestQueryMap: Client request will carry certain fields which are to be filtered. The parameters specified in the client request are different from the parameters in each of these indexed documents. To map the parameters of the request to the parameters of the ElasticSearch Document, this mapping is maintained.
queries.dateRefField : Each of these modules have separate indexes, and all of them have their own date fields. When a date filter is applied against these visualisations, each of them has to apply it against their own date reference fields. To maintain what is the date field in which index, we have this configured in this configuration parameter.
chartType : As there are different types of visualisations, this field defines what is the type of chart/visualisation that this data should be used to represent.
Chart types available are:
Metric - This represents the aggregated amount/value for records filter by the aggregate as query
Pie - This represents the aggregated data on grouping. This can be used to represent any line graph, bar graph, pie chart, or donuts.
Line - This graph/chart is data representation on date histograms or date groupings.
Perform - This chart represents groping data performance wise.
Table - Represents a form of plots and value with headers as grouped on and list of its key, values pairs.
xtable - Represents an advanced feature of table; it has addition capabilities for dynamic adding header values.
valueType: In any case of data, the values which are sent to plot, might be a percentage, an amount, or a count. To represent them and differentiate the numbers from amount and percentage, this field is used to indicate the type of value that this visualisation will send.
Action: Some visualisations are not just aggregation on data source. There might be cases where we have to do a post-aggregation computation. For example, in the case of top 3 performing ULBs, the target and total collection is obtained, and then the percentage is calculated. In such cases, the action that has to be performed on that data is defined in this parameter.
documentType: The type of document on which the query has to be executed is defined here.
drillChart: If there is a drill-down on the visualisation, then the code of the drill-down visualization is added here. This will be used by client service to manage drill-downs.
aggregationPaths: All the queries will have aggregation names in it. To fetch the value out of each aggregation response, the name of the aggregation in the query will be needed. These aggregation paths will have the names of aggregation in it.
insights: It is to show the data with the comparison of last year with arrow symbols. It will show the data as percentage is increased or decreased.
_comment: To display information on the “i” symbol of each visualisation, the visualisation information is maintained in this field.
Postman collection for fsm-dss: https://www.getpostman.com/collections/119ee90dd54c04617c3a


The following MDMS changes were done as part of the FSM v1.4 release:
PQM inbox
MDMS for inbox
Added MDMS configuration for inbox-v2 integration.
Role Action
MDMS
Added role-action mapping for all APIs of the PQM service.
For MDMS-V2 changes, refer to the below table for the sequence in which MDMS schema and data needs to be added for the PQM service:
PQM.BenchmarkRule
id, code, name
code
PQM.QualityTestLab
code
code
PQM.Material
code, name
code
PQM.Parameter
code, name
code
PQM.PlantConfig
code, pendingTestsToDisplayWithinDays, pendingTestsToDisplayWithinDaysInbox, pendingTestsToDisplayWithinDaysForULB, iotAnomalyDetectionDays, manualTestPendingEscalationDays
code
PQM.PlantType
code, name
code
PQM.ProcessType
code, name
code
PQM.Unit
code, name
code
PQM.WasteType
code, name
code
PQM.SourceType
code, name
code
PQM.Stage
code, name, output
code
PQM.Process
code, type, name, stages, wasteType
code
PQM.Plant
code, plantType, active
code
PQM.QualityCriteria
code, name, plantType, wasteType, address, processes
code
PQM.TestStandard
code, plant, process, stage, material, qualityCriteria, frequency, sourceType
code
Make sure TQM and FSM is enabled in this master -> cityModule.json
data/pg/common-masters/howItWorks.json -> HowItWorks
data/pg/FSM/SanitationWorkerSkills.json -> SanitationWorkerSkills
data/pg/FSM/SanitationWorkerEmploymentType.json -> File Link
data/pg/FSM/SanitationWorkerEmployer.json -> File Link
data/pg/FSM/SanitationWorkerFunctionalRoles.json -> File Link
data/pg/ACCESSCONTROL-ACTIONS-TEST/actions-test.json
{
"id": 346,
"name": "schema Create",
"url": "/mdms-v2/schema/v1/_create",
"parentModule": "",
"displayName": "Schema Create",
"orderNumber": 0,
"enabled": false,
"serviceCode": "",
"code": "null",
"path": ""
},
{
"id": 357,
"name": "Search PQM Application",
"url": "/mdms-v2/schema/v1/_search",
"displayName": "Search MDMS Schema",
"orderNumber": 0,
"enabled": false,
"serviceCode": "PQM",
"code": "null",
"path": ""
}
{
"id": 347,
"name": "MDMS",
"url": "/mdms-v2/v2/_create/PQM.SourceType",
"parentModule": "",
"displayName": "Add Data for PQM.SourceType",
"orderNumber": 0,
"enabled": false,
"serviceCode": "",
"code": "null",
"path": ""
},
{
"id": 201,
"name": "MDMS",
"url": "url",
"displayName": "Manage PQM Labs",
"orderNumber": 1,
"parentModule": "",
"enabled": true,
"serviceCode": "MDMS",
"code": "null",
"navigationURL": "/workbench-ui/employee/workbench/mdms-search-v2?moduleName=PQM&masterName=QualityTestLab",
"path": "9MDMS.PQM.QualityTestLab",
"leftIcon": "dynamic:ContractIcon"
},
{
"id": 202,
"name": "MDMS",
"url": "/mdms-v2/v2/_create/PQM.QualityTestLab",
"displayName": "create PQM.QualityTestLab",
"orderNumber": 1,
"parentModule": "",
"enabled": true,
"serviceCode": "MDMS",
"code": "null",
"path": ""
},
{
"id": 203,
"name": "MDMS",
"url": "/mdms-v2/v2/_update/PQM.QualityTestLab",
"displayName": "Update PQM.QualityTestLab",
"orderNumber": 1,
"parentModule": "",
"enabled": true,
"serviceCode": "MDMS",
"code": "null",
"path": ""
},
{
"id": 204,
"name": "MDMS",
"url": "url",
"displayName": "Manage PQM BenchmarkRule",
"orderNumber": 1,
"parentModule": "",
"enabled": true,
"serviceCode": "MDMS",
"code": "null",
"navigationURL": "/workbench-ui/employee/workbench/mdms-search-v2?moduleName=PQM&masterName=BenchmarkRule",
"path": "9MDMS.PQM.BenchmarkRule",
"leftIcon": "dynamic:ContractIcon"
},
{
"id": 205,
"name": "MDMS",
"url": "/mdms-v2/v2/_create/PQM.BenchmarkRule",
"displayName": "create PQM.BenchmarkRule",
"orderNumber": 1,
"parentModule": "",
"enabled": true,
"serviceCode": "MDMS",
"code": "null",
"path": ""
},
{
"id": 206,
"name": "MDMS",
"url": "/mdms-v2/v2/_update/PQM.BenchmarkRule",
"displayName": "Update PQM.BenchmarkRule",
"orderNumber": 1,
"parentModule": "",
"enabled": true,
"serviceCode": "MDMS",
"code": "null",
"path": ""
},
{
"id": 207,
"name": "MDMS",
"url": "url",
"displayName": "Manage PQM Material",
"orderNumber": 1,
"parentModule": "",
"enabled": true,
"serviceCode": "MDMS",
"code": "null",
"navigationURL": "/workbench-ui/employee/workbench/mdms-search-v2?moduleName=PQM&masterName=Material",
"path": "9MDMS.PQM.Material",
"leftIcon": "dynamic:ContractIcon"
},
{
"id": 208,
"name": "MDMS",
"url": "/mdms-v2/v2/_create/PQM.Material",
"displayName": "create PQM.Material",
"orderNumber": 1,
"parentModule": "",
"enabled": true,
"serviceCode": "MDMS",
"code": "null",
"path": ""
},
{
"id": 209,
"name": "MDMS",
"url": "/mdms-v2/v2/_update/PQM.Material",
"displayName": "Update PQM.Material",
"orderNumber": 1,
"parentModule": "",
"enabled": true,
"serviceCode": "MDMS",
"code": "null",
"path": ""
},
{
"id": 210,
"name": "MDMS",
"url": "url",
"displayName": "Manage PQM Unit",
"orderNumber": 1,
"parentModule": "",
"enabled": true,
"serviceCode": "MDMS",
"code": "null",
"navigationURL": "/workbench-ui/employee/workbench/mdms-search-v2?moduleName=PQM&masterName=Unit",
"path": "9MDMS.PQM.Unit",
"leftIcon": "dynamic:ContractIcon"
},
{
"id": 211,
"name": "MDMS",
"url": "/mdms-v2/v2/_create/PQM.Unit",
"displayName": "create PQM.Unit",
"orderNumber": 1,
"parentModule": "",
"enabled": true,
"serviceCode": "MDMS",
"code": "null",
"path": ""
},
{
"id": 212,
"name": "MDMS",
"url": "/mdms-v2/v2/_update/PQM.Unit",
"displayName": "Update PQM.Unit",
"orderNumber": 1,
"parentModule": "",
"enabled": true,
"serviceCode": "MDMS",
"code": "null",
"path": ""
},
{
"id": 213,
"name": "MDMS",
"url": "url",
"displayName": "Manage PQM TestType",
"orderNumber": 1,
"parentModule": "",
"enabled": true,
"serviceCode": "MDMS",
"code": "null",
"navigationURL": "/workbench-ui/employee/workbench/mdms-search-v2?moduleName=PQM&masterName=TestType",
"path": "9MDMS.PQM.TestType",
"leftIcon": "dynamic:ContractIcon"
},
{
"id": 214,
"name": "MDMS",
"url": "/mdms-v2/v2/_create/PQM.TestType",
"displayName": "create PQM.TestType",
"orderNumber": 1,
"parentModule": "",
"enabled": true,
"serviceCode": "MDMS",
"code": "null",
"path": ""
},
{
"id": 215,
"name": "MDMS",
"url": "/mdms-v2/v2/_update/PQM.TestType",
"displayName": "Update PQM.TestType",
"orderNumber": 1,
"parentModule": "",
"enabled": true,
"serviceCode": "MDMS",
"code": "null",
"path": ""
},
{
"id": 216,
"name": "MDMS",
"url": "url",
"displayName": "Manage PQM Plant",
"orderNumber": 1,
"parentModule": "",
"enabled": true,
"serviceCode": "MDMS",
"code": "null",
"navigationURL": "/workbench-ui/employee/workbench/mdms-search-v2?moduleName=PQM&masterName=Plant",
"path": "9MDMS.PQM.Plant",
"leftIcon": "dynamic:ContractIcon"
},
{
"id": 217,
"name": "MDMS",
"url": "/mdms-v2/v2/_create/PQM.Plant",
"displayName": "create PQM.Plant",
"orderNumber": 1,
"parentModule": "",
"enabled": true,
"serviceCode": "MDMS",
"code": "null",
"path": ""
},
{
"id": 218,
"name": "MDMS",
"url": "/mdms-v2/v2/_update/PQM.Plant",
"displayName": "Update PQM.Plant",
"orderNumber": 1,
"parentModule": "",
"enabled": true,
"serviceCode": "MDMS",
"code": "null",
"path": ""
},
{
"id": 219,
"name": "MDMS",
"url": "url",
"displayName": "Manage PQM PlantType",
"orderNumber": 1,
"parentModule": "",
"enabled": true,
"serviceCode": "MDMS",
"code": "null",
"navigationURL": "/workbench-ui/employee/workbench/mdms-search-v2?moduleName=PQM&masterName=PlantType",
"path": "9MDMS.PQM.PlantType",
"leftIcon": "dynamic:ContractIcon"
},
{
"id": 220,
"name": "MDMS",
"url": "/mdms-v2/v2/_create/PQM.PlantType",
"displayName": "create PQM.PlantType",
"orderNumber": 1,
"parentModule": "",
"enabled": true,
"serviceCode": "MDMS",
"code": "null",
"path": ""
},
{
"id": 221,
"name": "MDMS",
"url": "/mdms-v2/v2/_update/PQM.PlantType",
"displayName": "Update PQM.PlantType",
"orderNumber": 1,
"parentModule": "",
"enabled": true,
"serviceCode": "MDMS",
"code": "null",
"path": ""
},
{
"id": 222,
"name": "MDMS",
"url": "url",
"displayName": "Manage PQM Stage",
"orderNumber": 1,
"parentModule": "",
"enabled": true,
"serviceCode": "MDMS",
"code": "null",
"navigationURL": "/workbench-ui/employee/workbench/mdms-search-v2?moduleName=PQM&masterName=Stage",
"path": "9MDMS.PQM.Stage",
"leftIcon": "dynamic:ContractIcon"
},
{
"id": 223,
"name": "MDMS",
"url": "/mdms-v2/v2/_create/PQM.Stage",
"displayName": "create PQM.Stage",
"orderNumber": 1,
"parentModule": "",
"enabled": true,
"serviceCode": "MDMS",
"code": "null",
"path": ""
},
{
"id": 224,
"name": "MDMS",
"url": "/mdms-v2/v2/_update/PQM.Stage",
"displayName": "Update PQM.Stage",
"orderNumber": 1,
"parentModule": "",
"enabled": true,
"serviceCode": "MDMS",
"code": "null",
"path": ""
},
{
"id": 225,
"name": "MDMS",
"url": "url",
"displayName": "Manage PQM TestStandard",
"orderNumber": 1,
"parentModule": "",
"enabled": true,
"serviceCode": "MDMS",
"code": "null",
"navigationURL": "/workbench-ui/employee/workbench/mdms-search-v2?moduleName=PQM&masterName=TestStandard",
"path": "9MDMS.PQM.TestStandard",
"leftIcon": "dynamic:ContractIcon"
},
{
"id": 226,
"name": "MDMS",
"url": "/mdms-v2/v2/_create/PQM.TestStandard",
"displayName": "create PQM.TestStandard",
"orderNumber": 1,
"parentModule": "",
"enabled": true,
"serviceCode": "MDMS",
"code": "null",
"path": ""
},
{
"id": 227,
"name": "MDMS",
"url": "/mdms-v2/v2/_update/PQM.TestStandard",
"displayName": "Update PQM.TestStandard",
"orderNumber": 1,
"parentModule": "",
"enabled": true,
"serviceCode": "MDMS",
"code": "null",
"path": ""
},
{
"id": 228,
"name": "MDMS",
"url": "url",
"displayName": "Manage PQM QualityCriteria",
"orderNumber": 1,
"parentModule": "",
"enabled": true,
"serviceCode": "MDMS",
"code": "null",
"navigationURL": "/workbench-ui/employee/workbench/mdms-search-v2?moduleName=PQM&masterName=QualityCriteria",
"path": "9MDMS.PQM.QualityCriteria",
"leftIcon": "dynamic:ContractIcon"
},
{
"id": 229,
"name": "MDMS",
"url": "/mdms-v2/v2/_create/PQM.QualityCriteria",
"displayName": "create PQM.QualityCriteria",
"orderNumber": 1,
"parentModule": "",
"enabled": true,
"serviceCode": "MDMS",
"code": "null",
"path": ""
},
{
"id": 230,
"name": "MDMS",
"url": "/mdms-v2/v2/_update/PQM.QualityCriteria",
"displayName": "Update PQM.QualityCriteria",
"orderNumber": 1,
"parentModule": "",
"enabled": true,
"serviceCode": "MDMS",
"code": "null",
"path": ""
},
{
"id": 231,
"name": "MDMS",
"url": "url",
"displayName": "Manage PQM Parameter",
"orderNumber": 1,
"parentModule": "",
"enabled": true,
"serviceCode": "MDMS",
"code": "null",
"navigationURL": "/workbench-ui/employee/workbench/mdms-search-v2?moduleName=PQM&masterName=Parameter",
"path": "9MDMS.PQM.Parameter",
"leftIcon": "dynamic:ContractIcon"
},
{
"id": 232,
"name": "MDMS",
"url": "/mdms-v2/v2/_create/PQM.Parameter",
"displayName": "create PQM.Parameter",
"orderNumber": 1,
"parentModule": "",
"enabled": true,
"serviceCode": "MDMS",
"code": "null",
"path": ""
},
{
"id": 233,
"name": "MDMS",
"url": "/mdms-v2/v2/_update/PQM.Parameter",
"displayName": "Update PQM.Parameter",
"orderNumber": 1,
"parentModule": "",
"enabled": true,
"serviceCode": "MDMS",
"code": "null",
"path": ""
},
{
"id": 234,
"name": "MDMS",
"url": "url",
"displayName": "Manage PQM ProcessType",
"orderNumber": 1,
"parentModule": "",
"enabled": true,
"serviceCode": "MDMS",
"code": "null",
"navigationURL": "/workbench-ui/employee/workbench/mdms-search-v2?moduleName=PQM&masterName=ProcessType",
"path": "9MDMS.PQM.ProcessType",
"leftIcon": "dynamic:ContractIcon"
},
{
"id": 235,
"name": "MDMS",
"url": "/mdms-v2/v2/_create/PQM.ProcessType",
"displayName": "create PQM.ProcessType",
"orderNumber": 1,
"parentModule": "",
"enabled": true,
"serviceCode": "MDMS",
"code": "null",
"path": ""
},
{
"id": 236,
"name": "MDMS",
"url": "/mdms-v2/v2/_update/PQM.ProcessType",
"displayName": "Update PQM.ProcessType",
"orderNumber": 1,
"parentModule": "",
"enabled": true,
"serviceCode": "MDMS",
"code": "null",
"path": ""
},
{
"id": 237,
"name": "MDMS",
"url": "url",
"displayName": "Manage PQM ProcessSubType",
"orderNumber": 1,
"parentModule": "",
"enabled": true,
"serviceCode": "MDMS",
"code": "null",
"navigationURL": "/workbench-ui/employee/workbench/mdms-search-v2?moduleName=PQM&masterName=ProcessSubType",
"path": "9MDMS.PQM.ProcessSubType",
"leftIcon": "dynamic:ContractIcon"
},
{
"id": 238,
"name": "MDMS",
"url": "/mdms-v2/v2/_create/PQM.ProcessSubType",
"displayName": "create PQM.ProcessSubType",
"orderNumber": 1,
"parentModule": "",
"enabled": true,
"serviceCode": "MDMS",
"code": "null",
"path": ""
},
{
"id": 239,
"name": "MDMS",
"url": "/mdms-v2/v2/_update/PQM.ProcessSubType",
"displayName": "Update PQM.ProcessSubType",
"orderNumber": 1,
"parentModule": "",
"enabled": true,
"serviceCode": "MDMS",
"code": "null",
"path": ""
},
{
"id": 240,
"name": "MDMS",
"url": "url",
"displayName": "Manage PQM Process",
"orderNumber": 1,
"parentModule": "",
"enabled": true,
"serviceCode": "MDMS",
"code": "null",
"navigationURL": "/workbench-ui/employee/workbench/mdms-search-v2?moduleName=PQM&masterName=Process",
"path": "9MDMS.PQM.Process",
"leftIcon": "dynamic:ContractIcon"
},
{
"id": 241,
"name": "MDMS",
"url": "/mdms-v2/v2/_create/PQM.Process",
"displayName": "create PQM.Process",
"orderNumber": 1,
"parentModule": "",
"enabled": true,
"serviceCode": "MDMS",
"code": "null",
"path": ""
},
{
"id": 242,
"name": "MDMS",
"url": "/mdms-v2/v2/_update/PQM.Process",
"displayName": "Update PQM.Process",
"orderNumber": 1,
"parentModule": "",
"enabled": true,
"serviceCode": "MDMS",
"code": "null",
"path": ""
},
{
"id": 243,
"name": "MDMS",
"url": "url",
"displayName": "Manage PQM PlantConfig",
"orderNumber": 1,
"parentModule": "",
"enabled": true,
"serviceCode": "MDMS",
"code": "null",
"navigationURL": "/workbench-ui/employee/workbench/mdms-search-v2?moduleName=PQM&masterName=PlantConfig",
"path": "9MDMS.PQM.PlantConfig",
"leftIcon": "dynamic:ContractIcon"
},
{
"id": 244,
"name": "MDMS",
"url": "/mdms-v2/v2/_create/PQM.PlantConfig",
"displayName": "create PQM.PlantConfig",
"orderNumber": 1,
"parentModule": "",
"enabled": true,
"serviceCode": "MDMS",
"code": "null",
"path": ""
},
{
"id": 245,
"name": "MDMS",
"url": "/mdms-v2/v2/_update/PQM.PlantConfig",
"displayName": "Update PQM.PlantConfig",
"orderNumber": 1,
"parentModule": "",
"enabled": true,
"serviceCode": "MDMS",
"code": "null",
"path": ""
},
{
"id": 246,
"name": "MDMS",
"url": "url",
"displayName": "Manage PQM PlantAddress",
"orderNumber": 1,
"parentModule": "",
"enabled": true,
"serviceCode": "MDMS",
"code": "null",
"navigationURL": "/workbench-ui/employee/workbench/mdms-search-v2?moduleName=PQM&masterName=PlantAddress",
"path": "9MDMS.PQM.PlantAddress",
"leftIcon": "dynamic:ContractIcon"
},
{
"id": 247,
"name": "MDMS",
"url": "/mdms-v2/v2/_create/PQM.PlantAddress",
"displayName": "create PQM.PlantAddress",
"orderNumber": 1,
"parentModule": "",
"enabled": true,
"serviceCode": "MDMS",
"code": "null",
"path": ""
},
{
"id": 248,
"name": "MDMS",
"url": "/mdms-v2/v2/_update/PQM.PlantAddress",
"displayName": "Update PQM.PlantAddress",
"orderNumber": 1,
"parentModule": "",
"enabled": true,
"serviceCode": "MDMS",
"code": "null",
"path": ""
},
{
"id": 249,
"name": "MDMS",
"url": "url",
"displayName": "Manage PQM WasteType",
"orderNumber": 1,
"parentModule": "",
"enabled": true,
"serviceCode": "MDMS",
"code": "null",
"navigationURL": "/workbench-ui/employee/workbench/mdms-search-v2?moduleName=PQM&masterName=WasteType",
"path": "9MDMS.PQM.WasteType",
"leftIcon": "dynamic:ContractIcon"
},
{
"id": 250,
"name": "MDMS",
"url": "/mdms-v2/v2/_create/PQM.WasteType",
"displayName": "create PQM.WasteType",
"orderNumber": 1,
"parentModule": "",
"enabled": true,
"serviceCode": "MDMS",
"code": "null",
"path": ""
},
{
"id": 251,
"name": "MDMS",
"url": "/mdms-v2/v2/_update/PQM.WasteType",
"displayName": "Update PQM.WasteType",
"orderNumber": 1,
"parentModule": "",
"enabled": true,
"serviceCode": "MDMS",
"code": "null",
"path": ""
},
{
"id": 358,
"name": "Search PQM Application",
"url": "/mdms-v2/v2/_search",
"displayName": "Search PQM Applications",
"orderNumber": 0,
"enabled": false,
"serviceCode": "PQM",
"code": "null",
"path": ""
},
{
"id": 364,
"name": "MDMS",
"url": "/mdms-v2/v2/_create/PQM.SourceType",
"displayName": "create PQM.SourceType",
"orderNumber": 1,
"parentModule": "",
"enabled": true,
"serviceCode": "MDMS",
"code": "null",
"path": ""
},
{
"id": 365,
"name": "MDMS",
"url": "/mdms-v2/v2/_update/PQM.SourceType",
"displayName": "Update PQM.SourceType",
"orderNumber": 1,
"parentModule": "",
"enabled": true,
"serviceCode": "MDMS",
"code": "null",
"path": ""
},
{
"id": 23,
"name": "Profile Update",
"url": "/user/profile/_update",
"displayName": "Profile Update",
"orderNumber": 1,
"enabled": false,
"serviceCode": "ADMIN",
"code": "null",
"path": "Administration.Profile Update"
},
{
"id": 26,
"name": "Update Password",
"url": "/user/password/_update",
"displayName": "Update Password",
"orderNumber": 1,
"enabled": false,
"serviceCode": "ADMIN",
"code": "null",
"path": "Administration.Update Password"
},
{
"id": 370,
"name": "Create Workbench UiSchema",
"url": "/mdms-v2/v2/_create/Workbench.UISchema",
"displayName": "Create workbench ui-schema",
"orderNumber": 0,
"enabled": false,
"serviceCode": "MDMS",
"code": "null",
"path": ""
},
{
"id": 202,
"name": "Update Tenant Tenants",
"url": "/mdms-v2/v2/_update/tenant.tenants",
"displayName": "Update Tenant Tenants",
"orderNumber": 0,
"enabled": true,
"serviceCode": "PQM",
"code": "null",
"path": ""
}
data/pg/ACCESSCONTROL-ACTIONS-TEST/actions-test.json:
{
"rolecode": "MDMS_ADMIN",
"actionid": 202,
"actioncode": "",
"tenantId": "pg"
},
{
"rolecode": "MDMS_ADMIN",
"actionid": 370,
"actioncode": "",
"tenantId": "pg"
},
{
"rolecode": "MDMS_ADMIN",
"actionid": 26,
"actioncode": "",
"tenantId": "pg"
},
{
"rolecode": "PQM_ADMIN",
"actionid": 26,
"actioncode": "",
"tenantId": "pg"
},
{
"rolecode": "PQM_TP_OPERATOR",
"actionid": 26,
"actioncode": "",
"tenantId": "pg"
},
{
"rolecode": "HRMS_ADMIN",
"actionid": 26,
"actioncode": "",
"tenantId": "pg"
},
{
"rolecode": "SUPERUSER",
"actionid": 26,
"actioncode": "",
"tenantId": "pg"
},
{
"rolecode": "MDMS_ADMIN",
"actionid": 23,
"actioncode": "",
"tenantId": "pg"
},
{
"rolecode": "PQM_ADMIN",
"actionid": 23,
"actioncode": "",
"tenantId": "pg"
},
{
"rolecode": "PQM_TP_OPERATOR",
"actionid": 23,
"actioncode": "",
"tenantId": "pg"
},
{
"rolecode": "HRMS_ADMIN",
"actionid": 23,
"actioncode": "",
"tenantId": "pg"
},
{
"rolecode": "SUPERUSER",
"actionid": 23,
"actioncode": "",
"tenantId": "pg"
},
{
"rolecode": "MDMS_ADMIN",
"actionid": 364,
"actioncode": "",
"tenantId": "pg"
},
{
"rolecode": "MDMS_ADMIN",
"actionid": 365,
"actioncode": "",
"tenantId": "pg"
},
{
"rolecode": "MDMS_ADMIN",
"actionid": 358,
"actioncode": "",
"tenantId": "pg"
},
{
"rolecode": "SUPERUSER",
"actionid": 358,
"actioncode": "",
"tenantId": "pg"
},
{
"rolecode": "PQM_ADMIN",
"actionid": 358,
"actioncode": "",
"tenantId": "pg"
},
{
"rolecode": "PQM_TP_OPERATOR",
"actionid": 358,
"actioncode": "",
"tenantId": "pg"
},
{
"rolecode": "MDMS_ADMIN",
"actionid": 346,
"actioncode": "",
"tenantId": "pg"
},
{
"rolecode": "MDMS_ADMIN",
"actionid": 347,
"actioncode": "",
"tenantId": "pg"
},
{
"rolecode": "MDMS_ADMIN",
"actionid": 357,
"actioncode": "",
"tenantId": "pg"
},
{
"rolecode": "MDMS_ADMIN",
"actionid": 201,
"actioncode": "",
"tenantId": "pg"
},
{
"rolecode": "MDMS_ADMIN",
"actionid": 202,
"actioncode": "",
"tenantId": "pg"
},
{
"rolecode": "MDMS_ADMIN",
"actionid": 203,
"actioncode": "",
"tenantId": "pg"
},
{
"rolecode": "MDMS_ADMIN",
"actionid": 204,
"actioncode": "",
"tenantId": "pg"
},
{
"rolecode": "MDMS_ADMIN",
"actionid": 205,
"actioncode": "",
"tenantId": "pg"
},
{
"rolecode": "MDMS_ADMIN",
"actionid": 206,
"actioncode": "",
"tenantId": "pg"
},
{
"rolecode": "MDMS_ADMIN",
"actionid": 207,
"actioncode": "",
"tenantId": "pg"
},
{
"rolecode": "MDMS_ADMIN",
"actionid": 208,
"actioncode": "",
"tenantId": "pg"
},
{
"rolecode": "MDMS_ADMIN",
"actionid": 209,
"actioncode": "",
"tenantId": "pg"
},
{
"rolecode": "MDMS_ADMIN",
"actionid": 210,
"actioncode": "",
"tenantId": "pg"
},
{
"rolecode": "MDMS_ADMIN",
"actionid": 211,
"actioncode": "",
"tenantId": "pg"
},
{
"rolecode": "MDMS_ADMIN",
"actionid": 212,
"actioncode": "",
"tenantId": "pg"
},
{
"rolecode": "MDMS_ADMIN",
"actionid": 213,
"actioncode": "",
"tenantId": "pg"
},
{
"rolecode": "MDMS_ADMIN",
"actionid": 214,
"actioncode": "",
"tenantId": "pg"
},
{
"rolecode": "MDMS_ADMIN",
"actionid": 215,
"actioncode": "",
"tenantId": "pg"
},
{
"rolecode": "MDMS_ADMIN",
"actionid": 216,
"actioncode": "",
"tenantId": "pg"
},
{
"rolecode": "MDMS_ADMIN",
"actionid": 217,
"actioncode": "",
"tenantId": "pg"
},
{
"rolecode": "MDMS_ADMIN",
"actionid": 218,
"actioncode": "",
"tenantId": "pg"
},
{
"rolecode": "MDMS_ADMIN",
"actionid": 219,
"actioncode": "",
"tenantId": "pg"
},
{
"rolecode": "MDMS_ADMIN",
"actionid": 220,
"actioncode": "",
"tenantId": "pg"
},
{
"rolecode": "MDMS_ADMIN",
"actionid": 221,
"actioncode": "",
"tenantId": "pg"
},
{
"rolecode": "MDMS_ADMIN",
"actionid": 222,
"actioncode": "",
"tenantId": "pg"
},
{
"rolecode": "MDMS_ADMIN",
"actionid": 223,
"actioncode": "",
"tenantId": "pg"
},
{
"rolecode": "MDMS_ADMIN",
"actionid": 224,
"actioncode": "",
"tenantId": "pg"
},
{
"rolecode": "MDMS_ADMIN",
"actionid": 225,
"actioncode": "",
"tenantId": "pg"
},
{
"rolecode": "MDMS_ADMIN",
"actionid": 226,
"actioncode": "",
"tenantId": "pg"
},
{
"rolecode": "MDMS_ADMIN",
"actionid": 227,
"actioncode": "",
"tenantId": "pg"
},
{
"rolecode": "MDMS_ADMIN",
"actionid": 228,
"actioncode": "",
"tenantId": "pg"
},
{
"rolecode": "MDMS_ADMIN",
"actionid": 229,
"actioncode": "",
"tenantId": "pg"
},
{
"rolecode": "MDMS_ADMIN",
"actionid": 230,
"actioncode": "",
"tenantId": "pg"
},
{
"rolecode": "MDMS_ADMIN",
"actionid": 231,
"actioncode": "",
"tenantId": "pg"
},
{
"rolecode": "MDMS_ADMIN",
"actionid": 232,
"actioncode": "",
"tenantId": "pg"
},
{
"rolecode": "MDMS_ADMIN",
"actionid": 233,
"actioncode": "",
"tenantId": "pg"
},
{
"rolecode": "MDMS_ADMIN",
"actionid": 234,
"actioncode": "",
"tenantId": "pg"
},
{
"rolecode": "MDMS_ADMIN",
"actionid": 235,
"actioncode": "",
"tenantId": "pg"
},
{
"rolecode": "MDMS_ADMIN",
"actionid": 236,
"actioncode": "",
"tenantId": "pg"
},
{
"rolecode": "MDMS_ADMIN",
"actionid": 237,
"actioncode": "",
"tenantId": "pg"
},
{
"rolecode": "MDMS_ADMIN",
"actionid": 238,
"actioncode": "",
"tenantId": "pg"
},
{
"rolecode": "MDMS_ADMIN",
"actionid": 239,
"actioncode": "",
"tenantId": "pg"
},
{
"rolecode": "MDMS_ADMIN",
"actionid": 240,
"actioncode": "",
"tenantId": "pg"
},
{
"rolecode": "MDMS_ADMIN",
"actionid": 241,
"actioncode": "",
"tenantId": "pg"
},
{
"rolecode": "MDMS_ADMIN",
"actionid": 242,
"actioncode": "",
"tenantId": "pg"
},
{
"rolecode": "MDMS_ADMIN",
"actionid": 243,
"actioncode": "",
"tenantId": "pg"
},
{
"rolecode": "MDMS_ADMIN",
"actionid": 244,
"actioncode": "",
"tenantId": "pg"
},
{
"rolecode": "MDMS_ADMIN",
"actionid": 245,
"actioncode": "",
"tenantId": "pg"
},
{
"rolecode": "MDMS_ADMIN",
"actionid": 246,
"actioncode": "",
"tenantId": "pg"
},
{
"rolecode": "MDMS_ADMIN",
"actionid": 247,
"actioncode": "",
"tenantId": "pg"
},
{
"rolecode": "MDMS_ADMIN",
"actionid": 248,
"actioncode": "",
"tenantId": "pg"
},
{
"rolecode": "MDMS_ADMIN",
"actionid": 249,
"actioncode": "",
"tenantId": "pg"
},
{
"rolecode": "MDMS_ADMIN",
"actionid": 250,
"actioncode": "",
"tenantId": "pg"
},
{
"rolecode": "MDMS_ADMIN",
"actionid": 251,
"actioncode": "",
"tenantId": "pg"
}code
Alphanumeric or numeric representation assigned to uniquely identify the field.
name
Textual or human-readable identity given to a record.
code
Alphanumeric or numeric representation assigned to uniquely identify the field.
name
Textual or human-readable identity given to a record.
code
Alphanumeric or numeric representation assigned to uniquely identify the field.
name
Textual or human-readable identity given to a record.
code
Alphanumeric or numeric representation assigned to uniquely identify the field.
name
Textual or human-readable identity given to a record.
description
Details or explanation for a record.
code
Alphanumeric or numeric representation assigned to uniquely identify the field.
manualTestPendingEscalationDays
The number of days after which a scheduled test that is still pending requires escalation.
pendingTestsToDisplayWithinDays
The number of days within which pending tests, assessments, or evaluations should be displayed or considered.
code
Alphanumeric or numeric representation assigned to uniquely identify the field.
name
Textual or human-readable identity given to a record.
description
Details or explanation for a record.
code
Alphanumeric or numeric representation assigned to uniquely identify the field.
name
Textual or human-readable identity given to a record.
code
Alphanumeric or numeric representation assigned to uniquely identify the field.
name
Textual or human-readable identity given to a record.
code
Alphanumeric or numeric representation assigned to uniquely identify the field.
name
Textual or human-readable identity given to a record.
code
Alphanumeric or numeric representation assigned to uniquely identify the field.
name
Textual or human-readable identity given to a record.
description
Details or explanation for a record.
code
Alphanumeric or numeric representation assigned to uniquely identify the field.
name
Textual or human-readable identity given to a record.
description
Details or explanation for a record.
input
Materials provided as input to a stage.
output
Materials provided as output to a stage.
code
Alphanumeric or numeric representation assigned to uniquely identify the field.
type
Defines the type of process.
name
Textual or human-readable identity given to a record.
description
Details or explanation for a record.
stages
A list of stages that come under a particular process.
wasteType
The classification of waste materials based on their characteristics or origin.
code
Alphanumeric or numeric representation assigned to uniquely identify the record.
name
Textual or human-readable identity given to a record.
description
Details or explanation for a record.
plantType
The classification of plants based on their processing.
wasteType
The classification of waste materials based on their characteristics or origin
address
Location details for a particular plant.
processes
A list of processes that happen under a particular plant.
plantConfig
Configuration details for a particular plant.
ULBs
Comma separted ULB list who have operational access to. e.g. pg.cityb, pg.cityb
PlusCode
Address of the plant. e.g. JQ2R+7G Khapar Kheri, Punjab
Latitude
Latitude of the plant location
Longitude
Logitude value of the plant location
PlantLocation
Location of the plant. e.g. Bhalasore
PlantOperationalTimings
Plant Operational Timings. E.g. 10.00am-08.00pm
PlantOperationalCapcityKLD
Capacity of the plant for operating at max. E.g.50
code
Alphanumeric or numeric representation assigned to uniquely identify the field.
parameter
Anything that is measurable as an input/output for a particular stage.
unit
The unit for measuring this particular parameter.
benchmarkRule
The rules according to which a test value should be tested (For example, greater than, less than, equals to).
benchmarkValues
Specific numbers on which the benchmark rule is applied for a test value.
allowedDeviation
The acceptable difference from the benchmark values.
code
Alphanumeric or numeric representation assigned to uniquely identify the field.
plant
Plant code for which this test standard is registered.
process
Process code for which this test standard is registered.
stage
Stage code for which this test standard is registered.
material
Material code for which this test standard is registered.
qualityCriteria
The quality criteria which is applicable for the unique combination of plant, process, stage, and material.
frequency
The frequency at which this test standard should be scheduled.
sourceType
The origin of this particular test standard.


Desludging operators (DSO) can be registered via a user interface (UI) available to the urban local body (ULB) admin. Once created, multiple vehicles and drivers can be mapped to a DSO. DSOs can also be enabled/disabled in the system.
Desludging operators will have the following details:
Field Name
Type
Mandatory
Editable (Y/N)
Unique within a ULB (Y/N)
Vendor name
Free text
Y
N
N
Gender
Array
Y
N
N
DOB
Date
N
Y
N
Email address
Free text (Email format)
N
Y
N
Mobile number
Number
Y
N
Y
Door number
Free text
N
Y
N
Plot number
Free text
N
Y
N
Building name
Free text
N
Y
N
Street
Free text
N
Y
N
Pincode
Free text
N
Y
N
City
Array
Y
N
N
Locality/mohalla
Array
Y
N
N
Landmark
Free text
N
Y
N
Additional Details
Free text
N
Y
N
Status
Binary
Y
Y
N
Drivers can be registered via a UI available to the ULB admin. Once created, a driver can be mapped to a DSO. Drivers can also be enabled/disabled in the system.
Driver operators will have the following details:
Field name
Type
Mandatory
Editable (Y/N)
Unique within a ULB (Y/N)
Driver name
Free text
Y
N
N
Driver license number
Free text (Validation on the license format)
Y
Y
N
Gender
Array
N
Y
N
DOB
Date
N
Y
N
Email address
Free text (Email format)
N
Y
N
Driver phone number
Number
Y
N
N
Vehicles can be registered via a UI available to the ULB admin. Once created, a vehicle can be mapped to a DSO. Vehicles can also be enabled/disabled in the system.
Vehicles operators will have the following details:
Field name
Type
Mandatory
Editable (Y/N)
Unique within a ULB (Y/N)
Registration number
Free Text
Y
N
Y
Vehicle model
Array
Y
Y
N
Vehicle type
Array
Y
Y
N
Tank capacity
Array
Y
Y
N
Pollution certificate valid till
Date
N
Y
N
Insurance valid till
Date
N
Y
N
Road tax paid till
Date
N
Y
N
Fitness certificate valid till
Date
N
Y
N
Vehicle owner name
Free text
Y
N
N
Vehicle owner phone number
Number
Y
N
N
The citizen or the ULB official can apply for a desludging request.
Application Channel
Citizens can apply online using the web application.
Citizens can walk into a ULB and submit a request to the counter operator, who then creates an application on behalf of the citizen online.
Citizens can call the ULB and request for a desludging operation, which can then be transformed into an online application by the ULB official.
Application Submission
Desludging applications can be created by a citizen.
Desludging application requests can be created by a ULB official on behalf of a citizen.
- If the application is created by a ULB official, then capture the channel in which the request was received. It will be an additional field in the UI to capture the channel.
Field name
Type
Mandatory
Editable
Comments
Applicant name
Text
Y
N
Mobile number
Numeric
Y
N
Gender
Dropdown
Y
N
City
Dropdown
Y
N
As per the boundary data defined.
Locality
Dropdown
Y
N
As per the boundary data defined.
Whether property is in a slum
Binary
Y
N
Slum name
Dropdown
Y
N
Only if the above selection is yes. List of slums per ULB to be uploaded in the system.
Street name
Text
N
N
Door house number
Text
N
N
Landmark
Text
N
N
Geo location
Lat-Long
N
N
As per DIGIT standards.
Onsite sanitation type
Dropdown
N
Y
Select one from the list.
PIT size
L*B*D in feet (This UOM might change from state to state)
N
Y
Numeric
Property type
Dropdown
Y
N
Use the same ontology as defined in DIGIT Property Tax.
Property sub-type
Dropdown
Y
N
Use the same ontology as defined in DIGIT Property Tax.
Number of trips required
Numeric
Y
Y
Editable by ULB and DSO.
Vehicle capacity
Dropdown
Y
N
Populated as per the vehicle capacities available in the particular ULB.
Application channel
Dropdown
Y
Required only if the creator is a ULB official.
Total amount
Numeric, display only
Y
N
Calculated based on the billing slabs.
Minimum amount payable
Numeric, display only
Y
N
Displayed as per the configuration in the backend.
Advance amount
Numeric
Y
Y
Service Request Fee
Service request fee is calculated as a multiplier of the amount per trip defined in the billing slab table (based on property type, sub-type, whether it is a slum, vehicle capacity) and the number of trips.
For certain combinations with the above parameters, the pricing can be set at zero. In such cases, demand will not be generated.
ULBs can configure a minimum advance payment to be collected before starting a request. This can either be a fixed value (starting from 0) or a percentage (ranging from 0-100). Citizens will be able to make a payment above the minimum advance amount, and below the total trip amount as an advance payment.
Payment: Online/Cash Counter
Citizens can make both the advance and balance payments online.
Citizens can make both the advance and balance payments at the ULB counter.
Payment receipts will be generated and sent across via SMS. They can be downloaded at the citizen and ULB interfaces.
When a service request is received by a ULB official, he/she can do the following:
- Search and assign a DSO to the application request.
- Cancel the application with remarks.
- Update the application request with the number of trips required to empty the septic tank or Pit and the vehicle details.
- Change the DSO from an application request if the assigned DSO is not available.
- Update the status of the request as completed, post desludging.
- View past records of requests and service delivery.
Cancellation of application
A citizen or a ULB official can cancel the application online.
Citizens can cancel it only if the DSO is not assigned to the service request.
Application cannot be cancelled if the payment is made already.
ULB officials can cancel it only if the service is not completed by the DSO.
SMS and Email Updates
SMS and email updates are sent on every necessary process of the entire process flow.
A DSO should get notified about the request that is assigned to him/her. On receiving the request, the following actions can be taken:
- View the request.
- Assign requests to a vehicle.
- Update the number of trips.
- Flag a request ready for disposal.
- Close the request post desludging.
One DSO cannot see the details of the other DSO or the request assigned to the other DSOs.
Field name
Type
Required
Comments
Volume of waste collected
Numeric
Y
Citizens can provide feedback on the desludging request:
There will be an option to rate the service provided with comments.
There will be an option for citizens to update whether safety equipment is used by the sanitary workers during the operation.
Plant operators can do the following:
View the list of desludging operations for a day. Since an application may have multiple trips, the plant operator will view multiple line items against an application in the inbox.
Update the Vehicle entry log against an application request with the details like:
- Date and time of entry.
- Volume of sludge dumped at the plant.
Field name
Type
Required
Comments
Vehicle in-time
Time
Y
Vehicle out-time
Time
Y
Volume of sludge dumped
Numeric
Y
Additional details
Text
N
Attachments
Document/Image
N
If a vehicle without a corresponding request arrives at the FSTP, the FSTP can record the vehicle entry.
Field name
Type
Required
Comments
Vehicle number
Alphanumeric
Y
Only unregistered vehicles in the system.
DSO name
Text
Y
Locality
Text
Y
Vehicle in-time
Time
Y
Vehicle out-time
Time
Y
Volume of sludge dumped
Numeric
Y
Additional details
Text
N
Attachments
Document/Image
N
The DSO can also decline an incoming vehicle.
Attribute
Type
Required?
Comments
Vehicle
UUID
Y
Trip Number
Numeric
Y
Volume
Numeric
Y
Desludging request
UUID
Y
Reason for declining
String
Y
[ “Septage Source”, “Outside operational hours”, “Under Maintenance”]
Citizens can provide feedback on the desludging request:
Rate the service provided (1-5 stars).
Multi-select to update whether safety equipment is used by the sanitary workers during the operation.
List of PDFs
Acknowledgement Recepit: Confirming receipt of desludging receipts.
Payment receipts: Multiple payment receipts based on the payments made.
Search criteria
Field name
Type
Required
ULB name
Default
Internally pass the ULB name (Y)
From date
Date
Y
To date
Date
Y
DSO name
Search
N - Auto-populate on typing a few letters.
Search result
Application number
Application date
Current Status
DSO Name
Amount (Rs)
Date of completion
Search criteria
Field name
Type
Required
ULB name
Dropdown
Internally pass this info.
Mohalla
Dropdown
N
DSO
Search
N - Auto-populate on typing few characters.
From date
Date
Y
To date
Date
Y
Search result
Application number/Date
Mohalla
DSO Name
Status
SLA compliance
Volume of waste collected
Search criteria
Field name
Type
Comments
ULB name
Dropdown
If the logged-in user is a ULB employee, then pass this information internally.
If the logged-in user is an STP/FSTP operator, then ask the user to select the ULB name as one STP can be attached to multiple ULBs.
STP/FSTP name
Dropdown
Internally pass this information: We have mapping between ULB and STP/FSTP.
DSO name
Search
N - Auto-populate on typing a few letters.
Vehicle number
Dropdown
Populate only if the DSO name is selected.
From date
Date
Y
To date
Date
Y
Search result
Application number
DSO name /Vehicle number
Vehicle entry date
Vehicle in time
Vehicle out time
Volume of sludge dumped (L)
Filter criteria
Field name
Type
Comments
DDR (District name)
Dropdown
If the logged-in user is a ULB employee, then pass this information internally.
If the logged-in user is an admin, show for all the districts.
ULB name
Dropdown
If the logged-in user is a ULB employee, then pass this information internally.
If the logged-in user is an admin, show for all the ULBs.
Date range (From and to dates)
Date
Mandatory, auto-select for entire time period.
Selection criteria
Field Name
Type
Comments
Denomination
Array
Choose the denominate between Cr, Lac and Unit.
Other functionalities:
Share via:
a. Image: Downloads image
b. Whatsapp: Image shared via Whatsapp
Download:
a. Image format
Chart name
Chart type
X Axis
Y Axis
Logic
Comments
Tooltip (if any)
Drilldown available (Y/N)
Overview: Total requests
KPI
NA
NA
Sum of total the requests cumulated over a period of time.
Absolute number and percentage increase or decrease from previous year for the same time period.
NA
N
Overview: Total sludge treated (in KL)
KPI
NA
NA
Sum of the total sludge deposited from registered and unregistered vehicles at the FSTP.
Absolute number and percentage increase or decrease from the previous year for the same time period.
NA
N
Overview: Total collection
KPI
NA
NA
Sum of the total revenue collected against service delivery.
Absolute number and percentage increase or decrease from the previous year for the same time period.
NA
N
Overview: SLA compliance
KPI
NA
NA
Average SLA compliance (percentage of requests completed within SLA).
Percentage number and percentage increase or decrease from the previous year for the same time period.
NA
N
Overview: Citizen average rating
KPI
NA
NA
Average citizen rating (Total citizen rating/total number of applications with feedback).
Absolute number and percentage increase or decrease from the previous year for the same time period.
NA
N
Total cumulative collection
Area chart
Month
Total collection
Cumulative collection over a period of time.
- Month name - Value
N
Revenue by property type
Pie chart
NA
NA
Distribution of requests by property type.
The percentage of requests by each property type to be displayed on the chart.
Display percentage and absolute value.
N
Top 3 performing ULBs (SLA achievement)
Percentage completion on line chart
NA
NA
Average SLA per ULB.
Top 3 to be displayed. View more options available to view the entire list of ULBs.
N
Bottom 3 performing ULBs (SLA achievement)
Percentage completion on line chart
NA
NA
Average SLA per ULB
Bottom 3 to be displayed. View more options available to view the entire list of ULBs.
M
FSTP - Capacity utilisation
Line chart
Percentage capacity utilisation
Time (Month)
Total waste disposed of or total capacity.
Total waste treated to be displayed below the chart heading.
- Month - Capacity utilisation (%). - Capacity utilisation (%) as compared to last year for the same month.
Monthly waste collected versus monthly waste disposed off
Column chart
Waste collected and waste dumped
Time (Month)
- Sum of waste collected.
- Sum of waste disposed of.
- Month
- Waste collected (absolute number and % increase decrease as compared to last year for the same month).
- Waste disposed (absolute number and % increase or decrease as compared to last year for the same month).
Total request by region
Table
NA
NA
Fields:
- Serial number.
- District
- # of open requests.
- # of closed requests.
- # of total requests.
- Completion rate (Percentage completion).
- SLA achieved: Percentage.
- Total collection.
- Selection to display the number of rows in a table.
- Option to move to the next and the previous pages, and display the current page number.
- Search by district name.
- Show filters applied, if any.
Drilldown on district name to ULBs mapped in the district.
Vehicle log report
Table
NA
NA
Fields:
- Serial number.
- ULB.
- Volume of waste collected.
- Volume of waste dumped.
- Capacity utilisation (percentage). - Show comparison to last year.
- Selection to display the number of rows in a table.
- Option to move to the next and the previous pages, and display the current page number.
- Search by district name.
- Show filters applied, if any.
Advance Balance Workflow
Application type
Status
Roles
Action
Next state
Desludging
Citizen
FSM_CREATOR_EMP
Create application
Application created
Desludging
Application created
Citizen
FSM_CREATOR_EMP
Submit application
Pending for payment
Desludging
Pending for DSO assignment
FSM_EDITOR_EMP
Reject application
Application created
Desludging
Pending for payment
Citizen
Pay for the number of trips (may be 0 to full)
Pending for DSO assignment
Desludging
Pending for DSO assignment
FSM_EDITOR_EMP
Assign DSO
Pending for DSO approval
Desludging
Pending for DSO assignment
FSM_EDITOR_EMP
Return application
Application created
Desludging
Pending for DSO assignment
FSM_EDITOR_EMP
Reassign DSO
Pending for DSO approval
Desludging
Pending for DSO approval
DSO
FSM_EDITOR_EMP
Assign Vehicle
DSO in progress
Desludging
Pending for DSO approval
DSO
FSM_EDITOR_EMP
Reject
Pending for DSO assignment
Desludging
DSO in progress
FSM_EDITOR_EMP DSO
Update the number of trips or schedule trips
DSO in progress
Desludging
DSO in progress
Citizen
Pay (full amount)
DSO in progress
Desludging
DSO in progress
FSM_EDITOR_EMP DSO
Dispose
DSO in progress
Desludging
DSO in progress
DSO
FSM_EDITOR_EMP
Complete request (after collecting the total amount)
Pending citizen feedback
Desludging
Pending citizen feedback
Citizen
Citizen provides feedback
Request completed
Application Type
Status
Action
Roles
Next State
VehicleTrip
Schedules trip
FSM_DSO
SCHEDULED
VehicleTrip
SCHEDULED
Ready for disposal
FSM_DSO"
"FSM_EDITOR_EMP
Waiting for disposal
VehicleTrip
Waiting for disposal
Dispose
FSM_EMP_FSTPO
DISPOSED
Pay Later Workflow
Application type
Status
Roles
Action
Next state
Desludging
Citizen
FSM_CREATOR_EMP
Create application
Application created
Desludging
Application created
Citizen
FSM_CREATOR_EMP
Submit application
Pending for DSO assignment
Desludging
Pending for DSO assignment
FSM_EDITOR_EMP
Reject application
Application created
Desludging
Pending for DSO assignment
FSM_EDITOR_EMP
Assign DSO
Pending for DSO approval
Desludging
Pending for DSO assignment
FSM_EDITOR_EMP
Return application
Application created
Desludging
Pending for DSO assignment
FSM_EDITOR_EMP
Reassign DSO
Pending for DSO approval
Desludging
Pending for DSO approval
DSO
FSM_EDITOR_EMP
Assign Vehicle
DSO in progress
Desludging
Pending for DSO approval
DSO
FSM_EDITOR_EMP
Reject
Pending for DSO assignment
Desludging
DSO in progress
FSM_EDITOR_EMP DSO
Update the number of trips or schedule trips
DSO in progress
Desludging
DSO in progress
Citizen
Pay (Full Amount)
DSO in progress
Desludging
DSO in progress
FSM_EDITOR_EMP DSO
Dispose
DSO in progress
Desludging
DSO in progress
DSO
FSM_EDITOR_EMP
Complete Request (after collecting the total amount)
Pending citizen Feedback
Desludging
Pending citizen feedback
Citizen
Citizen provides feedback
Request completed
Application Type
Status
Action
Roles
Next state
VehicleTrip
Schedules trip
FSM_DSO
SCHEDULED
VehicleTrip
SCHEDULED
Ready for disposal
FSM_DSO"
"FSM_EDITOR_EMP
Waiting for disposal
VehicleTrip
Waiting for disposal
Dispose
FSM_EMP_FSTPO
DISPOSED
Zero Price Workflow
Application type
Status
Roles
Action
Next State
Desludging
-
Citizen
FSM_CREATOR_EMP
Create application
Application created
Desludging
Application created
Citizen
FSM_CREATOR_EMP
Submit application
Pending for payment
Desludging
Pending for DSO assignment
FSM_EDITOR_EMP
Reject application
Application created
Desludging
Pending for DSO assignment
FSM_EDITOR_EMP
Assign DSO
Pending for DSO approval
Desludging
Pending for DSO assignment
FSM_EDITOR_EMP
Return application
Application created
Desludging
Pending for DSO assignment
FSM_EDITOR_EMP
Reassign DSO
Pending for DSO approval
Desludging
Pending for DSO approval
DSO
FSM_EDITOR_EMP
Assign vehicle
DSO in progress
Desludging
Pending for DSO approval
DSO
FSM_EDITOR_EMP
Reject
Pending for DSO Assignment
Desludging
DSO in progress
FSM_EDITOR_EMP DSO
update No of trips / schedule trip
DSO in Progress
Desludging
DSO in progress
FSM_EDITOR_EMP
Reassign DSO
Pending for DSO approval
Desludging
DSO in progress
FSM_EDITOR_EMP DSO
Dispose
DSO in progress
Desludging
DSO in progress
DSO
FSM_EDITOR_EMP
Complete request (after collecting the total amount)
Pending citizen feedback
Desludging
Pending citizen feedback
Citizen
Citizen provides Feedback
Request completed
Application type
Status
Action
Roles
Next state
VehicleTrip
Schedules trip
FSM_DSO
SCHEDULED
VehicleTrip
SCHEDULED
Ready for disposal
FSM_DSO"
"FSM_EDITOR_EMP
Waiting for disposal
VehicleTrip
Waiting for disposal
Dispose
FSM_EMP_FSTPO
DISPOSED
This user story aims to enable the state and the urban local body (ULB) admin to define the input/output quality testing requirements, including testing parameters, benchmarks, and frequencies for each treatment process and stage in the plant. It also allows them to specify different standards for manual and IoT-based testing for particular input/output types and stages. No UI is required for the same.
- State admin
- ULB admin
- Setup plants, treatment process and stages, and map plants to the treatment process and stages.
- Plants may contain one or more treatment processes, each with a treatment process type and capacity.
- A treatment process will contain multiple stages.
- The state or ULB admin can define input/output testing requirements for each treatment process type and stage.
- They can enable or disable testing for specific input/output types and stages.
- They can define testing parameters, benchmarks, and frequencies at the national/state level.
- They can adjust testing frequencies for plants based on their testing results.
- They can specify different testing standards for manual and IoT-based testing for specific input/output types and stages.
Treatment process
Attribute
Type
Mandatory
Comments
Validation Required?
Treatment Process ID
Numeric
Y
Auto-generated numeric value which will act as a unique identified for a process flow.
N, this value should be system-generated.
Process Name
Text
Y
This is the commonly-used identifier for the process flow.
Max characters - 256
Status
Array
Y
Status of the process flow.
Active/Inactive, Single Select
Treatment Process Type
Array
Y
The dropdown will be auto-populated basis the list of waste maintained in the MDMS.
Single Select
Treatment Process Sub-type
Array
Y
The dropdown will be auto-populated basis the list of waste maintained in the MDMS.
Single Select
Plants
Attribute
Type
Mandatory
Comments
Validation Required?
Plant ID
Numeric
Y
Auto-generated numeric value which will act as a unique identifier for a plant.
Auto-generated
Plant Name
Text
Y
This is the commonly-used identifier for the plant
Maximum characters - 128
Plant Type
Array
Y
Single Select only, Faecal Sludge, Solid Waste, Co-treatment
Tenant Id
Text
Y
Status
Array
Y
Status of the plant
Active/Inactive, Single Select
Geolocation
Lat,Long
Y
Capture the exact latitude-longitude
Stages:
Attribute
Type
Mandatory
Comments
Validation Required?
Stage ID
Numeric
Y
Auto-generated numeric value which will act as a unique identifier for a job ID.
Auto-generated
Stage Name
Text
Y
This is the commonly-used identifier for the job.
Maximum characters - 128
Minimum Characters - NA
Status
Boolean
Y
Status of the stage.
Active/Inactive, Single Select
Input Quality Measurement Required
Boolean
Y
This selection will allow the user to setup if the input quality for the particular input type needs to be monitored. The user should be able to enable and disable input quality measurement requirement independently for each type.
Yes/No, Single Select
Output Type
Array
Y
The dropdown will be auto-populated basis the list of output types.
Multi-select
Output Quality Measurement Required
Boolean
Y
This selection will allow the user to setup if the output quality for the particular job needs to be monitored. The user should be able to enable and disable output quality measurement requirement independently for each type.
Yes/No, Single Select
Testing Parameters
Attribute
Type
Mandatory
Validation
Quality Parameter
Array
Y
Selecting from the predefined of the above-mentioned quality parameters and standards, Single Select.
Quality Parameter Unit of Measurement
Array
Y
Selection of unit of measurement (mg/L, Absolute value etc.), Single Select.
Benchmark Rule
Array
Y
Options include X>=,<=R, =<Y and >=Z, Single Select.
Benchmark Value
Numeric
Y
Entered by user, numeric only.
Testing Frequency - Manual (Days)
Numeric
Y
Selecting a custom frequency range for laboratory testing based on consent to operate, numeric only.
Monitoring Frequency - Quality Sensor (Days)
Numeric
N
Selecting a custom frequency
Note: Should be optional if the ULB/State chose NOT to have sensor-based monitoring, numeric only.
This feature can be managed through backend configurations and databases, allowing administrators to make changes easily.
- A state or ULB admin can define the input/output testing requirements for each treatment process and stage.
- They can enable or disable testing for specific input/output types and stages.
- They can define and edit testing parameters, benchmarks, and frequencies at the national/state level.
- They can adjust testing frequencies for plants based on their testing results.
- They can specify different testing standards for manual and IoT-based testing for specific input/output types and stages.
No specific notifications are required for this user story.
N/A
1. A state and ULB admin can define input/output testing requirements for each treatment process and stage.
2. They can enable or disable testing for specific input/output types and stages.
3. Testing parameters, benchmarks, and frequencies can be defined and managed at the national/state level.
4. Administrators can adjust testing frequencies for plants based on their testing results.
5. Different testing standards can be specified for manual and IoT-based testing for specific input/output types and stages.
This user story aims to automate the generation of schedules for tests based on the frequency of testing for various parameters. The generated schedule will be used for manual and IoT tests to display upcoming tests, generate alerts, and facilitate escalation in case of non-adherence to the test schedule.
DIGIT Sanitation
As a system, I want to automatically generate schedules for tests based on the frequency of testing for various parameters. This will help in displaying upcoming tests to the plant operator and stakeholders, generate alerts for upcoming tests, and escalate in case of non-adherence to the test schedule.
Attribute
Type
Mandatory
Validation
Test ID
Alphanumeric
View Only
Auto-generated on the creation of schedule.
Plant Name
Text
View Only
Auto-populated on the creation of schedule.
Treatment Process
Text
View Only
Auto-populated on the creation of schedule.
Treatment Process Type
Text
View Only
Auto-populated on the creation of schedule.
Stage
Text
View Only
Auto-populated on the creation of schedule.
Output Type
Text
View Only
Auto-populated on the creation of schedule.
Test Type
Array
Lab/IoT, auto-selected to the lab.
Parameter 1…n
Text
View Only
Auto-populated on the creation of schedule.
Testing Date
Date
View Only
Date calculated through a predefined laboratory testing schedule.
SLA
Numeric
View Only
Difference between the current date and testing date. The compliance to a testing schedule can be checked through this field. However, the actions based on failed/successful compliance falls under vendor management, which is not in scope currently and will be taken up separately under vendor management.
Status
Text
View Only
Status to be auto set to 'Scheduled'.
This feature can be managed through backend configurations and databases, allowing administrators to make changes easily.
- The system will automatically generate schedules for tests based on the frequency of testing for various parameters.
- Plant operators and stakeholders can view the upcoming tests on the schedule.
- Alerts will be automatically generated for upcoming tests to notify the relevant parties.
- In case of manual testing, escalations will be triggered if test results are pending beyond the specified days as per the test schedule.
- Alerts will be sent to the the plant operator and stakeholder [X] days prior to the test date.
- Escalations will be triggered for pending test results as per the test schedule.
N/A
1. The system should automatically generate schedules for tests based on the frequency of testing for each parameter.
2. Upcoming tests should be displayed to the plant operator and stakeholders.
3. Alerts should be generated for upcoming tests to notify the relevant parties.
4. Escalations should be triggered in case of non-adherence to the test schedule for manual testing.
5. The implementation of this feature should allow for easy configuration and management through backend settings.
This user story aims to implement an anomaly detection system that generates alerts in case of the following anomalies:
1. Lab results not as per the benchmark.
2. IoT device results not as per the benchmark.
3. Lab results and device results do not match.
- Test uploader
- IoT system
- DIGIT Sanitation
As a system, I want to detect anomalies in the test results and generate alerts for the following scenarios:
Field
Data Type
Required
Description
Anomaly Type
String
Yes
Specifies the type of anomaly detected.
Benchmark
Float
Yes
Defines the benchmark value for the test results.
Deviation Allowed
Float
Yes
Specifies the allowed deviation from the benchmark for anomaly detection.
Sample Collection Date
DateTime
Yes
The date on which the sample was collected for testing.
IoT Result Date
DateTime
Yes
The date on which the IoT result was recorded.
Alert Generation Date
DateTime
Yes
The date on which the alert was generated.
Lab Test Result
Float
Yes
The result of the manual lab test.
IoT Test Result
Float
Yes
The result recorded via IoT integration.
Alert Message
String
Yes
Specifies the message for the generated alert.
Matching Date
DateTime
Yes
The date on which the closest IoT result is matched with the sample collection date for comparison.
Lab results not as per the benchmark
This is to be generated when the manual test results uploaded by the test uploader are not as per the benchmarks defined (adjusted for deviations, configurable at plant level).
IoT results not as per the benchmark
This is to be generated when the loT test results recorded via the integration are not as per the benchmarks defined for [X] days (adjusted for deviations defined while setting testing parameters).
Generation of alerts: Device results and lab results do not match
In case the data that is recorded by the sensor does not match the data in the lab test result, an auto alert will generated.
Date to be matched on
Sample Collection Date
If the IoT result is not available for the sample collection date, the closest date after for which IoT data available to be considered.
Deviation allowed
x%
- Anomaly types, benchmark values, and allowed deviations should be specified for each scenario.
- The matching date for comparing IoT results should be calculated based on the sample collection date and the closest available IoT result date.
- Anomalies should be detected and alerts generated only if the deviation from the benchmark exceeds the allowed deviation.
- The anomaly detection system should be configurable to define benchmark values, allowed deviations, and matching date logic.
- The test uploader uploads manual lab test results.
- The integration system records IoT test results.
- DIGIT Sanitation continuously monitors the test results.
- Alerts are automatically generated if anomalies are detected.
- Alerts will be generated automatically when any of the specified anomalies are detected.
- The alert message will indicate the type of anomaly and the details of the test results.
1. The system should be able to detect and generate alerts for the specified anomalies, including lab results not meeting benchmarks, IoT results not meeting the benchmark, and lab and IoT results not matching
2. The allowed deviation for each anomaly type should be configurable.
3. The anomaly detection should be based on the benchmark values set for each type of test result.
4. Alerts should be generated with the appropriate message indicating the type of anomaly detected and the details of the test results.
5. The implementation should allow for easy configuration and management through backend settings.
This user story aims to implement an automated alert generation system for cases where no reading is received from a sensor based on the scheduled frequency.
- Integration system
- DIGIT Sanitation
As a system, I want to automatically generate an alert in case no reading is received from a sensor based on the scheduled frequency.
No reading received from device
Attribute
Type
Required?
Comments
Alert DateTime
Datetime
Y
Auto-captured based on the date-time.
Alert Type
Text
Y
Auto-captured
No reading received from the device.
Plant Name
Text
Y
Auto-captured
Process Name
Text
Y
Auto-captured
Process Type
Text
Y
Auto-captured
Device ID
Numeric
Y
Auto-captured
- The system should check if a reading was expected from the sensor on the scheduled date.
- An alert should be generated only if no reading is received from the sensor on the scheduled date.
- The alert generation system should be configured to specify the frequency of expected readings from each sensor.
- The integration system monitors the scheduled frequency of readings from the sensors.
- The alert generation system automatically detects cases where no reading is received from a sensor based on the scheduled date.
- An alert will be generated automatically if no reading is received from a sensor based on the scheduled date.
- The alert message will indicate the sensor ID and the scheduled date for the next reading.
1. The system should automatically detect cases where no reading is received from a sensor on the scheduled date.
2. Alerts should be generated with the appropriate message indicating the sensor ID and the scheduled date for the next reading.
3. The alert generation should be based on the configured frequency of expected readings from each sensor.
4. The implementation should allow for easy configuration and management through backend settings.
As a plant operator, I want to access the home page after logging in to the system. The landing page should provide an overview of relevant modules, pending tasks, and options to navigate to the specific sections.
Plant operator
Upon successful login, the plant operator will be directed to the home page. The home page will display the following elements:
Plant name: A visible label located on the top right-hand corner of the screen, indicating the name of the plant or facility the operator is associated with.
Help button: A clickable button available on every page to provide a guided view and assistance for users.
Modules cards: The home page will show cards for the following modules:
a) Vehicle Log Module: Allows the user to record incoming vehicles.
b) Treatment Quality Monitoring module: Provides access to information related to treatment quality.
c) View Dashboard: Navigates the user to a comprehensive dashboard.
List of pending tasks: This section will display a list of tests and tasks pending for the plant operator within the next [X] days. Alongside each pending task, the next action item in the workflow will be displayed, enabling the plant operator to take prompt action.
View all pending tasks button: A clickable button that redirects the user to a page displaying all pending tasks.
N/A
N/A
N/A
The plant operator can click on the cards representing different modules to navigate to their respective home pages for detailed information and functionalities.
The plant operator can click on the "View All Pending Tasks" button to view all pending tasks in the system.
N/A
The plant operator should be able to log in successfully and land on the home page.
The home page should display the plant name, help button, and cards for the different modules.
The list of pending tasks should be visible and filtered based on the defined time frame [X].
Each pending task should display the next action item required.
Clicking on the cards should redirect the user to the respective module's home page.
Clicking on the "View All Pending Tasks" button should redirect the user to a page displaying all pending tasks.
As a plant operator, I want to access the Treatment Quality Monitoring (TQM) home page by clicking on the treatment quality card. The TQM home page should provide access to upcoming tests, past test results, IoT readings, sensor monitoring, treatment quality dashboard, and performance metrics related to treatment quality.
Plant operator
After clicking on the treatment quality card, the plant operator will be redirected to the TQM home page, which will offer the following functionalities:
Inbox: The inbox will display the upcoming tests, and the plant operator can take necessary actions related to these tests. A count of the upcoming tests for quick reference will be displayed in brackets.
View past test results: This section will present the past results from both ab and IoT devices, allowing the plant operator to review historical data.
View IoT readings: The user can access records of IoT readings, enabling them to monitor IoT devices' data.
Sensor monitoring: A list of IoT devices and their status will be available for the plant operator to monitor and ensure smooth operations.
View dashboard: Clicking on this option will direct the plant operator to the treatment quality dashboard, providing comprehensive insights and visualisations.
View performance: This widget will display key performance indicators (KPIs) related to treatment quality, including:
a. Test compliance: The percentage of plant compliance with treatment quality standards, compared to the state-level compliance percentage.
b. Last treatment quality result: Indicates whether the last test result was a pass or fail, along with the date of the test.
c. Count of alerts raised in the past 30 days: Shows the number of alerts generated within the last 30 days.
d. Distribution of alerts based on the alert category: Presents a breakdown of alerts by their respective categories. (Note: For details about the calculation of these metrics, refer to the dashboard user stories).
e. Go back to the landing page: The plant operator can use the back button to return to the landing page.
f. Help button: A clickable button available on every page to provide a guided view and assistance for users.
N/A
N/A
N/A
The plant operator can view upcoming tests in the inbox and take necessary actions related to them.
The plant operator can review past test results from both Lab and IoT devices.
The plant operator can access records of IoT readings for monitoring purposes.
The plant operator can check the status of IoT devices through sensor monitoring.
The plant operator can navigate to the treatment quality dashboard for comprehensive insights.
The plant operator can view the performance metrics related to the treatment quality.
The plant operator can use the back button to return to the landing page.
N/A
The plant operator should be able to access the TQM home page by clicking on the treatment quality card.
The TQM home page should display the inbox with the upcoming tests and their count.
The plant operator should be able to view the past test results from lab and IoT devices.
The plant operator should be able to access the records of IoT readings.
The plant operator should be able to monitor IoT devices and their statuses.
Clicking on "View Dashboard" should redirect the plant operator to the treatment quality dashboard.
The performance metrics should accurately display test compliance, last treatment quality result, count of alerts raised in the past 30 days, and distribution of alerts based on their categories.
The back button should allow the plant operator to return to the landing page.
The help button should be available and functional on the TQM home page.
As a plant operator, I want to view a list of the upcoming tests by clicking on the 'Inbox' option. The list should display only lab tests, and I should be able to perform various tasks, such as filtering, sorting, and accessing the test details.
Plant operator
Upon clicking on the 'Inbox', the plant operator will be redirected to the list of upcoming lab tests. The following functionalities will be available:
Total count of the upcoming tests: The total count of the upcoming tests will be displayed beside the inbox, enclosed within brackets.
View list of the upcoming tests: The list will contain the following fields:
- Test ID
- Treatment process (if there is only one treatment process configured for the plant, this field will not be displayed)
- Stage: Indicates the process stage where the sample is to be collected from.
- Output type: Specifies whether the test is for biosolids or effluents.
- Pending date: The scheduled test date.
- Status: The current status of the test.
- SLA: Displays the difference between the test due date and today.
Attribute
Type
Mandatory
Validation
Test ID
Alphanumeric
View Only
Auto-generated on the creation of the schedule.
Plant Name
Text
View Only
Auto-populated on the creation of the schedule.
Treatment Process
Text
View Only
Auto-populated on the creation of the schedule.
Treatment Process Type
Text
View Only
Auto-populated on the creation of the schedule.
Stage
Text
View Only
Auto-populated on the creation of the schedule.
Output Type
Text
View Only
Auto-populated on the creation of the schedule.
Test Type
Array
Lab/IoT, auto-selected to the lab.
Parameter 1…n
Text
View Only
Auto-populated on the creation of the schedule.
Testing Date
Date
View Only
Date calculated through predefined laboratory testing schedule.
SLA
Numeric
View Only
Difference between the current date and testing date. The compliance to a testing schedule can be checked through this field. However, the actions based on failed/successful compliance falls under vendor management, which is not in scope currently and will be taken up separately under vendor management.
Status
Text
View Only
Status to be auto set to 'Scheduled'.
Test Result Status
Roles
Action
Next Status
Scheduled
FSTPO
ULB employee
Submit the sample for testing.
Pending results
Pending Results
FSTPO
ULB employee
Update the results.
Submitted
N/A
The plant operator can view a list of the upcoming tests with the relevant details.
The plant operator can use filters to refine the view based on the treatment process, output type, status, and date range.
The plant operator can use sorting options to arrange the tests based on "Pending Date."
The plant operator can access test details for further actions.
N/A
The plant operator should be able to view the list of the upcoming lab tests by clicking on 'Inbox'.
The list should only display the lab tests.
The list of the upcoming tests should contain relevant fields as described in the user story.
The action item displayed should be based on the next status in the treatment quality workflow for each test.
The filters and sorting options should work correctly, and the data should be updated based on the selected criteria.
The user should be able to navigate back to the landing page using the back button.
The help button should be available and functional on the list of upcoming tests page.
As a plant operator, I want to view the test details for the upcoming tests either via the pending tasks or the inbox. The test details page will provide comprehensive information about the test and allow me to perform specific actions based on the test's status.
Plant operator
View test details via the pending tasks:
The list of pending tasks can be accessed via the landing page for the Treatment Quality Monitoring (TQM).
The list will display the tests pending within the next [X] days.
The next action item in the task workflow will be displayed as a button beside each pending task for the plant operator to take prompt action.
Clicking on the action item button will redirect the user to the test details page.
View test details via the inbox:
A list of tests can be accessed from the Inbox.
An action item will be displayed based on the next status in the treatment quality workflow for each test:
- For tests in the 'Scheduled' stage, the "Update Status" will be shown.
- For tests in the "Pending Results" stage, the "Update Results" will be displayed.
Clicking on the action item button will redirect the user to the test details page.
Test details page:
It will consist of two cards. First card - Test Information: The first card will display the following fields:
Test ID
Treatment process
Stage
Output type
Pending date
Status
Parameters to be tested along with their unit of measurement
SLA (Displayed in red/green basis SLA. If today is greater than the pending date, it will be shown in red. If today is less than the Pending Date, it will be shown in green.)
Second card - Test status specific action: The second card will vary based on the test status:
For tests in the 'Scheduled' status, the user will be asked to select the lab.
For tests in the "Pending Results" status, the user will be asked to add test results.
Go back using the back button:
The user can go back using the back button, and the redirection will be based on the page from which the user accessed the test details page (either pending tasks or inbox).
Help button:
A clickable button available on every page to provide a guided view and assistance for users.
Attribute
Type
Required?
Comments/Validations
Test ID
Numeric
Y
Auto-generated by the system.
Plant Name
Array
View Only
Auto-populated on the creation of the schedule, dingle select for on-demand test.
Treatment Process
Array
View Only
Auto-populated on the creation of schedule, single select for on-demand test.
Treatment Process Type
Array
View Only
Auto-populated on the creation of the schedule, single select for on-demand test.
Stage
Array
View Only
Auto-populated on the creation of the schedule, single select for on-demand test.
Output Type
Array
View Only
Auto-populated on the creation of the schedule, single select for on-demand test.
Test Type
Array
Lab/IoT, auto-selected to the lab for on-demand.
Lab Submitted to
Text
Y
This will not be required in case test type = IoT.
Quality Parameter 1
Numeric
Y
Validation to be applied at impel.
Quality Parameter 2
Numeric
Y
Validation to be applied at impel.
Quality Parameter 3
Numeric
Y
Validation to be applied at impel.
Quality Parameter n
Numeric
Y
Validation to be applied at impel.
Collection Time
Date
Y
This is the date-time on which user updates the status to pending results. For IoT, this is the time sensor records reading.
Attachment
Document
Y
For a given collection location, the photo or PDF proof of the laboratory result mentioning the information of the above-mentioned parameters.
N/A
The plant operator can view test details either via the pending tasks or the Inbox.
The plant operator can perform specific actions based on the test's status, such as updating the status or adding test results.
The plant operator should be able to view the test details via the pending tasks or the inbox.
The test details page should display accurate information, including test ID, treatment process, stage, output type, pending date, status, parameters, unit of measurement, and SLA.
The second card on the test details page should prompt the plant operator to take the appropriate action based on the test's status ("Select Lab" for tests in the 'Scheduled' status and "Add Test Results" for tests in the "Pending Results" status).
The plant operator should be able to navigate back using the back button, and the redirection should be appropriate based on the page from which the test details page was accessed.
The help button should be available and functional on the test details page.
As a plant operator, I want to update the test details from the test details page. The test details page will display the next action item based on the workflow status of the test. I should be able to perform different actions depending on whether the test is in the 'Scheduled' status or the "Pending Results" status.
- Plant operator
Updating tests with the workflow status 'Scheduled':
- The test details page will prompt the plant operator to confirm if the sample has been submitted to the lab for testing.
- The user can perform the following actions:
- Select lab: The plant operator can choose a lab from a dropdown list configured in the Master Data Management System (MDMS).
- Update the status of the test: The button to update the test status will be deactivated until the lab is selected. Once the lab is chosen, the button will be activated.
- After clicking on "Update Status," the plant operator will be redirected back to the page from which the test details were accessed. A snack bar will confirm the status update, and the action item button will show the updated next step in the workflow.
- In case the update of the status fails, the plant operator will remain on the same page, and a failure message will be displayed.
Updating tests with the workflow status "Pending Results":
- The test details page will prompt the plant operator to fill in the test results.
- The user can perform the following actions:
- Update parameter readings (mandatory fields): Only numerical values will be allowed. In case non-numerical values are entered, an error message will be displayed, stating "Only numeric values allowed. Please input in the required format."
- Attach documents (non-mandatory): Only files in the formats .png, .jpg, .pdf will be supported. If a file of an unsupported format is selected, an error message will be displayed, stating: "The file type is not supported. Please upload in the following formats: .pdf, .png, .jpg." The file size should be within the permissible limit (X mb), and if the file size is larger, an error message will be displayed, stating: "The file size is too large. Please upload a file below X MB."
- Submit the test results: The button to submit the test results will be deactivated until all mandatory fields are filled. Once all required fields are completed, the button will be activated.
- On clicking the 'Submit' button, a pop-up will be displayed to the user to confirm the submission.
- The following actions will be available to the user in the pop-up:
- Confirm submission: The plant operator can confirm the submission by clicking on the 'Submit' button.
- Go back to the test details page: The plant operator can go back to the test details page by clicking on the "Go back" button.
- In case the submission of test results fails, the plant operator will remain on the same page, and a failure message will be displayed.
After the successful submission of the test results:
- Upon successful submission, the plant operator will be redirected to the summary page, and a snack bar will confirm the submission.
- The summary page will display the test results and whether they have passed or failed based on a comparison between the values entered by the user and the benchmarks.
- If all values are as per the benchmarks, the test results will be displayed as 'Pass'. All values will be shown in green, and the plant operator will receive feedback that all results are as per the benchmarks. The plant operator can go back to the home page by clicking on the back button.
- If one or more values are not as per the benchmarks, the test results will be displayed as 'Fail'. Values that meet the benchmarks will be shown in green, while values not meeting the benchmarks will be shown in red. The plant operator will be informed that the test results are not as per the benchmark. The plant operator can go back to the home page by clicking on the back button.
Attribute
Type
Required?
Comments/Validations
Test ID
Numeric
Y
Auto-generated by the system.
Plant Name
Array
View Only
Auto-populated on the creation of the schedule, single select for on-demand test.
Treatment Process
Array
View Only
Auto-populated on the creation of the schedule, single select for on-demand test.
Treatment Process Type
Array
View Only
Auto-populated on the creation of the schedule, single select for on-demand test.
Stage
Array
View Only
Auto-populated on the creation of the schedule, dingle select for on-demand test.
Output Type
Array
View Only
Auto-populated on the creation of the schedule, single select for on-demand test.
Test Type
Array
Lab/IoT, auto-selected to the lab for on-demand.
Lab Submitted to
Text
Y
This will not be required in case test type = IoT.
Quality Parameter 1
Numeric
Y
Validation to be applied at impel.
Quality Parameter 2
Numeric
Y
Validation to be applied at impel.
Quality Parameter 3
Numeric
Y
Validation to be applied at impel.
Quality Parameter n
Numeric
Y
Validation to be applied at impel.
Collection Time
Date
Y
This is the date-time on which user updates the status to pending results. For IoT, this is the time sensor records reading.
Attachment
Document
Y
For a given collection location, the photo or PDF proof of the laboratory result mentioning the information of above-mentioned parameters.
N/A
- The plant operator can update the test details, including lab selection and test status for tests in the 'Scheduled' status.
- The plant operator can fill in the test results for tests in the "Pending Results" status, including numerical values for parameter readings and optional document attachments.
- The plant operator can submit the test results and confirm the submission.
- The plant operator can go back to the test details page or the home page .
N/A
- The plant operator should be able to update the test details for tests in both 'Scheduled' and "Pending Results" status.
- The test details page should prompt the plant operator with appropriate actions based on the test's workflow status.
- Validations for numerical values and file formats/sizes should work as described.
- Successful submission of the test results should redirect the plant operator to the summary page and display the results as 'Pass' or 'Fail' based on the benchmarks.
- The plant operator should be able to go back to the test details page or the home page using the appropriate buttons.
- The help button should be available and functional on the test details and summary pages.
As a plant operator, I want to view past test results (both IoT and lab) by accessing the "Past Tests" section from the Treatment Quality Monitoring (TQM) landing page. I should be able to view a list of past tests, filter and sort them, and access detailed test results for each test.
- Plant operator
View past test results:
- Past test results (both IoT and lab) can be accessed via the TQM landing page by clicking on the "Past Tests" option.
- Clicking on "Past Tests" will redirect the user to the list of past tests.
- The user can perform the following tasks:
1. View the list of past tests:
The list will display the following fields for each test:
- Test ID
- Treatment process (if there is only one treatment process configured for the plant, this field will not be displayed).
- Stage: Indicates the process stage where the sample was collected from.
- Output type: Specifies whether the test is for biosolids or effluents.
- Pending date: The test date as per the schedule.
- Test result: Indicates whether the test result is 'Pass' or 'Fail'.
- View test details: The user can view detailed test results by clicking on the "View Results" button on each card.
2. Filter tests:
Clicking on 'Filter' will open a pop-up with the following filter options:
- Treatment process (if there is only one treatment process configured for the plant, this field will not be displayed): A dropdown with values for treatment processes configured for the plant. The selected treatment process will be displayed upon selection.
- Output type: A dropdown with values for the output types configured for the plant. The selected output type will be displayed upon selection.
- Test type: A dropdown with values for test types (IoT/lab). The selected test type will be displayed upon selection.
- Date range: A calendar view to select a date range. The selected date range will be displayed upon selection.
After selecting the filter values, the user can click on 'Filter' to apply the filters to the list of past tests. To clear filters, the user can click on "Clear All." To close the pop-up, the user can click on the cross on the top right-hand corner of the screen. The selected filter will be displayed on the screen, and clicking the cross button near the displayed filter will remove the filter.
3. Sort:
Clicking on 'Sort' will open a pop-up allowing tests to be sorted by "Pending Date" with the following options:
- Date (latest first).
- Date (latest last).
After selecting the sort criteria, the user can click on 'Sort' to apply the sorting to the list of past tests. To clear the sort, the user can click on "Clear All." To close the pop-up, the user can click on the cross on the top right-hand corner of the screen.
4. Go back to the landing page:
The plant operator can use the back button to return to the landing page.
5. Help button:
A clickable button available on every page to provide a guided view and assistance for users.
The user can download the list of tests, filtered by selection in excel and pdf formats.
Test details:
- The test summary page will consist of two cards.
First card - Test information:
The first card will display the following fields:
- Test ID
- Treatment process
- Stage
- Output type
- Test type
- Lab name/Device ID: This will show lab name/device ID based on the test type.
- Test submission on
- Test results: Indicates whether the test result is 'Pass' or 'Fail'.
Second card - Parameter details:
The second card will display the following fields:
- Parameters, their unit of measurement, and the recorded values.
- The values will be shown in green or red basis whether they are as per benchmarks or not.
- The plant operator can view past test results by accessing the "Past Tests" section.
- The plant operator can filter and sort the list of past tests based on treatment process, output type, test type, and date range.
- The plant operator can view detailed test results by clicking on the "View Results" button for each test.
- The plant operator can navigate back to the landing page or the list of past tests as needed.
- The help button is available and functional on the test summary page.
Attribute
Type
Required?
Comments
Test ID
Numeric
Y
Auto-generated by the system.
Plant Name
Array
View Only
Auto-populated on the creation of the schedule, single select for on-demand test.
Treatment Process
Array
View Only
Auto-populated on the creation of the schedule, single select for on-demand test.
Treatment Process Type
Array
View Only
Auto-populated on the creation of the schedule, single select for on-demand test.
Stage
Array
View Only
Auto-populated on the creation of the schedule, single select for on-demand test.
Output Type
Array
View Only
Auto-populated on the creation of the schedule, single select for on-demand test.
Test Type
Array
Lab/IoT, auto-selected to the lab for on-demand.
Lab Submitted to
Text
Y
This will not be required in case test type = IoT.
Quality Parameter 1
Numeric
Y
Validation to be applied at impel.
Quality Parameter 2
Numeric
Y
Validation to be applied at impel.
Quality Parameter 3
Numeric
Y
Validation to be applied at impel.
Quality Parameter n
Numeric
Y
Validation to be applied at impel.
Collection Time
Date
Y
This is the date-time on which user updates status to pending Results. For IoT, this is the time sensor records reading.
Attachment
Document
Y
For a given collection location, the photo or PDF proof of the laboratory result mentioning the information of above-mentioned parameters.
NA
N/A
N/A
- The plant operator should be able to view past test results by clicking on "Past Tests" from the TQM landing page.
- The list of past tests should display the relevant fields as described in the user story.
- The plant operator should be able to filter and sort the list of past tests based on treatment process, output type, test type, and date range.
- Clicking on the "View Results" button for each test should redirect the plant operator to the test summary page.
- The test summary page should display accurate information, including test ID, treatment process, stage, output type, test type, lab name/device ID, test submission on, test results.
- User can download the list past tests (filtered) by clicking on the download button.
As a plant operator, I want to view IoT readings from the Treatment Quality Monitoring (TQM) landing page by clicking on "View IoT Readings." I should be able to access the view tests page and filter the results to view only IoT readings.
- Plant operator
- The functionality of the view tests page for IoT readings remains the same as the view past tests page.
N/A
NA
N/A
View IoT readings:
- IoT readings can be accessed via the TQM landing page by clicking on "View IoT Readings."
- Clicking on "View IoT Readings" will redirect the user to the view tests page, with the filter pre-set to show only IoT readings.
N/A
- The plant operator should be able to view IoT readings by clicking on "View IoT Readings" from the TQM landing page.
- The view tests page should display a list of IoT readings with the relevant fields as described in the user story.
- The plant operator should be able to filter and sort the list of IoT readings based on treatment process, output type, and date range.
- Clicking on the "View Results" button for each IoT reading should redirect the plant operator to the test summary page.
- The test summary page for IoT readings should display accurate information, including test ID, treatment process, stage, output type, test type, lab name/device ID, test submission on, test results.
- The plant operator should be able to navigate back to the landing page or the list of IoT readings as needed.
- The help button should be available and functional on the view tests page for IoT readings.
As a plant operator, I want to access sensor monitoring from the Treatment Quality Monitoring (TQM) landing page. I should be able to view a list of IoT devices and their details. Additionally, I should be able to filter the devices based on various criteria and perform a search based on the device ID.
- Plant operator
Sensor monitoring:
- Sensor monitoring can be accessed by clicking on the "Sensor Monitoring" link on the TQM landing page.
- Clicking on "Sensor Monitoring" will display the list of IoT devices.
- The page will display the total number of IoT devices beside the page heading in brackets.
- For each device, a card will be available, displaying the following details:
- Device ID.
- Treatment process (if there is only one treatment process configured for the plant, this field will not be displayed).
- Stage: Indicates the process stage where the device is used.
- Output type: Specifies whether the device monitors biosolids or effluents.
- Last calibrated date: The date when the device was last calibrated.
- Device Status: Indicates whether the device is 'Active' or 'Inactive'.
- Verification status: Indicates the verification status of the device.
- Last verification date: The date of the last verification.
- Parameters: The parameters that the device monitors.
- Filter devices:
Clicking on 'Filter' will open a pop-up with the following filter options:
- Treatment process (if there is only one treatment process configured for the plant, this field will not be displayed): A dropdown with values for treatment processes configured for the plant. The selected treatment process will be displayed upon selection.
- Output type: A dropdown with values for the output types configured for the plant. The selected output type will be displayed upon selection.
- Device status: A radio button showing options 'Active' and 'Inactive' to filter devices based on their status.
- Parameters: Multi-select displaying all parameters configured on the backend. The plant operator can select multiple parameters to filter devices.
After selecting filter values, the user can click on 'Filter' to apply the filters to the list of IoT devices. To clear filters, the user can click on "Clear All." To close the pop-up, the user can click on the cross on the top right-hand corner of the screen. The selected filter will be displayed on the screen, and clicking the cross button near the displayed filter will remove the filter.
- Search:
Clicking on 'Search' will open a pop-up for the user to search for a device by the device ID. The search should support partial search (part search) to allow the plant operator to find devices quickly based on the device ID.
- Go back to the landing page:
The plant operator can use the back button to return to the landing page.
- Help button:
A clickable button available on every page to provide a guided view and assistance for users.
Attribute
Type
Required?
Comments
Configuration Date
Datetime
Y
Device Type
Text
Y
Selection from the device master data.
[“GPS Sensor”, “pH Sensor”, “Accelerometer”, “Light Sensor”]
Plant
Text
Y
Treatment Process
Text
Y
Stage
Text
Y
Output Type
Text
Y
Parameters
Array
Y
The parameters monitored by the device.
Monitoring Frequency
Numeric
Y
Custom frequency for the device.
Calibration Date
Datetime
Y
Input from the user about any change in the calibration or maintenance of the device.
Calibration Accuracy
Array
Y
Range to indicate the permissible deviation in the accuracy.
IsConnected?
Boolean
Y
To indicate the connectivity of the device.
Connectivity History
?
Y
Date-wise device audit log to know the connectivity status.
Verification History
?
Date-wise device verification log to know the days when device input was verified with the laboratory results.
NA
N/A
N/A
- The plant operator should be able to access sensor monitoring by clicking on the "Sensor Monitoring" link from the TQM landing page.
- The page should display the list of IoT devices with relevant fields as described in the user story.
- The plant operator should be able to filter devices based on treatment process, output type, device status, and parameters.
- The plant operator should be able to perform a search based on the device ID with partial search support.
- The plant operator should be able to navigate back to the landing page or the list of IoT devices as needed.
- The help button should be available and functional on the sensor monitoring page.
As a plant operator, I want to access the dashboards from the Treatment Quality Monitoring (TQM) landing page. I should be able to view different dashboards specific to the treatment process types. Additionally, I should be able to filter the dashboard based on a date range and perform actions like sharing and downloading the dashboard and its charts/tables.
- Plant operator
Dashboards:
- Dashboards can be accessed by clicking on the "View Dashboards" link on the TQM landing page.
Navigation:
- On landing on the dashboard, the user can navigate across the treatment process types to view the dashboard specific to the selected treatment process type.
Filters:
- Date range: The user should be able to filter the dashboard based on a date range to view relevant data for the selected time period.
Share:
- The user should be able to share the filtered dashboard over WhatsApp in the image format.
- The user should be able to share filtered charts/tables over WhatsApp in the image format.
Download:
- The user should be able to download the filtered dashboard in PDF and image formats.
- The user should be able to download filtered charts/tables in PDF and image formats.
Metrics:
- Overall KPIs:
- The dashboard will display the following KPIs:
- Total incoming sludge: The sum of the total sludge that is disposed at the plant for the selected time period.
- Number of trips: The count of the total incoming vehicles at the treatment plant for the selected time period.
- Overall quality: The number of tests where all parameters are as per the benchmarks compared to the total number of test results recorded.
- Compliance percentage: The percentage of tests where results have been recorded.
- Total alerts: The count of total alerts raised for the following types:
1. Test results not as per the benchmark.
2. No reading from the IoT device.
3. Lab results and IoT results not matching.
Computation of the KPIs can be accessed here.
- N/A
NA
- N/A
- N/A
<To be updated>
- The plant operator should be able to access the dashboards by clicking on the "View Dashboards" link from the TQM landing page.
- The user should be able to navigate across the treatment process types and view specific dashboards accordingly.
- The user should be able to filter the dashboard based on a date range to view relevant data for the selected time period.
- The user should be able to share the filtered dashboard and charts/tables over WhatsApp in the image format.
- The user should be able to download the filtered dashboard and charts/tables in PDF and image formats.
- The dashboard should display the specified KPIs for the plant operator to monitor and analyse treatment quality effectively.
As a plant operator, I want to view a dashboard card named "Treatment Quality Overview" on the dashboards page in the Treatment Quality Monitoring (TQM). The card should display the key performance indicators (KPIs) related to treatment quality, a table with relevant fields, and options to filter the data, share the dashboard, and download the data.
- Plant operator
Treatment quality overview dashboard card:
- The "Treatment Quality Overview" card will be available on the dashboards page in TQM.
- KPIs:
- The card will display the following KPIs:
- Total tests: The count of total tests for the filtered date range.
- The count of tests that have passed treatment quality.
- The count of tests that have failed treatment quality.
- Table:
- Heading: Name of the plant
- The table will display the following fields:
- Stage
- Output type
- Value of Parameters
- Compliance percentage
Detailed metric calculations for the Treatment Quality Monitoring dashboard are viewable here.
- Filter:
- The user should be able to filter the data displayed in the card based on a date range. This will allow the plant operator to view data for a specific time period.
- Share:
- The user should be able to share the dashboard card "Treatment Quality Overview" with others over WhatsApp in the image format. This will enable easy sharing of the treatment quality data with relevant stakeholders.
- Download:
- The user should be able to download the data displayed in the "Treatment Quality Overview" card. This should include the KPIs and table data. The download options should include PDF and image formats. This will allow the plant operator to keep a record of the treatment quality data for further analysis and reporting.
- View trends:
- For each stage in the table, a button will be available to "View Trends". Clicking on this button will redirect the user to view trends specific to the selected stage. This will help the plant operator analyse the historical performance of the treatment quality for a particular stage.
- Toggle IoT readings and lab results:
- The user should be able to toggle between viewing the IoT readings and the lab results in the "Treatment Quality Overview" card. This toggle will allow the plant operator to switch between different data sources and gain insights into the treatment quality from different perspectives.
- N/A
NA
- N/A
- N/A
<To be updated>
- The plant operator should be able to view the "Treatment Quality Overview" card on the dashboards page in TQM.
- The card should display the specified KPIs for the filtered date range.
- The table should show relevant fields, including stage, output type, value of parameters, and compliance percentage.
- The plant operator should be able to filter the data based on a date range to view data for a specific time period.
- The plant operator should be able to share the "Treatment Quality Overview" card with others over WhatsApp in the image format.
- The plant operator should be able to download the data from the "Treatment Quality Overview" card in PDF and image formats.
- The plant operator should be able to view trends for specific stages by clicking on the "View Trends" button in the table.
- The plant operator should be able to toggle between viewing the IoT readings and the lab results in the "Treatment Quality Overview" card.
As a plant operator, I want to view the trends of parameter readings over time for a stagein the treatment quality overview table. The chart should provide a comparison with the benchmark and a toggle to navigate between different parameters.
- Plant operator
Trends of parameter readings:
- The chart will be available once the plant operator clicks on the "View Trend" button in the treatment quality overview table.
- Chart features:
- Parameter trend over time:
- The chart will display the trend of one selected parameter over time.
- The x-axis of the chart will represent time, showing the data points over a specific time period.
- The y-axis will represent the parameter values recorded during that time period.
- Benchmark comparison:
- The chart will include a benchmark line to provide a comparison with the benchmark value for the selected parameter.
- The benchmark line will be displayed on the chart, helping the plant operator visualise how the parameter readings compare to the expected standard.
- Toggle for parameters:
- A toggle will be available to navigate between different parameters for which the trends are available.
- The plant operator can select a different parameter from the toggle to view the trend of that particular parameter.
- N/A
NA
- N/A
- N/A
<To be updated>
- The plant operator should be able to view the trends of parameter readings after clicking on the "View Trend" button in the treatment quality overview table.
- The chart should accurately display the trend of the selected parameter over time.
- The benchmark line should be visible and appropriately represent the expected standard for the selected parameter.
- The plant operator should be able to toggle between different parameters to view their trends.
As a ULB employee, I want to have a card for Treatment Quality Monitoring (TQM) on the landing page. The card should provide an overview of pending tests and tests nearing SLA, allow me to view upcoming tests using the inbox, access past test results, IoT readings, and sensor monitoring. Additionally, I should be able to view the treatment quality dashboard, and receive alerts related to TQM, which I can view in detail or dismiss.
ULB employee
Landing page: ULB employee
- Treatment Quality Monitoring card:
- The landing page will include a card for Treatment Quality Monitoring.
- Overview:
- The card will provide an overview of the total pending tests and the count of tests nearing SLA.
- View the upcoming tests using the inbox:
- The card will display the count of the upcoming tests beside in brackets.
- The ULB employee can click on the inbox to view the upcoming tests.
- View the past test results:
- The ULB employee can click on a link to view the past results from both lab and IoT devices.
- View IoT readings:
- The ULB employee can click on a link to access the record of IoT readings.
- Sensor monitoring:
- The ULB employee can click on a link to access a list of IoT devices along with their status.
- View dashboard:
- The ULB employee can click on a link to be directed to the treatment quality dashboard.
- Alerts:
- The card will display a list of alerts regarding Treatment Quality Monitoring.
- Specifically, it will display tests that have crossed SLA for greater than 7 days.
- The ULB employee can view the details of each test by clicking on the "View Details" button.
- The ULB employee can dismiss notifications by clicking on the cross button.
- Other functionality:
- The rest of the functionality on the landing page will remain the same as the current ULB employee landing page.
- N/A
NA
- N/A
- N/A
- The ULB employee should be able to view the Treatment Quality Monitoring card on the landing page.
- The card should display an overview of the total pending tests and tests nearing SLA.
- The ULB employee should be able to click on the inbox to view the upcoming tests.
- The ULB employee should be able to click on links to view past test results, IoT readings, sensor monitoring, and the treatment quality dashboard.
- The card should display alerts related to TQM and allow the ULB employee to view the details or dismiss them.
- The rest of the functionality on the landing page should remain unaffected.
As a user, I want to view a list of the upcoming lab tests in the Treatment Quality Monitoring (TQM) module by clicking on the inbox. The list should be sorted by the pending date, displaying the test with the highest SLA first. I should be able to see the test ID, plant name, treatment process, pending date, status, and SLA. Additionally, I should be able to filter the tests, search for specific tests by test ID or plant name, and redirect to other pages in the TQM module using the provided links.
ULB employee/state employee
View the list of upcoming tests:
- Inbox navigation:
- The user can click on the inbox to be redirected to the list of upcoming lab tests.
- Total count of upcoming tests:
- The total count of upcoming tests will be displayed beside the inbox in brackets.
- Sorting:
- The list of upcoming tests will be sorted by the pending date, where the test with the highest SLA is displayed first.
- Fields displayed:
- The list of upcoming tests will display the following fields:
- Test ID
- Plant Name
- Treatment Process
- Pending Date: This is the test date as per schedule
- Status: Status of the test
- SLA: The difference between the test due date and today. This will be displayed in red if the test due date is earlier than today, and in green if today is before the test due date.
- View test details:
- The user can view detailed information about a specific test by clicking on the test ID.
- Filters:
- Filters are displayed on the left-hand panel of the screen.
- The following filters are available:
- Treatment process: A multi-select showing values for the treatment processes configured for the urban local body (ULB). The selected treatment processes will be displayed as ticks on the multi-select box. If not selected, it is left blank.
- Stages: A dropdown showing values for the stages configured for the plant. The selected stage is displayed here on selection. If not selected, the field is left blank.
- Status: A multi-select showing values for the status in the treatment quality workflow.
- The user can select values for the filters and click on filter to filter the inbox accordingly.
- To clear the filters, the user can click on the refresh icon on the top right of the filter panel.
- Search:
- The user can search for specific tests using the following:
- Test ID
- Plant name
- Part search is enabled for both fields.
- The user can fill in either the test ID or the plant name or both and click on the search button.
- The user can clear the search by clicking on the clear search link.
- Retaining filters, sort, and search:
- In case filters, sort, or search are applied, and the user navigates to the test details page, on going back, the values of the filters, sort, and search should remain the same.
- Redirecting to other Links:
- Users can redirect to other pages in the TQM module via the links provided on the top left of the page.
- The following links will be displayed:
- View past results
- View IoT results
- Sensor monitoring
- View dashboard
- N/A
NA
- N/A
- N/A
- The user should be able to view the list of the upcoming lab tests by clicking on the inbox.
- The list of upcoming tests should be sorted correctly by the pending date, showing the test with the highest SLA first.
- The user should be able to see the test ID, plant name, treatment process, pending date, status, and SLA in the list of upcoming tests.
- The user should be able to view detailed information about a specific test by clicking on the test ID.
- The user should be able to filter the tests based on the treatment process, stages, and status.
- The user should be able to search for specific tests by the test ID or the plant name.
- The user should be able to redirect to other pages in the TQM module using the provided links.
As a user, I want to access a test details page by clicking on the test ID in the inbox. The test details page should display detailed information about the test, including test ID, plant name, treatment process, stage, output type, test type, test scheduled date, status, lab name, sample submission date, test results submission date, SLA, a table with parameter details, overall test results (pass/fail), attached documents (if any), and the test timeline. Additionally, I should be able to go back using the breadcrumbs of the page and download the test report.
ULB employee/State employee
- Accessing the test details page:
- The user can access the test details page by clicking on the test ID in the inbox.
- Fields displayed:
- The following information will be displayed on the test details page:
- Test ID
- Plant Name
- Treatment Process
- Stage
- Output Type
- Test Type
- Test Scheduled Date
- Status
- Lab Name
- Sample Submission Date
- Test Results Submission Date
- SLA: This will be displayed in red/green based on SLA. If today > pending date, it will be displayed in red. If today < pending date, it will be displayed in green for open tests. For closed tests, SLA will be displayed.
In case the information on any field is not available, such as lab name/value against parameters based on the status of the test, the value against the fields will be displayed as "To be Updated".
- Table with parameter details:
- The page will include a table with the following details:
- S.No
- Parameter
- Unit of Measurement (UoM)
- Benchmark
- Value Recorded: The value will be displayed in red/green based on comparison to the benchmark.
- Overall Test Results: Pass/Fail
- Attached documents:
- The user should be able to view attached documents (if any) by clicking on the document icon. No icon will be present if the documents are not attached.
- Test timeline:
- The test details page will display the test timeline, showing the various stages and dates involved in the test process.
- Go back:
- The user can go back to the previous page using the breadcrumbs of the page.
- Download test report:
- The user can download the test report by clicking on the download button.
N/A
N/A
N/A
N/A
- The user should be able to access the test details page by clicking on the test ID in the inbox.
- The test details page should display detailed information about the test, including Test ID, Plant Name, Treatment Process, Stage, Output Type, Test Type, Test Scheduled Date, Status, Lab Name, Sample Submission Date, Test Results Submission Date, and SLA.
- The page should include a table with parameter details, showing S.No, Parameter, UoM, Benchmark, Value Recorded, and Overall Test Results (Pass/Fail).
- The user should be able to view attached documents (if any) by clicking on the document icon.
- The test details page should display the test timeline, showing the various stages and dates involved in the test process.
- The user should be able to go back using the breadcrumbs of the page.
- The user should be able to download the test report by clicking on the download button.
As a user, I want to view past test results (both IoT and lab) via the TQM landing page by clicking on the "Past Tests" link. The Past Test Results page will display a list of past tests with the ability to view test details, search tests based on various criteria, sort the results, and download test results in Excel and PDF formats. Additionally, I should be able to go back using the breadcrumbs on the top of the page and clicking on the Test ID will redirect me to the test details page.
ULB employee/State employee
Past Test Results Page:
- Accessing Past Test Results Page:
- The user can access the Past Test Results page by clicking on the "Past Tests" link on the TQM landing page.
- Fields Displayed:
- The page will display a list of past tests sorted on the test date, with the following fields for each test:
- Test ID
- Plant
- Treatment Process (in case there is only 1 treatment process for the plant, this field will not be displayed)
- Test Type
- Test Date: This is the date the test results are updated
- Test Result: Pass/Fail
- View Test Details:
- The user can view test details by clicking on the "Test ID" link on each row, which will redirect the user to the test details page (same as redirection from Inbox).
- Search Tests:
- The user can search for past tests based on the following criteria:
- Test ID: Input Text field, Part search should be enabled.
- Plant: Dropdown of a list of plants in the ULB.
- Treatment Process: Dropdown of a list of treatment processes in the ULB.
- Test Type: This will be a dropdown showing values for Test Type (IoT/lab). Selected test type is displayed here on selection. If not, the field is left blank.
- Date range: Selection of date range (calendar view): Selected date range is displayed here on selection. If not, the field is left blank.
- Sort:
- Tests can be sorted by the Test Date by clicking on the date column.
- Clear Search:
- To clear the search and view all past tests, the user can click on the "Clear Search" button.
- Download Test Results:
- The user can download list of test results in Excel and PDF formats using the download button.
- Go Back:
- The user can go back to the previous page using the breadcrumbs on the top of the page. If the user has navigated to the Test details page from the Past Test results list, clicking back will redirect the user to the Past Test Results page.
N/A
N/A
N/A
N/A
- The user should be able to access the Past Test Results page by clicking on the "Past Tests" link on the TQM landing page.
- The Past Test Results page should display a list of past tests sorted on the test date, with relevant fields such as Test ID, Plant, Treatment Process, Test Type, Test Date, and Test Result (Pass/Fail).
- The user should be able to view test details by clicking on the "Test ID" link on each row, redirecting the user to the Test details page (same as redirection from Inbox).
- The user should be able to search for past tests based on Test ID, Plant, Treatment Process, Test Type, and Date range criteria.
- The user should be able to sort past tests by the Test Date.
- The user should be able to clear the search and view all past tests.
- The user should be able to download test results in Excel and PDF formats.
- The user should be able to go back using the breadcrumbs on the top of the page and clicking on the Test ID will redirect the user to the test details page.
As a user, I want to view IoT readings via the TQM landing page by clicking on the "View IoT Readings" link. On clicking the link, the user should be redirected to the list of past tests, with the search on Test Type selected as "IoT" and the results filtered for IoT readings only. All other functionality of the page should remain the same.
ULB employee/State employee
- Details:
- Accessing "View IoT Readings" Page:
- The user can access the "View IoT Readings" page by clicking on the "View IoT Readings" link on the TQM Landing Page.
- Redirected Page:
- On clicking "View IoT Readings," the user is redirected to the list of past tests, with the search on Test Type selected as "IoT," and the results filtered for IoT readings only.
- Other Functionality:
- All other functionality available on the page (e.g., viewing past test results, searching tests, sorting, downloading test results) will remain the same.
N/A
N/A
N/A
N/A
N/A
- The user should be able to access the "View IoT Readings" page by clicking on the "View IoT Readings" link on the TQM landing page.
- On clicking the link, the user should be redirected to the list of past tests, with the search on Test Type selected as "IoT," and the results filtered for IoT readings only.
- All other functionality available on the page should remain the same, allowing the user to view past test results, search tests, sort, and download test results as before.
As a user, I want to view the list of devices via the TQM landing page by clicking on the "Sensor Monitoring" link. On clicking the link, the user should be redirected to the list of devices. The page should display the total number of IoT devices, and each device should have specific details such as Device ID, Plant, Treatment Process, Stage, Output Type, Device Status, and the parameters it is monitoring. The user should be able to search and filter devices based on various criteria.
ULB employee/State employee
- Accessing "Sensor Monitoring" Page:
- The user can access the "Sensor Monitoring" page by clicking on the "Sensor Monitoring" link on the TQM Landing Page.
- Redirected Page:
- On clicking "Sensor Monitoring," the user is redirected to the list of devices.
- List of Devices:
- The page will display the total number of IoT devices beside the page heading in brackets.
- Each device will have a row displaying the following details:
- Device ID
- Plant
- Treatment Process
- Stage
- Output Type
- Device Status
- Parameters: One or multiple parameters that the device is monitoring.
- Filters:
- Search Devices:
- On clicking "Filter," a pop-up will be displayed with the following filters:
- Device ID: Allows part search for Device ID.
- Plant: Dropdown with values based on plants configured in the MDMS.
- Treatment Process: Dropdown with values based on the Treatment process type.
- Stage: Dropdown with values based on the Stage of the selected Treatment process.
- Output Type: Dropdown with values based on Output types configured for the plant.
- Device Status: Dropdown with options for Active/Inactive.
- The user can select values for the filters above and click on "Search" to filter the list of devices based on the selected criteria.
- To clear the search and view all devices, the user can click on "Clear All."
Attribute
Type
Required?
Comments and Validations
Configuration Date
Datetime
Y
Device Type
Text
Y
Selection from device master data
[“GPS Sensor”, “pH Sensor”, “Accelerometer”, “Light Sensor”]
Plant
Text
Y
Treatment Process
Text
Y
Stage
Text
Y
Output Type
Text
Y
Parameters
Array
Y
The parameters monitored by the device
Monitoring Frequency
Numeric
Y
Custom frequency for the device
Calibration Date
Datetime
Y
Input from the user about any change in the calibration/maintenance of the device
Calibration Accuracy
Array
Y
Range to indicate the permissible deviation in the accuracy
IsConnected?
Boolean
Y
To indicate the connectivity of the device
Connectivity History
?
Y
Date-wise device audit log to know the connectivity status
Verification History
?
Date-wise device verification log to know the days when device input was verified with laboratory results
N/A
N/A
- The user should be able to access the "Sensor Monitoring" page by clicking on the "Sensor Monitoring" link on the TQM landing page.
- On clicking the link, the user should be redirected to the list of devices, displaying the total number of IoT devices and specific details for each device, such as Device ID, Plant, Treatment Process, Stage, Output Type, Device Status, and the parameters it is monitoring.
- The user should be able to search and filter devices based on various criteria using the available filters.
- The user can perform the search and view the filtered devices based on the selected criteria.
- The user can clear the search and view all devices if needed.
As a user, I want to be able to record test results without a schedule for adhoc tests. A provision will be provided for the user to record test results by clicking on the "Add Test Result" link on the card. Clicking on the link should redirect the user to the "Add Test Result" page where the user can enter the required fields, including Plant Name, Treatment Process, Treatment Stage, Output Type, values against parameters, and any attachments. After submitting the test results, the user should be redirected to the test results page with specific changes to the display compared to the View Test Results page.
ULB employee/State employee
- Accessing "Add Test Result" Page:
- The user can access the "Add Test Result" page by clicking on the "Add Test Result" link on the Card.
- Redirected Page:
- Clicking on "Add Test Result" will redirect the user to the "Add Test Result" page.
- Fields to Enter:
- The user needs to enter the following fields:
- Plant Name: A dropdown based on the list of Plants available in the system. For a state-level user, this should display all plants in the state. For a ULB, it should also display the names tagged to the ULB.
- Treatment Process: A dropdown based on the list of Treatment Processes in the selected plant.
- Treatment Stage: A dropdown based on the list of Stages in the selected Treatment Process.
- Output Type: A dropdown based on the Output types available in the selected stage.
- Values against parameters: The user should fill in at least 1 parameter for the Submit button to be enabled. If no parameter is filled, and the user clicks on the Submit button, an error message is displayed as a snack bar.
- Attachments: If any attachments are required, the user can add them.
- Submitting Test Results:
- Once the user clicks on the Submit button, the test results page is displayed.
- Changes to "View Test Results" Page:
- The "View Test Results" page with the following changes:
- Test Type will be displayed as "Lab."
- Status, Lab Name, and SLA fields are not displayed.
- Workflow will not be displayed.
Attribute
Type
Required?
Comments/Validations
Test ID
Numeric
Y
Autogenerated by system
Plant Name
Array
View Only
Auto populated on creation of schedule, Single select for on demand test
Treatment Process
Array
View Only
Auto populated on creation of schedule, Single select for on demand test
Treatment Process Type
Array
View Only
Auto populated on creation of schedule, Single select for on demand test
Stage
Array
View Only
Auto populated on creation of schedule, Single select for on demand test
Output Type
Array
View Only
Auto populated on creation of schedule, Single select for on demand test
Test Type
Array
Lab/IoT, Autoselected to Lab for on demand
Lab Submitted to
Text
Y
This will not be required in case Test Type = IoT
Quality Parameter 1
Numeric
Y
Validation to be applied at impel
Quality Parameter 2
Numeric
Y
Validation to be applied at impel
Quality Parameter 3
Numeric
Y
Validation to be applied at impel
Quality Parameter n
Numeric
Y
Validation to be applied at impel
Collection Time
Date
Y
This is the date-time on which user updates status to Pending Results. For IoT, this is the time sensor records reading
Attachment
Document
Y
For a given collection location, photo or PDF proof of laboratory result mentioning the information of above-mentioned parameters
<To be updated>
N/A
N/A
- The user should be able to access the "Add Test Result" page by clicking on the "Add Test Result" link on the card.
- The "Add Test Result" page should allow the user to enter required fields, including Plant Name, Treatment Process, Treatment Stage, Output Type, values against parameters, and any attachments.
- After submitting the test results, the user should be redirected to the test results page with specific changes to the display compared to the "View Test Results" page.
The TQM Dashboard will be available to both ULB employees and state employees. It can be accessed by clicking on the 'Dashboard' link on the landing page. Upon clicking, the user will be directed to the dashboard view. The access to data in the dashboard will be based on the roles, where the ULB admin can view the dashboard for all plants in the ULB, and the state admin can view the dashboard for all plants in the state.
- ULB Employee
- State Employee
- Accessing "Dashboard" View:
- The user can access the Dashboard by clicking on the "Dashboard" link on the landing page.
- Redirected to Dashboard:
- Clicking on "Dashboard" will direct the user to the Dashboard view.
- Navigation:
- On the Dashboard view, the user can navigate across Treatment Process Types to view specific dashboards for each Treatment Process Type.
- Filters:
- Date Range: The user should be able to filter the dashboard based on the selected date range.
- ULB: For ULB Employees, the ULB is automatically selected to the ULB the Plant and Employee is tagged to. For State users, all ULBs should be available in the dropdown.
- Plant: For ULB Employees, plants tagged to the ULB to which the employee belongs should be available in the dropdown. For State users, all plants should be available.
- Share Functionality:
- User should be able to share the filtered dashboard over WhatsApp in image format.
- User should be able to share filtered charts/tables over WhatsApp in image format.
- Download Functionality:
- User should be able to download the filtered dashboard in PDF and image format.
- User should be able to download filtered charts/tables in PDF and image format.
- Metrics - Overall KPIs:
- The Dashboard will display the following KPIs:
- Total Incoming Sludge: Sum of the total sludge that is disposed of at the plant for the selected time period.
- # of trips: Count of total incoming vehicles at the Treatment Plant for the selected time period.
- Overall Quality: Number of tests where all parameters are as per benchmarks compared to the total number of test results recorded.
- Compliance %: % of tests where results have been recorded.
- Total Alerts: Count of total alerts raised of the following types:
1) Test Results not as per benchmark.
2) No reading from IoT device.
3) Lab results and IoT results not matching.
Detailed Metric calculations for the Treatment Quality Monitoring Dashboard are viewable here.
N/A
The user should have appropriate access rights to view the dashboard.
N/A
N/A
- The user should be able to access the dashboard by clicking on the 'Dashboard' link on the landing page.
- The Dashboard view should allow the user to navigate across Treatment Process Types to view specific dashboards for each Treatment Process Type.
- The user should be able to filter the dashboard based on the selected date range, ULB, and plant.
- The user should be able to share the filtered dashboard and charts/tables over WhatsApp in the image format.
- The user should be able to download the filtered dashboard and charts/tables in PDF and image formats.
- The Dashboard should display the overall KPIs, including Total Incoming Sludge, the number of trips, Overall Quality, Compliance percentage, and Total Alerts.
The Treatment Quality Overview provides an overview of the Treatment Quality for a particular Treatment Process. It includes KPIs, a map view, and a table of plant-wise details of test results (Pass/Fail) and compliance percentage.
ULB Employee/State Employee
- KPIs:
- Total Plants: The count of unique plants for the particular Treatment Process.
- Count of Plants Passed Treatment Quality: The count of plants that have passed Treatment Quality as per the last recorded test. Treatment Quality is said to have passed if all parameters for final output(s) of a Treatment process are as per benchmarks.
- Count of Plants Failed Treatment Quality: The count of plants that have failed Treatment Quality as per the last recorded test. Treatment Quality is said to have failed if one or more parameters for final output(s) of a Treatment process are not as per benchmarks.
- Map View:
- The dashboard will display a map view showing the location of each plant. Plants will be colour-coded based on whether they have passed or failed the last output quality test Treatment Quality. (Red = Failed, Green = Passed)
- Table:
- The table will show plant-wise details of Test Results (Pass/Fail) and Compliance Percentage based on the last recorded test. The user will also be able to see the change in compliance percentage compared to the last month.
- Drill down functionality will be available for a plant via this table.
- For Treatment Plant Users (TRP) and ULBs where only one plant is tagged for the process type, the drilled table is automatically visible.
- Drill Down:
- When a user drills down on a specific plant from the table, the following information will be viewable:
- Heading: Name of the Plant
- Table displaying the following fields:
- Stage
- Output Type
- Value of Parameters
- Compliance Percentage
- Button to view Trends for a particular Stage.
- Toggle to Toggle between IoT readings and Lab Results. The selected test type will appear highlighted.
- Switching between Process Flows:
- If there are multiple process flows, the user can switch between them using buttons. The selected process flow will appear highlighted.
Detailed Metric calculations for the Treatment Quality Monitoring Dashboard are viewable here.
- Filters:
- Date Range: The user should be able to filter the dashboard based on the selected date range.
- ULB: For ULB Employees, the ULB is automatically selected to the ULB the Plant and Employee is tagged to. For State users, all ULBs should be available in the dropdown.
- Plant: For ULB Employees, plants tagged to the ULB to which the employee belongs should be available in the dropdown. For State users, all plants should be available.
- Share Functionality:
- User should be able to share filtered charts/tables over WhatsApp in image format.
- Download Functionality:
- User should be able to download filtered charts/tables in PDF and image format.
N/A
The user should have appropriate access rights to view the Treatment Quality Overview dashboard.
N/A
N/A
- The Treatment Quality Overview dashboard should display the KPIs: Total Plants, Count of Plants Passed Treatment Quality, and Count of Plants Failed Treatment Quality.
- The map view should show the location of each plant, color-coded based on whether they have passed or failed Treatment Quality.
- The table should show plant-wise details of Test Results (Pass/Fail) and Compliance Percentage based on the last recorded test. The user should be able to see the change in compliance percentage compared to the last month.
- The drill down functionality should provide detailed information about a specific plant's Stage, Output Type, Value of Parameters, and Compliance Percentage.
- The user should be able to toggle between IoT readings and Lab Results for a specific plant.
- If there are multiple process flows, the user should be able to switch between them using buttons.
Scope:
The user will be able to view a trend chart for a specific parameter over time once they click on the "View Trend" button in the table. The chart will provide a comparison with the benchmark.
Actors:
- ULB Employee/State Employee
- Details:
- When the user clicks on the "View Trend" button in the table, a trend chart will be displayed.
- The chart should not be visible before Trend chart has been clicked on
- The chart will show the trend of the selected parameter over time.
- The chart will also display the benchmark for the selected parameter to provide a comparison.
- A toggle will be available to navigate between different parameters for viewing their trend charts.
Attributes Table:
- N/A
Validations:
- The user should have appropriate access rights to view trend charts.
Configurations:
- N/A
Notifications:
- N/A
User Interface:
Acceptance Criteria:
- The user should be able to view a trend chart for a specific parameter by clicking on the "View Trend" button in the table.
- The chart should show the trend of the selected parameter over time.
- The chart should display the benchmark for the selected parameter to provide a comparison.
- The user should be able to navigate between different parameters using the toggle to view their trend charts.
Dashboard
Dashboard_01
Dashboard
Trips mismatch - Vehicle log report
To check for the number of trips in the vehicle log report
1. Login as ULB employee and open dashboard. 2. Navigate to the Desludging Request Report.
Initially, the data is displayed district-wise, so, here it should display the summation number of trips of all boundary.
Initially data is displayed district-wise. However, there is mismatch in the number of trips.
FAILED
FAILED
FAILED
Dashboard_02
Dashboard
Desludging Request Report
To verify the data mismatch in the Desludging Request Report
1. Login as a ULB employee and open the dashboard. 2. Navigate to the Desludging Request Report.
Initially, data is displayed district wise so, here it should display summation Open Request of ULB.
Initially data is displayed district wise so, but there is mismatch in open request.
FAILED
FAILED
FAILED
Dashboard_03
Dashboard
Desludging Request Report” & Vehicle Log Report
To verify When ULB is selected from drop down, the “Desludging Request Report” & “Vehicle Log Report” is showing District wise data. And there is mismatch in data between district figures and summation of data of ULB
1. Login as ULB Employee and open dashboard. 2. Then navigate to Desludging Request Report. 3. Check for Desludging Request Report” & “Vehicle Log Report”
ashboard shall showcase the requisite data & details with exact usage in the platform. And the district wise data shall be the summation of ULB wise data.
Desludging Request Report” & Vehicle Log Report is showing District wise data. And there is mismatch in data between district figures and summation of data of ULBs
FAILED
FAILED
FAILED
Dashboard_04
Dashboard
Check for templates- Date Range
Check for Date Range values
1. Login to Date Range 2. Check for Date Range filter criteria
Date Range should ahve vlues like month, year and dates to select from
Date Range has vlues like month, year and dates to select from
PASSED
PASSED
PASSED
Dashboard_05
Dashboard
Check for templates- DDRs
Check for DDRs values
1. Login to Date Range 2. Check for DDRs filter criteria
DDRs should have drop dwon values to select from
DDRs should has drop dwon values to select from
PASSED
PASSED
PASSED
Dashboard_06
Dashboard
Check for templates- ULB
Check for ULB values
1. Login to Date Range 2. Check for ULB filter criteria
ULB should have drop dwon values to select from
ULB should has drop dwon values to select from
PASSED
PASSED
PASSED
Dashboard_07
Dashboard
Overview chart
Check for overview chart values and shareable over email, download and over whatsapp
1. Login to Date Range 2. Check if IOVerview chart is dispalyed 3. Check if below values are ppopulated Total Request Total Sludge Treated Average FSM Cost Total Collection SLA Compliance Citizen Average Rating
All the below values should be populated correctly Total Request Total Sludge Treated Average FSM Cost Total Collection SLA Compliance Citizen Average Rating and user should be able to share teh image
Below values are populated correctly Total Request Total Sludge Treated Average FSM Cost Total Collection SLA Compliance Citizen Average Rating User is able to share the image and download
PASSED
PASSED
PASSED
Dashboard_08
Dashboard
Total Cumulative Collection
Check for Total Cumulative Collection chart is populated as expected and X and Y axis has required values
1. Login to Date Range 2. Check if Total Cumulative Collection chart is displayed with X and Y axis
Total Cumulative Collection should have X axis based on the filter values selected and X axis with the collection volume
Total Cumulative Collection has qX axis based on the filter values selected and X axis with the collection volume
PASSED
PASSED
PASSED
Dashboard_09
Dashboard
FSM Collection by Usage Type
Check if FSM Collection by Usage Type displays all the requird property types
1. Login to Date Range 2. Check if FSM Collection by Usage Type chart is dispalyed 3. Check if below values are ppopulated IndependentHouse RecidentialApartment Hotel Toilets Restaurant Institutional Church RowHouses
All the below values should be displayed as expected IndependentHouse RecidentialApartment Hotel Toilets Restaurant Institutional Church RowHouses
All the below values are displayed as expected IndependentHouse RecidentialApartment Hotel Toilets Restaurant Institutional Church RowHouses
PASSED
PASSED
PASSED
Dashboard_09
Dashboard
FSM Service Request by Gender
Check if FSM Service Request by Gender is displayed as expected
1. Login to DSS dash board 2. Check for FSM Service Request by Gender if it displays Male , Female and Tansgender values as expected
FSM Service Request by Gender should displayall 3 gender data as expected
FSM Service Request by Gender displays all 3 gender data as expected
PASSED
PASSED
PASSED
Driver_01
Driver tab
Error message with duplicate mobile number for driver
To verify if proper error message is displayed when ULB employee create two drivers with same mobile number
1. Login to FSM registry using QAADMIN 2. Go to driver tab and create two new drivers with same mobile nuber
Proper error message should be displayed when ULB employee create two drivers with same mobile number
Proper error message is not displayed displayed when ULB employee create two drivers with same mobile number
FAILED- Fixed and retested (working as expected now)
FAILED- Fixed and retested (working as expected now)
FAILED- Fixed and retested (working as expected now)
Vendor_Driver_01
Vendor and Driver tab
Vendor and Driver tab
To verify when admin creates vendor and driver with same mobile number
1. Login to FSM registry using QAADMIN 2. Go to vendor and driver tab and create two new vendor and driver with same mobile nuber
Vendor name should be displayed for vendor and same for driver
Vendor name is displayed in driver listing when admin creates vendor and driver with same mobile number
FAILED- Fixed and retested (working as expected now)
FAILED- Fixed and retested (working as expected now)
FAILED- Fixed and retested (working as expected now)
DSO_01
DSO
DSO - Creating new application
To verify if DSO is able to create new application as citizen
1. Login using citizen ui with DSO mobile number 2. Create a application
DSO should be able to create new application
DSO is unable to create application
FAILED- Fixed and retested (working as expected now)
FAILED- Fixed and retested (working as expected now)
FAILED- Fixed and retested (working as expected now)
Citizen_01
DSO
DSO - Citizen flow
To verify Applications Created by Citizen is displayed for DSO user
1. Login as DSO using citizen login 2. create an application 3. Go to my applications 4. Check for applications displayed
Only Dso created applications should be displayed
Applications Created by Citizen is displayed for DSO user
FAILED- Fixed and retested (working as expected now)
FAILED- Fixed and retested (working as expected now)
FAILED- Fixed and retested (working as expected now)
Test Cases For Vendor Tab
/ 9
Admin Should be able to see FSM Registry page
Vendo_01
Vendor Tab
FSM Registry - Vendor Tab
To Verify admin can able to select FSM Registry Button
1.Login as Admin 2.Click on Fsm registry
Admin Can able to see FSM Registry page
PASSED
PASSED
PASSED
Vendo_02
Vendor Tab
FSM Registry - Vendor Tab
To Verify UI for vendor Tab in FSM Registry page
1.Login as Admin 2.Click on Fsm registry 3.Click on Vendor Button
Admin Should be able to see the Vendor page
Admin Can able to see the Vendor page
PASSED
PASSED
PASSED
Vendo_03
Vendor Tab
FSM Registry - Vendor Tab
To Verify for vendor button in FSM Registry page
1.Login as Admin 2.Click on Fsm registry 3.Click on Vendor Button
Admin Should be able to see all the components of vendor button
Admin Can able to see all the components of vendor button
PASSED
PASSED
PASSED
Vendo_04
Vendor Tab
FSM Registry - Vendor Tab
To Verify admin can able to enter vendor name in vendor name text field
1.Login as Admin 2.Click on Fsm registry 3.Click on By Vendor Button 4.Enter vendor name 5.Click on search
Admin Should be able to see vendor details
Admin Can able to see vendor details
PASSED
PASSED
PASSED
Vendo_05
Vendor Tab
FSM Registry - Vendor Tab
To verify admin can able to select Enable / disable toggle button
1.Login as Admin 2.Click on Fsm registry 3.Click on By Vendor Button 4Enter vendor name and click on search 5.Click on Enable/disable Toggle
Admin Should be able to see toggle button in orange colour if it is disabled or Should be display in black if it is enabled
Admin Can able to see toggle button in orange colour if it is disabled or Can display in black if it is enabled
PASSED
PASSED
PASSED
Vendo_06
Vendor Tab
FSM Registry - Vendor Tab
To verify admin can able to select the vendor name
1.Login as Admin 2.Click on Fsm registry 3.Click on By Vendor Button 4.Enter Vendor name 5.Click on search 5.Click on Vendor name
Admin Should be able to view Vendor's details , Vehicle details and Driver details
Admin Can able to view Vendor's details Vehicle details and Driver details
PASSED
PASSED
PASSED
Vendo_07
Vendor Tab
FSM Registry - Vendor Tab
To verify admin can able to add vehicle to vendor details
1.Login as Admin 2.Click on Fsm registry 3.Click on By Vendor Button 4.Enter Vendor name 5.Click on search 5.Click on Vendor name 6.Click on Add vehicle 7.Select a vehicle 8.Click on submit
Admin Should be able to view vehicle details in vendor's details
Admin Can able to view vehicle details in vendor's details
PASSED
PASSED
PASSED
Vendo_08
Vendor Tab
FSM Registry - Vendor Tab
To verify admin can able to add driver to vendor details
1.Login as Admin 2.Click on Fsm registry 3.Click on By Vendor Button 4.Enter Vendor name 5.Click on search 5.Click on Vendor name 6.Click on Add driver 7.Select a vehicle 8.Click on submit.
Admin Should be able to view driver details in vendor's details
Admin Can able to view driver details in vendor's details
PASSED
PASSED
PASSED
Vendo_09
Vendor Tab
FSM Registry - Vendor Tab
To verify admin able to select Take action button
1.Login as Admin 2.Click on Fsm registry 3.Click on By Vendor Button 4.Enter Vendor name 5.Click on search 6.Click on Vendor name 7.Click on take action button
Admin Should be able to view Take action button in orange colour
Admin can able to view Take action button in orange colour
PASSED
PASSED
PASSED
Vendo_10
Vendor Tab
FSM Registry - Vendor Tab
To verify admin able to select Edit or delete button
1.Login as Admin 2.Click on Fsm registry 3.Click on By Vendor Button 4.Enter Vendor name 5.Click on search 6.Click on Vendor name 7.Click on take action button 8.Enter or change the required fields
Admin Should be able to view edit and delete buttons in orange colour
Admin can able to view edit and delete buttons.
PASSED
PASSED
PASSED
Vendo_11
Vendor Tab
FSM Registry - Vendor Tab
To verify admin able to click on add icon
1.Login as Admin 2.Click on Fsm registry 3.Click on add icon
Admin Should be view vendor,Vehicle and driver list
Admin can able to view vendor,Vehicle and driver list
PASSED
PASSED
PASSED
Vendo_12
Vendor Tab
FSM Registry - Vendor Tab
To verify admin can able to add new vendor
1.Login as Admin 2.Click on Fsm registry 3.Click on Add icon 4.Click on Vendour 5.Enter all the required fields 6.Click on Submit application Button
New Vendor has to create.
New Vendor is created
PASSED
PASSED
PASSED
Vendo_13
Vendor Tab
FSM Registry - Vendor Tab
To verify Admin can able to see the vendor name in vendor list
1.Login as Admin 2.Click on Fsm registry 3.Enter vendor name 4.Click on search
Vendor's details should display
Vendor's details is displaying
PASSED
PASSED
PASSED
Test Cases For Vehicle Tab
/3
Vehicle_01
Vehicle Tab
FSM Registry - Vehicle Tab
Verify UI for vehicle number Tab in FSM Registry page
1.Login as Admin 2.Click on Fsm registry 3.Click on Vehicle number Button
Admin Should be able to see the Vehicle page
Admin Can able to see the Vehicle page
PASSED
PASSED
PASSED
Vehicle_02
Vehicle Tab
FSM Registry - Vehicle Tab
Verify for vehicle number button in FSM Registry page
1.Login as Admin 2.Click on Fsm registry 3.Click on Vehicle number Button
Admin Should be able to see all the components of Vehicle number button
Admin Can bable to see all the components of Vehicle number button
PASSED
PASSED
PASSED
Vehicle_03
Vehicle Tab
FSM Registry - Vehicle Tab
Verify admin can able to enter vehicle number in Vehicle number text field
1.Login as Admin 2.Click on Fsm registry 3.Click on By Vehicle number Button 4.Enter Vehicle number 5.Click on search
Admin Should be able to see vehicle details
Admin Can able to see vehicle details
PASSED
PASSED
PASSED
Vehicle_04
Vehicle Tab
FSM Registry - Vehicle Tab
To verify admin can able to select Enable / disable toggle button
1.Login as Admin 2.Click on Fsm registry 3.Click on By Vehicle number Button 4Enter vendor name and click on search 5.Click on Enable/disable Toggle
Admin Should be able to see toggle button in orange colour if it is disabled or toggle button Should display in black if it is enabled
Admin Can able to see toggle button in orange colour if it is disabled or toggle button Can display in black if it is enabled
PASSED
PASSED
PASSED
Vehicle_05
Vehicle Tab
FSM Registry - Vehicle Tab
To verify admin can able to select Vehicle number
1.Login as Admin 2.Click on Fsm registry 3.Click on By Vehiclenumber Button 4.Enter Vehicle number 5.Click on search 5.Click on Vehicle number
Admin Should be able to see Vehicle details.
Admin Can be able to see Vehicle details.
PASSED
PASSED
PASSED
Vehicle_06
Vehicle Tab
FSM Registry - Vehicle Tab
To verify admin able to select Take action button
1.Login as Admin 2.Click on Fsm registry 3.Click on By Vehicle number Button 4.Enter Vehicle number 5.Click on search 6.Click on vehicle number 7.Click on take action button
Admin Should be able to see edit and delete buttons in orange colour
Admin Can be able to see edit and delete buttons in orange colour
PASSED
PASSED
PASSED
Vehicle_07
Vehicle Tab
FSM Registry - Vehicle Tab
To Verify admin can able to Edit the vehicle details
1.Login as Admin 2.Click on Fsm registry 3.Enter Vehicle number 4.Click on Vehicle number 5.Click on Take action 6.Click on edit 7.Enter the details in required fields 8.Click on submit application Button
Admin Should be able to see updated vehicle details
Admin Can able to see updated vehicle details
PASSED
PASSED
PASSED
Vehicle_08
Vehicle Tab
FSM Registry - Vehicle Tab
To Verify admin can able to Delete the vehicle's details
1.Login as Admin 2.Click on Fsm registry 3.Enter vendor name 4.Click on vendor name 5.Click on Take action 6.Click on Delete 7.Click Again On Delete
Vehicle Should be deleted from the list
Vehicle is deleted from the list
PASSED
PASSED
PASSED
Vehicle_09
Vehicle Tab
FSM Registry - Vehicle Tab
To verify admin able to click on add icon
1.Login as Admin 2.Click on Fsm registry 3.Click on add icon
Admin Should be able to see vendor,Vehicle and driver list
Admin can able to see vendor,Vehicle and driver list
PASSED
PASSED
PASSED
Vehicle_10
Vehicle Tab
FSM Registry - Vehicle Tab
To verify admin can able to add new vehicle
1.Login as Admin 2.Click on Fsm registry 3.Click on Add icon 4.Click on Vehicle 5.Enter all the required fields 6.Click on Submit application Button
New Vehicle has to be created
New Vehicle is created
PASSED
PASSED
PASSED
Vehicle_11
Vehicle Tab
FSM Registry - Vehicle Tab
To verify Admin can able to see the vehicle name in vendor list
1.Login as Admin 2.Click on Fsm registry 3.Enter Vehicle number 4.Click on search
Admin Should be able to see Vehicle's details
Admin Can able to see Vehicle's details
PASSED
PASSED
PASSED
Test Cases For Driver Tab
/1
Driver_01
Driver Tab
FSM Registry - DriverTab
To check UI of Driver tab
1.Login as Admin 2.Click on Fsm registry 3.Click on Driver Button
Admion Should be able to see the Driver page
Admin Can able to see the Driver page
PASSED
PASSED
PASSED
Driver_02
Driver Tab
FSM Registry - DriverTab
To verify Admin can able to enter Driver name in Driver Text field
1.Login as Admin 2.Click on Fsm registry 3.Click on Driver Button 4.Enter driver name in driver text field 5.Click on Search
Admin Should be able to see all the components of Driver page details
Admin Can able to see all the components of Driver page details
PASSED
PASSED
PASSED
Driver_03
Driver Tab
FSM Registry - DriverTab
To Verify admin can able to enter Driver name in name Driver text field
1.Login as Admin 2.Click on Fsm registry 3.Click on By Driver Button 4.Enter Driver name 5.Click on search
Admin Should be able to see all the details of the Driver
Admin can able to see all the details of the Driver
PASSED
PASSED
PASSED
Driver_04
Driver Tab
FSM Registry - DriverTab
To verify admin can able to select Enable / disable toggle button
1.Login as Admin 2.Click on Fsm registry 3.Click on By Driver Button 4.Enter Driver name 5.Click on search 6.Click on Enable or Disable toggle button
Admin Should be able to see toggle button in orange colour if it is enabled or Should display in black if it is Disabled
Admin can able to see toggle button in orange colour if it is enabled or Should display in black if it is Disabled
PASSED
PASSED
PASSED
Driver_05
Driver Tab
FSM Registry - DriverTab
To verify admin able to select Take action button
1.Login as Admin 2.Click on Fsm registry 3.Click on By Driver Button 4.Enter Driver name 5.Click on search 6. Click on Driver name 7.Click on take action button
Admin Should be able to see edit and delete buttons in orange colour
Admin can able to see edit and delete buttons in orange colour
PASSED
PASSED
PASSED
Driver_06
Driver Tab
FSM Registry - DriverTab
To verify admin able to click on add icon
1.Login as Admin 2.Click on Fsm registry 3.Click on add icon
Admin Should be able to see vendor,Vehicle and driver list
Admin can able to see vendor,Vehicle and driver list
PASSED
PASSED
PASSED
Driver_07
Driver Tab
FSM Registry - DriverTab
To verify admin can able to add new Driver
1.Login as Admin 2.Click on Fsm registry 3.Click on Add icon 4.Click on Driver 5.Enter all the required fields 6.Click on Submit application Button
New Driver has to be created
New Driver is created
PASSED
PASSED
PASSED
Driver_08
Driver Tab
FSM Registry - DriverTab
To verify Admin can able to see the Driver name in Driver list
1.Login as Admin 2.Click on Fsm registry 3.Enter Driver name 4.Click on search
Driver details should display
Driver details is displaying
PASSED
PASSED
PASSED
Complete request : upload photo - copy
Complete_request_01
Complete request
Uplaod Photo
To verify the localisation has been changed from upload pit photo to upload photo
1.Login as Editor. 2.Select the application which has to be completed. 3.Click on take action. 4.click on complete request.
The localisation Can be changed from upload pit photo to upload photo
The localisation Can been changed from upload pit photo to upload photo
PASSED
PASSED
PASSED
FSM Registry Login to Inbox and empty inbox
FSM Registry_01
FSM Registry-Inbox
FSM Registry Login to Inbox and empty inbox
To verify admin can able to view add Add new vendor option
1.Login as Admin. 2.click on Fsm registry button 3.Enter the invalid vendor name. 4.Click on search
Admin should be able to view add new vendor option .
Admin Can able to view add new vendor option .
PASSED
PASSED
PASSED
FSM Registry_02
FSM Registry-Inbox
FSM Registry Login to Inbox and empty inbox
To verify admin can able to view add Add new vehicle option
1.Login as Admin. 2.click on Fsm registry button 3.Enter the invalid vehicle name. 4.Click on search
Admin should be able to view add new vehicle option
Admin Can able to view add new vehicle option
PASSED
PASSED
PASSED
FSM Registry_03
FSM Registry-Inbox
FSM Registry Login to Inbox and empty inbox
To verify admin can able to view add Add new driver option
1.Login as Admin. 2.click on Fsm registry button 3.Enter the invalid driver name. 4.Click on search.
Admin should be able to view add new vendor option .
Admin Can able to view add new vendor option .
PASSED
PASSED
PASSED
ULB Inbox
ULB Employee_01
ULB Employee
ULB Employee Inbox
To verify Filter options like assigned to me and assigned to all Can be removed from UI
1.Login as ULB Employee 2.Click on inbox 3.Check whether Filter options like assigned to me and assigned to all is there.
ULB Employee Can not be able to view assigned to me and assigned to all filter options.
ULB Employee can able to view assigned to me and assigned to all filter options.
PASSED
PASSED
PASSED
ULB Employee_02
Creator flow
ULB Employee Inbox
To check that creator can be able to view FSM Page with New De sludging application , inbox and reports options.
1.Login As admin 2.click on New Desludging application button. 3.click the browser back button
Creator Can be able to view FSM Page with New De sludging application , inbox and reports options.
Creator can be able to view FSM Page with New De sludging application , inbox and reports options.
PASSED
PASSED
PASSED
Test cases for Vehicle validation
Vehicle number validation_01
Vehicle
Vehicle number validation
The Add new text field Can accept the vehicle number in the AB 00 CD 1234 format
1.Login as FSTPO. 2.Click on Home. 3.Click on Add new. 4.Enter the vehicle number in the AB 00 CD 1234 format.
The Add new text field Can be able to accept the vehicle number in the AB 00 CD 1234 format
The Add new text field is accepting the vehicle number in the AB 00 CD 1234 format
PASSED
PASSED
PASSED
Vehicle number validation_02
Vehicle
Vehicle number validation
The Add new text field Can accept the vehicle number in the AB 00 C 1234 format
1.Login as FSTPO. 2.Click on Home. 3.Click on Add new. 4.Enter the vehicle number in the AB 00 C 1234 format.
The Add new text field Can be able to accept the vehicle number in the AB 00 C 1234 format
The Add new text field is accepting the vehicle number in the AB 00 C 1234 format
PASSED
PASSED
PASSED
Vehicle number validation_03
Vehicle
Vehicle number validation
The Add new text field Can accept the vehicle number in the AB 00C 1234 format
1.Login as FSTPO. 2.Click on Home. 3.Click on Add new. 4.Enter the vehicle number in the AB 00C 1234 format.
The Add new text field Can be able to accept the vehicle number in the AB 00C 1234 format
The Add new text field is accepting the vehicle number in the AB 00C 1234 format
PASSED
PASSED
PASSED
Vehicle number validation_04
Vehicle
Vehicle number validation
The Add new text field Can accept the vehicle number in the AB 00CD 1234 format
1.Login as FSTPO. 2.Click on Home. 3.Click on Add new. 4.Enter the vehicle number in the AB 00CD 1234 format.
The Add new text field Can be able to accept the vehicle number in the AB 00CD 1234 format
The Add new text field is accepting the vehicle number in the AB 00CD 1234 format
PASSED
PASSED
PASSED
ULB New application +(modify application)
ULB Employee_01
ULB Employee
ULB New application + modify application
To verify that collector can able to collect the advance amount
1.Login as collector 2.search with the application number and click on the application number and collect the payment.
Collector Can be able to Collect the advance amount.
Collector can able to Collect the advance amount.
PASSED
PASSED
PASSED
ULB Employee_02
ULB Employee
ULB New application + modify application
To verify that collector can able to collect the Balance amount
1.Login as collector 2.search with the application number and click on the application number and collect the payment.
Collector Can be able to Collect the balance amount.
Collector can able to Collect the balance amount.
PASSED
PASSED
PASSED
ULB Employee_03
ULB Employee
ULB New application + modify application
To verify that Collector can able to view the advance amount and paid amount and balance amount in payment Reciept.
1.Login as collector 2.search with the application number and click on the application number and collect the payment. 3.Download the reciept and view the advance amount and paid amount and balance amount in payment Reciept.
Collector Can be able to view the advance amount and paid amount and balance amount in payment Reciept.
Collector can able to view the advance amount and paid amount and balance amount in payment Reciept.
PASSED
PASSED
PASSED
ULB collecting advance
, https://digit-discuss.atlassian.net/browse/SM-807
Collector - Advance amount_01
Collector - Advance amount
ULB collecting advance amount
To verify that collector can able to collect the advance amount
1.Login as collector 2.search with the application number and click on the application number and collect the payment.
Collector Can be able to Collect the advance amount.
Collector can able to Collect the advance amount.
PASSED
PASSED
PASSED
Collector - Advance amount_02
Collector - Advance amount
ULB collecting advance amount
To verify that collector can able to collect the Balance amount
1.Login as collector 2.search with the application number and click on the application number and collect the payment.
Collector Can be able to Collect the balance amount.
Collector can able to Collect the balance amount.
PASSED
PASSED
PASSED
Collector - Advance amount_03
Collector - Advance amount
ULB collecting advance amount
To verify that Collector can able to view the advance amount and paid amount and balance amount in payment Reciept.
1.Login as collector 2.search with the application number and click on the application number and collect the payment. 3.Download the reciept and view the advance amount and paid amount and balance amount in payment Reciept.
Collector Can be able to view the advance amount and paid amount and balance amount in payment Reciept.
Collector can able to view the advance amount and paid amount and balance amount in payment Reciept.
PASSED
PASSED
PASSED
Collector - Advance amount_04
Collector - Advance amount
ULB collecting advance amount
To verify that collector can able to collect the remaining amount and the breadcrumbs Can be as follows Home/FSM/ Inbox/ Collect Payment / Generate Receipt
1.Login as Collector. 2.click on inbox and enter the application number and click on the application number, 3.Click on generate reciept and enter all the fields and click on submit application
collector Can be able to collect the remaining amount and the breadcrumbs Can be as follows Home/FSM/ Inbox/ Collect Payment / Generate Receipt
collector can able to collect the remaining amount and the breadcrumbs Can be as follows Home/FSM/ Inbox/ Collect Payment / Generate Receipt
PASSED
PASSED
PASSED
Collector - Advance amount_05
Collector - Advance amount
ULB collecting advance amount
To verify that citizen is getting the message in the given format after paying the full amount
Check has to check the message and Can be in the given format Dear citizen, amount of Rs.* is received towards the payment of cleaning septic tank /pit for reference no. *. Please click this link **to download the receipt. Thank You. EGOVS.
citizen Can be able to get the message in the given format.
citizen can able to get the message in the given format.
PASSED
PASSED
PASSED
Collector - Advance amount_06
Collector - Advance amount
ULB collecting advance amount
To verify that citizen able to download the reciept from the message link.
Click on the download the reciept link which has sent to citizen and download the report
Citizen Can be able to download the report.
ULB employee update number of trips
ULB Employee - No of trips update_01
ULB Employee - No of trips update
ULB employee update number of trips
cr amount
1.Login as Editor. 2.click on inbox and enter the application number and click on the application number, 3.click on take action 4.click on update trips. 5.Now increase/decrease the trips
Editor Can be able to increase/decrease the trips when citizen has paid some advance amount.
Editor can be able to increase/decrease the trips when citizen has paid some advance amount.
PASSED
PASSED
PASSED
ULB Employee - No of trips update_02
ULB Employee - No of trips update
ULB employee update number of trips
To verify that can able to reduce the trips when citizen has paid some advance amount
1.Login as Editor. 2.click on inbox and enter the application number and click on the application number, 3.click on take action 4.click on update trips. 5.Now reduce the trips
Editor Can not be able to reduce the trips when citizen has paid some advance amount.
Editor can't able to reduce the trips when citizen has paid some advance amount.
PASSED
PASSED
PASSED
ULB Employee - No of trips update_03
ULB Employee - No of trips update
ULB employee update number of trips
To verify that Editor can be able to view the message as not allowed to reduce the number of trips as amount as already collected when amount has been already paid
1.Login as Editor. 2.click on inbox and enter the application number and click on the application number, 3.click on take action 4.click on update trips.
Editor Can be able to view the message as not allowed to reduce the number of trips as amount as already collected when amount has been already paid
Editor can be able to view the message as not allowed to reduce the number of trips as amount as already collected when amount has been already paid
PASSED
PASSED
PASSED
ULB Employee - No of trips update_04
ULB Employee - No of trips update
ULB employee update number of trips
To verify that Editor can able to Complete the request when citizen pay the full amount
1.Login as Editor. 2.click on inbox and enter the application number and click on the application number, 3.click on take action 4.complete the request.
Editor Can be able to complete the request when citizen makes the full payment.
Editor can be able to complete the request when citizen makes the full payment.
PASSED
PASSED
PASSED
ULB Employee - No of trips update_05
ULB Employee - No of trips update
ULB employee update number of trips
To verify that editor can't able to Complete the request when citizen did not pays the full amount
Login as editor and click on inbox and enter the application number and click on the application number and try to complete the request
editor Can not be able to Complete the request when citizen did not pays the full amount
editor cannot able to Complete the request when citizen did not pays the full amount
PASSED
PASSED
PASSED
DSO update number of trips
DSO update number of trips_01
DSO update number of trips
DSO update number of trips
To verify that DSOcan able to increase or decrease the trips when citizen has paid some advance amount
1.Login as Editor. 2.click on inbox and enter the application number and click on the application number, 3.click on take action 4.click on update trips. 5.Now increase/decrease the trips
DSO Can be able to increase/decrease the trips when citizen has paid some advance amount.
DSO can be able to increase/decrease the trips when citizen has paid some advance amount.
PASSED
PASSED
PASSED
DSO update number of trips_02
DSO update number of trips
DSO update number of trips
To verify that can able to reduce the trips when citizen has paid some advance amount
1.Login as Editor. 2.click on inbox and enter the application number and click on the application number, 3.click on take action 4.click on update trips. 5.Now reduce the trips
DSOCan not be able to reduce the trips when citizen has paid some advance amount.
DSO can't able to reduce the trips when citizen has paid some advance amount.
PASSED
PASSED
PASSED
DSO update number of trips_03
DSO update number of trips
DSO update number of trips
To verify that DSO can be able to view the message as not allowed to reduce the number of trips as amount as already collected when amount has been already paid
1.Login as Editor. 2.click on inbox and enter the application number and click on the application number, 3.click on take action 4.click on update trips.
DSO Can be able to view the message as not allowed to reduce the number of trips as amount as already collected when amount has been already paid
DSO can be able to view the message as not allowed to reduce the number of trips as amount as already collected when amount has been already paid
PASSED
PASSED
PASSED
DSO update number of trips_04
DSO update number of trips
DSO update number of trips
To verify that DSO can able to Complete the request when citizen pay the full amount
1.Login as Editor. 2.click on inbox and enter the application number and click on the application number, 3.click on take action 4.complete the request.
DSOCan be able to complete the request when citizen makes the full payment.
DSOcan be able to complete the request when citizen makes the full payment.
PASSED
PASSED
PASSED
DSO update number of trips_05
DSO update number of trips
DSO update number of trips
To verify that DSo can't able to Complete the request when citizen did not pays the full amount
Login as DSoand click on inbox and enter the application number and click on the application number and try to complete the request
DSoCan not be able to Complete the request when citizen did not pays the full amount
DSocannot able to Complete the request when citizen did not pays the full amount
PASSED
PASSED
PASSED
Workflow changes from creator flow side
Workflow changes - Creator side_01
Workflow changes - Creator side
Workflow changes from creator side
To verify that collector can able to collect the advance amount
1.Login as collector 2.search with the application number and click on the application number and collect the payment.
Collector Can be able to Collect the advance amount.
Collector can able to Collect the advance amount.
PASSED
PASSED
PASSED
Workflow changes - Creator side_02
Workflow changes - Creator side
Workflow changes from creator side
To verify that Collector can able to view the advance amount and paid amount and balance amount in payment Reciept.
1.Login as collector 2.search with the application number and click on the application number and collect the payment. 3.Download the reciept and view the advance amount and paid amount and balance amount in payment Reciept.
Collector Can be able to view the advance amount and paid amount and balance amount in payment Reciept.
Collector can able to view the advance amount and paid amount and balance amount in payment Reciept.
PASSED
PASSED
PASSED
Workflow changes - Creator side_03
Workflow changes - Creator side
Workflow changes from creator side
To verify that Editor can able to assign the DSO
1.Login as Editor. 2.click on inbox and enter the application number and click on the application number, 3.click on take action. 4.click on assign DSO. 5.Assign the DSO.
Editor Can be able to assign the DSO
Editor can able to assign the DSO
PASSED
PASSED
PASSED
Workflow changes - Creator side_04
Workflow changes - Creator side
Workflow changes from creator side
To verify that Editor/DSO can able to assign the Vehicle.
1.Login as Editor/DSO. 2.2.click on inbox and enter the application number and click on the application number, 3.click on take action. 4.click on assign vehicle 5.Assign the vehicle.
Editor/DSO Can be able to assign the Vehicle
Editor/DSO can able to assign Vehicle
PASSED
PASSED
PASSED
Workflow changes - Creator side_05
Workflow changes - Creator side
Workflow changes from creator side
To verify that Editor /DSO can able to increase or decrease the trips when citizen has paid some advance amount
1.Login as Editor /DSO. 2.click on inbox and enter the application number and click on the application number, 3.click on take action 4.click on update trips. 5.Now increase/decrease the trips
Editor /DSO Can be able to increase/decrease the trips when citizen has paid some advance amount.
Editor /DSO can be able to increase/decrease the trips when citizen has paid some advance amount.
PASSED
PASSED
PASSED
Workflow changes - Creator side_06
Workflow changes - Creator side
Workflow changes from creator side
To verify that can able to reduce the trips when citizen has paid some advance amount
1.Login as Editor /DSO. 2.click on inbox and enter the application number and click on the application number, 3.click on take action 4.click on update trips. 5.Now reduce the trips
Editor /DSO Can not be able to reduce the trips when citizen has paid some advance amount.
Editor /DSO can't able to reduce the trips when citizen has paid some advance amount.
PASSED
PASSED
PASSED
Workflow changes - Creator side_07
Workflow changes - Creator side
Workflow changes from creator side
To verify that Editor /DSO can be able to view the message as not allowed to reduce the number of trips as amount as already collected when amount has been already paid
1.Login as Editor /DSO. 2.click on inbox and enter the application number and click on the application number, 3.click on take action 4.click on update trips.
Editor /DSO Can be able to view the message as not allowed to reduce the number of trips as amount as already collected when amount has been already paid
Editor /DSO can be able to view the message as not allowed to reduce the number of trips as amount as already collected when amount has been already paid
PASSED
PASSED
PASSED
Workflow changes - Creator side_08
Workflow changes - Creator side
Workflow changes from creator side
To verify that collector can able to Balance amount
1.Login as collector 2.search with the application number and click on the application number and collect the payment.
Collector Can be able to Collect the balance amount.
Collector can be able to Collect the balance amount.
PASSED
PASSED
PASSED
Workflow changes - Creator side_09
Workflow changes - Creator side
Workflow changes from creator side
To verify that Collector can able to view the advance amount and paid amount and balance amount in payment Reciept.
1.Login as collector 2.search with the application number and click on the application number and collect the payment. 3.Download the reciept and view the advance amount and paid amount and balance amount in payment Reciept.
Collector Can be able to view the advance amount and paid amount and balance amount in payment Reciept.
Collector can able to view the advance amount and paid amount and balance amount in payment Reciept.
PASSED
PASSED
PASSED
Workflow changes - Creator side_10
Workflow changes - Creator side
Workflow changes from creator side
To verify that FSTPO can able to click on Dispose
1.Login as FSTPO. 2.click on inbox and enter the application number and click on the application number, 3.click on take action 4.And Click on dispose.
FSTPO Can be able to click on Dispose.
FSTPO can able to dispose.
PASSED
PASSED
PASSED
Workflow changes - Creator side_11
Workflow changes - Creator side
Workflow changes from creator side
To verify that Editor/DSO can able to Complete the request when citizen pay the full amount
1.Login as Editor. 2.click on inbox and enter the application number and click on the application number, 3.click on take action 4.complete the request.
Editor/DSOCan be able to complete the request when citizen makes the full payment.
Editor/DSOcan be able to complete the request when citizen makes the full payment.
PASSED
PASSED
PASSED
Workflow changes - Creator side_12
Workflow changes - Creator side
Workflow changes from creator side
To verify that Editor/DSO Can not able to Complete the request when citizen did not pays the full amount
Login as Editor/DSOand click on inbox and enter the application number and click on the application number and try to complete the request
Editor/DSOCan not be able to Complete the request when citizen did not pays the full amount
Editor/DSOcannot able to Complete the request when citizen did not pays the full amount
PASSED
PASSED
PASSED
Workflow changes - Creator side_13
Workflow changes - Creator side
Workflow changes from creator side
To verify that Citizen can able to give Feedback.
1.Login as citizen. 2.click on my application. 3.click on application number. 4.click on Citizen provides Feedback. 5.Fill all the fields. 6.click on submit.
Citizen Can be able to give Feedback.
Citizen can able to give feedback
PASSED
PASSED
PASSED
Workflow changes from citizen side
Workflow changes - Citizen side_01
Workflow changes - Citizen side
Workflow changes from Citizen side
To verify that citizen is able to view warning message when he enters the amount greater than the advance amount
1.Login as creator 2.click on new desludging appliction 3.Enter all the mandatory fields till Payment Preference 4.Select pre pay in Payment Preference 5.Then enter greater than the advance amount
citizen as to able to view warning message as Amount entered is greater than the advance amount.
citizen can able to view warning message as Amount entered is greater than the advance amount.
PASSED
PASSED
PASSED
Workflow changes - Citizen side_02
Workflow changes - Citizen side
Workflow changes from Citizen side
To verify that citizen is able to view warning message when he enters the amount lesser than the advance amount
11.Login as creator 2.click on new desludging appliction 3.Enter all the mandatory fields till Payment Preference 4.Select pre pay in Payment Preference 5.Then enter lesser than the advance amount
citizen as to able to view warning message as Amount entered is lesser than the advance amount.
citizen can able to view warning message as Amount entered is greater than the advance amount.
PASSED
PASSED
PASSED
Workflow changes - Citizen side_03
Workflow changes - Citizen side
Workflow changes from Citizen side
To verify that editor can able to update the trips.
1.Login as editor. 2.search with the citizen created application number and click on application number 3.Click on take action. 4.update the trips.
Editor Can be able to update the trips.
Editor can be able to update the trips.
PASSED
PASSED
PASSED
Workflow changes - Citizen side_04
Workflow changes - Citizen side
Workflow changes from Citizen side
To verify that collector can able to collect the advance amount
1.Login as collector 2.search with the application number and click on the application number and collect the payment.
Collector Can be able to Collect the advance amount.
Collector can able to Collect the advance amount.
PASSED
PASSED
PASSED
Workflow changes - Citizen side_05
Workflow changes - Citizen side
Workflow changes from Citizen side
To verify that Collector can able to view the advance amount and paid amount and balance amount in payment Reciept.
1.Login as collector 2.search with the application number and click on the application number and collect the payment. 3.Download the reciept and view the advance amount and paid amount and balance amount in payment Reciept.
Collector Can be able to view the advance amount and paid amount and balance amount in payment Reciept.
Collector can able to view the advance amount and paid amount and balance amount in payment Reciept.
PASSED
PASSED
PASSED
Workflow changes - Citizen side_06
Workflow changes - Citizen side
Workflow changes from Citizen side
To verify that Editor can able to assign the DSO
1.Login as Editor. 2.click on inbox and enter the application number and click on the application number, 3.click on take action. 4.click on assign DSO. 5.Assign the DSO.
Editor Can be able to assign the DSO
Editor can able to assign the DSO
PASSED
PASSED
PASSED
Workflow changes - Citizen side_07
Workflow changes - Citizen side
Workflow changes from Citizen side
To verify that Editor/DSO can able to assign the Vehicle.
1.Login as Editor/DSO. 2.click on inbox and enter the application number and click on the application number, 3.click on take action. 4.click on assign vehicle 5.Assign the vehicle.
Editor/DSO Can be able to assign the Vehicle
Editor/DSO can able to assign Vehicle
PASSED
PASSED
PASSED
Workflow changes - Citizen side_08
Workflow changes - Citizen side
Workflow changes from Citizen side
To verify that Editor /DSO can able to increase or decrease the trips when citizen has paid some advance amount
1.Login as Editor /DSO. 2.click on inbox and enter the application number and click on the application number, 3.click on take action 4.click on update trips. 5.Now increase/decrease the trips
Editor /DSO Can be able to increase/decrease the trips when citizen has paid some advance amount.
Editor /DSO can be able to increase/decrease the trips when citizen has paid some advance amount.
PASSED
PASSED
PASSED
Workflow changes - Citizen side_09
Workflow changes - Citizen side
Workflow changes from Citizen side
To verify that can able to reduce the trips when citizen has paid some advance amount
1.Login as Editor /DSO. 2.click on inbox and enter the application number and click on the application number, 3.click on take action 4.click on update trips. 5.Now reduce the trips
Editor /DSO Can not be able to reduce the trips when citizen has paid some advance amount.
Editor /DSO can't able to reduce the trips when citizen has paid some advance amount.
PASSED
PASSED
PASSED
Workflow changes - Citizen side_10
Workflow changes - Citizen side
Workflow changes from Citizen side
To verify that Editor /DSO can be able to view the message as not allowed to reduce the number of trips as amount as already collected when amount has been already paid
1.Login as Editor /DSO. 2.click on inbox and enter the application number and click on the application number, 3.click on take action 4.click on update trips.
Editor /DSO Can be able to view the message as not allowed to reduce the number of trips as amount as already collected when amount has been already paid
Editor /DSO can be able to view the message as not allowed to reduce the number of trips as amount as already collected when amount has been already paid
PASSED
PASSED
PASSED
Workflow changes - Citizen side_11
Workflow changes - Citizen side
Workflow changes from Citizen side
To verify that collector can able to Balance amount
1.Login as collector 2.search with the application number and click on the application number and collect the payment.
Collector Can be able to Collect the balance amount.
Collector can be able to Collect the balance amount.
PASSED
PASSED
PASSED
Workflow changes - Citizen side_12
Workflow changes - Citizen side
Workflow changes from Citizen side
To verify that Collector can able to view the advance amount and paid amount and balance amount in payment Reciept.
1.Login as collector 2.search with the application number and click on the application number and collect the payment. 3.Download the reciept and view the advance amount and paid amount and balance amount in payment Reciept.
Collector Can be able to view the advance amount and paid amount and balance amount in payment Reciept.
Collector can able to view the advance amount and paid amount and balance amount in payment Reciept.
PASSED
PASSED
PASSED
Workflow changes - Citizen side_13
Workflow changes - Citizen side
Workflow changes from Citizen side
To verify that FSTPO can able to click on Dispose
1.Login as FSTPO. 2.click on inbox and enter the application number and click on the application number, 3.click on take action 4.And Click on dispose.
FSTPO Can be able to click on Dispose.
FSTPO can able to dispose.
PASSED
PASSED
PASSED
Workflow changes - Citizen side_14
Workflow changes - Citizen side
Workflow changes from Citizen side
To verify that Editor/DSO can able to Complete the request when citizen pay the full amount
1.Login as Editor. 2.click on inbox and enter the application number and click on the application number, 3.click on take action 4.complete the request.
Editor/DSOCan be able to complete the request when citizen makes the full payment.
Editor/DSOcan be able to complete the request when citizen makes the full payment.
PASSED
PASSED
PASSED
Workflow changes - Citizen side_15
Workflow changes - Citizen side
Workflow changes from Citizen side
To verify that Editor/DSOCan not able to Complete the request when citizen did not pays the full amount
Login as Editor/DSOand click on inbox and enter the application number and click on the application number and try to complete the request
Editor/DSOCan not be able to Complete the request when citizen did not pays the full amount
Editor/DSOcannot able to Complete the request when citizen did not pays the full amount
PASSED
PASSED
PASSED
Workflow changes - Citizen side_16
Workflow changes - Citizen side
Workflow changes from Citizen side
To verify that Citizen can able to give Feedback.
1.Login as citizen. 2.click on my application. 3.click on application number. 4.click on Citizen provides Feedback. 5.Fill all the fields. 6.click on submit.
Citizen Can be able to give Feedback.
Citizen can able to give feedback
PASSED
PASSED
PASSED
FSM V1.2 : Citizen New application +(modify application)
Citizen side - warning message_01
Citizen side - warning message
Citizen side - warning message
To verify that citizen is able to view warning message when he enters the amount greater than the advance amount
1.Login as creator 2.click on new desludging appliction 3.Enter all the mandatory fields till Payment Preference 4.Select pre pay in Payment Preference 5.Then enter greater than the advance amount
citizen as to able to view warning message as Amount entered is greater than the advance amount.
citizen can able to view warning message as Amount entered is greater than the advance amount.
PASSED
PASSED
PASSED
Citizen side - warning message_02
Citizen side - warning message
Citizen side - warning message
To verify that citizen is able to view warning message when he enters the amount lesser than the advance amount
11.Login as creator 2.click on new desludging appliction 3.Enter all the mandatory fields till Payment Preference 4.Select pre pay in Payment Preference 5.Then enter lesser than the advance amount
citizen as to able to view warning message as Amount entered is lesser than the advance amount.
citizen can able to view warning message as Amount entered is greater than the advance amount.
PASSED
PASSED
PASSED
Payment mode from citzen side
Citizen side - Pyment_01
Citizen side - Pyment
Citizen side - Pyment
To verify citizen can able to make the payment for partial amount.
1.Login as citizen and create a desludging application. 2.Login as editor and update the trips. 3.Login as citizen and make the payment for partial amount by entering all the mandatory fields.
citizen should be able to make the payment for partial amount.
citizen can able to make the payment for partial amount.
PASSED
PASSED
PASSED
Citizen side - Pyment_02
Citizen side - Pyment
Citizen side - Pyment
To verify citizen can able to make the payment for full amount.
1.Login as citizen and create a desludging application. 2.Login as editor and update the trips. 3.Login as citizen and make the payment for full amount by entering all the mandatory fields.
citizen should be able to make the payment for full amount.
citizen can able to make the payment for full amount.
PASSED
PASSED
PASSED
Citizen side - Pyment_03
Citizen side - Pyment
Citizen side - Pyment
To verify citizen can able to make the payment after paying the partial amount
1.Login as citizen and create a desludging application. 2.Login as editor and update the trips. 3.Login as citizen and make the payment for partial amount by entering all the mandatory fields. 4.Login as Editor, assign the DSO. 5.Login as Editor, Assign the vehicle and update the trips. 6.Login as Citizen make the payment for partial amount by entering all the mandatory fields.
citizen should be able to make the payment after paying the partial amount
citizen can be able to make the payment after paying the partial amount
PASSED
PASSED
PASSED
Citizen side - Pyment_04
Citizen side - Pyment
Citizen side - Pyment
To verify citizen can able to make the payment after paying the full amount
1.Login as citizen and create a desludging application. 2.Login as editor and update the trips. 3.Login as citizen and make the payment for full amount by entering all the mandatory fields. 4.Login as Editor, assign the DSO. 5.Login as Editor, Assign the vehicle and update the trips. 6.Login as Citizen make the payment for full amount by entering all the mandatory fields.
citizen should not be able to make the payment after paying the full amount
citizen can not able to make the payment after paying the full amount
PASSED
PASSED
PASSED
Updating Citizen Feedback form
Citizen Feedback form_01
Citizen Feedback form
Update Citizen Feedback form
Verify that "Number of Trips" text field has removed From the UI
1.Login as citizen. 2.click on my application. 3.click on application number. 4.click on Citizen provides Feedback. 5.check that Number of Trips text field has removed From the UI
"Number of Trips" text field should be removed From the UI
"Number of Trips" text field is removed From the UI
PASSED
PASSED
PASSED
Citizen Feedback form_02
Citizen Feedback form
Update Citizen Feedback form
Verify that "Did desludging happen" textfield has removed From the UI
1.Login as citizen. 2.click on my application. 3.click on application number. 4.click on Citizen provides Feedback. 5.Check that Did desludging happen textfield has removed From the UI
"Did desludging happen" textfield should be removed From the UI
"Did desludging happen" textfield is removed From the UI
PASSED
PASSED
PASSED
Citizen Feedback form_03
Citizen Feedback form
Update Citizen Feedback form
Verify that "Provide Feedback " rating scale is a mandatory field
1.Login as citizen. 2.click on my application. 3.click on application number. 4.click on Citizen provides Feedback.
"Provide Feedback " rating scale should be mandatory field
"Provide Feedback " rating scale is a mandatory field
PASSED
PASSED
PASSED
Citizen Feedback form_04
Citizen Feedback form
Update Citizen Feedback form
Verify that "Safety gear used " checkbox is a mandatory field
1.Login as citizen. 2.click on my application. 3.click on application number. 4.click on Citizen provides Feedback. 5.Check that Provide Feedback rating scale is a mandatory field
Verify that "Safety gear used " checkbox should be mandatory field
Verify that "Safety gear used " checkbox should is a mandatory field
PASSED
PASSED
PASSED
Citizen Feedback form_05
Citizen Feedback form
Update Citizen Feedback form
Verify that "Comments" textfield is a not a mandatory field
1.Login as citizen. 2.click on my application. 3.click on application number. 4.click on Citizen provides Feedback. 5.Check that Commentstextfield is a not a mandatory field
Verify that "Comments" textfield is a not a mandatory field
Verify that "Comments" textfield is a not a mandatory field
PASSED
PASSED
PASSED
Citizen Feedback form_06
Citizen Feedback form
Update Citizen Feedback form
Verify that Submit button Should not highlighted when mandatory fields are not filled
1.Login as citizen. 2.click on my application. 3.click on application number. 4.click on Citizen provides Feedback. 5.check that Submit button Should not highlighted when mandatory fields are not filled
Submit button Should not highlighted when mandatory fields are not filled
Submit button isn't highlighted when mandatory fields are not filled
PASSED
PASSED
PASSED
Citizen Feedback form_07
Citizen Feedback form
Update Citizen Feedback form
Verify that when citizen didn't fill the mandatory fields suggestions has to display
1.Login as citizen. 2.click on my application. 3.click on application number. 4.click on Citizen provides Feedback. 5. Check that when citizen didn't fill the mandatory fields suggestions has to display
when citizen didn't fill the mandatory fields suggestions messages should display
when citizen didn't fill the mandatory fields suggestions messages like "please rate your experience between 1-5 stars" and "please select the options from below" is displaying
PASSED
PASSED
PASSED
Skip Collection Process for Zero Pricing
Zero pricing_01
Zero pricing
Skip Collection Process for Zero Pricing
Verify that when citizen selects the "Kathagada Parbatia Sahi "slum while creating the De-sludging application the payment details should be ₹ 0
1.Login as citizen. 2.Create an application by selecting "Kathagada Parbatia Sahi" slum option .
Payment details should be ₹ 0 when citizen creates the application by selecting "Kathagada Parbatia Sahi "slum option
when citizen selects the "Kathagada Parbatia Sahi "slum while creating the De-sludging application the payment details is showing as ₹ 0
PASSED
PASSED
PASSED
Zero pricing_02
Zero pricing
Skip Collection Process for Zero Pricing
Verify that when creator selects the "Kathagada Parbatia Sahi" slum while creating the De-sludging application the payment details should be ₹ 0
1.Login as creator. 2.Create an application by selecting the "Kathagada Parbatia Sahi" slum option .
Payment details should be ₹ 0 when creator creates the application by selecting "Kathagada Parbatia Sahi "slum option
when creator selects the "Kathagada Parbatia Sahi" slum while creating the De-sludging application the payment details is showing as ₹ 0
PASSED
PASSED
PASSED
Zero pricing_03
Zero pricing
Skip Collection Process for Zero Pricing
Verify that when the citizen created the application by selecting the slum option then that applicaton while completing the request ,It should not ask the payment details.
1.Login as Editor. 2.click on inbox and enter the application number and click on the application number, 3.click on take action 4.complete the request.
Verify that when the citizen created the application, by selecting the slum option then that applicaton while completing the request ,It should not ask the payment details.
when the citizen created the application by selecting the slum option then that applicaton while completing the request ,It is not asking the payment details.
PASSED
PASSED
PASSED
Zero pricing_04
Zero pricing
Skip Collection Process for Zero Pricing
Configure property type as Residential and sub property type as independent house using API for zero pricing by NOT selecting any slum
Select property type as Residential and sub property type as independent house using API for zero pricing by NOT selecting any slum
Citizen Should not able to create the application
Citizen cannot able to create the application
PASSED
PASSED
PASSED
Advance Balance Workflow Enhancement
Advance Balance Workflow _01
Advance Balance Workflow
Advance Balance Workflow
Verify when minimum pricing by the ULB is zero and citizen chooses to pay 0
1.Login as citizen. 2.Set the minimum pricing given by the ULB
A citizen creates a request where minimum pricing by the ULB is zero and citizen chooses to pay 0. No. of Trips = 1, Amount per Trip is 1000. The workflow is as follows: Create request ----> Accept Request ------> Assign DSO -------> Assign Vehicle ------> Collect Payment ------> Complete Request The collect payment step should display 100% of the total amount as amount due. The payment receipt displays Amount per trip: 1000, Total Amount: 1000, Advance amount paid: 0, Balance amount paid: 1000, Total due: 0
A citizen creates a request where minimum pricing by the ULB is zero and citizen chooses to pay 0. No. of Trips = 1, Amount per Trip is 1000. The workflow is as follows: Create request ----> Accept Request ------> Assign DSO -------> Assign Vehicle ------> Collect Payment ------> Complete Request The collect payment step should display 100% of the total amount as amount due. The payment receipt displays Amount per trip: 1000, Total Amount: 1000, Advance amount paid: 0, Balance amount paid: 1000, Total due: 0
PASSED
PASSED
PASSED
Advance Balance Workflow _02
Advance Balance Workflow
Advance Balance Workflow
Verify when A citizen creates a new request. The minimum pricing by the ULB is 100%.
1.Login as citizen. 2.Set the minimum pricing given by the ULB 3. The citizen chooses 1 trip, Amount per trip = 1000. The input box for entering Advance Amount is non editable and displays value equal to 100% of the trip amount.
The citizen chooses 1 trip, Amount per trip = 1000. The input box for entering Advance Amount is non editable and displays value equal to 100% of the trip amount. The acknowledgment receipt displays the following: Amount per trip: 1000 Total Amount: 1000 Advance Amount due: 1000
The citizen chooses 1 trip, Amount per trip = 1000. The input box for entering Advance Amount is non editable and displays value equal to 100% of the trip amount. The acknowledgment receipt displays the following: Amount per trip: 1000 Total Amount: 1000 Advance Amount due: 1000
PASSED
PASSED
PASSED
Advance Balance Workflow _03
Advance Balance Workflow
Advance Balance Workflow
Verify when A citizen creates a new request. The minimum pricing by the ULB is 100%. and When the no. of trips is edited by the ULB to 2, advance amount is updated automatically for 100% of the amount for 2 trips.
1.Login as citizen. 2.Set the minimum pricing given by the ULB 3. The citizen chooses 1 trip, Amount per trip = 1000. The input box for entering Advance Amount is non editable and displays value equal to 100% of the trip amount.
The citizen chooses 1 trip, Amount per trip = 1000. The input box for entering Advance Amount is non editable and displays value equal to 100% of the trip amount. When the no. of trips is edited by the ULB to 2, advance amount is updated automatically for 100% of the amount for 2 trips. he acknowledgment receipt displays the following: Amount per trip: 1000 Total Amount: 1000 Advance Amount due: 1000
The citizen chooses 1 trip, Amount per trip = 1000. The input box for entering Advance Amount is non editable and displays value equal to 100% of the trip amount. When the no. of trips is edited by the ULB to 2, advance amount is updated automatically for 100% of the amount for 2 trips. he acknowledgment receipt displays the following: Amount per trip: 1000 Total Amount: 1000 Advance Amount due: 1000
PASSED
PASSED
PASSED
Advance Balance Workflow _04
Advance Balance Workflow
Advance Balance Workflow
Verify when a citizen creates a new request where minimum pricing by the ULB is set at 500 Rs. The citizen chooses to pay 600 Rs.
1.Login as citizen. 2.Set the minimum pricing given by the ULB 3. citizen creates a new request where minimum pricing by the ULB is set at 500 Rs. The citizen chooses to pay 600 Rs..
A citizen creates a new request where minimum pricing by the ULB is set at 500 Rs. The citizen chooses to pay 600 Rs. The collection screen displays 600 Rs. The workflow is as follows: Create Request -----> Accept Request------> Collect Payment -------> Assign Vehicle ----->Collect Payment ----> Complete Request
A citizen creates a new request where minimum pricing by the ULB is set at 500 Rs. The citizen chooses to pay 600 Rs. The collection screen displays 600 Rs. The workflow is as follows: Create Request -----> Accept Request------> Collect Payment -------> Assign Vehicle ----->Collect Payment ----> Complete Request
PASSED
PASSED
PASSED
Advance Balance Workflow _05
Advance Balance Workflow
Advance Balance Workflow
Verify when a citizen created a new request. Minimum pricing by the ULB is set at 500 Rs. The citizen enters Rs. 400. An error is shows which states “Amount entered is less than minimum amount”.
1.Login as citizen. 2.Set the minimum pricing given by the ULB 3. citizen created a new request. Minimum pricing by the ULB is set at 500 Rs. The citizen enters Rs. 400. An error is shows which states “Amount entered is less than minimum amount”.
citizen created a new request. Minimum pricing by the ULB is set at 500 Rs. The citizen enters Rs. 400. An error is shows which states “Amount entered is less than minimum amount”.
citizen created a new request. Minimum pricing by the ULB is set at 500 Rs. The citizen enters Rs. 400. An error is shows which states “Amount entered is less than minimum amount”.
PASSED
PASSED
PASSED
Advance Balance Workflow _06
Advance Balance Workflow
Advance Balance Workflow
Verify when a ULB creates a request where minimum pricing by the ULB is zero and citizen chooses to pay 0. The workflow is as follows:
1.Login as citizen. 2.Set the minimum pricing given by the ULB 3. ULB creates a request where minimum pricing by the ULB is zero and citizen chooses to pay 0. The workflow is as follows:
A ULB creates a request where minimum pricing by the ULB is zero and citizen chooses to pay 0. The workflow is as follows: Create request ----> Accept Request ------> Assign DSO -------> Assign Vehicle ------> Collect Payment ------> Complete Request The collect payment step should display 100% of the total amount as amount due
A ULB creates a request where minimum pricing by the ULB is zero and citizen chooses to pay 0. The workflow is as follows: Create request ----> Accept Request ------> Assign DSO -------> Assign Vehicle ------> Collect Payment ------> Complete Request The collect payment step should display 100% of the total amount as amount due
PASSED
PASSED
PASSED
Advance Balance Workflow _07
Advance Balance Workflow
Advance Balance Workflow
Verify when a ULB creates a new request. The minimum pricing by the ULB is 100%. The citizen chooses 1 trip and The input box for entering Advance Amount is non editable and displays value equal to 100% of the trip amount. When the no. of trips is edited by the ULB to 2, advance amount is updated automatically for 100% of the amount for 2 trips
1.Login as citizen. 2.Set the minimum pricing given by the ULB 3. ULB creates a new request. The minimum pricing by the ULB is 100%.
A ULB creates a new request. The minimum pricing by the ULB is 100%. The citizen chooses 1 trip and The input box for entering Advance Amount is non editable and displays value equal to 100% of the trip amount. When the no. of trips is edited by the ULB to 2, advance amount is updated automatically for 100% of the amount for 2 trips.
A ULB creates a new request. The minimum pricing by the ULB is 100%. The citizen chooses 1 trip and The input box for entering Advance Amount is non editable and displays value equal to 100% of the trip amount. When the no. of trips is edited by the ULB to 2, advance amount is updated automatically for 100% of the amount for 2 trips.
PASSED
PASSED
PASSED
Advance Balance Workflow _08
Advance Balance Workflow
Advance Balance Workflow
Verify when ULB creates a new request with 1 trip and trip amount as 1000 where minimum pricing by the ULB is set at 500 Rs. The citizen chooses to pay 600 Rs
1.Login as citizen. 2.Set the minimum pricing given by the ULB 3. ULB creates a new request with 1 trip and trip amount as 1000 where minimum pricing by the ULB is set at 500 Rs. The citizen chooses to pay 600 Rs
ULB creates a new request with 1 trip and trip amount as 1000 where minimum pricing by the ULB is set at 500 Rs. The citizen chooses to pay 600 Rs verify acknowledgement, collection screen, payment receipt, Post servicing, collection screen, ayment receipt
ULB creates a new request with 1 trip and trip amount as 1000 where minimum pricing by the ULB is set at 500 Rs. The citizen chooses to pay 600 Rs verify acknowledgement, collection screen, payment receipt, Post servicing, collection screen, ayment receipt
PASSED
PASSED
PASSED
Advance Balance Workflow _09
Advance Balance Workflow
Advance Balance Workflow
Verify when ULB creates a new request with 1 trip and trip amount as 1000 where minimum pricing by the ULB is set at 500 Rs. The citizen chooses to pay 600 Rs
1.Login as citizen. 2.Set the minimum pricing given by the ULB 3. ULB creates a new request with 1 trip and trip amount as 1000 where minimum pricing by the ULB is set at 500 Rs. The citizen chooses to pay 600 Rs
ULB creates a new request with 1 trip and trip amount as 1000 where minimum pricing by the ULB is set at 500 Rs. The citizen chooses to pay 600 Rs verify acknowledgement, collection screen, payment receipt, Post servicing, collection screen, ayment receipt
ULB creates a new request with 1 trip and trip amount as 1000 where minimum pricing by the ULB is set at 500 Rs. The citizen chooses to pay 600 Rs verify acknowledgement, collection screen, payment receipt, Post servicing, collection screen, ayment receipt
PASSED
PASSED
PASSED
Advance Balance Workflow _10
Advance Balance Workflow
Advance Balance Workflow
Verify when ULB created a new request. Minimum pricing by the ULB is set at 500 Rs. The citizen enters Rs. 400. An error is shows which states “Amount entered is less than minimum amount
1.Login as citizen. 2.Set the minimum pricing given by the ULB 3.ULB created a new request. Minimum pricing by the ULB is set at 500 Rs. The citizen enters Rs. 400. An error is shows which states “Amount entered is less than minimum amount
ULB created a new request. Minimum pricing by the ULB is set at 500 Rs. The citizen enters Rs. 400. An error is shows which states “Amount entered is less than minimum amount
ULB created a new request. Minimum pricing by the ULB is set at 500 Rs. The citizen enters Rs. 400. An error is shows which states “Amount entered is less than minimum amount
PASSED
PASSED
PASSED
Requests unable to be completed when requests are being created using driver/DSO/employee number
Driver/DSO/employee - Request creation_01
Driver/DSO/employee - Request creation
Driver/DSO/employee - Request creation
Verify Requests unable to be completed when requests are being created using driver/DSO/employee number
1. Login as DSO 2. Use same phone number as citizen and employee
Check whether Requests unable to be completed when requests are being created using driver/DSO/employee number
Requests unable to be completed when requests are being created using driver/DSO/employee number
PASSED
PASSED
PASSED
Test Cases
https://digit-discuss.atlassian.net/browse/SAN-1017 https://digit-discuss.atlassian.net/browse/SAN-1159
Employee_01
Employee
Employee Search details
Verify if UB employee is able to Search without filling details and only selecting date range should display results
1. Login to ULB employee editor and go to inbox 2. Click on search application 3. Give the date range from and to
Should be able to see all applications created in the date range and no other field should be mandatory
Should be able to see all applications created in the date range and no other field should be mandatory
PASSED
PASSED
PASSED
https://digit-discuss.atlassian.net/browse/SAN-996 https://digit-discuss.atlassian.net/browse/SAN-1163
Editor_01
Editor
Editor Application timeline
Verify Application timeline correct Provider Info- Editor side
1. Login as citizen/creator 2. Create an applciation and fill all details and go until last step using Editor login 3. Validate the application timeline info
Appication time line should show below information Request Completed Pending Citizen Feedback - citizen info Disposed - FSTPO info Disposal in progress - Driver Info Pending for Payment - Accountant Info DSO in Progress - DSO info Pending for DSO Approval - NA Pending for DSO Assignment - NA Application created - Citizen contact info
Appication time line should show below information Request Completed Pending Citizen Feedback - citizen info Disposed - FSTPO info Disposal in progress - Driver Info Pending for Payment - Accountant Info DSO in Progress - DSO info Pending for DSO Approval - NA Pending for DSO Assignment - NA Application created - Citizen contact info
PASSED
PASSED
PASSED
https://digit-discuss.atlassian.net/browse/SAN-978 https://digit-discuss.atlassian.net/browse/SAN-1168
UI_UX_01
UI/UX
UI/UX
Verify UI UX enhancements in citizen and employee login
1. login as citizen/Employee 2. Validate below UI UX enhancements In Employee Login, FSM Icon in Card is missing on left top card In Update Application success screen, Localisation of Select DSO Now, Select DSO need to be changed In Update and Schedule screen from employee side, When Septic tank with soak pit is selected, needs to remove spacing in pit dimension In Collector Login, when collecting payment need to remove spacing in payment mode in radio button
Below UI UX enhancements are validated In Employee Login, FSM Icon in Card is missing on left top card In Update Application success screen, Localisation of Select DSO Now, Select DSO need to be changed In Update and Schedule screen from employee side, When Septic tank with soak pit is selected, needs to remove spacing in pit dimension In Collector Login, when collecting payment need to remove spacing in payment mode in radio button
Below UI UX enhancements are validated In Employee Login, FSM Icon in Card is missing on left top card In Update Application success screen, Localisation of Select DSO Now, Select DSO need to be changed In Update and Schedule screen from employee side, When Septic tank with soak pit is selected, needs to remove spacing in pit dimension In Collector Login, when collecting payment need to remove spacing in payment mode in radio button
PASSED
PASSED
PASSED
DSO_01
DSO
DSO - Assign vehicle
Verify DSO is able to assign same vehicle for multiple requests - ENGLISH
1) Login as DSO. 2) Click on inbox. 3) Click on application number. 4) Click on take action and Assign the vehicle. 5) Select another application. 6) Click on take action and Assign same vehicle.
DSO Should be able to assign same vehicle to multiple requests.
DSO Should be able to assign same vehicle to multiple requests.
PASSED
PASSED
PASSED
DSO_02
DSO
DSO - Assign vehicle
Verify DSO is able to assign same vehicle for multiple requests - HINDI
1) Login as DSO. 2) Click on inbox. 3) Click on application number. 4) Click on take action and Assign the vehicle. 5) Select another application. 6) Click on take action and Assign same vehicle.
DSO Should be able to assign same vehicle to multiple requests.
DSO Should be able to assign same vehicle to multiple requests.
PASSED
PASSED
PASSED
DSO_03
DSO
DSO - Assign vehicle
Verify Vehicle capacity field and Number of trips is disable while assigning vehicle - ENGLISH
1) Login as DSO. 2) Click on inbox. 3) Click on application number and Assign the vehicle. 4) Check vehicle capacity and number of trips fields.
Vehicle capacity and number of trips should be deisable.
Vehicle capacity and number of trips should be deisable.
PASSED
PASSED
PASSED
DSO_04
DSO
DSO - Assign vehicle
Verify Vehicle capacity field and Number of trips is disable while assigning vehicle - HINDI
1) Login as DSO. 2) Click on inbox. 3) Click on application number and Assign the vehicle. 4) Check vehicle capacity and number of trips fields.
Vehicle capacity and number of trips should be deisable.
Vehicle capacity and number of trips should be deisable.
PASSED
PASSED
PASSED
DSO_05
DSO
DSO - Assign vehicle
Verify DSO assigned vehicle is captured on new application - ENGLISH
1) Login as DSO. 2) Click on inbox. 3) Click on application number and Assign vehicle. 4) Check application.
DSO assigned vehicle number should be captured on new application.
DSO assigned vehicle number should be captured on new application.
PASSED
PASSED
PASSED
DSO_06
DSO
DSO - Assign vehicle
Verify DSO assigned vehicle is captured on new application - HINDI
1) Login as DSO. 2) Click on inbox. 3) Click on application number and Assign vehicle. 4) Check application.
DSO assigned vehicle number should be captured on new application.
DSO assigned vehicle number should be captured on new application.
PASSED
PASSED
PASSED
DSO_07
DSO
DSO - Assign vehicle
Verify DSO is able to overwrite number of trips while scheduling vehicle - ENGLISH
1) Login as DSO. 2) Click on inbox. 3) Click on application number and assign vehicle. 4) Click on take action and overwrite number of trips.
DSO should be able to overwrite number of trips.
DSO should be able to overwrite number of trips.
PASSED
PASSED
PASSED
DSO_08
DSO
DSO - Assign vehicle
Verify DSO is able to overwrite number of trips while scheduling vehicle - HINDI
1) Login as DSO. 2) Click on inbox. 3) Click on application number and assign vehicle. 4) Click on take action and overwrite number of trips.
DSO should be able to overwrite number of trips.
DSO should be able to overwrite number of trips.
PASSED
PASSED
PASSED
DSO_09
DSO
DSO - Assign vehicle
Verify DSO is able to select valid date in Desludging on field - ENGLISH
1) Login as DSO. 2) Click on inbox. 3) Click on application number and assign vehicle. 4) Click on take action and Select valid date.
DSO Should be able to select valid date.
DSO Should be able to select valid date.
PASSED
PASSED
PASSED
DSO_10
DSO
DSO - Assign vehicle
Verify DSO is able to select valid date in Desludging on field - HINDI
1) Login as DSO. 2) Click on inbox. 3) Click on application number and assign vehicle. 4) Click on take action and Select valid date.
DSO Should be able to select valid date.
DSO Should be able to select valid date.
PASSED
PASSED
PASSED
DSO_11
DSO
DSO - Assign vehicle
Verify DSO is able to schedule vehicle - ENGLISH
1) Login as DSO. 2) Click on inbox. 3) Click on application number and assign vehicle. 4) Click on take action and Click on schedule.
DSO should be able to schedule vehicle.
DSO should be able to schedule vehicle.
PASSED
PASSED
PASSED
DSO_12
DSO
DSO - Assign vehicle
Verify DSO is able to schedule vehicle - HINDI
1) Login as DSO. 2) Click on inbox. 3) Click on application number and assign vehicle. 4) Click on take action and Click on schedule.
DSO should be able to schedule vehicle.
DSO should be able to schedule vehicle.
PASSED
PASSED
PASSED
https://digit-discuss.atlassian.net/browse/SAN-1063 https://digit-discuss.atlassian.net/browse/SAN-1157
FSTPO_01
FSTPO
FSTPO Inbox
To verify FSTPO can able to select Home button
1.Login as FSTPO in mobile 2.click on Home button
FSTPO should be able to see home page details
FSTPO should be able to see home page details
PASSED
PASSED
PASSED
FSTPO_02
FSTPO
FSTPO Inbox
To verify FSTPO can able to select Inbox button in FSTPO operations page
1.Login as FSTPO in Desktop 2.click on Home button 3.Click on Inbox button
FSTPO Should be able to view Inbox page
FSTPO Should be able to view Inbox page
PASSED
PASSED
PASSED
FSTPO_03
FSTPO
FSTPO Inbox
To verify FSTPO Can able to enter all fields and FSTPO Should able to select Application number or Vehicle log number
1.Login as FSTPO in Desktop 2.click on Home button 3.Click on Inbox button a 4.Enter all the fields or 5.Click on Application number or Vehicle log number
FSTPO Should be able to view vehicle scheduling page
FSTPO Should be able to view vehicle scheduling page
PASSED
PASSED
PASSED
FSTPO_04
FSTPO
FSTPO Inbox
To verify FSTPO Can able to select Search Button
1.Login as FSTPO in Mobile 2.click on Home button 3.Click on Add new button 4.Enter vehicle number 5.click on next 6.Click on Select 7.Enter application number or vehicle number or Dso name
FSTPO Should be able to view application details after filtered
FSTPO Should be able to view application details after filtered
PASSED
PASSED
PASSED
FSTPO_05
FSTPO
FSTPO Inbox
To verify FSTPO Can able to select Sort Button
1.Login as FSTPO in Mobile 2.click on Home button 3.Click on Add new button 4.Enter vehicle number 5.click on next 6.Click on Select 7.Click on Date(latest first) or click on Date(latest last)
FSTPO Should be able to view application details after filtered
FSTPO Should be able to view application details after filtered
PASSED
PASSED
PASSED
FSTPO_06
FSTPO
FSTPO Inbox
To verify FSTPO can able to enter all fields and Vehicle in time and vehicle out time in vehicle entry log page and FSTPO can able to choose file from device and able to upload that file
1.Login as FSTPO in Desktop 2.click on Home button 3.Click on Add new button 4.Enter vehicle number 5.click on next 6.click on citizen name 7.click on Select 8.Fill the details in all the fields 9.Click on choose file and select a photo and upload it
FSTPO Should able to enter all the fields and FSTPO should able to view photo uploaded details
FSTPO Should able to enter all the fields and FSTPO should able to view photo uploaded details
PASSED
PASSED
PASSED
FSTPO_07
FSTPO
FSTPO Inbox
To verify FSTPO can able to select Take action button in vehicle scheduling page
1.Login as FSTPO in Desktop 2.click on Home button 3.Click on Add new button 4.Enter vehicle number 5.click on next 6.click on citizen name 7.Fill the details in all the fields 8.Click on choose file and select a photo and upload it 9.click on Take action button
FSTPO Should be able to view Submit button or Decline vehicle button
FSTPO Should be able to view Submit button or Decline vehicle button
PASSED
PASSED
PASSED
FSTPO_08
FSTPO
FSTPO Inbox
To verify FSTPO can able to select Submit button in vehicle scheduling page
1.Login as FSTPO in Desktop 2.click on Home button 3.Click on Add new button 4.Enter vehicle number 5.click on next 6.click on citizen name. 9.Fill the details in all the fields 10.Click on choose file and select a photo and upload it 11.click on Take action button 12.Click on submit
FSTPO Should be able to view vehicle submitted sucessfully message on the screen
FSTPO Should be able to view vehicle submitted sucessfully message on the screen
PASSED
PASSED
PASSED
FSTPO_09
FSTPO
FSTPO Inbox
To verify FSTPO can able to select Decline vehicle button in vehicle scheduling page
.1.Login as FSTPO in Desktop 2.click on Home button 3.Click on Add new button 4.Enter vehicle number 5.click on next 6.click on citizen name 7.Fill the details in all the fields 8.Click on choose file and select a photo and upload it 9.click on Take action button 10.Click on submit 11.click on Decline vehicle
FSTPO Should be able to view reason for Declining
FSTPO Should be able to view reason for Declining
PASSED
PASSED
PASSED
FSTPO_10
FSTPO
FSTPO Inbox
To verify FSTPO can able to select Reason For Declining Dropdown
1.Login as FSTPO in Desktop 2.click on Home button 3.Click on Add new button 4.Enter vehicle number 5.click on next 6.click on citizen name 7.Fill the details in all the fields 8.Click on choose file and select a photo and upload it 9.click on Take action button 10.click on Decline vehicle 11.Select anyone of the reason from Reason For declining dropdown
FSTPO Should be able to select any one reason
FSTPO Should be able to select any one reason
PASSED
PASSED
PASSED
FSTPO_11
FSTPO
FSTPO Inbox
To verify FSTPO can able to select Decline vehicle button
1.Login as FSTPO in Desktop 2.click on Home button 3.Click on Add new button 4.Enter vehicle number 5.click on next 6.click on citizen name 7.Fill the details in all the fields 8.Click on choose file and select a photo and upload it 9.click on Take action button 10.click on Decline vehicle 11.Select anyone of the reason from Reason For declining dropdown 12.Click on Decline vehicle button
FSTPO Should be able to view updated sucessfully message on the screen
FSTPO Should be able to view updated sucessfully message on the screen
PASSED
PASSED
PASSED
https://digit-discuss.atlassian.net/browse/SAN-1064 https://digit-discuss.atlassian.net/browse/SAN-1158
FSTPO_01
FSTPO
FSTPO Home
To verify FSTPO can able to select Home button
1.Login as FSTPO in mobile 2.click on Home button
FSTPO should be able to see home page details
FSTPO should be able to see home page details
PASSED
PASSED
PASSED
FSTPO_02
FSTPO
FSTPO Home
To verify FSTPO can able to select Inbox button in FSTPO operations page
1.Login as FSTPO in Desktop 2.click on Home button 3.Click on Inbox button
FSTPO Should be able to view Inbox page
FSTPO Should be able to view Inbox page
PASSED
PASSED
PASSED
FSTPO_03
FSTPO
FSTPO Home
To verify FSTPO Can able to enter all fields and FSTPO Should able to select Application number or Vehicle log number
1.Login as FSTPO in Desktop 2.click on Home button 3.Click on Inbox button a 4.Enter all the fields or 5.Click on Application number or Vehicle log number
FSTPO Should be able to view vehicle scheduling page
FSTPO Should be able to view vehicle scheduling page
PASSED
PASSED
PASSED
FSTPO_04
FSTPO
FSTPO Home
To verify FSTPO can able to enter all fields and Vehicle in time and vehicle out time in vehicle entry log page and FSTPO can able to choose file from device and able to upload that file
1.Login as FSTPO in Desktop 2.click on Home button 3.Click on Add new button 4.Enter vehicle number 5.click on next 6.click on citizen name 7.click on Select 8.Fill the details in all the fields 9.Click on choose file and select a photo and upload it
FSTPO Should able to enter all the fields and FSTPO should able to view photo uploaded details
FSTPO Should able to enter all the fields and FSTPO should able to view photo uploaded details
PASSED
PASSED
PASSED
FSTPO_05
FSTPO
FSTPO Home
To verify FSTPO can able to select Take action button in vehicle scheduling page
1.Login as FSTPO in Desktop 2.click on Home button 3.Click on Add new button 4.Enter vehicle number 5.click on next 6.click on citizen name 7.Fill the details in all the fields 8.Click on choose file and select a photo and upload it 9.click on Take action button
FSTPO Should be able to view Submit button or Decline vehicle button
FSTPO Should be able to view Submit button or Decline vehicle button
PASSED
PASSED
PASSED
FSTPO_06
FSTPO
FSTPO Home
To verify FSTPO can able to select Submit button in vehicle scheduling page
1.Login as FSTPO in Desktop 2.click on Home button 3.Click on Add new button 4.Enter vehicle number 5.click on next 6.click on citizen name. 9.Fill the details in all the fields 10.Click on choose file and select a photo and upload it 11.click on Take action button 12.Click on submit
FSTPO Should be able to view vehicle submitted sucessfully message on the screen
FSTPO Should be able to view vehicle submitted sucessfully message on the screen
PASSED
PASSED
PASSED
FSTPO_07
FSTPO
FSTPO Home
To verify FSTPO can able to select Decline vehicle button in vehicle scheduling page
.1.Login as FSTPO in Desktop 2.click on Home button 3.Click on Add new button 4.Enter vehicle number 5.click on next 6.click on citizen name 7.Fill the details in all the fields 8.Click on choose file and select a photo and upload it 9.click on Take action button 10.Click on submit 11.click on Decline vehicle
FSTPO Should be able to view reason for Declining
FSTPO Should be able to view reason for Declining
PASSED
PASSED
PASSED
FSTPO_08
FSTPO
FSTPO Home
To verify FSTPO can able to select Reason For Declining Dropdown
1.Login as FSTPO in Desktop 2.click on Home button 3.Click on Add new button 4.Enter vehicle number 5.click on next 6.click on citizen name 7.Fill the details in all the fields 8.Click on choose file and select a photo and upload it 9.click on Take action button 10.click on Decline vehicle 11.Select anyone of the reason from Reason For declining dropdown
FSTPO Should be able to select any one reason
FSTPO Should be able to select any one reason
PASSED
PASSED
PASSED
FSTPO_09
FSTPO
FSTPO Home
To verify FSTPO can able to select Decline vehicle button
1.Login as FSTPO in Desktop 2.click on Home button 3.Click on Add new button 4.Enter vehicle number 5.click on next 6.click on citizen name 7.Fill the details in all the fields 8.Click on choose file and select a photo and upload it 9.click on Take action button 10.click on Decline vehicle 11.Select anyone of the reason from Reason For declining dropdown 12.Click on Decline vehicle button
FSTPO Should be able to view updated sucessfully message on the screen
FSTPO Should be able to view updated sucessfully message on the screen
PASSED
PASSED
PASSED
https://digit-discuss.atlassian.net/browse/SAN-987 https://digit-discuss.atlassian.net/browse/SAN-1165
Editor_01
Editor
DSO Photo upload
Verify if Editor should be able to view the photo uploaded by DSO
1. Login to citizen/creator 2. Go through all the steps and create application 3. Go until DSO login 4. Login as DSO ,upload the photo
Photo should be uploaded
Photo should be uploaded
PASSED
PASSED
PASSED
Editor_02
Editor
DSO Photo upload
Verify if Editor should be able to view the photo uploaded by DSO
1. Login to citizen/creator 2. Go through all the steps and create application 3. Go until DSO login 4. Login as DSO ,upload the photo 5.Login as editor and check photos uploaded by DSO is viewable
Editor should able to view photo in his timeline
Editor should able to view photo in his timeline
PASSED
PASSED
PASSED
https://digit-discuss.atlassian.net/browse/SAN-1037 https://digit-discuss.atlassian.net/browse/SAN-1162
DSO and FSTPO
Photo uploads
To check all the application timeline aligned with roles
1.Go through until Application updated/payment/trips screen
Application timeline should be aligned with roles
Application timeline should be aligned with roles
PASSED
PASSED
PASSED
Editor_01
DSO and FSTPO
Photo uploads
To check photos uploaded by DSO
1.Login as editor check who has uploaded the DSO
Editor should be viewable as photo uploaded by DSO
Editor should be viewable as photo uploaded by DSO
PASSED
PASSED
PASSED
Editor_02
DSO and FSTPO
Photo uploads
To check the breadcrumbs in all the FSTPO pages
1.Login as FSTPO Check all the breadcrumbs
Breadcrumbs should be in the format Home/Inbox/vehicle log
Breadcrumbs should be in the format Home/Inbox/vehicle log
PASSED
PASSED
PASSED
Editor_03
DSO and FSTPO
Photo uploads
To check the the Disposing time Schedule in the Format AM/PM
1.Login as FSTPO Check whether Disposal time schedule is in the format AM/PM
FSTPO Should be able to select AM/PM in Disposal scheduling page
FSTPO Should be able to select AM/PM in Disposal scheduling page
PASSED
PASSED
PASSED
https://digit-discuss.atlassian.net/browse/SAN-1075 https://digit-discuss.atlassian.net/browse/SAN-1160
UI_UX_01
Ui/UX
UI/UX changes
Verify UI UX enhancements in citizen and employee login
1. login as citizen/Employee 2. Validate below UI UX enhancements 3.Log in as citizen,In service request text change in trip number screen in create application 4.Login as citizen ,In trip number screen in citizen side, number of trips will be on top and vehicle capacity will be on bottom. 5.Login as DSo Localisation should be changed from Scheduled to Update Trips 6.Login as Citizen all the Location detail and pit detail and combining all under property details
In UI UX AUDIT 1.In service request text change in trip number screen in create application should be creadted. 2.Citizen should be viewable In trip number screen in citizen side, number of trips will be on top and vehicle capacity will be on bottom. 3.Schedule localisation shoule be changed to Update trips 4.All the location details and pit details should be under property details
In UI UX AUDIT 1.In service request text change in trip number screen in create application should be creadted. 2.Citizen should be viewable In trip number screen in citizen side, number of trips will be on top and vehicle capacity will be on bottom. 3.Schedule localisation shoule be changed to Update trips 4.All the location details and pit details should be under property details
PASSED
PASSED
PASSED
9
Employee _01
Employee
Dashboard charts
1.Dashboard Should have pie chart for gender,revenue by usage type,application preference,customer rating ,request status , data and Apply all the drill-down (by Date, ULB) on payment chart 2.Dashboard should be on mobile and desktop versions 3.The Dashboard chart should be shareable and downloadable
Login using Dashboard credentials
Dashboard should display pie chart for gender,revenue by usage type,application preference,customer rating ,request status , data and Apply all the drill-down and dashboard should be viewable in both mobile and desktop versions and it should be in shareable and downable format
Dashboard should display pie chart for gender,revenue by usage type,application preference,customer rating ,request status , data and Apply all the drill-down and dashboard should be viewable in both mobile and desktop versions and it should be in shareable and downable format
PASSED
PASSED
PASSED
Citizen Flow
FSM/Citizen/01
Citizen
Citizen feedback
Validate that Citizen is able to verify new field "Number of Trips" on citizen feedback page_With English and Hindi Language
1. Login as Citizen 2. Go to My application 3.Citizen should be able to see the completed application 4.Validate that Citizen is able to verify new field "Number of Trips" on citizen feedback page in EN & Hindi
1)Citizen is able to verify new field "Number of Trips" on citizen feedback page In EN 2)Citizen is able to verify new field "कुल फेरों की संख्या" on citizen feedback page_Hindi
1)Citizen is able to verify new field "Number of Trips" on citizen feedback page In EN 2)Citizen is able to verify new field "कुल फेरों की संख्या" on citizen feedback page_Hindi
PASSED
PASSED
PASSED
FSM/Citizen/02
Citizen
Citizen feedback
Validate Citizen is able to Add integer from dropdown field on citizen feedback page_Hindi/English
1. Login as Citizen 2. Go to My application 3.Citizen should be able to see the completed application 4.Validate that Citizen is able to Add integer from dropdown field on citizen feedback page 5.Validate that Citizen is able to submit the feed back with giving the proper rating and comments
Citizen will be able to Add integer from 1-10 from drop down and will be able to submit the feedback
Citizen will be able to Add integer from 1-10 from drop down and will be able to submit the feedback
PASSED
PASSED
PASSED
FSM/Citizen/03
Citizen
Citizen feedback
Validate that Total number of trips field should not be mandatory for feedback submission _Hindi/English
1. Login as Citizen 2. Go to My application 3.Citizen should be able to see the completed application 4.Validate that Citizen is able to submit the feed back without Total num of Field trips
Citizen will be able to submit the feed back without Total num of Field trips
Citizen will be able to submit the feed back without Total num of Field trips
PASSED
PASSED
PASSED
Citizen Flow
FSM/Citizen/05
Citizen
Citizen feedback number of trips
Validate that citizen gender info is Captured on New application right after OTP step with citizen login_English_Male
1.Login as a Citizen in mSeva Portal 2.Navigate to FSM 3.Citizen Create New Application 4.Validate that citizen gender info is Captured on New application as Male right after OTP step 5.Validate Citizen is able to Complete the Request further with required details 6.Validate Citizen shouldn’t see gender information on the application summary view
1. citizen gender info is Captured on New application as Male right after OTP step 2. Citizen shouldn’t see gender information on the application summary view
1. citizen gender info is Captured on New application as Male right after OTP step 2. Citizen shouldn’t see gender information on the application summary view
PASSED
PASSED
PASSED
FSM/Citizen/06
Citizen
Citizen feedback number of trips
Validate that citizen gender info is Captured on New application right after OTP step with citizen login_Hindi_Female
1.Login as a Citizen in mSeva Portal 2.Navigate to FSM 3.Citizen Create New Application 4.Validate that citizen gender info is Captured on New application as Female right after OTP step 5.Validate Citizen is able to Complete the Request further with required details 6.Validate Citizen shouldn’t see gender information on the application summary view
1. citizen gender info is Captured on New application as Female right after OTP step 2. Citizen shouldn’t see gender information on the application summary view
1. citizen gender info is Captured on New application as Female right after OTP step 2. Citizen shouldn’t see gender information on the application summary view
PASSED
PASSED
PASSED
FSM/Citizen/07
Citizen
Citizen feedback number of trips
Validate that citizen gender info is Captured on New application right after OTP step with Employee Creator login_English_Transgender
1.Login as a Employee Creator in mSeva Portal 2.Navigate to FSM 3.Citizen Create New Application 4.Validate that citizen gender info is Captured on New application as Transgender right after OTP step 5.Validate Citizen is able to Complete the Request further with required details 6.Validate Citizen shouldn’t see gender information on the application summary view
1. citizen gender info is Captured on New application as Transgender right after OTP step 2. Citizen shouldn’t see gender information on the application summary view
1. citizen gender info is Captured on New application as Transgender right after OTP step 2. Citizen shouldn’t see gender information on the application summary view
PASSED
PASSED
PASSED
FSM/Citizen/08
Citizen
Citizen feedback number of trips
Validate that citizen gender info is Captured on New application right after OTP step with Employee Creator login_Hindi_Others
1.Login as a Employee Creator in mSeva Portal 2.Navigate to FSM 3.Citizen Create New Application 4.Validate that citizen gender info is Captured on New application as Others right after OTP step 5.Validate Citizen is able to Complete the Request further with required details 6.Validate Citizen shouldn’t see gender information on the application summary view
1. citizen gender info is Captured on New application as Others right after OTP step 2. Citizen shouldn’t see gender information on the application summary view
1. citizen gender info is Captured on New application as Others right after OTP step 2. Citizen shouldn’t see gender information on the application summary view
PASSED
PASSED
PASSED
FSM/Citizen/09
Citizen
Citizen feedback number of trips
Validate that Citizen gender step is skippable with Citizen Login_Hindi
1.Login as a Citizen in mSeva Portal 2.Navigate to FSM 3.Citizen Create New Application 4.Validate that Citizen gender step is skippable
It is Validated that Citizen gender step is skippable in Citizen Logins
It is Validated that Citizen gender step is skippable in Citizen Logins
PASSED
PASSED
PASSED
FSM/Citizen/10
Citizen
Citizen feedback number of trips
Validate that Citizen gender step is skippable with Employee creator Login_English
1.Login as a Employee Creator in mSeva Portal 2.Navigate to FSM 3.Citizen Create New Application 4.Validate that Citizen gender step is skippable
It is Validated that Citizen gender step is skippable in Employee creator Logins
It is Validated that Citizen gender step is skippable in Employee creator Logins
PASSED
PASSED
PASSED
FSM/Citizen/11
Citizen
Citizen feedback number of trips
Validate that Employee editor is able to view the gender of the applicant on the application summary view_Hindi
1.Login as a Employee editor in mSeva Portal 2.Navigate to FSM 3.Search for application and Click on Take action 4.Validate that Employee is able to view the gender of the applicant on the application summary view
Employee is able to view the gender of the applicant on the application summary view
Employee is able to view the gender of the applicant on the application summary view
PASSED
PASSED
PASSED
FSM/Citizen/12
Citizen
Citizen feedback number of trips
Validate that DSO is not able to view the gender of the applicant on the application summary view_English
1.Login as a DSO in mSeva Portal 2.Navigate to FSM 3.Search for application and Click on Take action 4.Validate that DSO is not able to view the gender of the applicant on the application summary view
DSO is not able to view the gender of the applicant on the application summary view
DSO is not able to view the gender of the applicant on the application summary view
PASSED
PASSED
PASSED
DSO Flow
FSM/DSO/01
DSO
DSO validation message
Validate message when unregistered phone number is entered in DSO login_English
1.Login to the mSeva Portal 2.Navigate to FSM 3.User click on DSO Login 4."Validate message when unregistered phone number is entered in DSO login: Please use a registered number for logging as a DSO"
validate message when unregistered phone number is entered in DSO login: Please use a registered number for logging as a DSO
validate message when unregistered phone number is entered in DSO login: Please use a registered number for logging as a DSO
PASSED
PASSED
PASSED
FSM/DSO/02
DSO
DSO validation message
Validate message when unregistered phone number is entered in DSO login_Hindi
1.Login to the mSeva Portal 2.Navigate to FSM 3.User click on DSO Login 4. Validate message when unregistered phone number is entered in DSO login: कृपया डीएसओ के रूप में लॉगिंग के लिए पंजीकृत नंबर का उपयोग करें
Validate message when unregistered phone number is entered in DSO login: कृपया डीएसओ के रूप में लॉगिंग के लिए पंजीकृत नंबर का उपयोग करें
Validate message when unregistered phone number is entered in DSO login: कृपया डीएसओ के रूप में लॉगिंग के लिए पंजीकृत नंबर का उपयोग करें
PASSED
PASSED
PASSED
FSM/DSO/03
DSO
DSO validation message
Validate when DSO login with registered phone number is able to see the application_English
1.Login to the mSeva Portal 2.Navigate to FSM 3.User click on DSO Login 4. Validate when DSO login with registered phone number is able to see the application
Validate when DSO login with registered phone number is able to see the application
Validate when DSO login with registered phone number is able to see the application
PASSED
PASSED
PASSED
FSM/DSO/04
DSO
DSO validation message
Validate when DSO login with registered phone number is able to see the application_Hindi
1.Login to the mSeva Portal 2.Navigate to FSM 3.User click on DSO Login 4.Validate when DSO login with registered phone number is able to see the application
Validate when DSO login with registered phone number is able to see the application
Validate when DSO login with registered phone number is able to see the application
PASSED
PASSED
PASSED
DSO Flow
FSM/DSO/01
DSO
DSO - edit pit and property usage details
Validate that DSO can edit the Pit Details for a application_English
1.Login as a DSO in mSeva Portal 2.Navigate to FSM 3.Search for application and Click on Take action 4.Validate that DSO can edit the Pit Type and Pit Dimension and Upload a PIT photo for a application 5.Validate DSO is able to Submit the Request further with required details
1.DSO will be able to edit the Pit Type and Pit Dimension and Upload a PIT photo for a application
1.DSO will be able to edit the Pit Type and Pit Dimension and Upload a PIT photo for a application
PASSED
PASSED
PASSED
FSM/DSO/02
DSO
DSO - edit pit and property usage details
Validate that DSO can edit the Pit Details for a application_Hindi
1.Login as a DSO in mSeva Portal 2.Navigate to FSM 3.Search for application and Click on Take action 4.Validate that DSO can edit the Pit Type and Pit Dimension and Upload a PIT photo for a application 5.Validate DSO is able to Submit the Request further with required details
1.DSO will be able to edit the Pit Type and Pit Dimension and Upload a PIT photo for a application
1.DSO will be able to edit the Pit Type and Pit Dimension and Upload a PIT photo for a application
PASSED
PASSED
PASSED
FSM/DSO/03
DSO
DSO - edit pit and property usage details
Validate that DSO cannot modify the applicant and the property address for a application_Hindi
1.Login as a DSO in mSeva Portal 2.Navigate to FSM 3.Search for application and Click on Take action 4.Validate that DSO cannot modify the applicant and the property address for a application
1.DSO will not be able to edit the applicant and the property address for a application
1.DSO will not be able to edit the applicant and the property address for a application
PASSED
PASSED
PASSED
FSM/DSO/04
DSO
DSO - edit pit and property usage details
Validate that DSO cannot modify the possible service date_English
1.Login as a DSO in mSeva Portal 2.Navigate to FSM 3.Search for application and Click on Take action 4.Validate that DSO cannot modify the possible service date for a application
1.DSO will not be able to modify the possible service date for a application
1.DSO will not be able to modify the possible service date for a application
PASSED
PASSED
PASSED
FSM/DSO/05
DSO
DSO - edit pit and property usage details
Validate that DSO shouldn’t be able to modify old applications (i.e. service date < current date) or applications in citizen feedback pending status_Hindi/English
1.Login as a DSO in mSeva Portal 2.Navigate to FSM 3.Search for application and Click on Take action 4.Validate that DSO shouldn’t be able to modify old applications (i.e. service date < current date) or applications in citizen feedback pending status
1.DSO will not be able to modify old applications (i.e. service date < current date) or applications in citizen feedback pending status
1.DSO will not be able to modify old applications (i.e. service date < current date) or applications in citizen feedback pending status
PASSED
PASSED
PASSED
Employee Specific Test Cases
Employee Flow
FSM/Emp/01
Employee
Employee - Select vehicle capacity instead of vehicle make
Validate ULB Employee select vehicle capacity instead of Vechile Type_English_Employee Editor
1.Login as a Employee Editor in mSeva Portal 2.Navigate to FSM 3.Search for application and Click on Take action 4.Validate ULB Employee select vehicle capacity from the drop down 5.Validate Vechile Type is not present in the form 6.Validate Employee is able to Submit the Request further
1) ULB Employee should be able to select vehicle capacity from the drop down 2)ULB Employee doesn’t see the Vechile Type in the entire form 3)ULB Employee is able to Submit the Request further
1) ULB Employee should be able to select vehicle capacity from the drop down 2)ULB Employee doesn’t see the Vechile Type in the entire form 3)ULB Employee is able to Submit the Request further
PASSED
PASSED
PASSED
FSM/Emp/02
Employee
Employee - Select vehicle capacity instead of vehicle make
Validate ULB Employee select vehicle capacity instead of Vechile Type_Hindi_Employee Editor
1.Login as a Employee Editor in mSeva Portal 2.Navigate to FSM 3.Search for application and Click on Take action 4.Validate ULB Employee select vehicle capacity from the drop down 5.Validate Vechile Type is not present in the form 6.Validate Employee is able to Submit the Request further
1) ULB Employee should be able to select vehicle capacity from the drop down 2)ULB Employee doesn’t see the Vechile Type in the entire form 3)ULB Employee is able to Submit the Request further
1) ULB Employee should be able to select vehicle capacity from the drop down 2)ULB Employee doesn’t see the Vechile Type in the entire form 3)ULB Employee is able to Submit the Request further
PASSED
PASSED
PASSED
FSM/Emp/03
Employee
Employee - Select vehicle capacity instead of vehicle make
Validate ULB Employee select vehicle capacity instead of Vechile Type_English_Employee Creator
1.Login as a Employee Creator in mSeva Portal 2.Navigate to FSM 3.Validate ULB Employee select vehicle capacity from the drop down 4.Validate Vechile Type is not present in the form 5.Validate Employee is able to Submit the Request further
1) ULB Employee should be able to select vehicle capacity from the drop down 2)ULB Employee doesn’t see the Vechile Type in the entire form 3)ULB Employee is able to Submit the Request further
1) ULB Employee should be able to select vehicle capacity from the drop down 2)ULB Employee doesn’t see the Vechile Type in the entire form 3)ULB Employee is able to Submit the Request further
PASSED
PASSED
PASSED
FSM/Emp/04
Employee
Employee - Select vehicle capacity instead of vehicle make
Validate ULB Employee select vehicle capacity instead of Vechile Type_Hindi_Employee Creator
1.Login as a Employee Creator in mSeva Portal 2.Navigate to FSM 3.Validate ULB Employee select vehicle capacity from the drop down 4.Validate Vechile Type is not present in the form 5.Validate Employee is able to Submit the Request further
1) ULB Employee should be able to select vehicle capacity from the drop down 2)ULB Employee doesn’t see the Vechile Type in the entire form 3)ULB Employee is able to Submit the Request further
1) ULB Employee should be able to select vehicle capacity from the drop down 2)ULB Employee doesn’t see the Vechile Type in the entire form 3)ULB Employee is able to Submit the Request further
PASSED
PASSED
PASSED
DSO Specific Test Cases
DSO Flow
DSO_01
DSO
DSO - Edit property usage details
Check wehther "Try updating the pit details, it should allow the user to update the pit details."
1. Login as citizen and create an application 2. Login as editor and update application to make payment 3. Login as Collector and make payment 4. Login as Editor and update pit details and Asiign DSO 5. Login as DSO and Try updating the pit details, it should allow the user to update the pit details.
Try updating the pit details, it should allow the user to update the pit details.
Try updating the pit details, it should allow the user to update the pit details.
PASSED
PASSED
PASSED
DSO_02
DSO
DSO - Edit property usage details
Check whether "DSO shouldn’t be able to modify old applications (i.e. desludging date < current date) or applications in citizen feedback pending status"
1. Login as citizen and create an application 2. Login as editor and update application to make payment 3. Login as Collector and make payment 4. Login as Editor and update pit details and Asiign DSO 5. Login as DSO and TDSO shouldn’t be able to modify old applications (i.e. desludging date < current date) or applications in citizen feedback pending status
DSO shouldn’t be able to modify old applications (i.e. desludging date < current date) or applications in citizen feedback pending status
DSO shouldn’t be able to modify old applications (i.e. desludging date < current date) or applications in citizen feedback pending status
PASSED
PASSED
PASSED
DSO_03
DSO
DSO - Edit property usage details
Check whether "DSO can add pit photo"
1. Login as citizen and create an application 2. Login as editor and update application to make payment 3. Login as Collector and make payment 4. Login as Editor and update pit details and Asiign DSO 5. Login as DSO and DSO can add pit photo
DSO can add pit photo
DSO can add pit photo
PASSED
PASSED
PASSED
DSO_04
DSO
DSO - Edit property usage details
Check whether Pre-selected Property and Pit details should be shown. If no value is present, then show - and data from mdms in the drop-down
1. Login as citizen and create an application 2. Login as editor and update application to make payment 3. Login as Collector and make payment 4. Login as Editor and update pit details and Asiign DSO 5. Login as DSO and DSO can Pre-selected Property and Pit details should be shown. If no value is present, then show - and data from mdms in the drop-down
Pre-selected Property and Pit details should be shown. If no value is present, then show - and data from mdms in the drop-down
Pre-selected Property and Pit details should be shown. If no value is present, then show - and data from mdms in the drop-down
PASSED
PASSED
PASSED
DSO_05
DSO
DSO - Edit property usage details
Check whether This will need to be a role based edit. This can be edited by roles = dso, editor
1. Login as citizen and create an application 2. Login as editor and update application to make payment 3. Login as Collector and make payment 4. Login as Editor and update pit details and Asiign DSO 5. Login as DSO and This will need to be a role based edit. This can be edited by roles = dso, editor
This will need to be a role based edit. This can be edited by roles = dso, editor
This will need to be a role based edit. This can be edited by roles = dso, editor
PASSED
PASSED
PASSED
DSO_06
DSO
DSO - Edit property usage details
Check whether the application should be editable in: Pending for DSO approval, DSO InProgress status
1. Login as citizen and create an application 2. Login as editor and update application to make payment 3. Login as Collector and make payment 4. Login as Editor and update pit details and Asiign DSO 5. Login as DSO and the application should be editable in: Pending for DSO approval, DSO InProgress status
the application should be editable in: Pending for DSO approval, DSO InProgress status
the application should be editable in: Pending for DSO approval, DSO InProgress status
PASSED
PASSED
PASSED
DSO Specific Test Cases
DSO Flow
Vehicle_01
Employee
Employee - Edit property usage details
check whether Vehicle Capacity is a mandatory field
1.Login as a Employee editor in mSeva Portal 2.Navigate to FSM 3.Validate ULB Employee select vehicle capacity from the drop down
Vehicle Capacity is a mandatory field
Vehicle Capacity is a mandatory field
PASSED
PASSED
PASSED
Vehicle_02
Employee
Employee - Edit property usage details
check whether Vehicle Capacity should show unique capacity value from master data
1.Login as a Employee editor in mSeva Portal 2.Navigate to FSM 3.Validate ULB Employee select vehicle capacity from the drop down
Vehicle Capacity should show unique capacity value from master data
Vehicle Capacity should show unique capacity value from master data
PASSED
PASSED
PASSED
Vehicle_03
Employee
Employee - Edit property usage details
check whether Vehicle Capacity should show unique capacity value from master data
1.Login as a Employee editor in mSeva Portal 2.Navigate to FSM 3.Validate ULB Employee select vehicle capacity from the drop down
Vehicle Capacity should show unique capacity value from master data
Vehicle Capacity should show unique capacity value from master data
PASSED
PASSED
PASSED
Vehicle_04
Employee
Employee - Edit property usage details
Check whether Vehicle Type is not shown on any user interface
1.Login as a Employee editor in mSeva Portal 2.Navigate to FSM 3.Validate ULB Employee select vehicle capacity from the drop down
Vehicle Type is not shown on any user interface
Vehicle Type is not shown on any user interface
PASSED
PASSED
PASSED
Vehicle_05
Employee
Employee - Edit property usage details
Check whether Ensure that the logic for assignment of DSO is not changed with this ticket
1.Login as a Employee editor in mSeva Portal 2.Navigate to FSM 3.Validate ULB Employee select vehicle capacity from the drop down
Ensure that the logic for assignment of DSO is not changed with this ticket
Ensure that the logic for assignment of DSO is not changed with this ticket
PASSED
PASSED
PASSED
DSO Specific Test Cases
FSM/DSO/01
DSo and FSTPO
DSo and FSTPO gender
Check whether DSO gender addition is during DSO creation
1.User requests search DSO API 2.User can see the Gender info for that DSO in return
User should be able to Create new DSO with Gender info using Create DSO API and can Verify the gender info using search API.
User should be able to Create new DSO with Gender info using Create DSO API and can Verify the gender info using search API.
PASSED
PASSED
PASSED
FSM/DSO/02
DSo and FSTPO
DSo and FSTPO gender
Check whether search API is updated so that DSO gender can be returned
1.User requests search DSO API 2.User can see the Gender info for that DSO in return
DSO gender is returned when Search DSO request is Triggered
DSO gender is returned when Search DSO request is Triggered
PASSED
PASSED
PASSED
FSM/DSO/03
DSo and FSTPO
DSo and FSTPO gender
Validate If DSO is registered as Citizen then it should show Gender
1.Citizen is Registered as DSO 2.User requests search DSO API 3.User can see the Gender info for that DSO in return
Citizen is registered as DSO then Gender info should be returned
Citizen is registered as DSO then Gender info should be returned
PASSED
PASSED
PASSED
FSM/DSO/04
DSo and FSTPO
DSo and FSTPO gender
Validate update API is Updating gender info for existing DSOs
1.User request Update API for updating gender infor for existing DSOs 2.User requests search DSO API 3.User can see the Gender info for that DSO in return
User should be able to request update API for existing DSOs with gender info
User should be able to request update API for existing DSOs with gender info
PASSED
PASSED
PASSED
FSM/DSO/05
DSo and FSTPO
DSo and FSTPO gender
Citizen gender should not get overriden when DSO gender is updated from Backend (pre requisite: when Citizen is a DSO also)
1.User request Update API for updating gender info for existing DSO 2.User requests search DSO API 3.User can see the Gender info for that DSO in return 4.Validate Citizen gender should not get overriden in UI
User should be able to validate Citizen gender is not getting overriden when DSO gender is updated from Backend (pre requisite: when Citizen is a DSO also)
User should be able to validate Citizen gender is not getting overriden when DSO gender is updated from Backend (pre requisite: when Citizen is a DSO also)
PASSED
PASSED
PASSED
FSM/DSO/06
DSo and FSTPO
DSo and FSTPO gender
DSO gender should not get overriden when Citizen gender is updated from Backend (pre requisite: when Citizen is a DSO also)
1.User request Update API for updating gender info for existing citizen 2.User requests search citizen API 3.User can see the Gender info for that citizen in return 4.Validate DSO gender info should not get overriden in backend
User should be able to validate DSO gender is not getting overriden when Citizen gender is updated from Backend (pre requisite: when Citizen is a DSO also)
User should be able to validate DSO gender is not getting overriden when Citizen gender is updated from Backend (pre requisite: when Citizen is a DSO also)
PASSED
PASSED
PASSED
Employee Specific Test Cases
FSM/Emp/01
Employee
Employee update number of trips
Validate that "No Option Availaible" message should be present in drop down when there is no vechicle present to assign in Assign Vechile page
1.Login as a Employee Editor in mSeva Portal 2.Navigate to FSM 3.Search for application and Click on Take action 4.Validate that "No Option Availaible" message should be present in drop down on Assign Vechile page
User should be able to Validate that "No Option Availaible" message should be present in drop down on Assign Vechile page
User should be able to Validate that "No Option Availaible" message should be present in drop down on Assign Vechile page
PASSED
PASSED
PASSED
FSM/Emp/02
Employee
Employee update number of trips
Validate that list of Vechile is pesent in drop down in Assign Vechile page
1.Login as a Employee Editor in mSeva Portal 2.Navigate to FSM 3.Search for application and Click on Take action 4.Validate that list of Vechile is pesent in drop down in Assign Vechile page
User should be able to Validate that list of Vechile is pesent in drop down in Assign Vechile page
User should be able to Validate that list of Vechile is pesent in drop down in Assign Vechile page
PASSED
PASSED
PASSED
Employee Flow
FSM/Emp/01
Employee
Employee - Slum area create application
Validate "Waiting for disposal" application status is added in filter _English
1.Login as a ULB Employee in mSeva Portal with English language 2.Navigate to FSM 3.Go to employee inbox 4.Validate "Waiting for disposal" application status is added in filter 5. Validate "Waiting for disposal" under “Application Status” and show “-” under “SLA Days Remaining” 6)Status should also reflect on application Timeline when user click on application
1. User should be able to Filter out the application on basis of "Waiting for disposal" Filter. 2. User is able to see "Waiting for disposal" under “Application Status” and see “-” under “SLA Days Remaining” 3)Status should also reflect on application Timeline when user click on application
1. User should be able to Filter out the application on basis of "Waiting for disposal" Filter. 2. User is able to see "Waiting for disposal" under “Application Status” and see “-” under “SLA Days Remaining” 3)Status should also reflect on application Timeline when user click on application
PASSED
PASSED
PASSED
FSM/Emp/02
Employee
Employee - Slum area create application
Validate "Disposed" application status is added in filter_English
1.Login as a ULB Employee in mSeva Portal with English language 2.Navigate to FSM 3.Go to employee inbox 4.Validate "Disposed" application status is added in filter 5. Validate "Disposed" under “Application Status” and show “-” under “SLA Days Remaining” 6)Status should also reflect on application Timeline when user click on application
1. User should be able to Filter out the application on basis of "Disposed" Filter. 2. User is able to see"Disposed" under “Application Status” and see “-” under “SLA Days Remaining” 3)Status should also reflect on application Timeline when user click on application
1. User should be able to Filter out the application on basis of "Disposed" Filter. 2. User is able to see"Disposed" under “Application Status” and see “-” under “SLA Days Remaining” 3)Status should also reflect on application Timeline when user click on application
PASSED
PASSED
PASSED
FSM/Emp/034
Employee
Employee - Slum area create application
Validate "Citizen Feedback Pending" application status is added in filter _English
1.Login as a ULB Employee in mSeva Portal with English language 2.Navigate to FSM 3.Go to employee inbox 4.Validate "Citizen Feedback Pending" application status isadded in filter 5. Validate "Citizen Feedback Pending" under “Application Status” and show “-” under “SLA Days Remaining” 6)Status should also reflect on application Timeline when user click on application
1. User should be able to Filter out the application on basis of "Citizen Feedback Pending" Filter. 2. User is able to show "Citizen Feedback Pending" under “Application Status” and see “-” under “SLA Days Remaining” 3)Status should also reflect on application Timeline when user click on application
1. User should be able to Filter out the application on basis of "Citizen Feedback Pending" Filter. 2. User is able to show "Citizen Feedback Pending" under “Application Status” and see “-” under “SLA Days Remaining” 3)Status should also reflect on application Timeline when user click on application
PASSED
PASSED
PASSED
FSM/Emp/04
Employee
Employee - Slum area create application
Validate Application Created, Pending DSO Assignment, Pending for Payment, Pending for DSO Approval, DSO Rejected, DSO InProgress application status is Present in filter_English
1.Login as a ULB Employee in mSeva Portal with English language 2.Navigate to FSM 3.Go to employee inbox 4.Validate Application Created, Pending DSO Assignment, Pending for Payment, Pending for DSO Approval, DSO Rejected, DSO InProgress application status is Present in filter 5. Validate "Application Created, Pending DSO Assignment, Pending for Payment, Pending for DSO Approval, DSO Rejected, DSO InProgress application status under “Application Status” and show “num of days” under “SLA Days Remaining”
1. User should be able to see Application Created, Pending DSO Assignment, Pending for Payment, Pending for DSO Approval, DSO Rejected, DSO InProgress application status in filter column 2. User is able to see above status under “Application Status” and see “num of days” under “SLA Days Remaining” 3.Status should also reflect on application Timeline when user click on application
1. User should be able to see Application Created, Pending DSO Assignment, Pending for Payment, Pending for DSO Approval, DSO Rejected, DSO InProgress application status in filter column 2. User is able to see above status under “Application Status” and see “num of days” under “SLA Days Remaining” 3.Status should also reflect on application Timeline when user click on application
PASSED
PASSED
PASSED
FSM/Emp/05
Employee
Employee - Slum area create application
Validate "Waiting for disposal" application status is added in filter_Hindi
1.Login as a ULB Employee in mSeva Portal with Hindi language 2.Navigate to FSM 3.Go to employee inbox 4.Validate "Waiting for disposal" application status is added in filter 5. Validate "Waiting for disposal" under “Application Status” and show “-” under “SLA Days Remaining” 6)Status should also reflect on application Timeline when user click on application
1. User should be able to Filter out the application on basis of "Waiting for disposal" Filter. 2. User is able to see "Waiting for disposal" under “Application Status” and see “-” under “SLA Days Remaining”
1. User should be able to Filter out the application on basis of "Waiting for disposal" Filter. 2. User is able to see "Waiting for disposal" under “Application Status” and see “-” under “SLA Days Remaining”
PASSED
PASSED
PASSED
FSM/Emp/06
Employee
Employee - Slum area create application
Validate "Disposed" application status is added in filter_Hindi
1.Login as a ULB Employee in mSeva Portal with Hindi language 2.Navigate to FSM 3.Go to employee inbox 4.Validate "Disposed" application status is added in filter 5. Validate "Disposed" under “Application Status” and show “-” under “SLA Days Remaining” 6)Status should also reflect on application Timeline when user click on application
tatus should also reflect on application Timeline when user click on application
PASSED
PASSED
PASSED
FSM/Emp/07
Employee
Employee - Slum area create application
Validate "Citizen Feedback Pending" application status is added in filter_Hindi
1.Login as a ULB Employee in mSeva Portal with Hindi language 2.Navigate to FSM 3.Go to employee inbox 4.Validate "Citizen Feedback Pending" application status isadded in filter 5. Validate "Citizen Feedback Pending" under “Application Status” and show “-” under “SLA Days Remaining” 6)Status should also reflect on application Timeline when user click on application
1. User should be able to Filter out the application on basis of "Citizen Feedback Pending" Filter. 2. User is able to show "Citizen Feedback Pending" under “Application Status” and see “-” under “SLA Days Remaining” 3.Status should also reflect on application Timeline when user click on application
1. User should be able to Filter out the application on basis of "Citizen Feedback Pending" Filter. 2. User is able to show "Citizen Feedback Pending" under “Application Status” and see “-” under “SLA Days Remaining” 3.Status should also reflect on application Timeline when user click on application
PASSED
PASSED
PASSED
FSM/Emp/08
Employee
Employee - Slum area create application
Validate Application Created, Pending DSO Assignment, Pending for Payment, Pending for DSO Approval, DSO Rejected, DSO InProgress application status is Present in filter_Hindi
1.Login as a ULB Employee in mSeva Portal with Hindi language 2.Navigate to FSM 3.Go to employee inbox 4.Validate Application Created, Pending DSO Assignment, Pending for Payment, Pending for DSO Approval, DSO Rejected, DSO InProgress application status is Present in filter 5. Validate "Application Created, Pending DSO Assignment, Pending for Payment, Pending for DSO Approval, DSO Rejected, DSO InProgress application status under “Application Status” and show “num of days” under “SLA Days Remaining”
1. User should be able to see Application Created, Pending DSO Assignment, Pending for Payment, Pending for DSO Approval, DSO Rejected, DSO InProgress application status in filter column 2. User is able to see above status under “Application Status” and see “num of days” under “SLA Days Remaining”
1. User should be able to see Application Created, Pending DSO Assignment, Pending for Payment, Pending for DSO Approval, DSO Rejected, DSO InProgress application status in filter column 2. User is able to see above status under “Application Status” and see “num of days” under “SLA Days Remaining”
PASSED
PASSED
PASSED
Citizen Flow
FSM/Citizen/01
Citizen
Add ULB contact in FSM application flow
Validate Citizen is able to see helpline numbe on hamburger menu_English
1.Login as a Citizen with English Language 2.Navigate to FSM 3.Validate Citizen is able to see helpline numbe on hamburger menu
Citizen should be able to see Helpline number on hamburger menu
Citizen should be able to see Helpline number on hamburger menu
PASSED
PASSED
PASSED
FSM/Citizen/02
Citizen
Add ULB contact in FSM application flow
Helpline link should be clickable and trigger call function for the entered number_English
1.Login as a Citizen with English Language 2.Navigate to FSM 3.Validate Citizen is able to see helpline numbe on hamburger menu 4.Helpline link should be clickable and trigger call function for the entered number
Citizen should be able to click Helpline link and trigger call function for the entered number
Citizen should be able to click Helpline link and trigger call function for the entered number
PASSED
PASSED
PASSED
FSM/Citizen/03
Citizen
Add ULB contact in FSM application flow
Validate Citizen is able to see helpline numbe on hamburger menu_Hindi
1.Login as a Citizen with Hindi Language 2.Navigate to FSM 3.Validate Citizen is able to see helpline numbe on hamburger menu
Citizen should be able to see Helpline number on hamburger menu
Citizen should be able to see Helpline number on hamburger menu
PASSED
PASSED
PASSED
FSM/Citizen/04
Citizen
Add ULB contact in FSM application flow
Helpline link should be clickable and trigger call function for the entered number_Hindi
1.Login as a Citizen with Hindi Language 2.Navigate to FSM 3.Validate Citizen is able to see helpline numbe on hamburger menu 4.Helpline link should be clickable and trigger call function for the entered number
Citizen should be able to click Helpline link and trigger call function for the entered number
Citizen should be able to click Helpline link and trigger call function for the entered number
PASSED
PASSED
PASSED
FSTPO Specific Test Cases
FSTPO Flow
FSM/FSTPO/01
FSTPO
FSTPO can decline the vehicle trip
Validate Decline Vehicle action should be added for FSTPO,with predefined reasons and conditional comment option
1.Login as a FSTPO 2.Navigate to FSM 3.Search for application and Click on Take action 4.Validate Decline Vehicle action with predefined reasons and conditional comment option is added for FSTPO
User should be able to Validate Decline Vehicle action with predefined reasons and conditional comment option is added for FSTPO
User should be able to Validate Decline Vehicle action with predefined reasons and conditional comment option is added for FSTPO
PASSED
PASSED
PASSED
FSM/FSTPO/02
FSTPO
FSTPO can decline the vehicle trip
Validate Reason for Declining is a mandatory Field
1.Login as a FSTPO with English/Hindi language 2.Navigate to FSM 3.Search for application and Click on Take action 4.FSTPO clicks on Decline Vehicle button without choosing Reason for Declining 5.Validate error msg: This field cannot be empty
Reason for Declining is a Mandatory Field
Reason for Declining is a Mandatory Field
PASSED
PASSED
PASSED
FSM/FSTPO/03
FSTPO
FSTPO can decline the vehicle trip
Validate when "others" is selected as Reason for Declining then "Comments" input box appear which is mandatory field
1.Login as a FSTPO with English/Hindi language 2.Navigate to FSM 3.Search for application and Click on Take action 4.FSTPO choose "Others" in Reason for Declining Field 5.Validate "Comments" input box appear 6.FSTPO clicks on Decline Vehicle button without entering anything in "comment" input box 7.Validate error msg: This field cannot be empty
If "others" is selected as Reason for Declining then "Comments" input box appear which is mandatory field
If "others" is selected as Reason for Declining then "Comments" input box appear which is mandatory field
PASSED
PASSED
PASSED
FSM/FSTPO/04
FSTPO
FSTPO can decline the vehicle trip
Validate After declining from FSTPO, the vehicle trip will be in “TRIP DECLINED” status
1.Login as a FSTPO with English/Hindi language 2.Navigate to FSM 3.Search for application and Click on Take action 4.FSTPO choose Reason for Declining and clicks on "Decline Vehicle" Button. 5.Validate the vehicle trip will be in “TRIP DECLINED” status
Validate After declining from FSTPO, the vehicle trip should be in “TRIP DECLINED” status
Validate After declining from FSTPO, the vehicle trip should be in “TRIP DECLINED” status
PASSED
PASSED
PASSED
FSM/FSTPO/05
FSTPO
FSTPO can decline the vehicle trip
Validate Declining a vehicle will not require Vehicle Out time
1.Login as a FSTPO with English/Hindi language 2.Navigate to FSM 3.Search for application and Click on Take action 4.FSTPO choose Reason for Declining and clicks on "Decline Vehicle" Button. 5.Validate the vehicle trip will be in “TRIP DECLINED” status
Validate Declining vehicle should not require Vehicle Out time
Validate Declining vehicle should not require Vehicle Out time
PASSED
PASSED
PASSED
Dashboard Specific Test Cases
FSM/DSS/01
Dashboard
Dashboard
Validate a pie-chart for Request by gender in FSM Dashboard in Desktop
1.Login as a FSM DSS in mSeva Portal in Desktop 2.Navigate to Dashboard and then in FSM 3.Validate a pie-chart for Request by gender in FSM DSS Dashboard is Present
It is Validated a pie-chart for Request by gender in FSM DSS Dashboard is Present in Desktop version
It is Validated a pie-chart for Request by gender in FSM DSS Dashboard is Present in Desktop version
PASSED
PASSED
PASSED
FSM/DSS/02
Dashboard
Dashboard
Validate that the view of DSS Dashbord is in 2x2 ( ColumnxRow)
1.Login as a FSM DSS in mSeva Portal 2.Navigate to Dashboard and then in FSM 3.Validate that the view of DSS Dashbord is in 2x2 ( ColumnxRow)
It is Validated that the view of DSS Dashbord is in 2x2 ( ColumnxRow)
It is Validated that the view of DSS Dashbord is in 2x2 ( ColumnxRow)
PASSED
PASSED
PASSED
FSM/DSS/03
Dashboard
Dashboard
Validate the DSS Dashboard is seen with gender info in Mobile Version
1.Login as a FSM DSS in mSeva Portal in Mobile 2.Navigate to Dashboard and then in FSM 3.Validate the DSS Dashboard is seen with gender info in Mobile Version
It is Validated that DSS Dashboard is seen with gender info in Mobile Version
It is Validated that DSS Dashboard is seen with gender info in Mobile Version
PASSED
PASSED
PASSED
FSM/DSS/04
Dashboard
Dashboard
Validate the FSM Dashboard is Shareable and can be downloaded in PDF
1.Login as a FSM DSS in mSeva Portal in Mobile 2.Navigate to Dashboard and then in FSM 3.Validate the DSS Dashboard is sharable 4.Validate the DSS Dashboard can be Downloaded in PDF
It is Validated that DSS Dashboard is Shareable and can be downloaded as well
It is Validated that DSS Dashboard is Shareable and can be downloaded as well
PASSED
PASSED
PASSED
PASSED
PASSED
PASSED
FSM/FSM-CREATOR_EMP_01
Employee Creator
Creator- Application creation
Check whether FSM-CREATOR can Create an application request with property type institutional , with capacity of vehicle as 5000 litres and number os trips 3 - the auto calculated amount should be = 2400 * 3 = Rs.7200/- -- ENGLISH
1. Login as citizen/creator and create an application 2. Login as editor and check if you are able toedit the application 3. Check if the number of trips is editable by selecting INSTITUTIONAL 4. Total Price calculated should be no of trips * price for each price
Calculated amount should display = 2400 * 3 = Rs.7200/-
Calculated amount should display = 2400 * 3 = Rs.7200/-
FSM/FSM-CREATOR_EMP_03
Employee Creator
Creator- Application creation
Check whether FSM-CREATOR can Create an application request with property type commercial ,with capacity as 1000 and number of trips 1 - the auto calculated amount should be = 1000*1 = Rs.1000/- -- ENGLISH
1. Login as FSM-CREATOR_EMP 2. FSM-CREATOR enter login ID and password, choosing city as Amritsar 3. Navigte to application creation page 4. Entr all the required fields, make sure to select COMMERCIAL , with capacity as 1000 and number of trips 1 5. Auto Calculated amount should display = 1000*1 = Rs.1000/-
calculated amount should be = 1000*1 = Rs.1000/-
calculated amount should be = 1000*1 = Rs.1000/-
PASSED
PASSED
PASSED
FSM/FSM-CREATOR_EMP_05
Employee Creator
Creator- Application creation
Check whether FSM-CREATOR can Create an application request with property type residential , with capacity of vehicle as 5000 litres with slum data and number os trips 3 - the auto calculated amount should be = 1500 * 3 = Rs.4500/- -- ENGLISH
1. Login as FSM-CREATOR_EMP 2. FSM-CREATOR enter login ID and password, choosing city as Amritsar 3. Navigte to application creation page 4. Entr all the required fields, make sure to select RESIDENTIAL , with capacity of vehicle as 5000 litres with slum data and number os trips 3 5. Auto calculated amount should be = 1500 * 3 = Rs.4500/-
calculated amount should be = 1500 * 3 = Rs.4500/-
calculated amount should be = 1500 * 3 = Rs.4500/-
PASSED
PASSED
PASSED
FSM/FSM-CREATOR_EMP_07
Employee Creator
Creator- Application creation
Check whether FSM-CREATOR can Create an application request with property type institutional , with capacity of vehicle as 5000 litres and number os trips 3 - the auto calculated amount should be = 2400 * 3 = Rs.7200/- -- HINDI
1. Login as FSM-CREATOR_EMP 2. FSM-CREATOR enter login ID and password, choosing city as Amritsar 3. Navigte to application creation page 4. Entr all the required fields, make sure to select INSTITUTIONAL , with capacity of vehicle as 5000 litres and number os trips 3 5. Auto calculated amount should display = 2400 * 3 = Rs.7200/-
Calculated amount should display = 2400 * 3 = Rs.7200/-
Calculated amount should display = 2400 * 3 = Rs.7200/-
PASSED
PASSED
PASSED
FSM/FSM-CREATOR_EMP_09
Employee Creator
Creator- Application creation
Check whether FSM-CREATOR can Create an application request with property type commercial ,with capacity as 1000 and number of trips 1 - the auto calculated amount should be = 1000*1 = Rs.1000/- -- HINDI
1. Login as FSM-CREATOR_EMP 2. FSM-CREATOR enter login ID and password, choosing city as Amritsar 3. Navigte to application creation page 4. Entr all the required fields, make sure to select COMMERCIAL , with capacity as 1000 and number of trips 1 5. Auto Calculated amount should display = 1000*1 = Rs.1000/-
calculated amount should be = 1000*1 = Rs.1000/-
calculated amount should be = 1000*1 = Rs.1000/-
PASSED
PASSED
PASSED
PASSED
PASSED
PASSED
FSM-EDITOR_Waiting_For_Dsiposal_Disposed_01
Employee
Show vehicle trip status in employee inbox along with fsm application
Check whther below status is updated 1. Waiting for disposal 2. Disposed 3. Customer Fedback Rating-- Existing functionality --ENGLISH
1. Login as a FSM-CREATOR 2. Creatte an applciation and submit 3. Login as FSM-EDITOR and go to inbox and look for the application created above 4. complete the DSO assignment process 5. Login with DSO and complete DSO process 6. Now the application status should be waiting for disposal since FSTPO is yet to be acted upon this 7. Login with FSM-EDITOR and go to inbox and check the status of the application and it should show as "Waiting for Disposal" 8. Now login with FSM-FSTPO and complete the application process 9. Now login with FSM-EDITOR and check the status under inbox it should as "Disposed" 10. Once the status is chagned to disposed, verify if the status is changed to "customer feedback pending" on the applcition--existing functionality
FSM-EDITOR All the 3 below status should be updated accordingly 1. Waiting for disposal 2. Disposed 3. Customer Fedback Rating-- Existing functionality
FSM-EDITOR All the 3 below status should be updated accordingly 1. Waiting for disposal 2. Disposed 3. Customer Fedback Rating-- Existing functionality
PASSED
PASSED
PASSED
FSM-EDITOR_SLA_for_Waiting_For_Dsiposal_Disposed_02
Employee
Show vehicle trip status in employee inbox along with fsm application
Check for SLA column for below status is present as - (No value) 1. Waiting for disposal 2. Disposed --ENGLISH
"1. Login as a FSM-CREATOR 2. Creatte an applciation and submit 3. Login as FSM-EDITOR and go to inbox and look for the application created above 4. complete the DSO assignment process 5. Login with DSO and complete DSO process 6. Now the application status should be waiting for disposal since FSTPO is yet to be acted upon this 7. Login with FSM-EDITOR and go to inbox and check the SLA status oshould be displayed as - (no value) for app status as ""Waiting for Disposal"" 8. Now login with FSM-FSTPO and complete the application process 9. Now login with FSM-EDITOR and check the status under inbox it should as SLA status should be displayed as - (no value) for applicationstatus as "disposed"
FSM-EDITOR SLA should be displayed as - for both the status of application
FSM-EDITOR SLA should be displayed as - for both the status of application
PASSED
PASSED
PASSED
FSM-EMP_FSTPO_Waiting_For_Dsiposal_Disposed_03
Employee
Show vehicle trip status in employee inbox along with fsm application
Check whther below status is updated 1. Waiting for disposal 2. Disposed 3. Customer Fedback Rating-- Existing functionality --ENGLISH
1. Login as a FSM-CREATOR 2. Creatte an applciation and submit 3. Login as FSM-EMP_FSTPO and go to inbox and look for the application created above 4. complete the DSO assignment process 5. Login with DSO and complete DSO process 6. Now the application status should be waiting for disposal since FSTPO is yet to be acted upon this 7. Login with FSM-EMP_FSTPO and go to inbox and check the status of the application and it should show as "Waiting for Disposal" 8. Now login with FSM-FSTPO and complete the application process 9. Now login with FSM-EMP_FSTPO and check the status under inbox it should as "Disposed" 10. Once the status is chagned to disposed, verify if the status is changed to "customer feedback pending" on the applcition--existing functionality
FSM-EMP_FSTPO All the 3 below status should be updated accordingly 1. Waiting for disposal 2. Disposed 3. Customer Fedback Rating-- Existing functionality
FSM-EMP_FSTPO All the 3 below status should be updated accordingly 1. Waiting for disposal 2. Disposed 3. Customer Fedback Rating-- Existing functionality
PASSED
PASSED
PASSED
FSM-EMP_FSTPO_SLA_for_Waiting_For_Dsiposal_Disposed_04
Employee
Show vehicle trip status in employee inbox along with fsm application
Check for SLA column for below status is present as - (No value) 1. Waiting for disposal 2. Disposed --ENGLISH
"1. Login as a FSM-CREATOR 2. Creatte an applciation and submit 3. Login as FSM-EMP_FSTPO and go to inbox and look for the application created above 4. complete the DSO assignment process 5. Login with DSO and complete DSO process 6. Now the application status should be waiting for disposal since FSTPO is yet to be acted upon this 7. Login with FSM-EMP_FSTPO and go to inbox and check the SLA status of the application vehcile trip status as ""Waiting for Disposal"" should be displayed as - (no value) 8. Now login with FSM-FSTPO and complete the application process 9. Now login with FSM-EMP_FSTPO and check the status under inbox it should as SLA status should be displayed as - (no value) for applicationstatus as "disposed"
FSM-EMP_FSTPO SLA should be displayed as - for both the status of application
FSM-EMP_FSTPO SLA should be displayed as - for both the status of application
PASSED
PASSED
PASSED
FSM-EDITOR_Waiting_For_Dsiposal_Disposed_HINDI_05
Employee
Show vehicle trip status in employee inbox along with fsm application
Check whther below status is updated 1. Waiting for disposal 2. Disposed 3. Customer Fedback Rating-- Existing functionality --HINDI
1. Login as a FSM-CREATOR 2. Creatte an applciation and submit 3. Login as FSM-EDITOR and go to inbox and look for the application created above 4. complete the DSO assignment process 5. Login with DSO and complete DSO process 6. Now the application status should be waiting for disposal since FSTPO is yet to be acted upon this 7. Login with FSM-EDITOR and go to inbox and check the status of the application and it should show as "Waiting for Disposal" 8. Now login with FSM-FSTPO and complete the application process 9. Now login with FSM-EDITOR and check the status under inbox it should as "Disposed" 10. Once the status is chagned to disposed, verify if the status is changed to "customer feedback pending" on the applcition--existing functionality
FSM-EDITOR All the 3 below status should be updated accordingly 1. Waiting for disposal 2. Disposed 3. Customer Fedback Rating-- Existing functionality
FSM-EDITOR All the 3 below status should be updated accordingly 1. Waiting for disposal 2. Disposed 3. Customer Fedback Rating-- Existing functionality
PASSED
PASSED
PASSED
FSM-EDITOR_SLA_for_Waiting_For_Dsiposal_Disposed_HINDI_06
Employee
Show vehicle trip status in employee inbox along with fsm application
Check for SLA column for below status is present as - (No value) 1. Waiting for disposal 2. Disposed --HINDI
"1. Login as a FSM-CREATOR 2. Creatte an applciation and submit 3. Login as FSM-EDITOR and go to inbox and look for the application created above 4. complete the DSO assignment process 5. Login with DSO and complete DSO process 6. Now the application status should be waiting for disposal since FSTPO is yet to be acted upon this 7. Login with FSM-EDITOR and go to inbox and check the SLA status oshould be displayed as - (no value) for app status as ""Waiting for Disposal"" 8. Now login with FSM-FSTPO and complete the application process 9. Now login with FSM-EDITOR and check the status under inbox it should as SLA status should be displayed as - (no value) for applicationstatus as "disposed"
FSM-EDITOR SLA should be displayed as - for both the status of application
FSM-EDITOR SLA should be displayed as - for both the status of application
PASSED
PASSED
PASSED
FSM-EMP_FSTPO_Waiting_For_Dsiposal_Disposed_HINDI_07
Employee
Show vehicle trip status in employee inbox along with fsm application
Check whther below status is updated 1. Waiting for disposal 2. Disposed 3. Customer Fedback Rating-- Existing functionality --HINDI
1. Login as a FSM-CREATOR 2. Creatte an applciation and submit 3. Login as FSM-EMP_FSTPO and go to inbox and look for the application created above 4. complete the DSO assignment process 5. Login with DSO and complete DSO process 6. Now the application status should be waiting for disposal since FSTPO is yet to be acted upon this 7. Login with FSM-EMP_FSTPO and go to inbox and check the status of the application and it should show as "Waiting for Disposal" 8. Now login with FSM-FSTPO and complete the application process 9. Now login with FSM-EMP_FSTPO and check the status under inbox it should as "Disposed" 10. Once the status is chagned to disposed, verify if the status is changed to "customer feedback pending" on the applcition--existing functionality
FSM-EMP_FSTPO All the 3 below status should be updated accordingly 1. Waiting for disposal 2. Disposed 3. Customer Fedback Rating-- Existing functionality
FSM-EMP_FSTPO All the 3 below status should be updated accordingly 1. Waiting for disposal 2. Disposed 3. Customer Fedback Rating-- Existing functionality
PASSED
PASSED
PASSED
FSM/Emp/01
Employee
Show vehicle trip status in employee inbox along with fsm application
Check for SLA column for below status is present as - (No value) 1. Waiting for disposal 2. Disposed --HINDI
"1. Login as a FSM-CREATOR 2. Creatte an applciation and submit 3. Login as FSM-EMP_FSTPO and go to inbox and look for the application created above 4. complete the DSO assignment process 5. Login with DSO and complete DSO process 6. Now the application status should be waiting for disposal since FSTPO is yet to be acted upon this 7. Login with FSM-EMP_FSTPO and go to inbox and check the SLA status of the application vehcile trip status as ""Waiting for Disposal"" should be displayed as - (no value) 8. Now login with FSM-FSTPO and complete the application process 9. Now login with FSM-EMP_FSTPO and check the status under inbox it should as SLA status should be displayed as - (no value) for applicationstatus as "disposed"
FSM-EMP_FSTPO SLA should be displayed as - for both the status of application
FSM-EMP_FSTPO SLA should be displayed as - for both the status of application
PASSED
PASSED
PASSED
FSM/Emp/02
Employee
Show vehicle trip status in employee inbox along with fsm application
Validate "Waiting for disposal" application status is added in filter _English
1. User should be able to Filter out the application on basis of "Waiting for disposal" Filter. 2. User is able to see "Waiting for disposal" under “Application Status” and see “-” under “SLA Days Remaining” 3)Status should also reflect on application Timeline when user click on application
1. User should be able to Filter out the application on basis of "Waiting for disposal" Filter. 2. User is able to see "Waiting for disposal" under “Application Status” and see “-” under “SLA Days Remaining” 3)Status should also reflect on application Timeline when user click on application
1. User should be able to Filter out the application on basis of "Waiting for disposal" Filter. 2. User is able to see "Waiting for disposal" under “Application Status” and see “-” under “SLA Days Remaining” 3)Status should also reflect on application Timeline when user click on application
PASSED
PASSED
PASSED
FSM/Emp/03
Employee
Show vehicle trip status in employee inbox along with fsm application
Validate "Disposed" application status is added in filter_English
1. User should be able to Filter out the application on basis of "Disposed" Filter. 2. User is able to see"Disposed" under “Application Status” and see “-” under “SLA Days Remaining” 3)Status should also reflect on application Timeline when user click on application
1. User should be able to Filter out the application on basis of "Disposed" Filter. 2. User is able to see"Disposed" under “Application Status” and see “-” under “SLA Days Remaining” 3)Status should also reflect on application Timeline when user click on application
1. User should be able to Filter out the application on basis of "Disposed" Filter. 2. User is able to see"Disposed" under “Application Status” and see “-” under “SLA Days Remaining” 3)Status should also reflect on application Timeline when user click on application
PASSED
PASSED
PASSED
FSM/Emp/04
Employee
Show vehicle trip status in employee inbox along with fsm application
Validate "Citizen Feedback Pending" application status is added in filter _English
1. User should be able to Filter out the application on basis of "Citizen Feedback Pending" Filter. 2. User is able to show "Citizen Feedback Pending" under “Application Status” and see “-” under “SLA Days Remaining” 3)Status should also reflect on application Timeline when user click on application
1. User should be able to Filter out the application on basis of "Citizen Feedback Pending" Filter. 2. User is able to show "Citizen Feedback Pending" under “Application Status” and see “-” under “SLA Days Remaining” 3)Status should also reflect on application Timeline when user click on application
1. User should be able to Filter out the application on basis of "Citizen Feedback Pending" Filter. 2. User is able to show "Citizen Feedback Pending" under “Application Status” and see “-” under “SLA Days Remaining” 3)Status should also reflect on application Timeline when user click on application
PASSED
PASSED
PASSED
FSM/Emp/05
Employee
Show vehicle trip status in employee inbox along with fsm application
Validate Application Created, Pending DSO Assignment, Pending for Payment, Pending for DSO Approval, DSO Rejected, DSO InProgress application status is Present in filter_English
1. User should be able to see Application Created, Pending DSO Assignment, Pending for Payment, Pending for DSO Approval, DSO Rejected, DSO InProgress application status in filter column 2. User is able to see above status under “Application Status” and see “num of days” under “SLA Days Remaining” 3.Status should also reflect on application Timeline when user click on application
1. User should be able to see Application Created, Pending DSO Assignment, Pending for Payment, Pending for DSO Approval, DSO Rejected, DSO InProgress application status in filter column 2. User is able to see above status under “Application Status” and see “num of days” under “SLA Days Remaining” 3.Status should also reflect on application Timeline when user click on application
1. User should be able to see Application Created, Pending DSO Assignment, Pending for Payment, Pending for DSO Approval, DSO Rejected, DSO InProgress application status in filter column 2. User is able to see above status under “Application Status” and see “num of days” under “SLA Days Remaining” 3.Status should also reflect on application Timeline when user click on application
PASSED
PASSED
PASSED
FSM/Emp/06
Employee
Show vehicle trip status in employee inbox along with fsm application
Validate "Waiting for disposal" application status is added in filter_Hindi
1. User should be able to Filter out the application on basis of "Waiting for disposal" Filter. 2. User is able to see "Waiting for disposal" under “Application Status” and see “-” under “SLA Days Remaining”
1. User should be able to Filter out the application on basis of "Waiting for disposal" Filter. 2. User is able to see "Waiting for disposal" under “Application Status” and see “-” under “SLA Days Remaining”
1. User should be able to Filter out the application on basis of "Waiting for disposal" Filter. 2. User is able to see "Waiting for disposal" under “Application Status” and see “-” under “SLA Days Remaining”
PASSED
PASSED
PASSED
FSM/Emp/07
Employee
Show vehicle trip status in employee inbox along with fsm application
Validate "Disposed" application status is added in filter_Hindi
3. atus should also reflect on application Timeline when user click on application
3. atus should also reflect on application Timeline when user click on application
PASSED
PASSED
PASSED
FSM/Emp/08
Employee
Show vehicle trip status in employee inbox along with fsm application
Validate "Citizen Feedback Pending" application status is added in filter_Hindi
1. User should be able to Filter out the application on basis of "Citizen Feedback Pending" Filter. 2. User is able to show "Citizen Feedback Pending" under “Application Status” and see “-” under “SLA Days Remaining” 3.Status should also reflect on application Timeline when user click on application
1. User should be able to Filter out the application on basis of "Citizen Feedback Pending" Filter. 2. User is able to show "Citizen Feedback Pending" under “Application Status” and see “-” under “SLA Days Remaining” 3.Status should also reflect on application Timeline when user click on application
1. User should be able to Filter out the application on basis of "Citizen Feedback Pending" Filter. 2. User is able to show "Citizen Feedback Pending" under “Application Status” and see “-” under “SLA Days Remaining” 3.Status should also reflect on application Timeline when user click on application
PASSED
PASSED
PASSED
FSM/Emp/09
Employee
Show vehicle trip status in employee inbox along with fsm application
Validate Application Created, Pending DSO Assignment, Pending for Payment, Pending for DSO Approval, DSO Rejected, DSO InProgress application status is Present in filter_Hindi
1. User should be able to see Application Created, Pending DSO Assignment, Pending for Payment, Pending for DSO Approval, DSO Rejected, DSO InProgress application status in filter column 2. User is able to see above status under “Application Status” and see “num of days” under “SLA Days Remaining”
1. User should be able to see Application Created, Pending DSO Assignment, Pending for Payment, Pending for DSO Approval, DSO Rejected, DSO InProgress application status in filter column 2. User is able to see above status under “Application Status” and see “num of days” under “SLA Days Remaining”
1. User should be able to see Application Created, Pending DSO Assignment, Pending for Payment, Pending for DSO Approval, DSO Rejected, DSO InProgress application status in filter column 2. User is able to see above status under “Application Status” and see “num of days” under “SLA Days Remaining”
PASSED
PASSED
PASSED
FSTPO_01
FSTPO
FSTPO Vehicle Log Inbox
Check whther "Application number for each vehicle log for each trip should be shown in the inbox"
1. Login as FSTPO 2. Click on Inbox 3. Check whther "Application number for each vehicle log for each trip should be shown in the inbox"
Application number for each vehicle log for each trip should be shown in the inbox
Application number for each vehicle log for each trip should be shown in the inbox
PASSED
PASSED
PASSED
FSTPO_02
FSTPO
FSTPO Vehicle Log Inbox
Check whether "Search criteria via Application umber must be made available to view all the trips taken in that application."
1. Login as FSTPO 2. Click on Inbox 3. Check whther "Search criteria via Application umber must be made available to view all the trips taken in that application."
Search criteria via Application umber must be made available to view all the trips taken in that application.
Search criteria via Application umber must be made available to view all the trips taken in that application.
PASSED
PASSED
PASSED
FSTPO_FLOW_01
FSTPO
FSTPO - View error message
check whtether "FSTPO must have number of cards generated for each disposal based on the number of trips entered."
1. Login as citizen/Creator and create the application 2. Login as Editor and update applciation 3. Login as collector and complete payment 4. Login as Editor and assign DSO 5. Login as DSO and assignvehicle with 2 or 3 trips 6. Now login as FSTPO and check "FSTPO must have number of cards generated for each disposal based on the number of trips entered."
FSTPO must have number of cards generated for each disposal based on the number of trips entered.
FSTPO must have number of cards generated for each disposal based on the number of trips entered.
PASSED
PASSED
PASSED
FSTPO_FLOW_02
FSTPO
FSTPO - View error message
Check whether "User must not be allowed to enter the Trip No: (should not be user selection)"
1. Login as citizen/Creator and create the application 2. Login as Editor and update applciation 3. Login as collector and complete payment 4. Login as Editor and assign DSO 5. Login as DSO and assignvehicle with 2 or 3 trips 6. Now login as FSTPO and check "User must not be allowed to enter the Trip No: (should not be user selection)."
User must not be allowed to enter the Trip No: (should not be user selection)
User must not be allowed to enter the Trip No: (should not be user selection)
PASSED
PASSED
PASSED
FSTPO_FLOW_03
FSTPO
FSTPO - View error message
Check whether"Trip must be provided with “_of (no of trips entered by the DSO) eg: 2 of 3 in each screen each time."
1. Login as citizen/Creator and create the application 2. Login as Editor and update applciation 3. Login as collector and complete payment 4. Login as Editor and assign DSO 5. Login as DSO and assignvehicle with 2 or 3 trips 6. Now login as and check whether "Trip must be provided with “_of (no of trips entered by the DSO) eg: 2 of 3 in each screen each time.."
Trip must be provided with “_of (no of trips entered by the DSO) eg: 2 of 3 in each screen each time.
Trip must be provided with “_of (no of trips entered by the DSO) eg: 2 of 3 in each screen each time.
PASSED
PASSED
PASSED
FSTPO_FLOW_04
FSTPO
FSTPO - View error message
Check whether "Take action and submit screen must be shown only after FSTP operator has entered the last screen with in and out time and the Trip number is for eg, 4 of 4 trips."
1. Login as citizen/Creator and create the application 2. Login as Editor and update applciation 3. Login as collector and complete payment 4. Login as Editor and assign DSO 5. Login as DSO and assignvehicle with 2 or 3 trips 6. Now login as and check whether "Take action and submit screen must be shown only after FSTP operator has entered the last screen with in and out time and the Trip number is for eg, 4 of 4 trips..."
Take action and submit screen must be shown only after FSTP operator has entered the last screen with in and out time and the Trip number is for eg, 4 of 4 trips.
Take action and submit screen must be shown only after FSTP operator has entered the last screen with in and out time and the Trip number is for eg, 4 of 4 trips.
PASSED
PASSED
PASSED
FSTPO_FLOW_05
FSTPO
FSTPO - View error message
Check whether "After using the previous option, that option must be removed and cannot be used the next time."
1. Login as citizen/Creator and create the application 2. Login as Editor and update applciation 3. Login as collector and complete payment 4. Login as Editor and assign DSO 5. Login as DSO and assignvehicle with 2 or 3 trips 6. Now login as and check whether "After using the previous option, that option must be removed and cannot be used the next time...."
After using the previous option, that option must be removed and cannot be used the next time.
After using the previous option, that option must be removed and cannot be used the next time.
PASSED
PASSED
PASSED
FSTPO_FLOW_06
FSTPO
FSTPO - View error message
Check whether "API Validation : the in time for the next team should not be before the out time of the previous trip."
1. Login as citizen/Creator and create the application 2. Login as Editor and update applciation 3. Login as collector and complete payment 4. Login as Editor and assign DSO 5. Login as DSO and assignvehicle with 2 or 3 trips 6. Now login as and check whether "API Validation : the in time for the next team should not be before the out time of the previous trip.."
API Validation : the in time for the next team should not be before the out time of the previous trip.
API Validation : the in time for the next team should not be before the out time of the previous trip.
PASSED
PASSED
PASSED
FSM Dashboard View_01
Dashboad
FSM Dashboard View
Check whether under dashboard view user is able to see " pie chart for gender data"
1. Login as FSM Dashboard ViewER QADV/eGov@123 https://qa.digit.org/employee/user/login 2. Go to Dashboard on left hand side 3. Click on FSM 4. Validte if pie chart is available for gender data
Show pie chart for gender data
Show pie chart for gender data
PASSED
PASSED
PASSED
FSM Dashboard View_02
Dashboad
FSM Dashboard View
Check if drill-down (by Date, ULB) on payment chart is available
1. Login as FSM Dashboard ViewER QADV/eGov@123 https://qa.digit.org/employee/user/login 2. Go to Dashboard on left hand side 3. Click on FSM 4. Check if drill-down (by Date, ULB) on payment chart is available
Check if drill-down (by Date, ULB) on payment chart is available
Check if drill-down (by Date, ULB) on payment chart is available
PASSED
PASSED
PASSED
FSM Dashboard View_03
Dashboad
FSM Dashboard View
Check above charts on mobile and desktop versions
1. Login as FSM Dashboard ViewER QADV/eGov@123 https://qa.digit.org/employee/user/login 2. Go to Dashboard on left hand side 3. Click on FSM 4. Check above graphs on mobile and desktop versions
Check above two graphs on mobile and desktop versions
Check above two graphs on mobile and desktop versions
PASSED
PASSED
PASSED
FSM Dashboard View_04
Dashboad
FSM Dashboard View
Check if chart should be shareable and downloadable
1. Login as FSM Dashboard ViewER QADV/eGov@123 https://qa.digit.org/employee/user/login 2. Go to Dashboard on left hand side 3. Click on FSM 4. check if chart should be shareable and downloadable
check if chart should be shareable and downloadable
check if chart should be shareable and downloadable
PASSED
PASSED
PASSED


