
UI Developer Guide
This guide offers a systematic view of how to create the application screens on DIGIT.
Developer code: Download the UI code from the link here Sanitation.
UI Development Pre-requisites
Technical pre-requisites
Knowledge of the DIGIT UI framework
Prior knowledge of React JS
Prior knowledge of Redux/Hooks
Prior knowledge of SCSS/React StoryBook
Prior knowledge of Git
Prior knowledge of Queries and Mutations
Citizen Module Setup
This section of the guide enables developers to create their own front-end citizen module from scratch which they can deploy on top of DIGIT UI. The new module will be visible as a ‘card’ in the DIGIT citizen portal.
Steps to build a citizen portal for a module:
Create Project Structure:
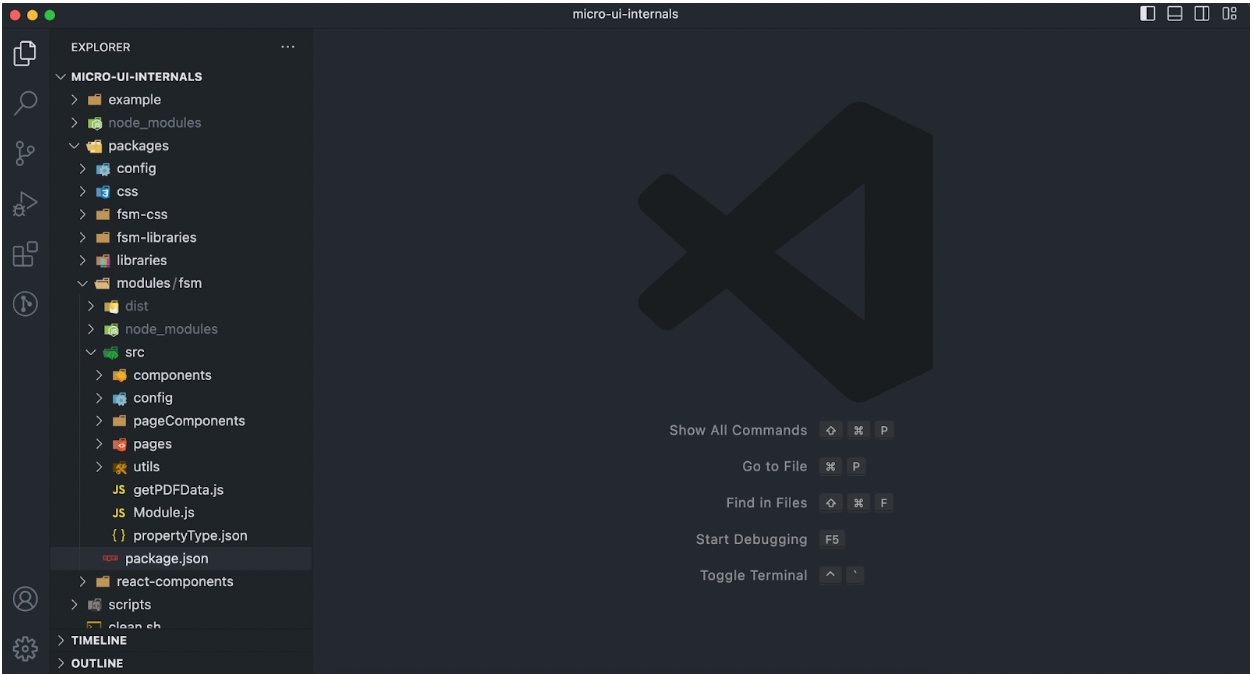
Project Structure
Front-end module project structure
Download the UI code from the link here Sanitation.
Follow the steps detailed in this doc.
Create Project Structure
Go to micro-ui--internals → packages → modules.
Inside the module, create a folder and provide a name for the service. For instance, the service name here is birth registration.
Create folder fsm (you can give any name).
Add the package.json to the created folder. Mention the module name and other dependencies here.
{
 "name": "@egovernments/digit-ui-module-fsm",
 "version": "1.6.1",
 "license": "MIT",
 "main": "dist/index.js",
 "description": "Digit FSM Module",
 "module": "dist/index.modern.js",
 "source": "src/Module.js",
 "files": [
   "dist"
 ],
 "scripts": {
   "start": "microbundle-crl watch --no-compress --format modern,cjs",
   "build": "microbundle-crl --compress --no-sourcemap --format cjs",
   "prepublish": "yarn build"
 },
 "peerDependencies": {
   "react": "17.0.2",
   "react-router-dom": "5.3.0"
 },
 "dependencies": {
   "@egovernments/digit-ui-react-components": "^1.6.1",
   "microbundle-crl": "0.13.11",
   "react": "17.0.2",
   "react-dom": "17.0.2",
   "react-hook-form": "6.15.8",
   "react-i18next": "11.16.2",
   "react-query": "3.6.1",
   "react-router-dom": "5.3.0",
   "react-time-picker": "4.2.1"
 }
}
After creating the package.json for FSM, the project structure (as seen in the image below) is created:
Install Dependency:
Add MDMS (Master Data Management Service) Configuration.
When creating a new module, the module needs to be enabled in citymodule.json. A sample module is available for reference here: .
For the purpose of illustration here, add the following module (birth registration) as given below:
{
 "tenantId": "pb",
 "moduleName": "tenant",
 "citymodule": [
   {
     "module": "FSM",
     "code": "FSM",
     "bannerImage": "https://egov-uat-assets.s3.amazonaws.com/FSM.png",
     "active": true,
     "order": 2,
     "tenants": [
       {
         "code": "pb.jalandhar"
       },
       {
         "code": "pb.amritsar"
       }
     ]
   }
The FSM UI module needs to be registered in three places so that it will be available for the developer at run-time as well as at the time of deployment.
Below are the three places where the module needs to be registered:
micro-ui/web/micro-ui-internals/package.json
micro-ui/web/micro-ui-internals/example/package.json
micro-ui/web/micro-ui-internalsWeb/package.json
Micro-ui-internals:
Open the micro-ui-internals package.json file and add this module as a dependency.
"dev:fsm": "cd packages/modules/fsm && yarn start",
"build:fsm": "cd packages/modules/fsm && yarn build",
In the example/package.json, add the following line:
"@egovernments/digit-ui-module-fsm":”1.6.1”,
In the web/package.json, add the following line:
"@egovernments/digit-ui-module-fsm":”1.6.1”,
Import Required Components:
DIGIT comes with common re-usable libraries that can be imported for use in a new module. CSS , libraries , common , react components can be imported by adding into package.json.
"@egovernments/digit-ui-css": "1.5.3",
"@egovernments/digit-ui-libraries":"1.5.3",
"@egovernments/digit-ui-module-common":"1.5.3",
"@egovernments/digit-ui-module-fsm":"1.5.0",
"@egovernments/digit-ui-module-dss":"1.5.3",
"@egovernments/digit-ui-react-components":"1.5.3",
Common components live in micro-ui/web/micro-ui-internals/packages/react-components micro-ui/web/micro-ui-internals/packages/css. DIGIT components that we are reusing:
FormComposer
ActionBar
Banner
Card
CardText
Loader
SubmitBar
AppContainer
BackButton
PrivateRoute
Icons
CitizenHomecard
Write Citizen Module Code
This section will walk you through the code that needs to be developed for the application. Detailed user screen wireframes should be available at this point for development.
Following are the steps:
1. Create Application Form:
We need to create a form where users can enter all required information and submit the form. Create a file called index.js in the path below:
/web/micro-ui/internals/packages/module/br/src/pages/citizen/create/index.js
index.js will import the Formcomposer. Inside that, add the heading, label, and form components. The configuration file that will contain the actual form schema is mapped below in the following two lines. The newConfig.json file details are mentioned in the below sections:
import { newConfig } from "../../../components/config/config";
const configs = newConfig?newConfig:newConfig;
import { FormComposer } from "@egovernments/digit-ui-react-components";
import React from "react";
import { useTranslation } from "react-i18next";
import { newConfig } from "../../../components/config/config";


const Create = () => {
 const { t } = useTranslation();
 const configs = newConfig?newConfig:newConfig;
 return (
   <FormComposer
   heading={t("Create New Desludging Application")}
   label={t("ES_COMMON_APPLICATION_SUBMIT")}
   config={configs.map((config) => {
     return {
       ...config,
       body: config.body.filter((a) => !a.hideInEmployee),
     };
   })}
    fieldStyle={{ marginRight: 0 }}
 />
 );
};


export default Create;
2. Filling in config.js:
Create a file called config.js under the following path:
/micro-ui/web/micro-ui-internals/packages/modules/br/src/components/config.js
This file defines the form meta-data and structure. The form heading goes into the "head" field. Components inside the form go into the body field. This form config has already been mapped in the index.js file, and therefore, will be rendered onto the screen:
const newConfig = [
 {
   head: "ES_TITLE_APPLICANT_DETAILS",
   body: [
     {
       label: "ES_NEW_APPLICATION_APPLICATION_CHANNEL",
       isMandatory: true,
       type: "component",
       key: "channel",
       component: "SelectChannel",
       nextStep: "applicantName",
     },
     {
       type: "component",
       key: "applicationData",
       withoutLabel: true,
       component: "SelectName",
     },
     {
       type: "component",
       key: "paymentPreference",
       withoutLabel: true,
       component: "SelectPaymentType",
     },
   ],
 },
];


export default newConfig;
Components used in the newConfig.js:
3. Routing:
After adding the config.js and create/index.js, add routing for the birth registration form. Create the index.js into fsm/src/pages/citizen/index.js, where the private route will be added. In index.js, mention the path and component name, the component one needs to show or render when one hits that route.
import { AppContainer, BackButton,PrivateRoute } from "@egovernments/digit-ui-react-components";
import React from "react";
import {  Switch, useRouteMatch } from "react-router-dom";


import { useTranslation } from "react-i18next";


const App = () => {
 const { path, url, ...match } = useRouteMatch();
 const { t } = useTranslation();


 const Create = Digit?.ComponentRegistryService?.getComponent("Create");
 const Response = Digit?.ComponentRegistryService?.getComponent("Response");
  return (
   <span className={"pt-citizen"}>
     <Switch>
       <AppContainer>
       <BackButton>Back</BackButton>

         <PrivateRoute path={`${path}/new-application`} component={Create} />
         <PrivateRoute path={`${path}/response`} component={Response} />
       </AppContainer>
     </Switch>
   </span>
 );
};


export default App;
4. Filling in module.js:
module.js is the entry point of every module, so one needs to register all the components, links, code, etc.
import {  CitizenHomeCard, PTIcon } from "@egovernments/digit-ui-react-components";
import React, { useEffect } from "react";
import { useTranslation } from "react-i18next";
import { useRouteMatch } from "react-router-dom";
import CitizenApp from "./pages/citizen";
import Create from "./pages/citizen/create/index";
import EmployeeApp from "./pages/employee";
import Response from "./pages/citizen/create/Response";


const componentsToRegister = {
 Response,
 FSMCreate : Create,
};


export const FSMModule = ({ stateCode, userType, tenants }) => {
 const { path, url } = useRouteMatch();


 const moduleCode = "FSM";
 const language = Digit.StoreData.getCurrentLanguage();
 const { isLoading, data: store } = Digit.Services.useStore({ stateCode, moduleCode, language });


 if (userType === "citizen") {
   return <CitizenApp path={path} stateCode={stateCode} />;
 }


 return <EmployeeApp path={path} stateCode={stateCode} />;
};


export const FSMLinks = ({ matchPath, userType }) => {
 const { t } = useTranslation();


 const links = [
    {
     link: `${matchPath}/new-application`,
     i18nKey: t("FSM Registration”),
   },


 ];


 return <CitizenHomeCard header={t("FsmRegistration")} links={links} Icon={() => <PTIcon className="fill-path-primary-main" />} />;
};


export const initFSMComponents = () => {
 Object.entries(componentsToRegister).forEach(([key, value]) => {
   Digit.ComponentRegistryService.setComponent(key, value);
 });
};
5. Enable Module in the UI framework:
After registering all components, links and module code, enable it in two places:
Web/Src/app.js : In app.js we import the FSMModule, initFSMComponents, and FSMLinks and enable the FSM module.
import React from 'react';


import { initDSSComponents } from "@egovernments/digit-ui-module-dss";
import { PaymentModule, PaymentLinks, paymentConfigs } from "@egovernments/digit-ui-module-common";
import { DigitUI } from "@egovernments/digit-ui-module-core";
import { initLibraries } from "@egovernments/digit-ui-libraries";
import { initEngagementComponents } from "@egovernments/digit-ui-module-engagement";
import {initCustomisationComponents} from "./Customisations";
import { initCommonPTComponents } from "@egovernments/digit-ui-module-commonpt";
import { FSMModule ,initFSMModuleComponents ,FSMModuleLinks} from "@egovernments/digit-ui-module-br";


initLibraries();
//"WS" removed the ws enabledModules ;
const enabledModules = ["Payment","QuickPayLinks", "DSS","Engagement", "FSM"];
window.Digit.ComponentRegistryService.setupRegistry({
 ...paymentConfigs,
 PaymentModule,
 PaymentLinks,
 FSMModule,
 FSMLinks,


});


initFSMComponents();
initDSSComponents();
initEngagementComponents();


initCustomisationComponents();


function App() {
 const stateCode = window.globalConfigs?.getConfig("STATE_LEVEL_TENANT_ID") || process.env.REACT_APP_STATE_LEVEL_TENANT_ID;
 if (!stateCode) {
   return <h1>stateCode is not defined</h1>
 }
 return (
   <DigitUI stateCode={stateCode} enabledModules={enabledModules}  />
 );
}


export default App;
web/micro-ui-internals/example/src/index.js:
In index.js, we will import the FSMModule, initFSMComponents, and FSMLinks and enable the FSM module.
import React from "react";
import ReactDOM from "react-dom";
import { initLibraries } from "@egovernments/digit-ui-libraries";
import { FSMModule, initFSMComponents ,FSMLinks} from "@egovernments/digit-ui-module-br";
import { initDSSComponents } from "@egovernments/digit-ui-module-dss";
import { PaymentModule, PaymentLinks, paymentConfigs } from "@egovernments/digit-ui-module-common";
import { initEngagementComponents } from "@egovernments/digit-ui-module-engagement";
import { DigitUI } from "@egovernments/digit-ui-module-core";
import "@egovernments/digit-ui-css/example/index.css";


var Digit = window.Digit || {};


const enabledModules = [ "Payment","QuickPayLinks", "DSS","Engagement","FSM"];


const initTokens = (stateCode) => {
 const userType = window.sessionStorage.getItem("userType") || process.env.REACT_APP_USER_TYPE || "CITIZEN";


 const token =window.localStorage.getItem("token")|| process.env[`REACT_APP_${userType}_TOKEN`];
 const citizenInfo = window.localStorage.getItem("Citizen.user-info")
 const citizenTenantId = window.localStorage.getItem("Citizen.tenant-id") || stateCode;


 const employeeInfo = window.localStorage.getItem("Employee.user-info");
 const employeeTenantId = window.localStorage.getItem("Employee.tenant-id");


 const userTypeInfo = userType === "CITIZEN" || userType === "QACT" ? "citizen" : "employee";
 window.Digit.SessionStorage.set("user_type", userTypeInfo);
 window.Digit.SessionStorage.set("userType", userTypeInfo);


 if (userType !== "CITIZEN") {
   window.Digit.SessionStorage.set("User", { access_token: token, info: userType !== "CITIZEN" ? JSON.parse(employeeInfo) : citizenInfo });
 } else {
   // if (!window.Digit.SessionStorage.get("User")?.extraRoleInfo) window.Digit.SessionStorage.set("User", { access_token: token, info: citizenInfo });
 }


 window.Digit.SessionStorage.set("Citizen.tenantId", citizenTenantId);
if(employeeTenantId && employeeTenantId.length) window.Digit.SessionStorage.set("Employee.tenantId", employeeTenantId);
};


const initDigitUI = () => {
 window?.Digit.ComponentRegistryService.setupRegistry({


   PaymentModule,
   FSMModule,
   PaymentLinks,
   FSMLinks,
 });


 initDSSComponents();
 initEngagementComponents();
 initFSMComponents();


  const stateCode = window?.globalConfigs?.getConfig("STATE_LEVEL_TENANT_ID") || "pb";
 initTokens(stateCode);


 const registry = window?.Digit.ComponentRegistryService.getRegistry();
 ReactDOM.render(<DigitUI stateCode={stateCode} enabledModules={enabledModules} />, document.getElementById("root"));
};


initLibraries().then(() => {
 initDigitUI();
});
Once the link is added to the homepage, one can see the FSM module on our Digit-UI Homepage. Next, add the homepage card for the citizen module.
import {
 Calender, CardBasedOptions, CaseIcon, ComplaintIcon, DocumentIcon, HomeIcon, Loader, OBPSIcon, PTIcon, StandaloneSearchBar, WhatsNewCard
} from "@egovernments/digit-ui-react-components";
import React from "react";
import { useTranslation } from "react-i18next";
import { useHistory } from "react-router-dom";


const Home = () => {
const { t } = useTranslation();
const history = useHistory();
const tenantId = Digit.ULBService.getCitizenCurrentTenant(true);
const { data: { stateInfo } = {}, isLoading } = Digit.Hooks.useStore.getInitData();


const conditionsToDisableNotificationCountTrigger = () => {
 if (Digit.UserService?.getUser()?.info?.type === "EMPLOYEE") return false;
 if (!Digit.UserService?.getUser()?.access_token) return false;
 return true;
};


const { data: EventsData, isLoading: EventsDataLoading } = Digit.Hooks.useEvents({
 tenantId,
 variant: "whats-new",
 config: {
   enabled: conditionsToDisableNotificationCountTrigger(),
 },
});


if (!tenantId) {
 history.push(`/digit-ui/citizen/select-language`);
}


const allCitizenServicesProps = {
 header: t("DASHBOARD_CITIZEN_SERVICES_LABEL"),
 sideOption: {
   name: t("DASHBOARD_VIEW_ALL_LABEL"),
   onClick: () => history.push("/digit-ui/citizen/all-services"),
 },
 options: [


   {
     name: t("FSM"),
     Icon: <OBPSIcon />,
     onClick: () => history.push("/digit-ui/citizen/FSM-home"),
   },

 ],
 styles: { display: "flex", flexWrap: "wrap", justifyContent: "flex-start", width: "100%" },
};
const allInfoAndUpdatesProps = {
 header: t("CS_COMMON_DASHBOARD_INFO_UPDATES"),
 sideOption: {
   name: t("DASHBOARD_VIEW_ALL_LABEL"),
   onClick: () => {},
 },
 options: [
   {
     name: t("CS_HEADER_MYCITY"),
     Icon: <HomeIcon />,
   },
   {
     name: t("EVENTS_EVENTS_HEADER"),
     Icon: <Calender />,
     onClick: () => history.push("/digit-ui/citizen/engagement/events"),
   },
   {
     name: t("CS_COMMON_DOCUMENTS"),
     Icon: <DocumentIcon />,
     onClick: () => history.push("/digit-ui/citizen/engagement/docs"),
   },
   {
     name: t("CS_COMMON_SURVEYS"),
     Icon: <DocumentIcon />,
     onClick: () => history.push("/digit-ui/citizen/engagement/surveys/list"),
   },

 ],
 styles: { display: "flex", flexWrap: "wrap", justifyContent: "flex-start", width: "100%" },
};


return isLoading ? (
 <Loader />
) : (
 <div className="HomePageWrapper">
   <div className="BannerWithSearch">
     <img src={stateInfo?.bannerUrl} />
     <div className="Search">
       <StandaloneSearchBar placeholder={t("CS_COMMON_SEARCH_PLACEHOLDER")} />
     </div>
   </div>


   <div className="ServicesSection">
     <CardBasedOptions {...allCitizenServicesProps} />
     <CardBasedOptions {...allInfoAndUpdatesProps} />
   </div>


   {conditionsToDisableNotificationCountTrigger() ? (
     EventsDataLoading ? (
       <Loader />
     ) : (
       <div className="WhatsNewSection">
         <div className="headSection">
           <h2>{t("DASHBOARD_WHATS_NEW_LABEL")}</h2>
           <p onClick={() => history.push("/digit-ui/citizen/engagement/whats-new")}>{t("DASHBOARD_VIEW_ALL_LABEL")}</p>
         </div>
         <WhatsNewCard {...EventsData?.[0]} />
       </div>
     )
   ) : null}
 </div>
);
};


export default Home;
6. Integration with Backend API:
This section will explain how to integrate the UI part for the citizen module with the backend API.
import Urls from '@egovernments/digit-ui-libraries/src/services/atoms/urls';
import { Request } from '@egovernments/digit-ui-libraries/src/services/atoms/Utils/Request';


export const FSMService = {
 search: (tenantId, filters = {}) =>
   Request({
     url: Urls.fsm.search,
     useCache: false,
     method: "POST",
     auth: true,
     userService: false,
     params: { tenantId, ...filters },
   }),
 create: (details, tenantId) =>
   Request({
     url: Urls.fsm.create,
     data: details,
     useCache: true,
     userService: true,
     method: "POST",
     params: { tenantId },
     auth: true,
   })
};
export default FSMService;
In Request, pass the URL so that the URL is mentioned or added into the service/atoms/url.js
fsm: {
 create: "https://62f0e3e5e2bca93cd23f2ada.mockapi.io/user",
 get:"https://62f0e3e5e2bca93cd23f2ada.mockapi.io/user",
}
Hooks
Once FSMService is created with all requests, create a hook and that hook will be used in the code to pass the data to the backend.
import { useQuery, useMutation } from "react-query";


import FSMService from "../../services/elements/FSM";


export const useFSMCreate = (tenantId, config = {}) => {
 return useMutation((data) => BRService.create(data, tenantId));
};


export default useFSMCreate;
After creating Service and Hooks, register it into packages/ libraries/src/index.js
import Enums from "./enums/index";
import mergeConfig from "./config/mergeConfig";
import { useStore } from "./services/index";
import { initI18n } from "./translations/index";
import { Storage, PersistantStorage } from "./services/atoms/Utils/Storage";
import { UserService } from "./services/elements/User";
import { ULBService } from "./services/molecules/Ulb";
import Hooks from "./hooks";
import { subFormRegistry } from "./subFormRegistry";
import FSMService from "./services/elements/FSM";


const setupLibraries = (Library, props) => {
 window.Digit = window.Digit || {};
 window.Digit[Library] = window.Digit[Library] || {};
 window.Digit[Library] = { ...window.Digit[Library], ...props };
};


const initLibraries = () => {
 setupLibraries("SessionStorage", Storage);
 setupLibraries("PersistantStorage", PersistantStorage);
 setupLibraries("UserService", UserService);
 setupLibraries("ULBService", ULBService);


 setupLibraries("Config", { mergeConfig });
 setupLibraries("Services", { useStore });


 setupLibraries("FSMService", FSMService);


 return new Promise((resolve) => {
   initI18n(resolve);
 });
};


export { initLibraries, Enums, Hooks, subFormRegistry };
Once the backend is set up, the hooks or service will be used to send the data to the backend after submitting the form. Add the onSubmit function in this file: (fsm/src/pages/citizen/create/index.js) and in that function, pass the user’s entered data to the BRService that has been created.
import { FormComposer, Loader } from "@egovernments/digit-ui-react-components";
import React, {  useState } from "react";
import { useTranslation } from "react-i18next";
import { useHistory } from "react-router-dom";
import { newConfig } from "../../../components/config/config";


const Create = () => {
 const tenantId = Digit.ULBService.getCurrentTenantId();
 const { t } = useTranslation();
 const history = useHistory();


 const onSubmit = (data) => {


   let Users = [
     {


       user: {
         firstName: data?.FSMSelectName?.firstName,
         lastName: data?.FSMSelectName?.lastName,
         tenantId: tenantId,
       },

     },
   ];
     /* use customiseCreateFormData hook to make some chnages to the Employee object */
    Digit.FSMService.create(Users, tenantId).then((result,err)=>{
      let getdata = {...data , get: result }
      onSelect("", getdata, "", true);
      console.log("daaaa",getdata);
    })
    .catch((e) => {
    console.log("err");
   });


   history.push("/digit-ui/citizen/fsm/response");


   console.log("getting data",Users)

 };
  /* use newConfig instead of commonFields for local development in case needed */


 const configs = newConfig?newConfig:newConfig;


 return (
   <FormComposer
   heading={t("FSM Registration")}
   label={t("ES_COMMON_APPLICATION_SUBMIT")}
   config={configs.map((config) => {
     return {
       ...config,
       body: config.body.filter((a) => !a.hideInEmployee),
     };
   })}
   onSubmit={onSubmit}
   fieldStyle={{ marginRight: 0 }}
 />
 );
};


export default Create;
Once the integration is done, the data will be saved into the database.
Local Development Setup
The following tools have to be installed before development. Make sure to install the specific versions provided below. If no version is provided, it is assumed that the latest version can be installed.
Install Visual Studio Code. VS Code Extensions to be installed from the marketplace:
Install NodeJS 14.20.0
version 1.22.19
Clone the DIGIT-OSS repository locally from your organization's umbrella. This contains the frontend code under the frontend folder.
Build & Deploy
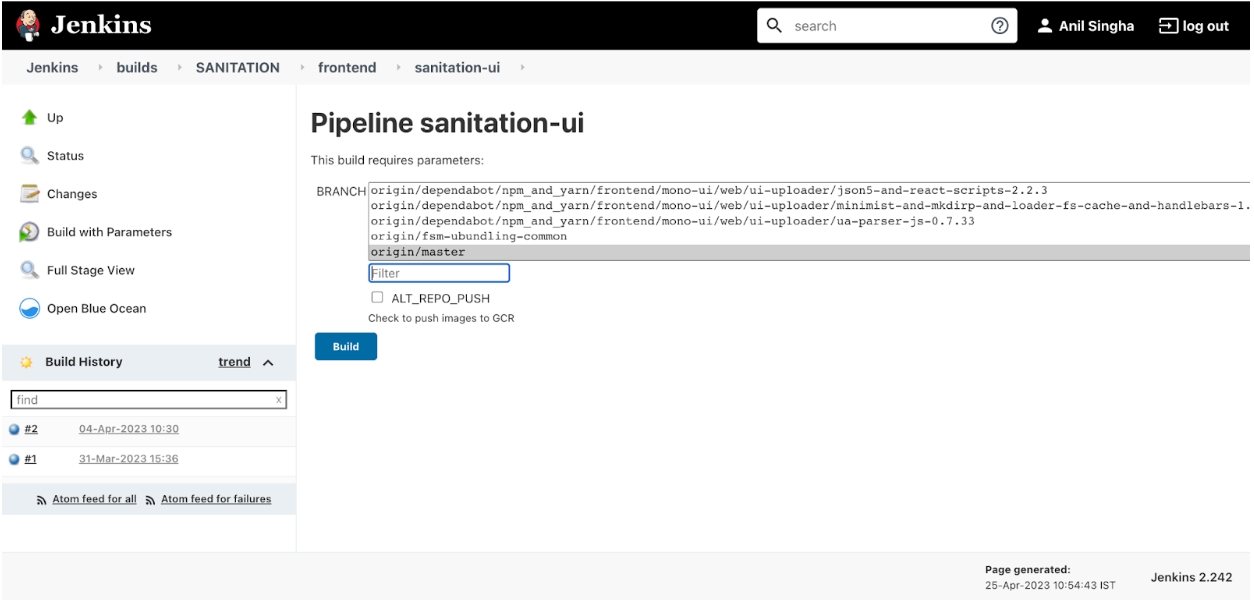
Go to the Jenkins build page. Click on SANITATION under the folder path mentioned below. frontend/sanitation-ui

Click on Build with parameter. Select the feature branch name by searching for it in the search box on the right side of the screen. Click on Build.
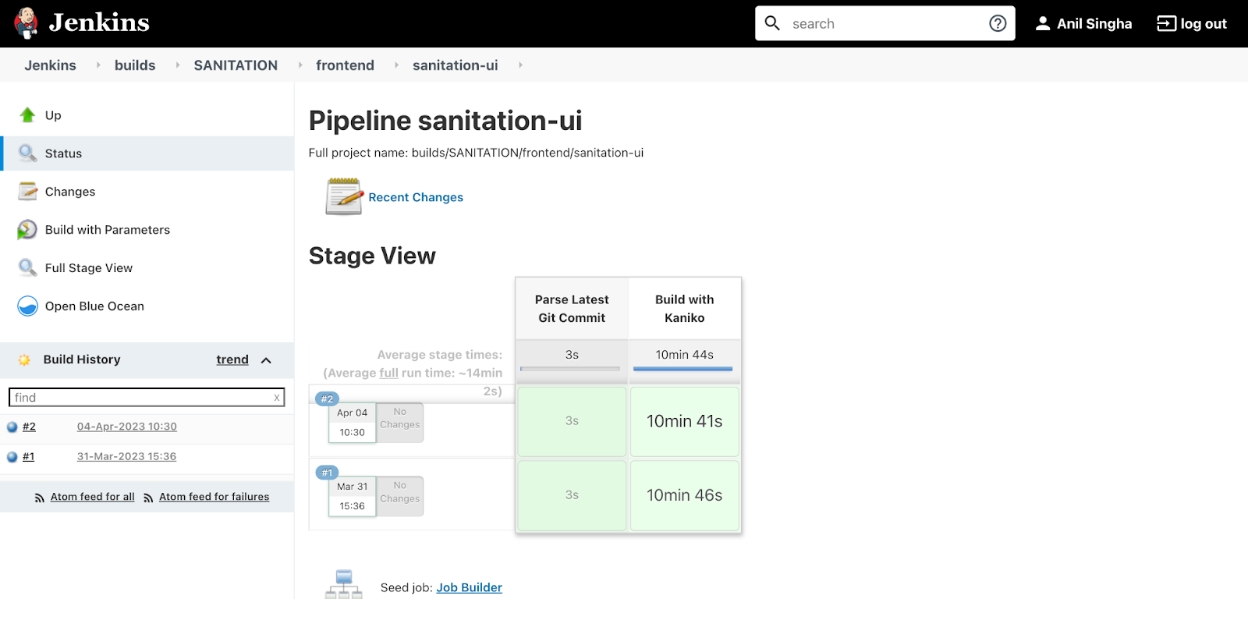
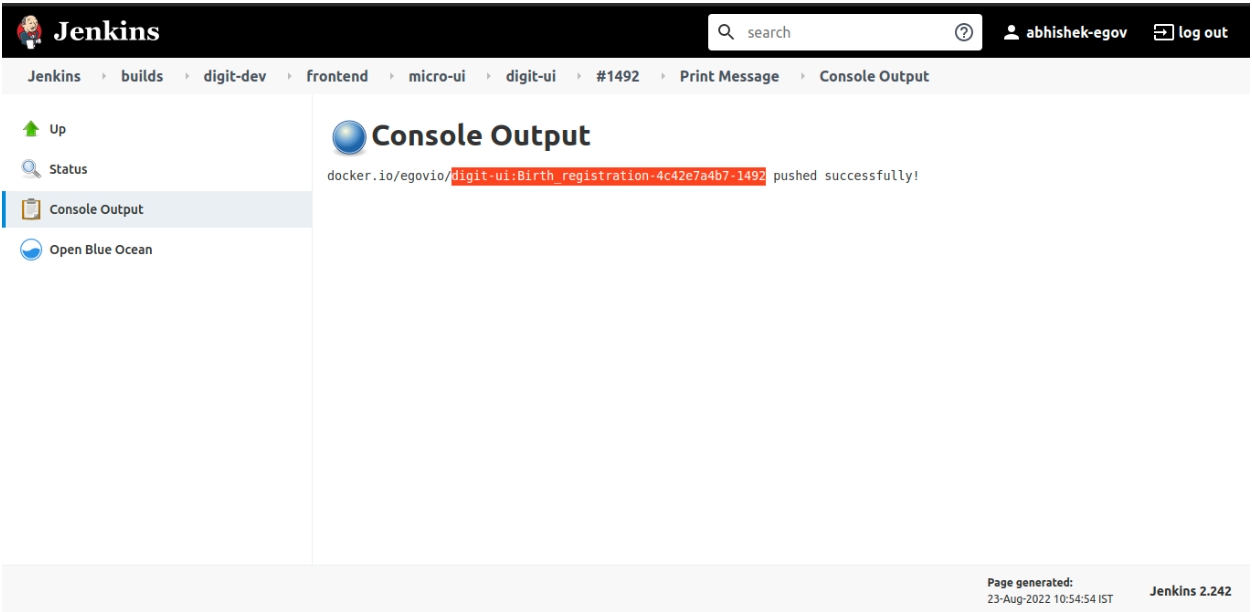
Once the build is successful, open the console output and find the docker image that has been built. Copy the docker image ID.
Deploy
Link: https://builds.companyname.org/job/deployments/job/deploy-to-dev/build?delay=0sec
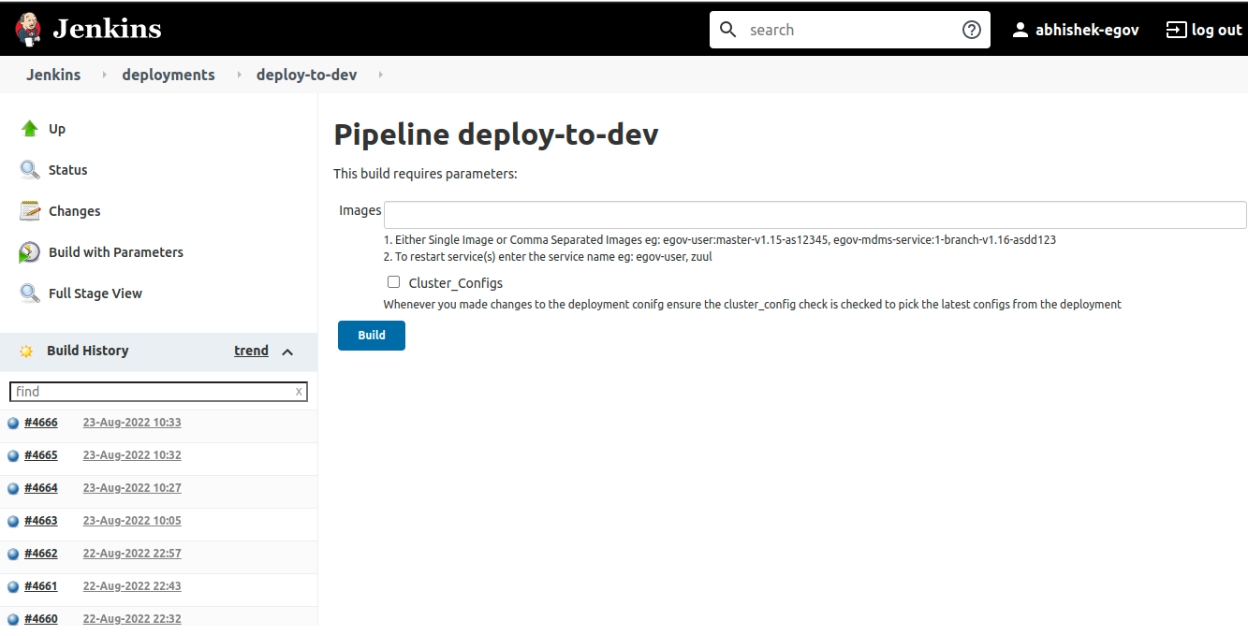
Copy the docker image IDs from the previous step and paste in the above box. Click on ‘Build’. Once the image is deployed, you will see a message as shown below:
Run the Application
After the application is built and deployed, run and test it in the local environment.
Configure Environment File - Citizen To run the application in the local environment, add the .env file in the example folder - If the user is a citizen, configure the .env file as shown below:
SKIP_PREFLIGHT_CHECK=true
REACT_APP_USER_TYPE=CITIZEN
REACT_APP_EMPLOYEE_TOKEN=c835932f-2ad4-4d05-83d6-49e0b8c59f8a
REACT_APP_CITIZEN_TOKEN=7cd58aae-30b3-41ed-a1b3-3417107a993c
REACT_APP_PROXY_API=https://dev.companyname.org
REACT_APP_PROXY_ASSETS=https://dev.companyname.org
REACT_APP_GLOBAL=https://path/to/public/s3/bucket/globalConfigs.js
REACT_APP_CENTRAL_GLOBAL=https://path/to/public/s3/bucket/statebglobalConfigs.js
REACT_APP_QA_GLOBAL=https://path/to/public/s3/bucket/egov-dev-assets/globalConfigs.js
REACT_APP_UAT_GLOBAL=https://path/to/public/s3/bucket/egov-uat-assets/globalConfigs.js
REACT_APP_STATEB_GLOBAL=https://path/to/public/s3/bucket/statebglobalConfigs.js
staging=https://staging.companyname.org
Configure Environment File - Employee
SKIP_PREFLIGHT_CHECK=true
REACT_APP_USER_TYPE=EMPLOYEE
REACT_APP_EMPLOYEE_TOKEN=c835932f-2ad4-4d05-83d6-49e0b8c59f8a
REACT_APP_CITIZEN_TOKEN=7cd58aae-30b3-41ed-a1b3-3417107a993c
REACT_APP_PROXY_API=https://dev.companyname.org
REACT_APP_PROXY_ASSETS=https://dev.companyname.org
REACT_APP_GLOBAL=https://path/to/public/s3/bucket/globalConfigs.js
REACT_APP_CENTRAL_GLOBAL=https://path/to/public/s3/bucket/statebglobalConfigs.js
REACT_APP_QA_GLOBAL=https://path/to/public/s3/bucket/egov-dev-assets/globalConfigs.js
REACT_APP_UAT_GLOBAL=https://path/to/public/s3/bucket/egov-uat-assets/globalConfigs.js
REACT_APP_STATEB_GLOBAL=https://path/to/public/s3/bucket/statebglobalConfigs.js
staging=https://staging.companyname.org
Open Terminal in micro-UI-internals and run the following command:
yarn start
The application will start after you run the command.
Login
There are two types of login:
Employee:
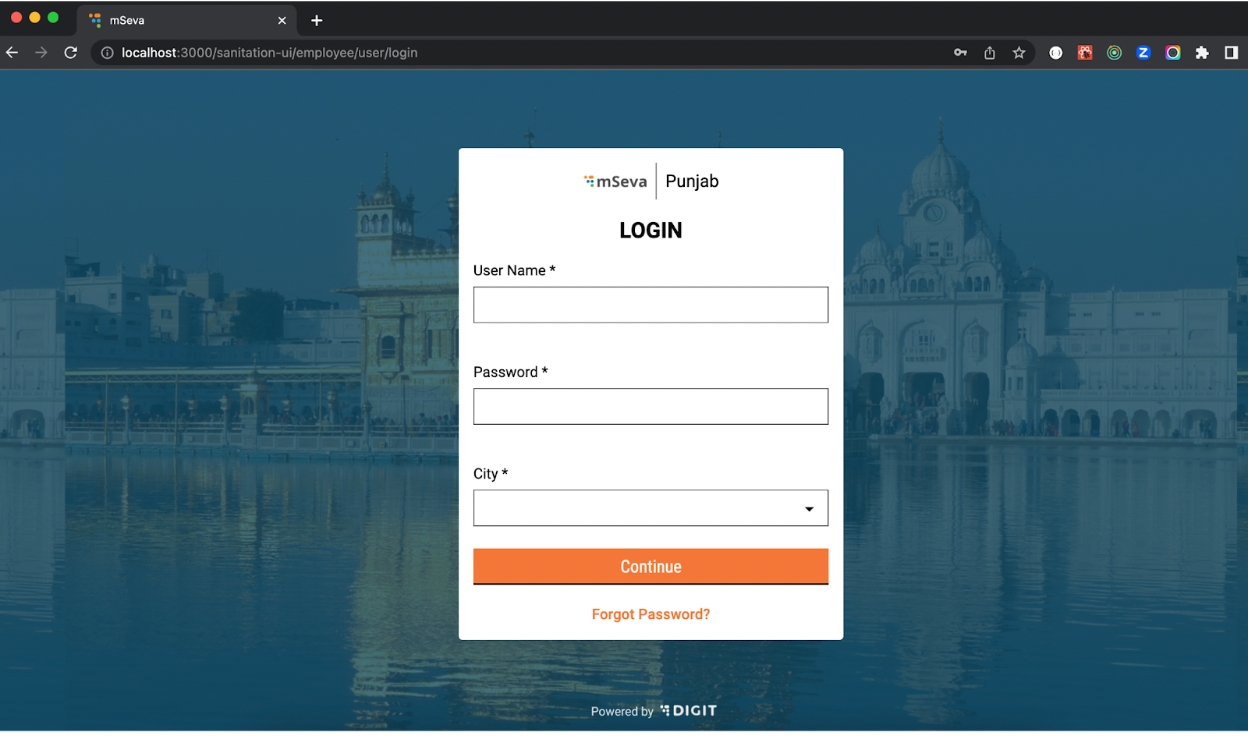
Homepage Employee: After the login is successful for employees, users are redirected to the employee home page.
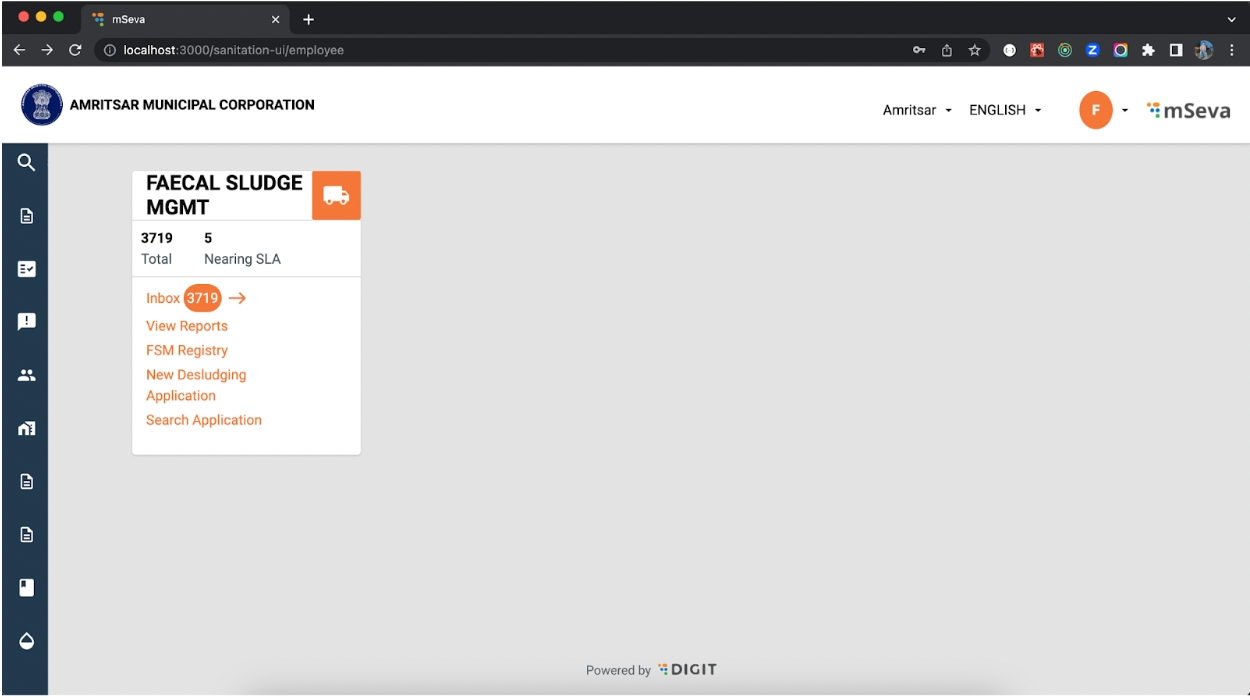
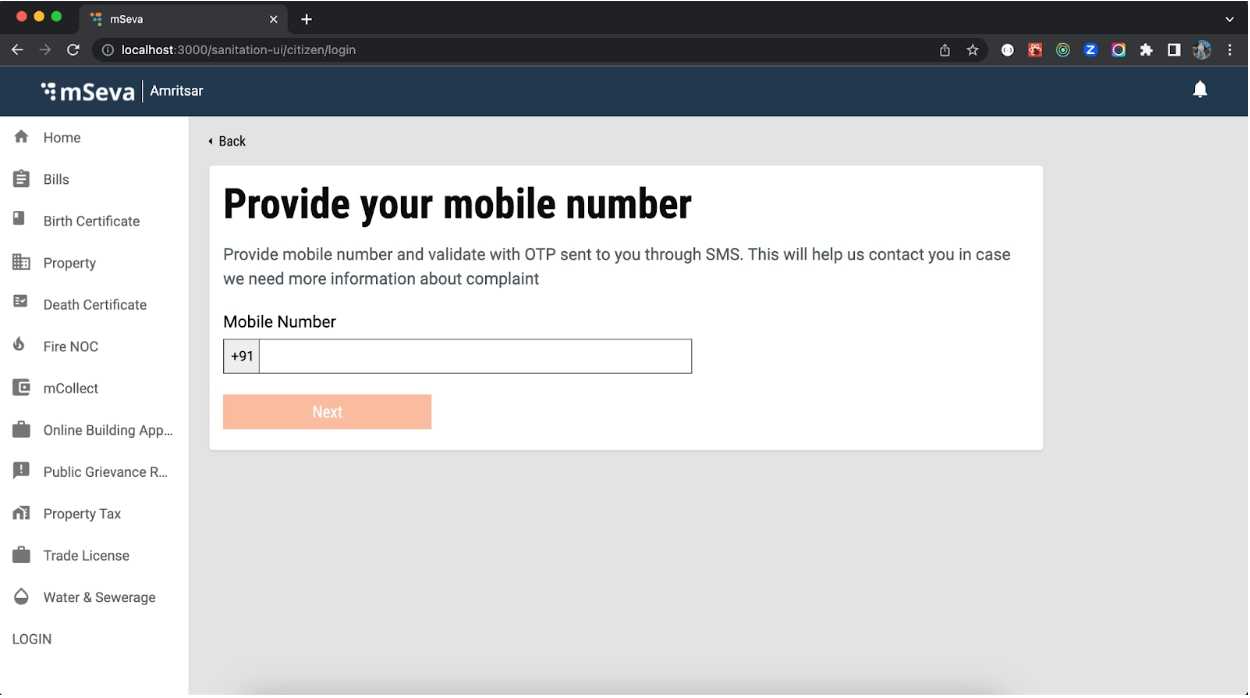
On the homepage, users can see the cards for FSM. These cards need to be added. Go through the link to create an employee card. Homepage Citizen: After the login is successful for citizens, users are redirected to the citizen homepage.

Was this helpful?